Normal view

GPT-6 Astra, Looped Transformers, and Hidden Reasoning

9 September 2026 at 11:14

A lot has happened in the last few weeks. I am sure that OpenAI’s GPT-6 Astra is top of mind for everyone right now. In particular, thoughts on its performance, the looped transformer/recurrent depth aspects, and rumors that Astra is “hiding” its reasoning trace (i.e., chain of thought).

So, in this article, I want to start with some brief impressions of Astra and some thoughts on where all this is headed. Then, I will discuss, in detail, what “looped transformers” are, and how (or rather, if) this relates to hiding chains of thought.

Lastly, after covering the basics of the looped transformer, I wanted to highlight some new insights from recent research papers on the topic.

1. GPT-6 Astra impressions

First things first. Before getting into the architecture rumors and related research literature, let me briefly summarize some GPT-6 Astra observations and tidbits.

Last week, OpenAI’s new GPT-6 Astra was released with a big fanfare. I used it over the past couple of days, and it’s an exceptionally good model, likely the best I’ve used as of this writing. But what, exactly, has it improved, and how?

1.1 Astra benchmarks

Astra is the best model I’ve used so far, and it’s disproportionately good at 3D rendering and animation tasks (relative to other models). With that, I mean that while it leapfrogs its GPT-5.6 predecessor in practically all categories (writing, math, coding, and more), it especially does so when it comes to graphical demos.

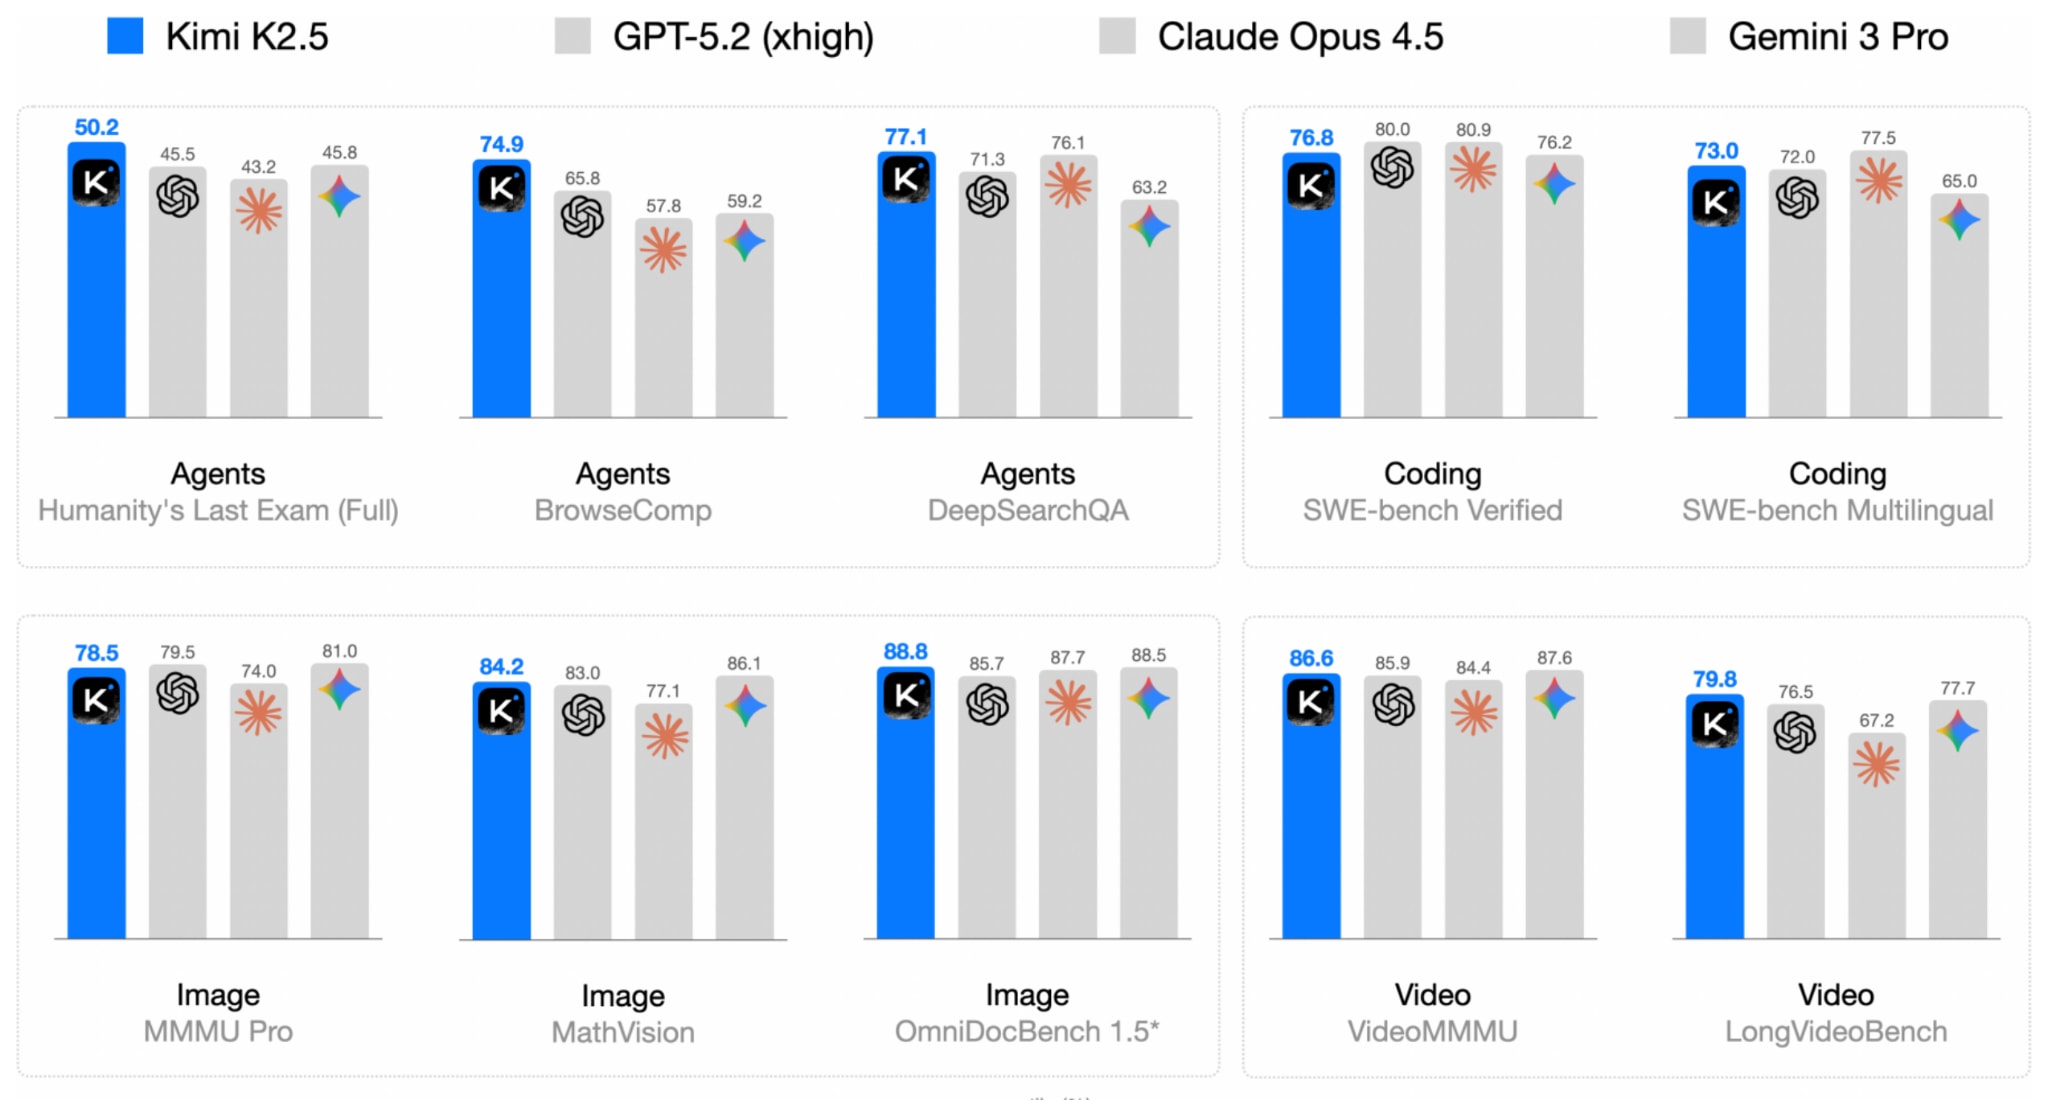
We can see this also reflected in the benchmarks. For instance, GPT-6 Astra is really good at math and coding, as shown below.

benchmarks-1
Figure 1: Selection of three popular coding benchmarks and one challenging math benchmark. More benchmarks are shared on the Astra release blog: https://openai.com/index/gpt-6-astra/

One of the highlights (not shown in the figure) is that Astra also achieves 99.9% on the ARC-AGI-3 benchmark (GPT-5.6 Sol only 7.8%), which measures a mix of solving logic puzzles and generalization. However, the math, coding, and computer use benchmarks are more interesting because they are closer to real-world use.

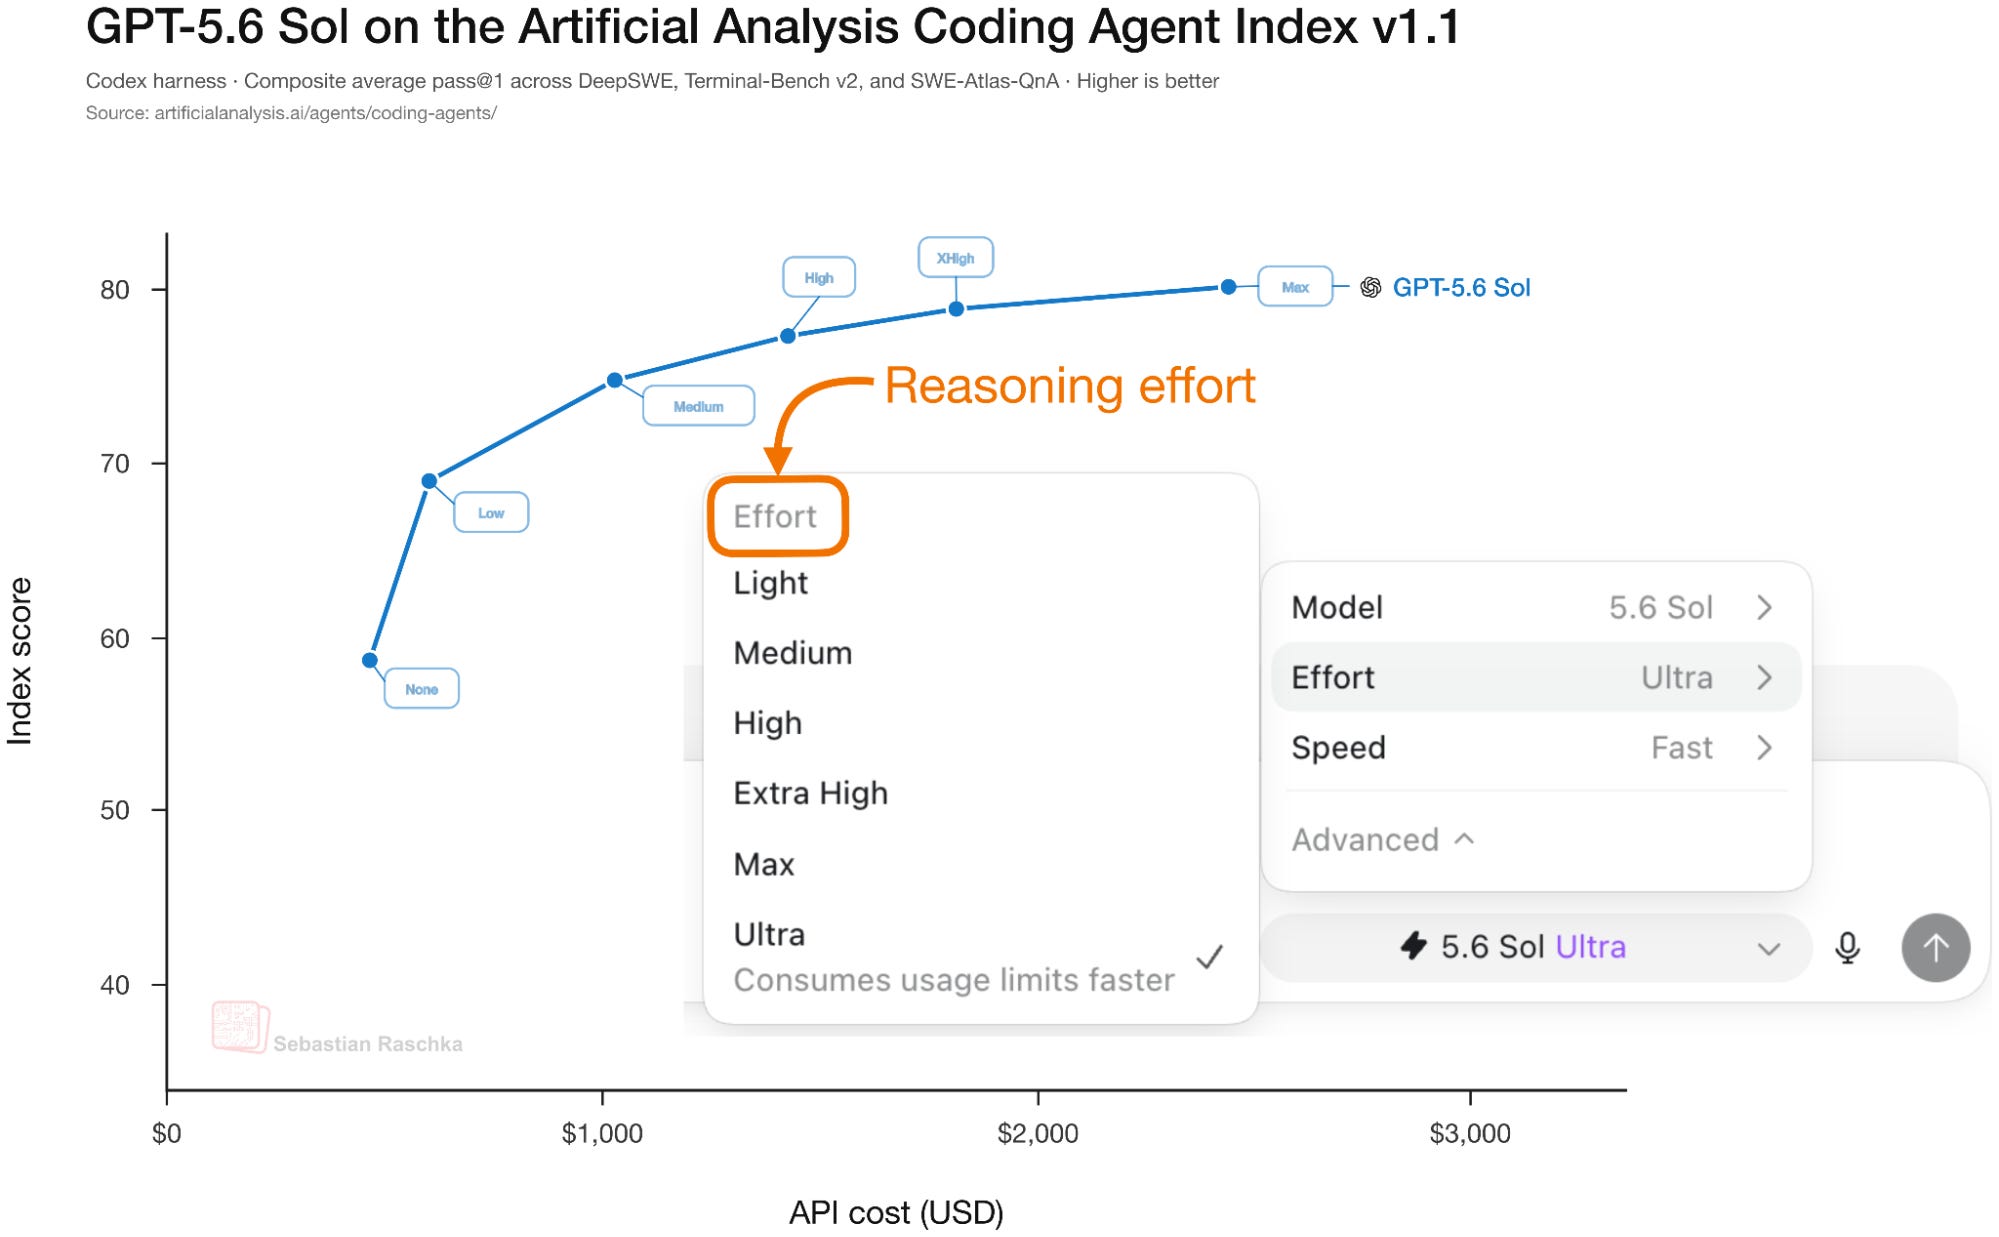
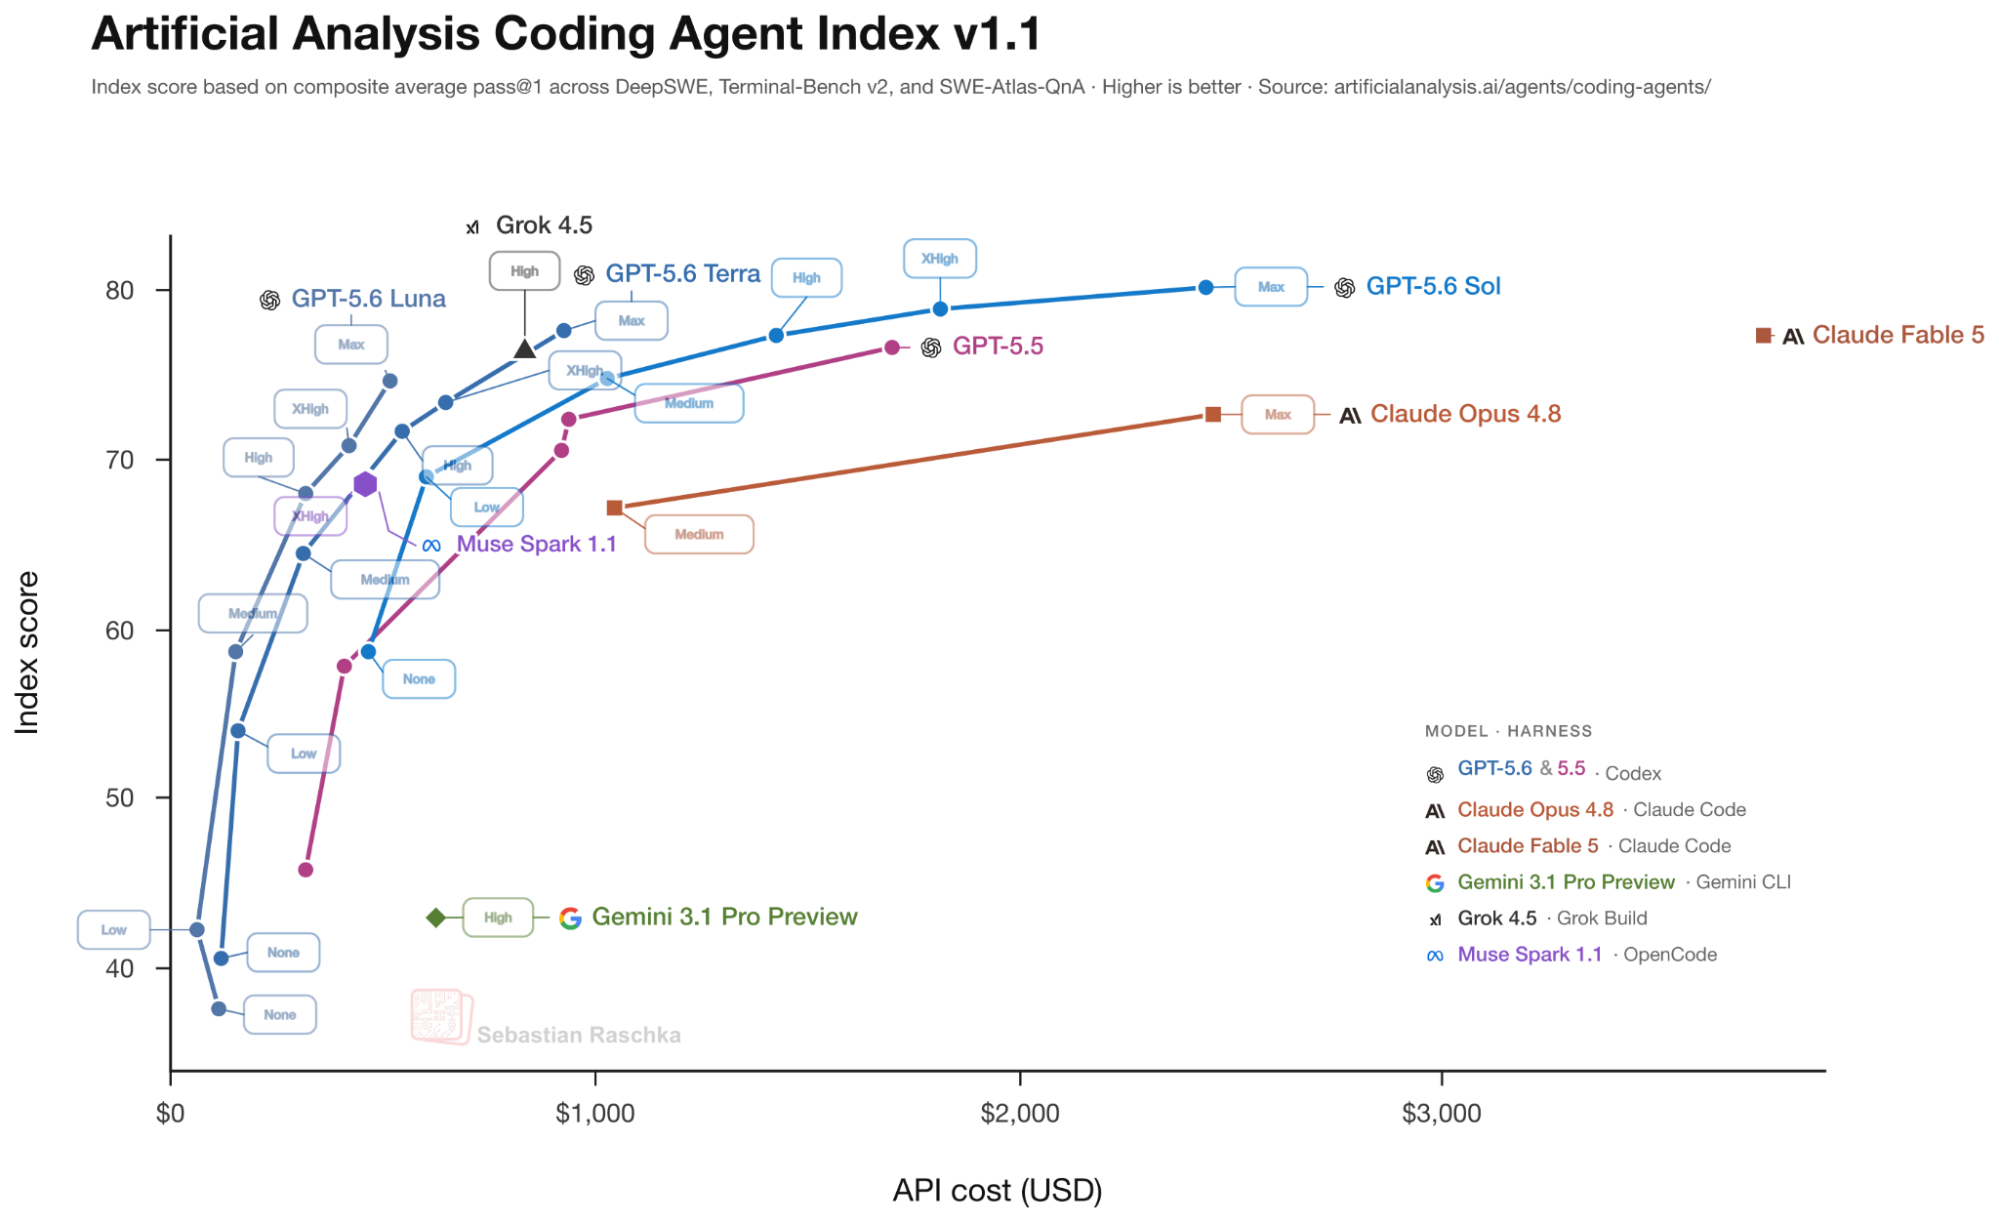
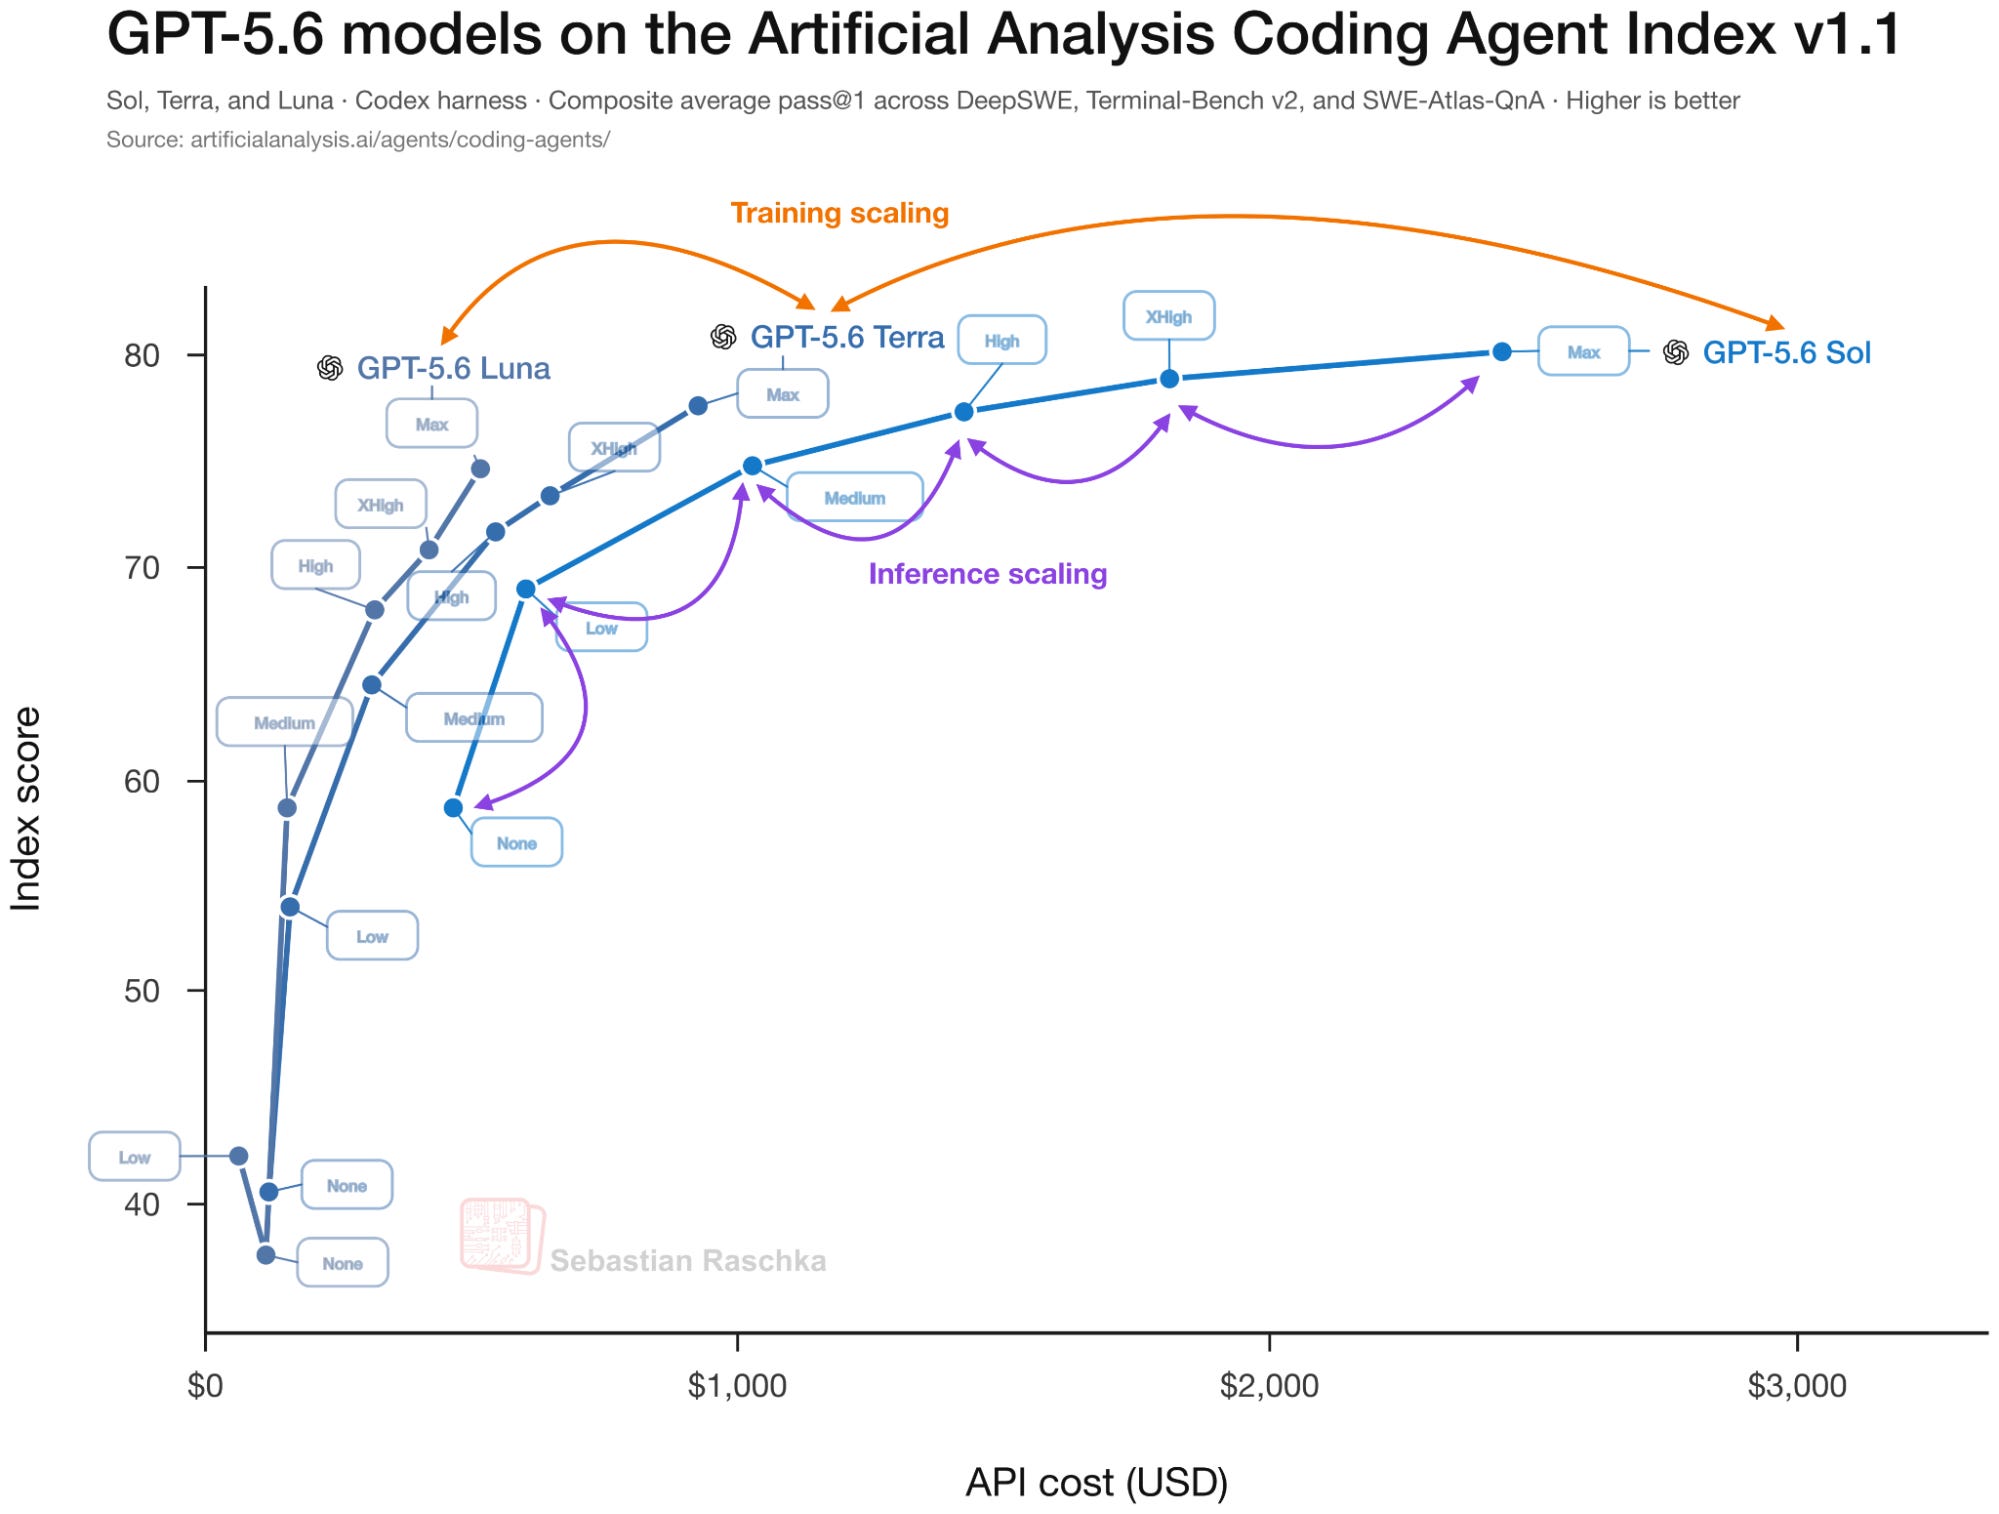
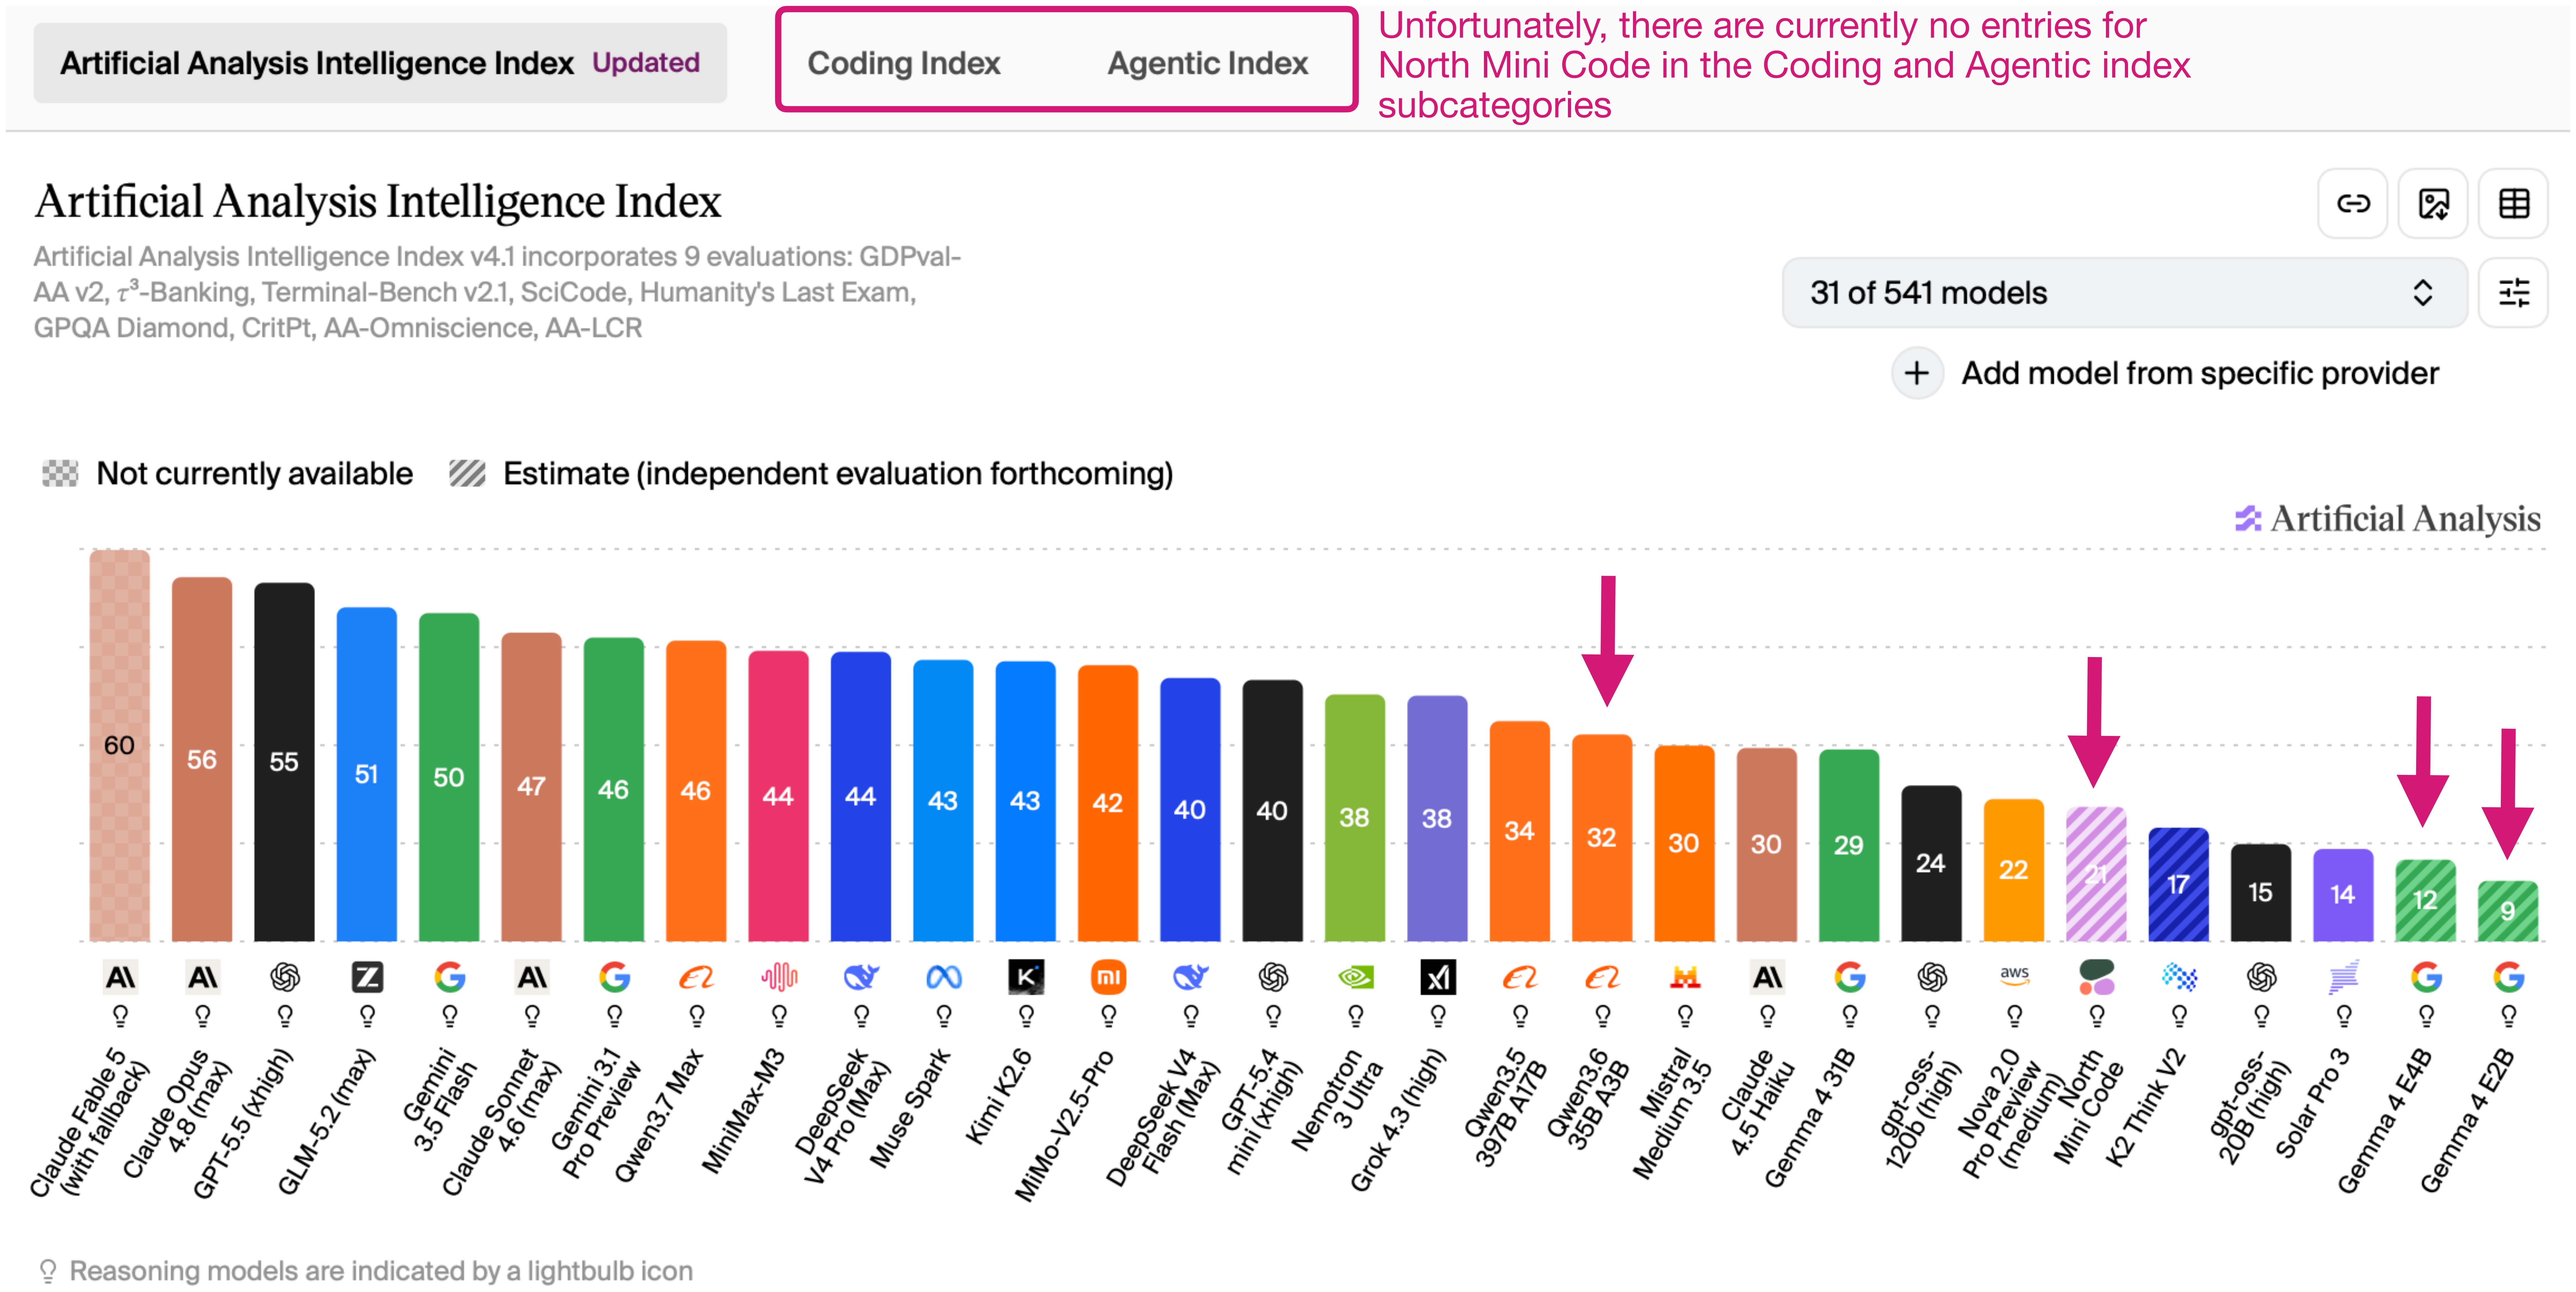
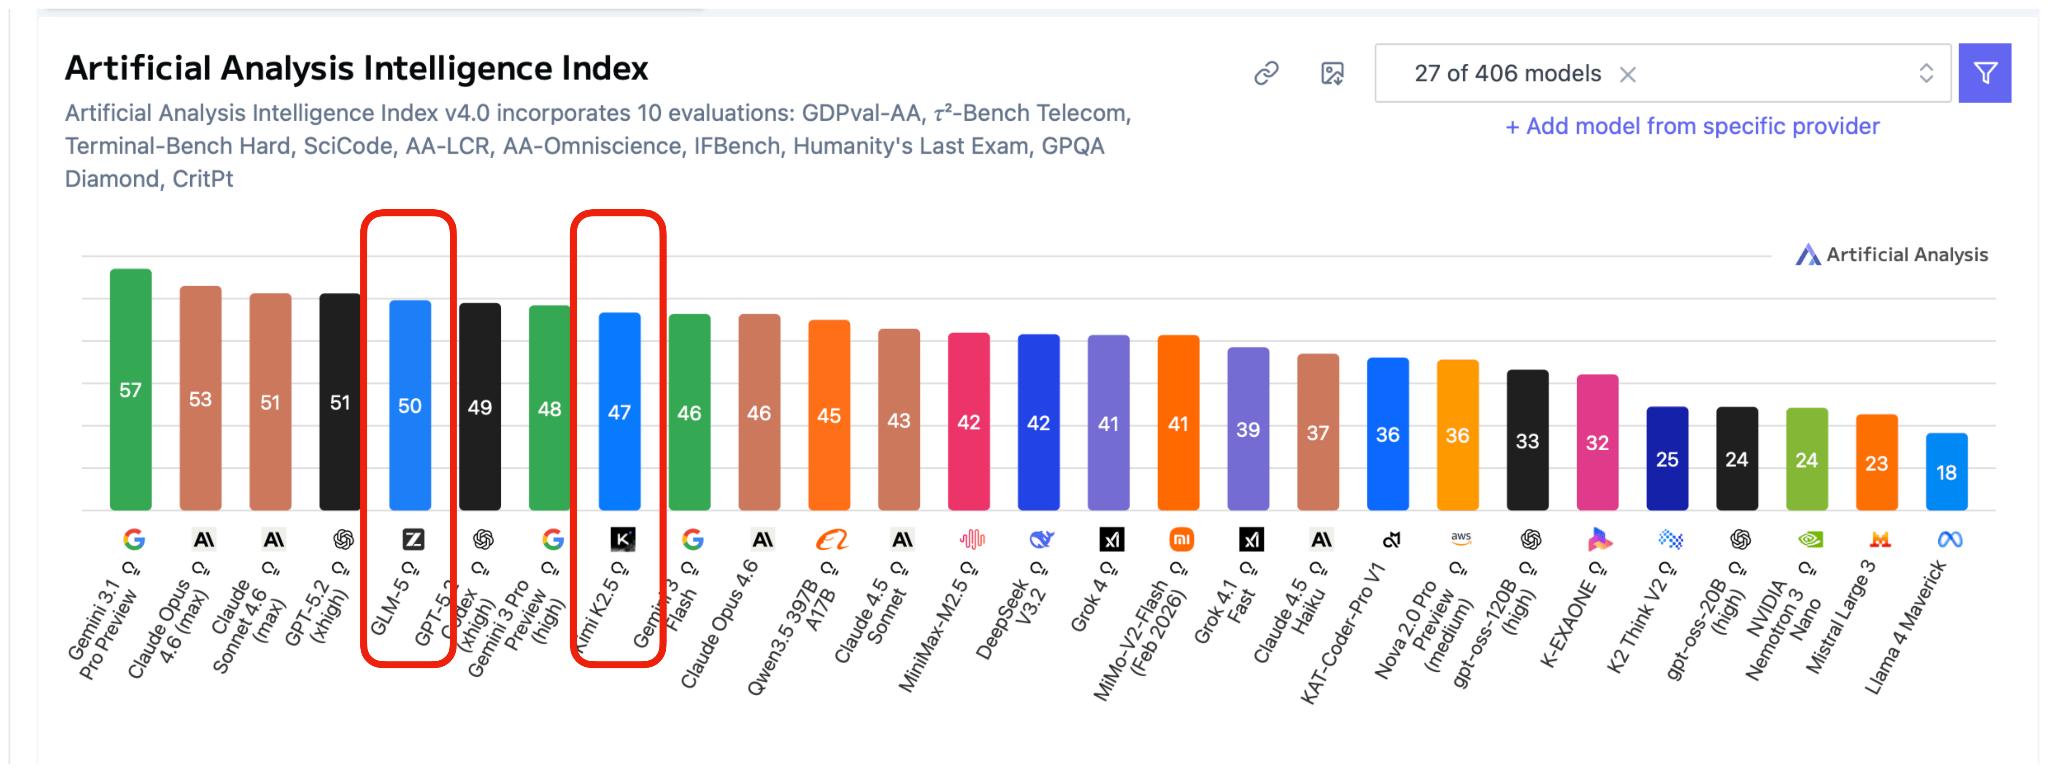
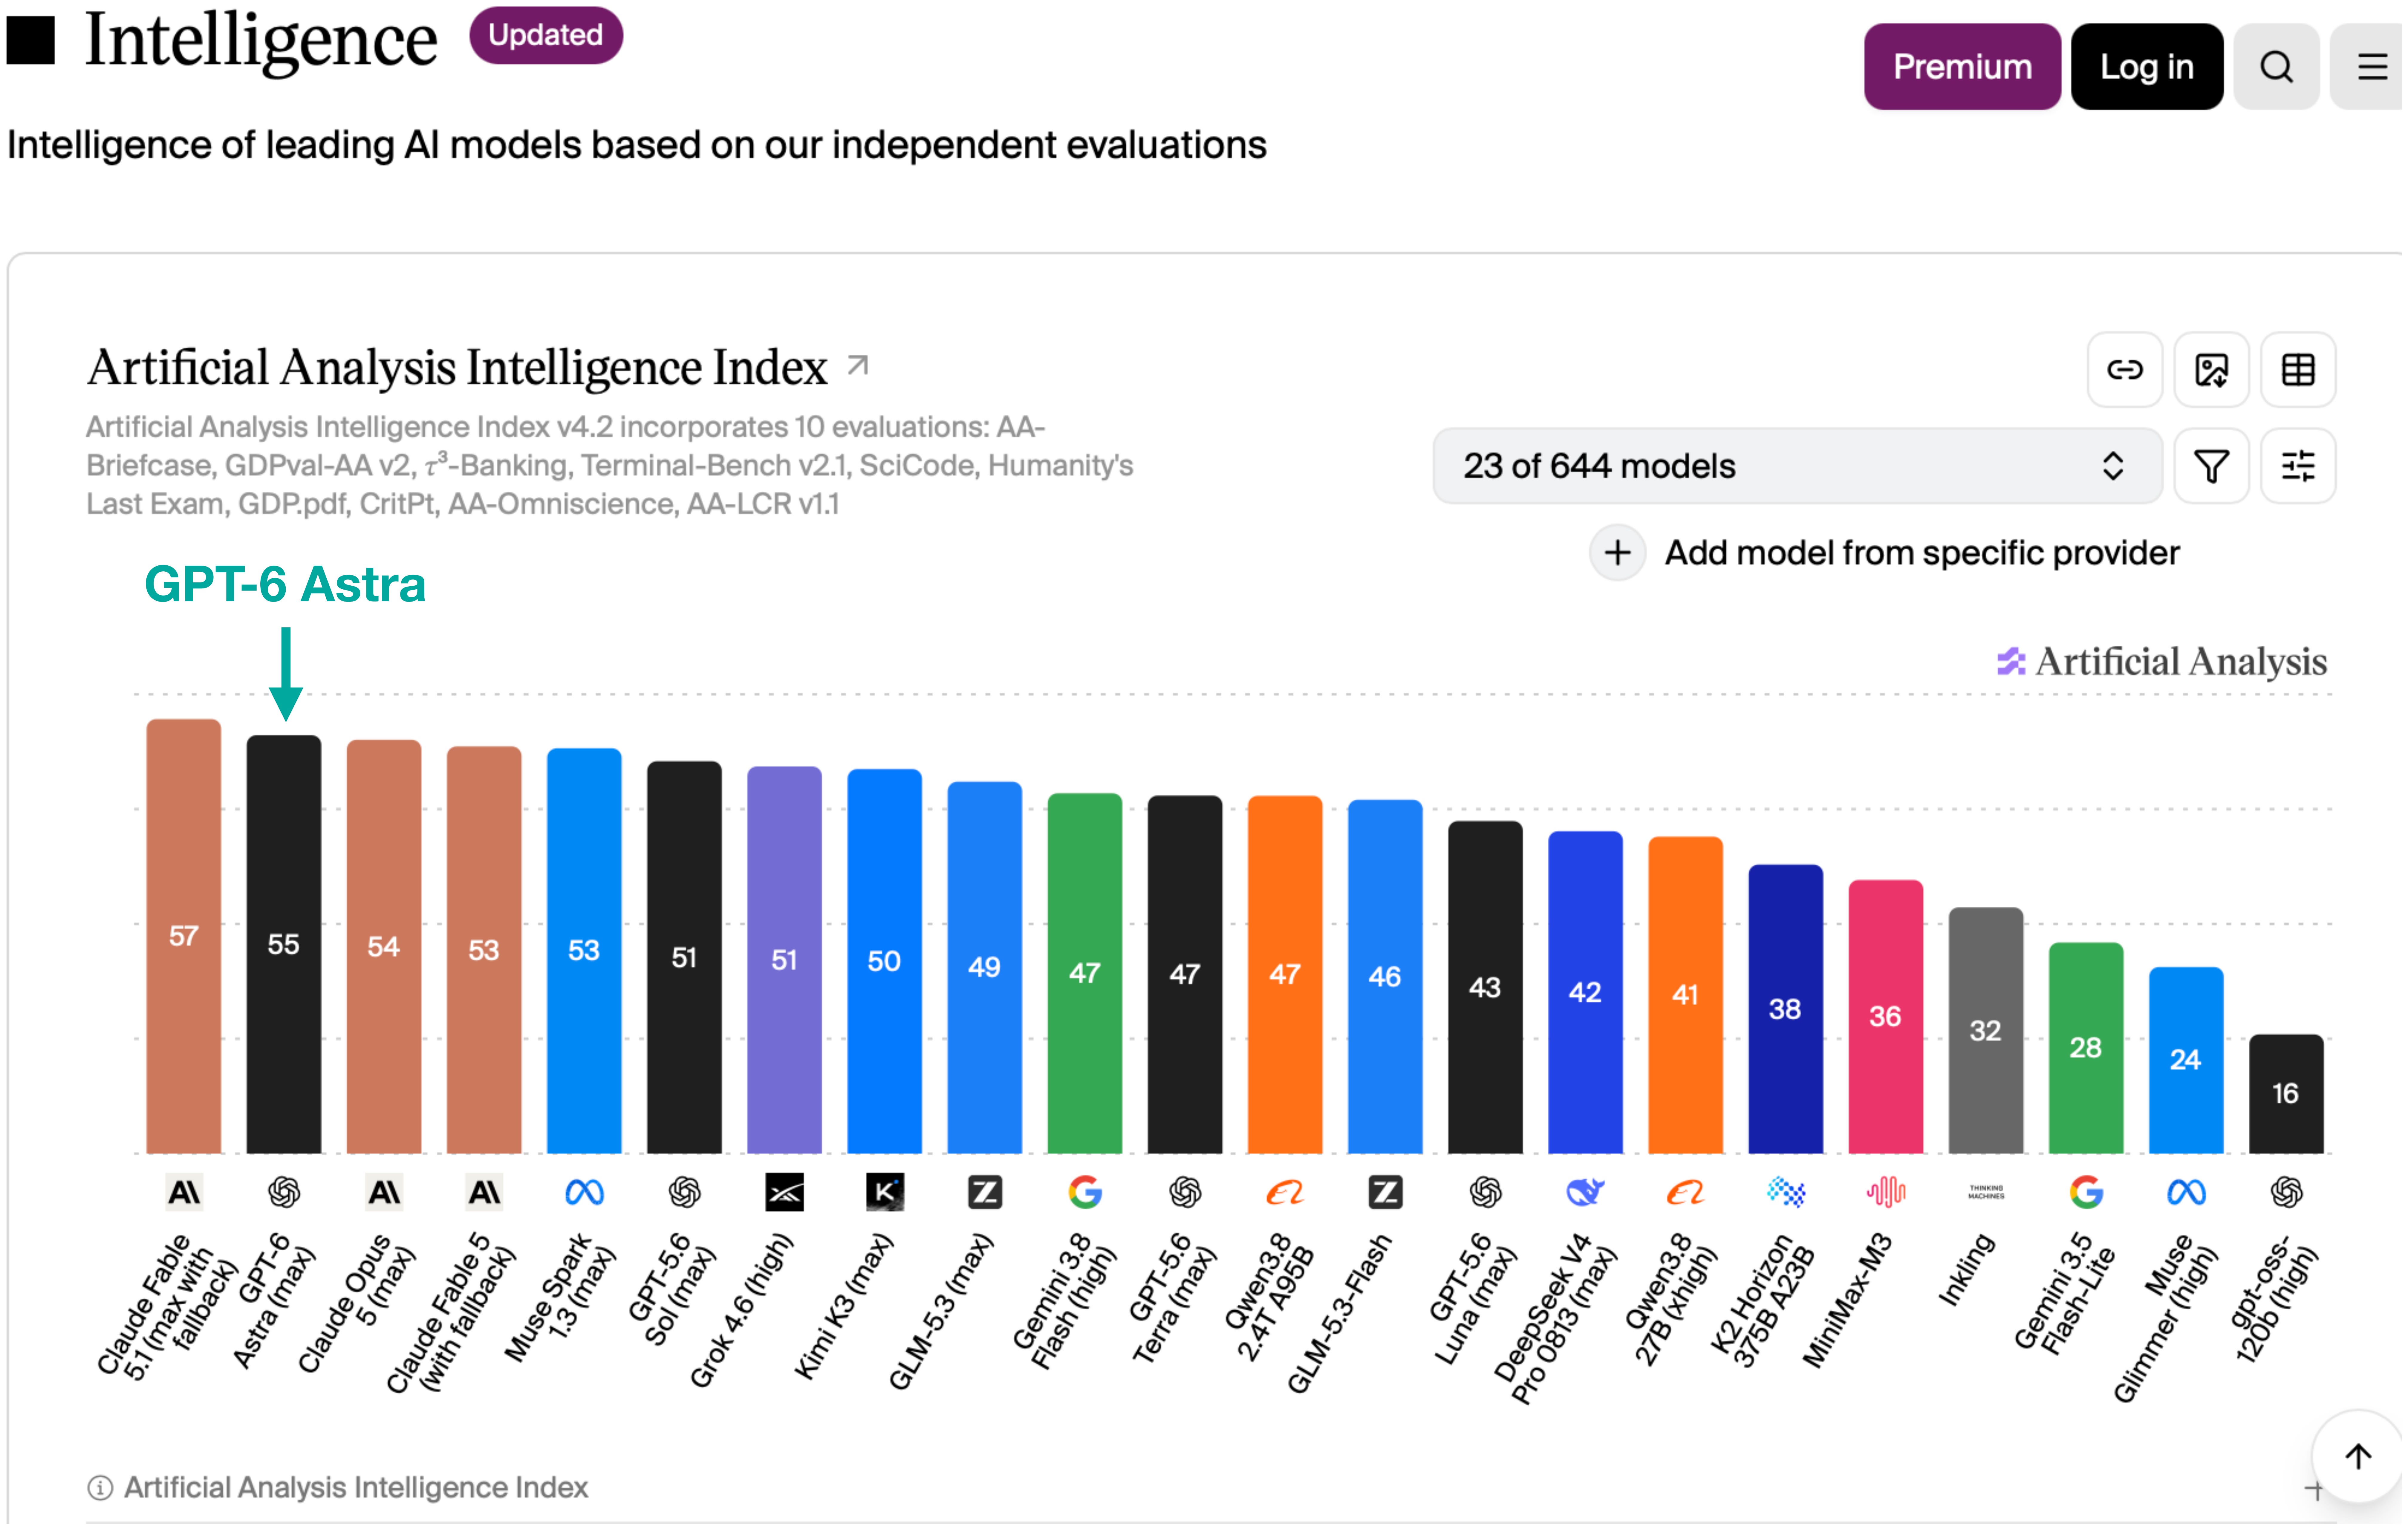
Coming back to the Artificial Analysis Coding Agent Index v1.4 (lower right in the previous figure), which blends several agentic coding tasks, GPT-6 Astra is clearly at the frontier, but it doesn’t pull ahead by leaps and bounds. This can also be seen in the general Artificial Analysis Intelligence Index shown below, which blends different types of tasks, not just coding tasks.
artificial-intelligence
Figure 2: Artificial Analysis Intelligence Index via https://artificialanalysis.ai/#intelligence

Now, the big advantage of Artificial Analysis benchmarks is that they are independent and thus may be a bit more trustworthy than self-evaluated benchmarks by model developers.

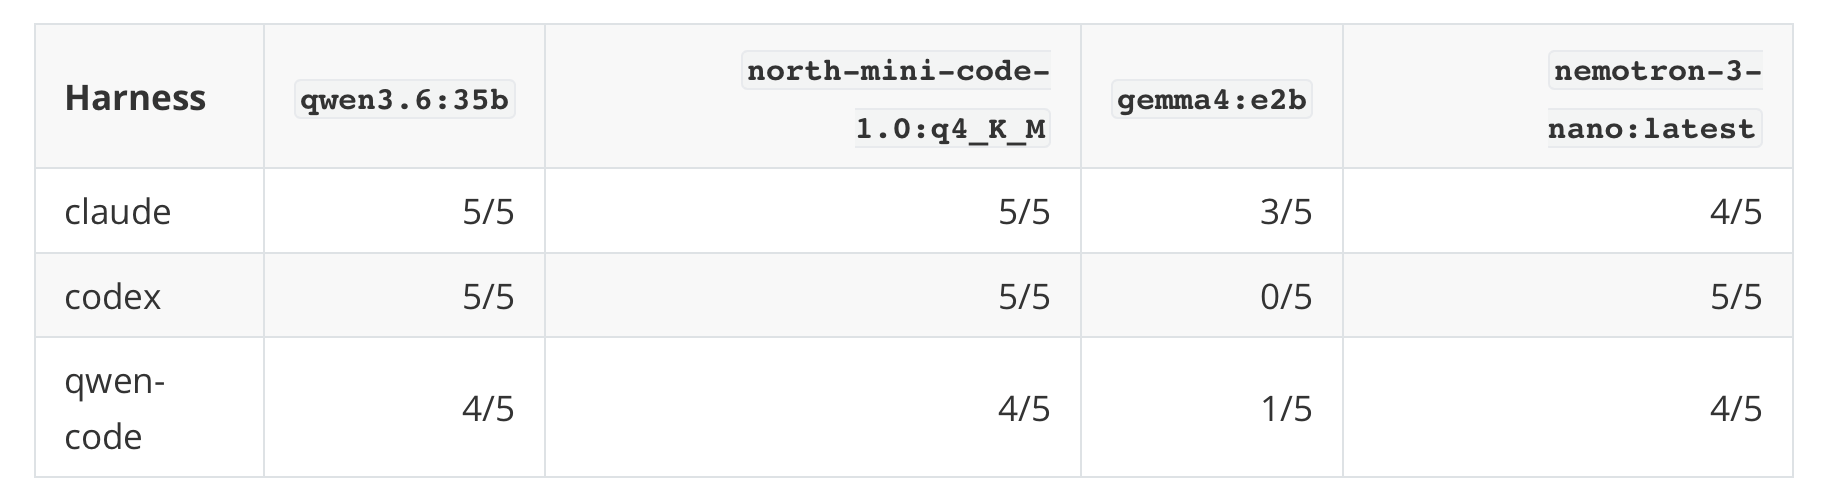
The harness setup depends on the benchmark. For example, GDPval-AA and AA-Briefcase use their open-source, minimal Stirrup harness across the different LLMs they compare. In the Intelligence Index v4.2 shown above, Terminal-Bench v2.1 uses Terminus 2, and τ³-Banking uses the τ-Bench harness. The separate Coding Agent Index also compares different coding-agent harnesses.

For evaluations that use a shared harness, this makes it more of an apples-to-apples comparison. At the same time, during model training, models are typically developed with one primary harness in mind (and fine-tuned less on other harnesses). Plus, the primary harness is often developed to suit and amplify a model’s strengths.

So, some of the agentic evaluations might underestimate how well Astra performs in its primary harness. How much this affects its Intelligence Index score would need to be tested by comparing Astra across harnesses on the same tasks.

As a side note, as a colleague recently suggested to me (as also recommended by the Claude Code lead), it’s maybe not a bad idea to delete (/archive) some of your existing AGENTS.md contents and SKILL.md files, as newer LLMs have become more efficient at understanding the prompt and solving the problem at hand. The extra hand-holding could unnecessarily constrain newer models and lead to worse solutions.

Of course, I am not suggesting never using SKILL.md files again, but for some workflows, because they can improve efficiency upon reuse, since the model doesn’t have to rediscover them. But what I am suggesting is that some workflows don’t need describing, and “old” descriptions may no longer be ideal, and the LLM may be able to come up with better solutions. So, it’s perhaps time to update or regenerate said instruction files.

1.2 Computer use capabilities

GPT-6 Astra seems to be exceptionally strong in image and rendering tasks. When these tasks involve interacting with graphical user interfaces, they also demonstrate computer-use capabilities, meaning the model operates software on your local computer through the Codex/ChatGPT app.

Computer use is where the model really shines compared to others, and anything graphic-related also makes for interesting and intuitive demos on social media platforms. There are tons of examples of impressive demos out there, from modeling rendering New York City in blender to virtual open house tours.

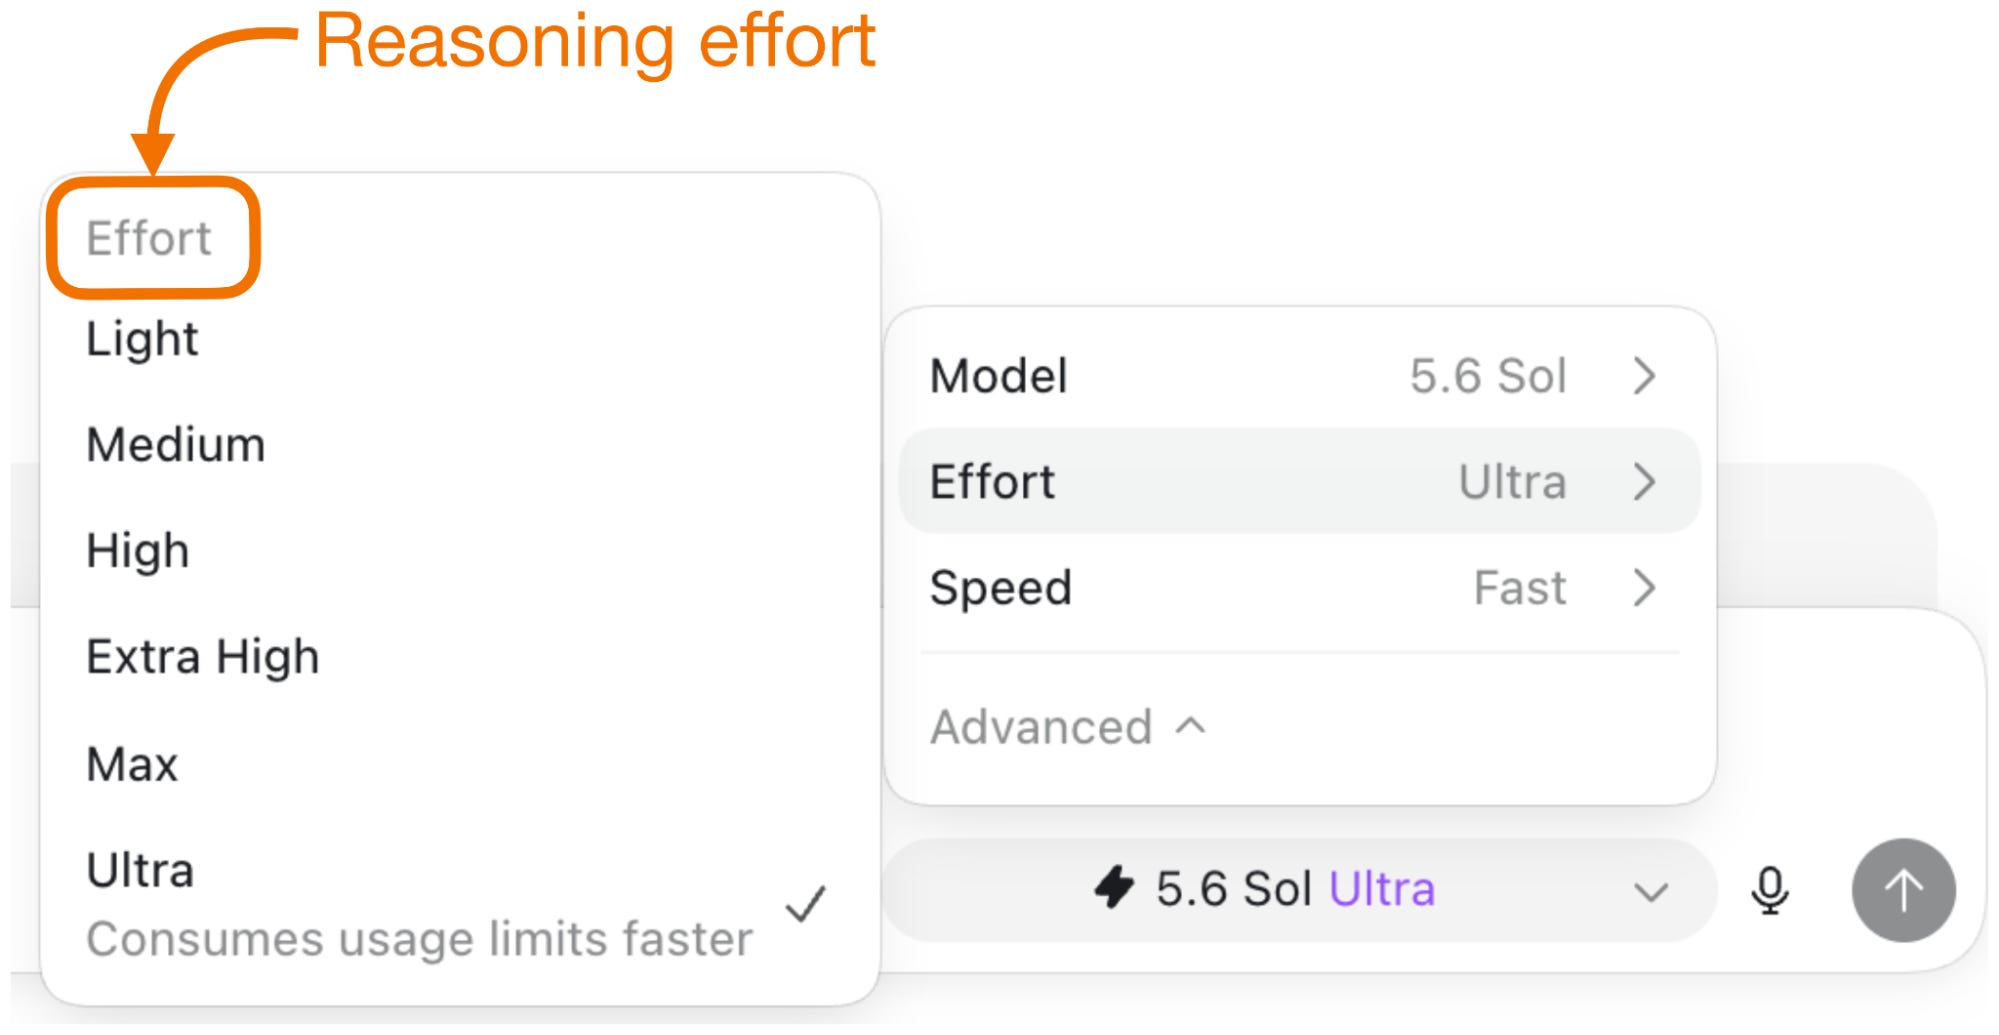
To pick one example, below is a comparison where I had GPT-6 Astra Medium and High redraw a picture of me in a browser version of MS Paint using the mouse on my computer (not Extra High and Max, because I didn’t want to waste all my tokens :)).

This highlights not only the model’s artistic capabilities but, more importantly, its ability to use tools on one’s computer (in this case, Paint; you can see the model using the interface via the mouse cursor).

This is not the first model that, inside a harness, is capable of general computer use. For example, I successfully used GPT models for some UI tasks (e.g., expense-related tasks in Excel) and so on since earlier this year. However, computer use is a relatively new capability, enabled by the harness, and usually feels not quite as mature yet. This makes sense. LLMs are text models, so naturally the lower-hanging fruit is writing and coding and using APIs and CLIs.

At the same time, there are many tools and software that don’t expose CLIs (yet), and instead of waiting until someone designs that interface, why not improve models to use graphical user interfaces (and, as mentioned before, this makes for pretty and impressive demos, anyway)? This is somewhat analogous to the emerging humanoid robot developments. Sure, humanoid robots are not the most efficient robots, for example, at the assembly line, where special-purpose machines exist. But they are versatile.

So, I expect the upcoming months (or years) also to be an era of computer use refinement on both the LLM and the agent harness layer. I.e., in addition to the current capabilities, and expanding their math and coding capabilities, models will be trained with an increasing amount of computer use in mind. And this will also make LLMs more accessible for everyday computer tasks outside the tech world (”Hey ChatGPT, please do my tax return” :))

1.3 Computer use training

The computer usage trend is also consistent with the recent reporting that OpenAI purchased tens of thousands of Mac Minis and Mac Studios for Reinforcement Learning. So, here the Macs are not used to literally train the models (it’s better to use GPUs for that) but rather to expose macOS during the model training for the model to learn to use said operating system and the tools therein.

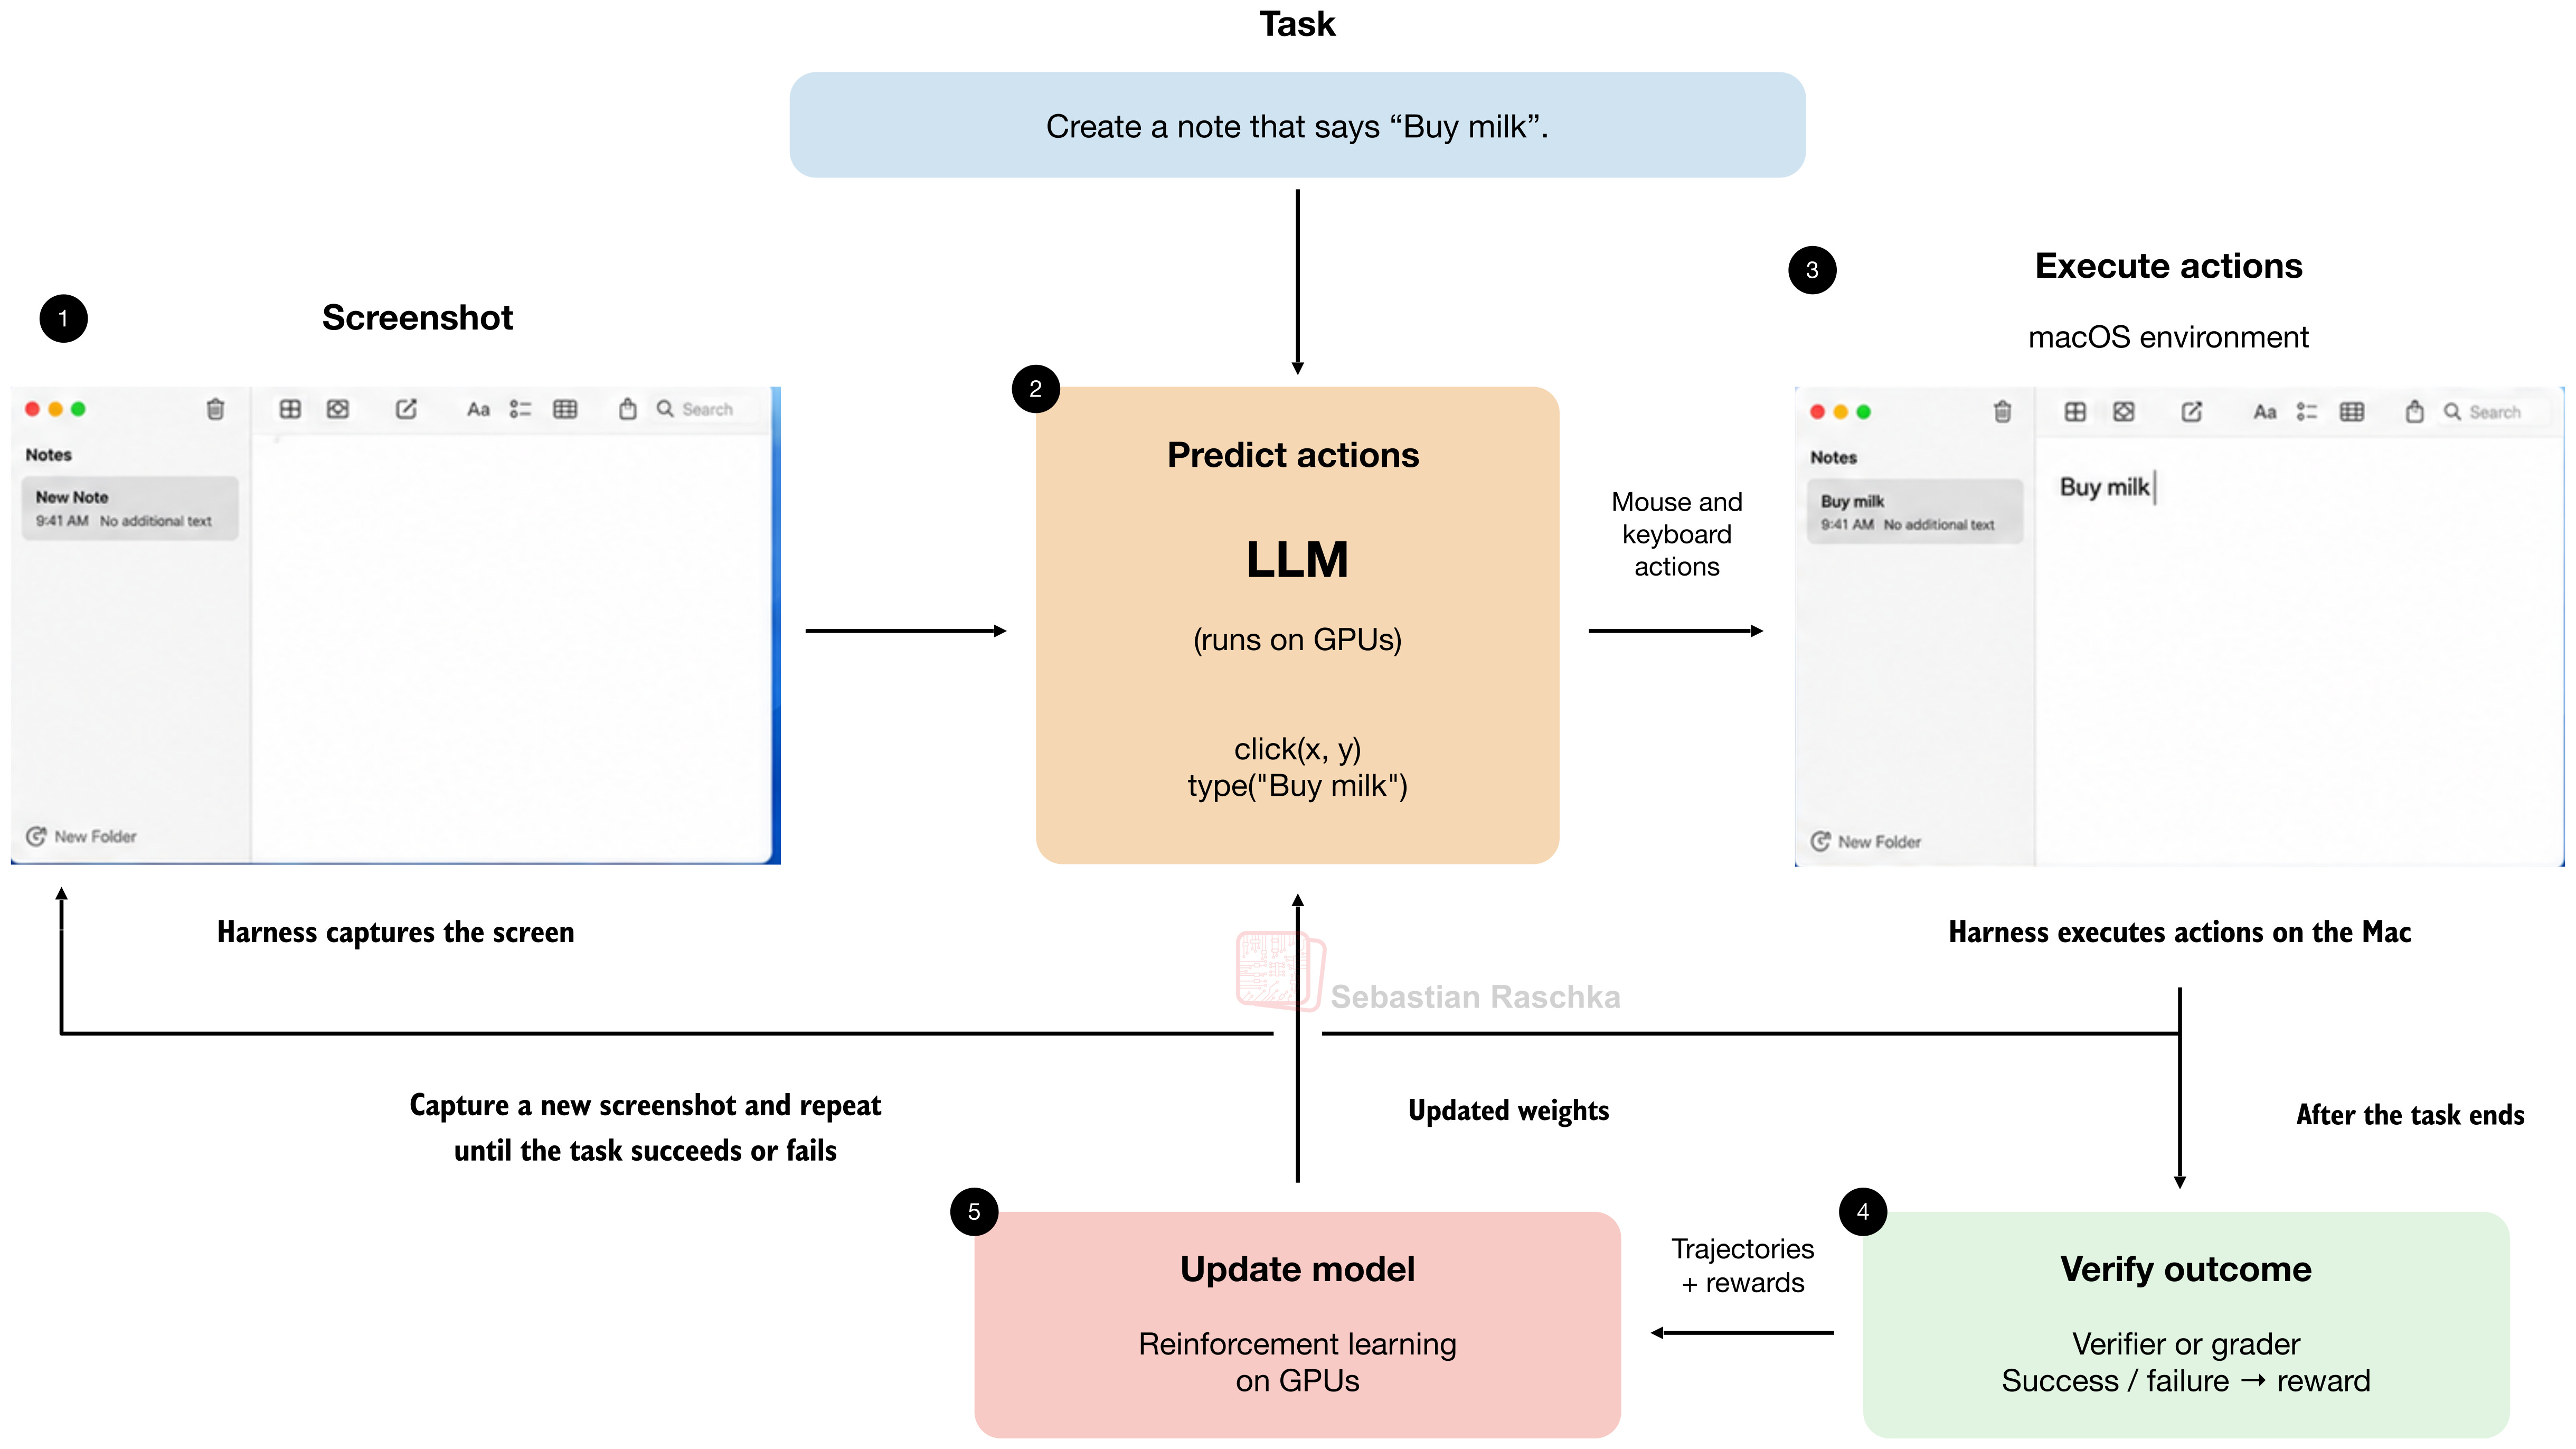
So, how does computer-use training on said Macs work? In short, the Macs (or their macOS operating system, to be precise) serve as an environment that the model can interact with during training.

The basic workflow looks like this:

  1. Prompt the model by giving it a task, such as “open an app xyz and do abc”.

  2. Provide it with screenshots of the macOS interface (this is usually done by the harness).

  3. The LLM then predicts mouse/keyboard actions (click, key presses, scrolling, and so on).

  4. Execute those actions on the Mac (again, this is done by the harness).

  5. Feed new screenshots of the updated environment after performing the actions in the previous step.

  6. Repeat steps 2-5 until the task succeeds or fails.

  7. Use success/failure signals and verifiers (or graders) as training feedback, including reinforcement learning during post-training; this is analogous to regular Reinforcement Learning with Verifiable Rewards (RLVR).
computer-use-flow
Figure 3: Overview of a computer-use training workflow.

Again, the Mac is mostly the environment here and not the machine for running or updating the model during training. The model likely sits on NVIDIA GPUs and is fed via API to said Mac. By the way, NVIDIA’s CEO mentioned that GPT-6 Astra was being trained on ~100,000 Grace Blackwell GPUs.

1.4 GPT-6 Astra is still a reasoning model

The focus on computer-use training discussed in the previous section is not a fundamental paradigm shift in the training pipeline. GPT-6 Astra (and likely any LLM in the foreseeable future) is still a reasoning model. This means the LLM is trained with reinforcement learning with verifiable rewards (RLVR) and produces intermediate reasoning traces (chains of thought)

But I will discuss the reasoning model aspects of GPT-6 Astra (especially regarding hiding chains of thought) a bit later in this article.

2. Looped transformers

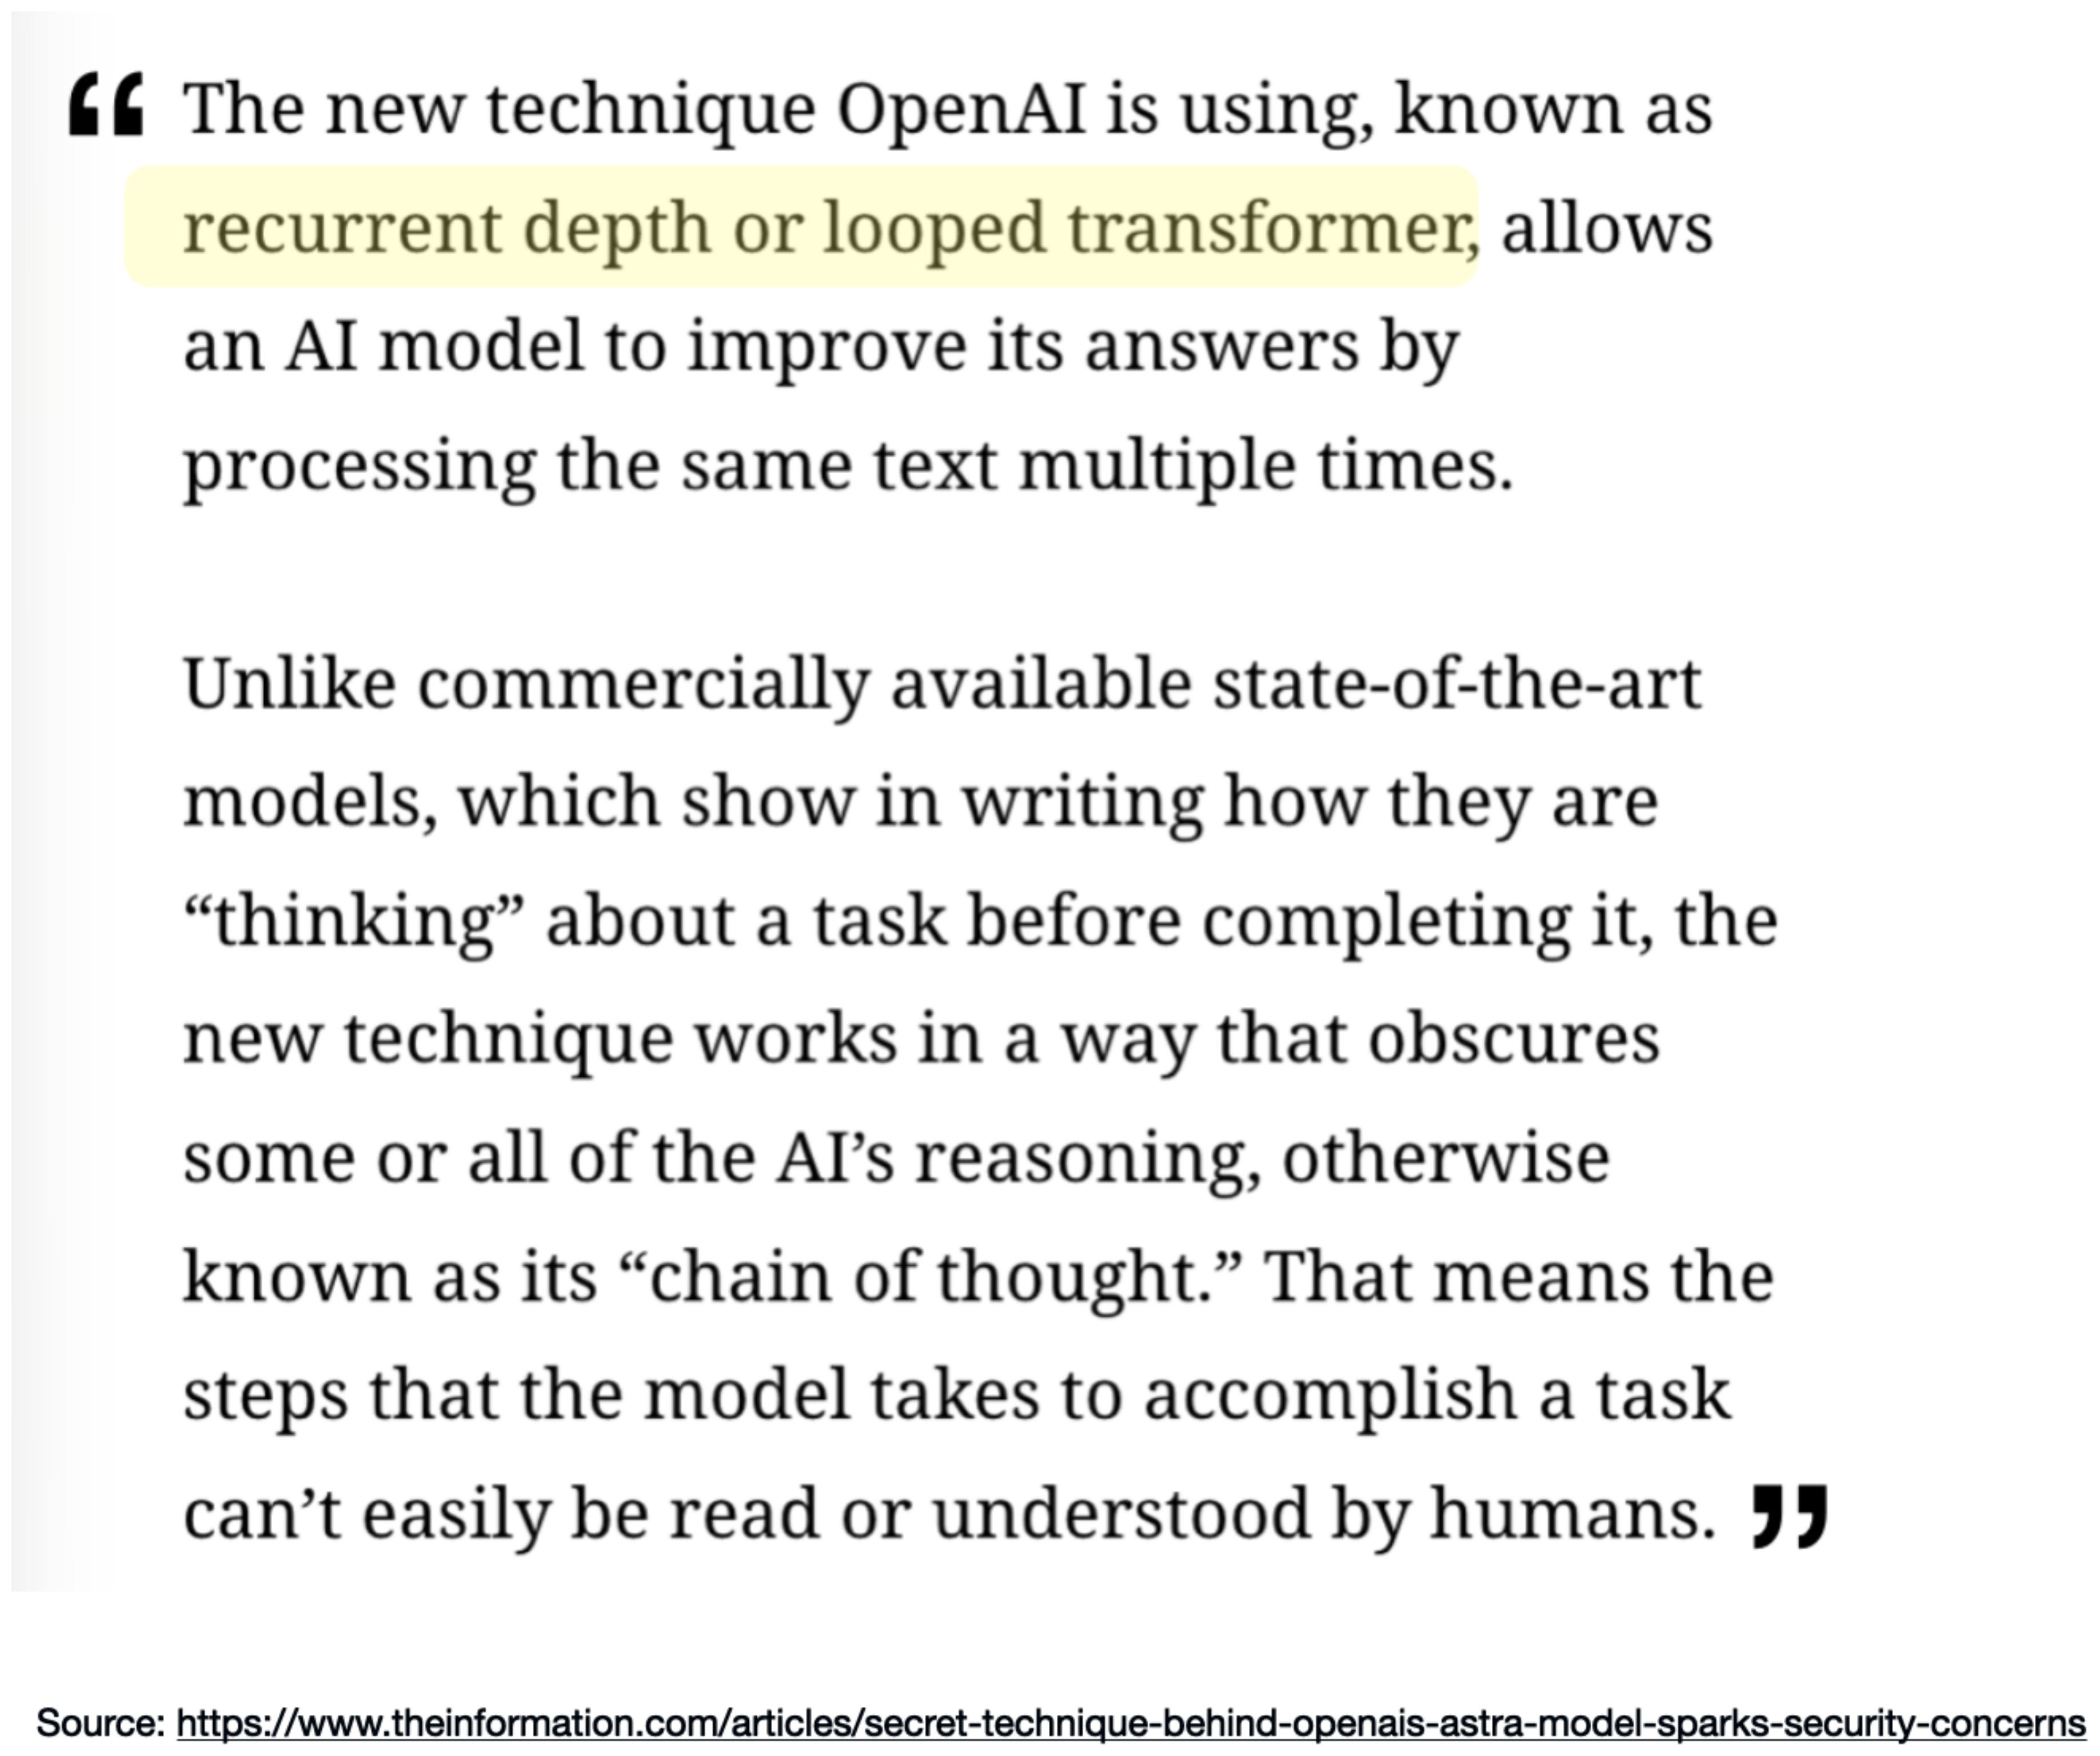
That being said, about two days before the official model, the news magazine The Information published an articlereporting that, according to some inside information, Astra is using a concept called “recurrent depth” or “looped transformers.”
Since LLM architectures are within my area of expertise and my passion, I created a short lecture video explaining the general looped transformer mechanism and addressing the comment about hidden reasoning chains, which you can find below.

In the following subsections, I’ll first explain what looped transformers are, and I’ll revisit the comment about the hidden chains of thought later in this article.

(The looped transformer explanation may seem a bit long, but I really think that it helps with establishing a foundational understanding of the technique, which is then useful to judging the claim that it obscures the reasoning traces or chains of thought.)

2.1 Reusing transformer blocks

So, what’s a looped transformer?

A Looped Transformer is essentially an architectural tweak, with the main idea being to pass the intermediate representations through the same transformer blocks multiple times (instead of just once). Compared to just adding more blocks, the “trick” here is that the weights stay the same across these passes.


Definitions & Jargon

Throughout this article, I’ll use the following terms:

  • A transformer block is a unit containing attention, a feedforward module, normalization, and shortcut connections. These blocks are often called “transformer layers” in papers.

  • A stack is a sequence of transformer blocks.

  • A block application means running an input through a transformer block once.


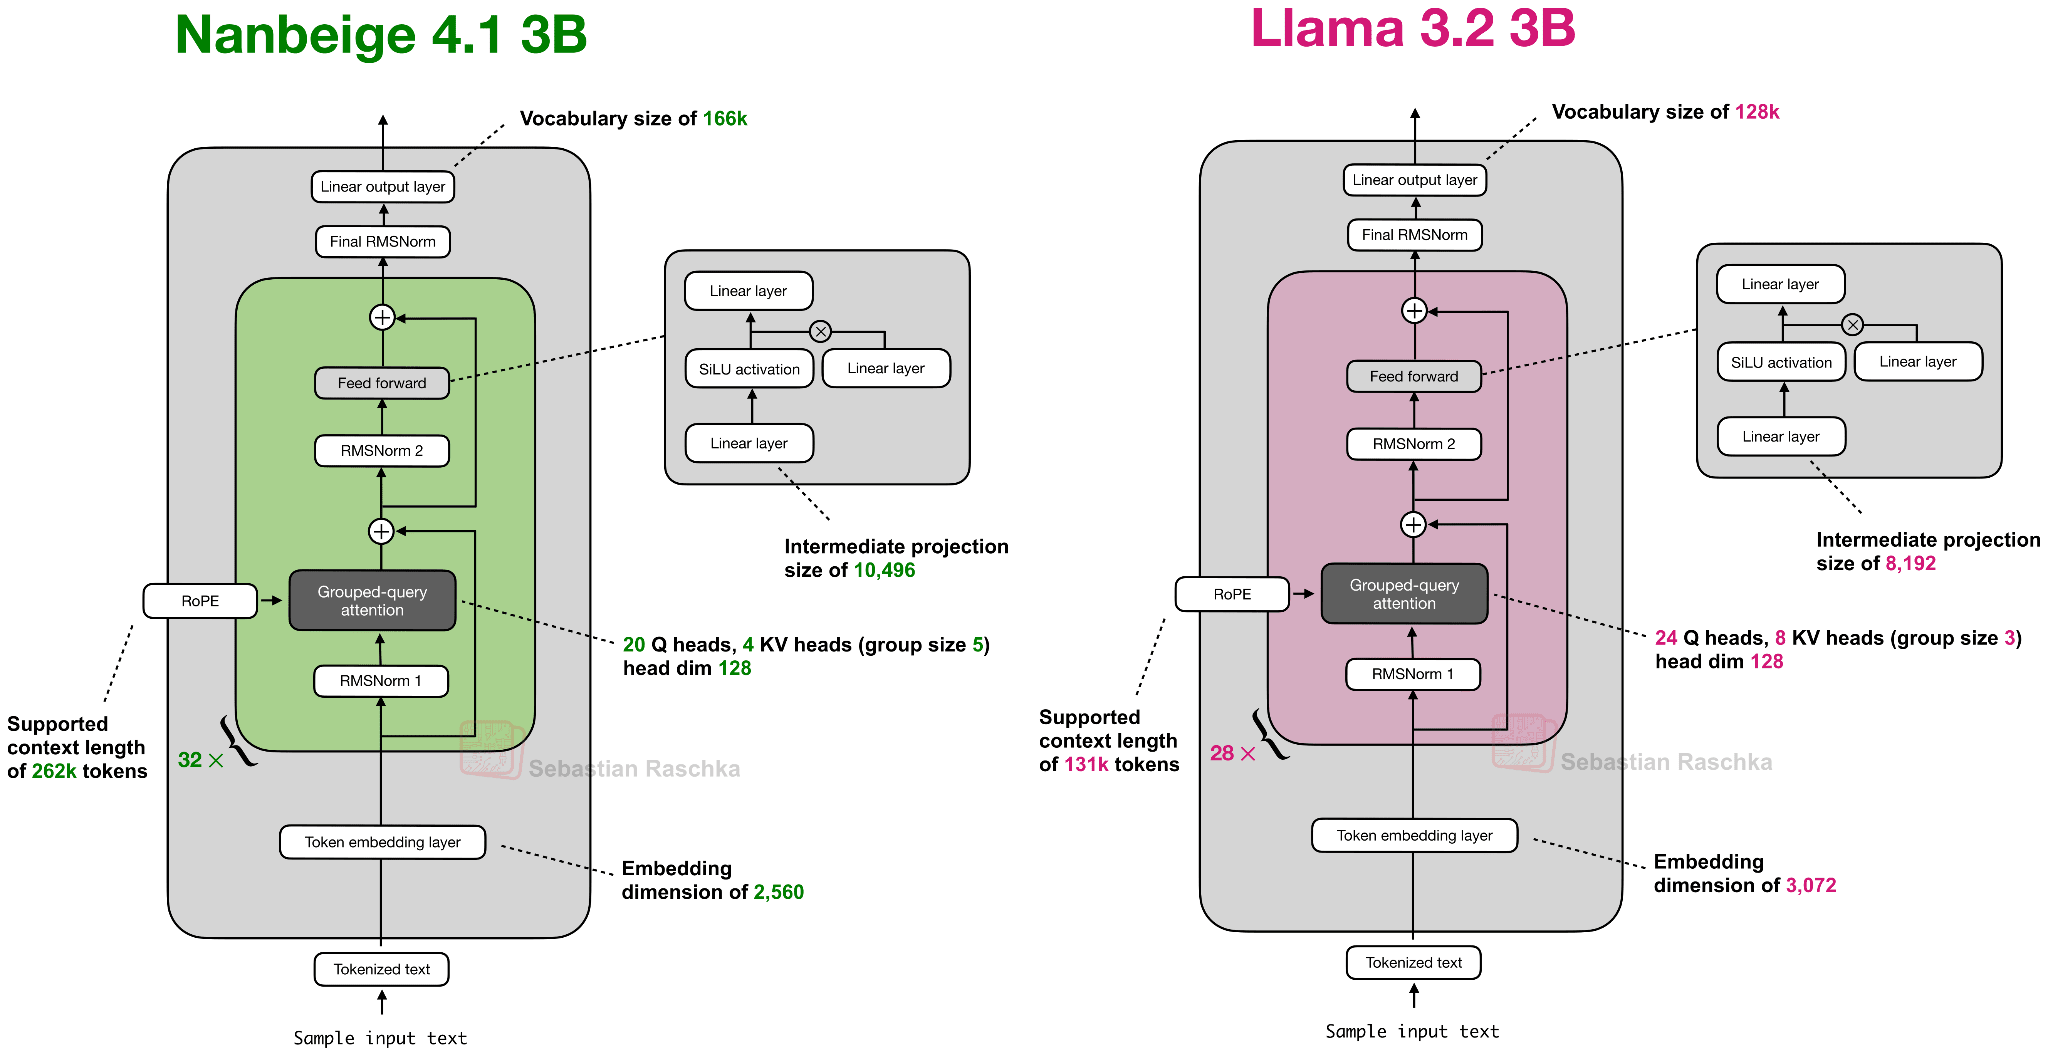
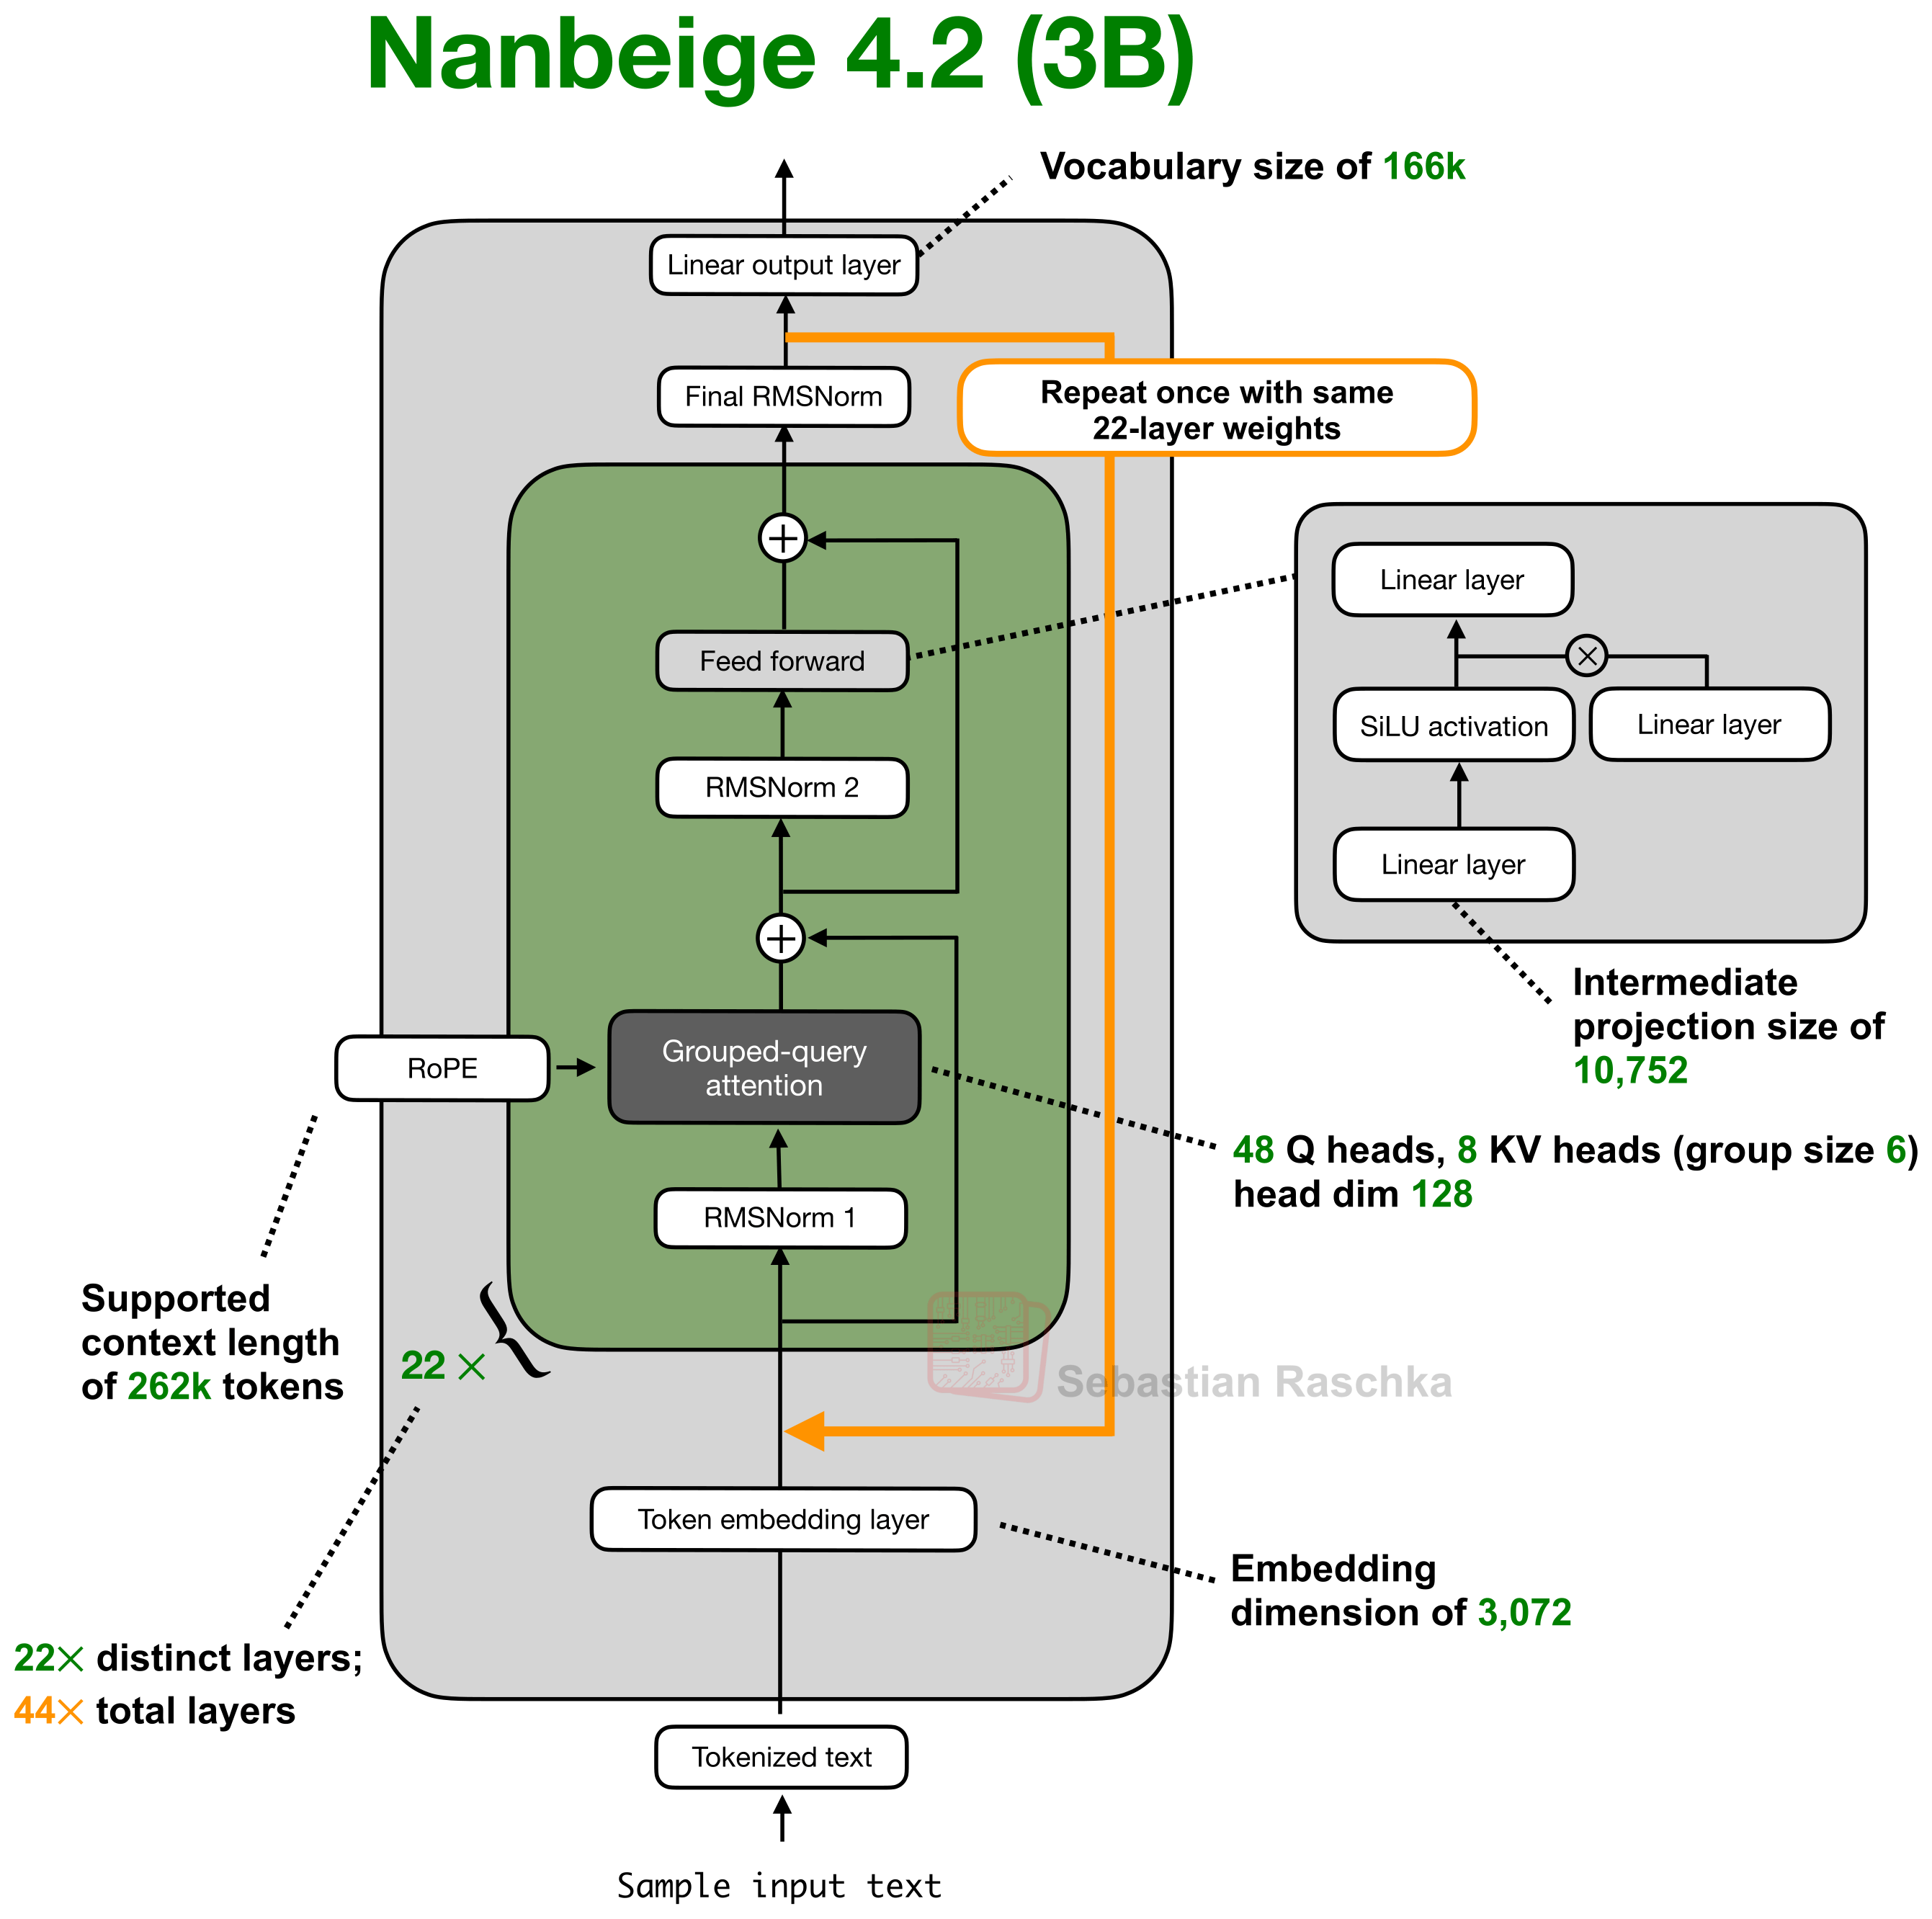
The looped transformer is nothing new, and the basic idea already appeared in the Universal Transformers paper from 2018. But before discussing Universal Transformer, let’s start with a simpler example, Nanbeige4.2-3B, a recent open-weight LLM that came out in July and that I covered on Substack Notes and in my LLM Architecture Gallery earlier this summer.

The Nanbeige architecture, shown below, essentially looks like a regular transformer. However, notice that it has an extra (orange) arrow looping back to the beginning of the transformer stack.
nanbeige
Figure 5. Nanbeige4.2-3B applies the same stack of 22 transformer blocks twice. The orange arrow shows where the intermediate representations are passed back into the stack.

Let’s walk through this from the bottom up. First, as in any other transformer-based LLM, the input text is tokenized and converted into embedding vectors. These vectors then pass through 22 transformer blocks, and each of these 22 blocks has its own weights.

However, the looping transformer aspect here is that after the first pass, the hidden states are fed back through the same 22 blocks. So, block 1 is applied again, followed by block 2, and so on up to block 22.

If we were to unroll this computation, we would have 44 transformer block applications. However, compared to a conventional transformer with 44 distinct blocks, the second stack of 22 block applications reuses the weights from the first stack. For example, block application 23 uses the weights of block 1, block application 24 uses the weights of block 2, and so on.
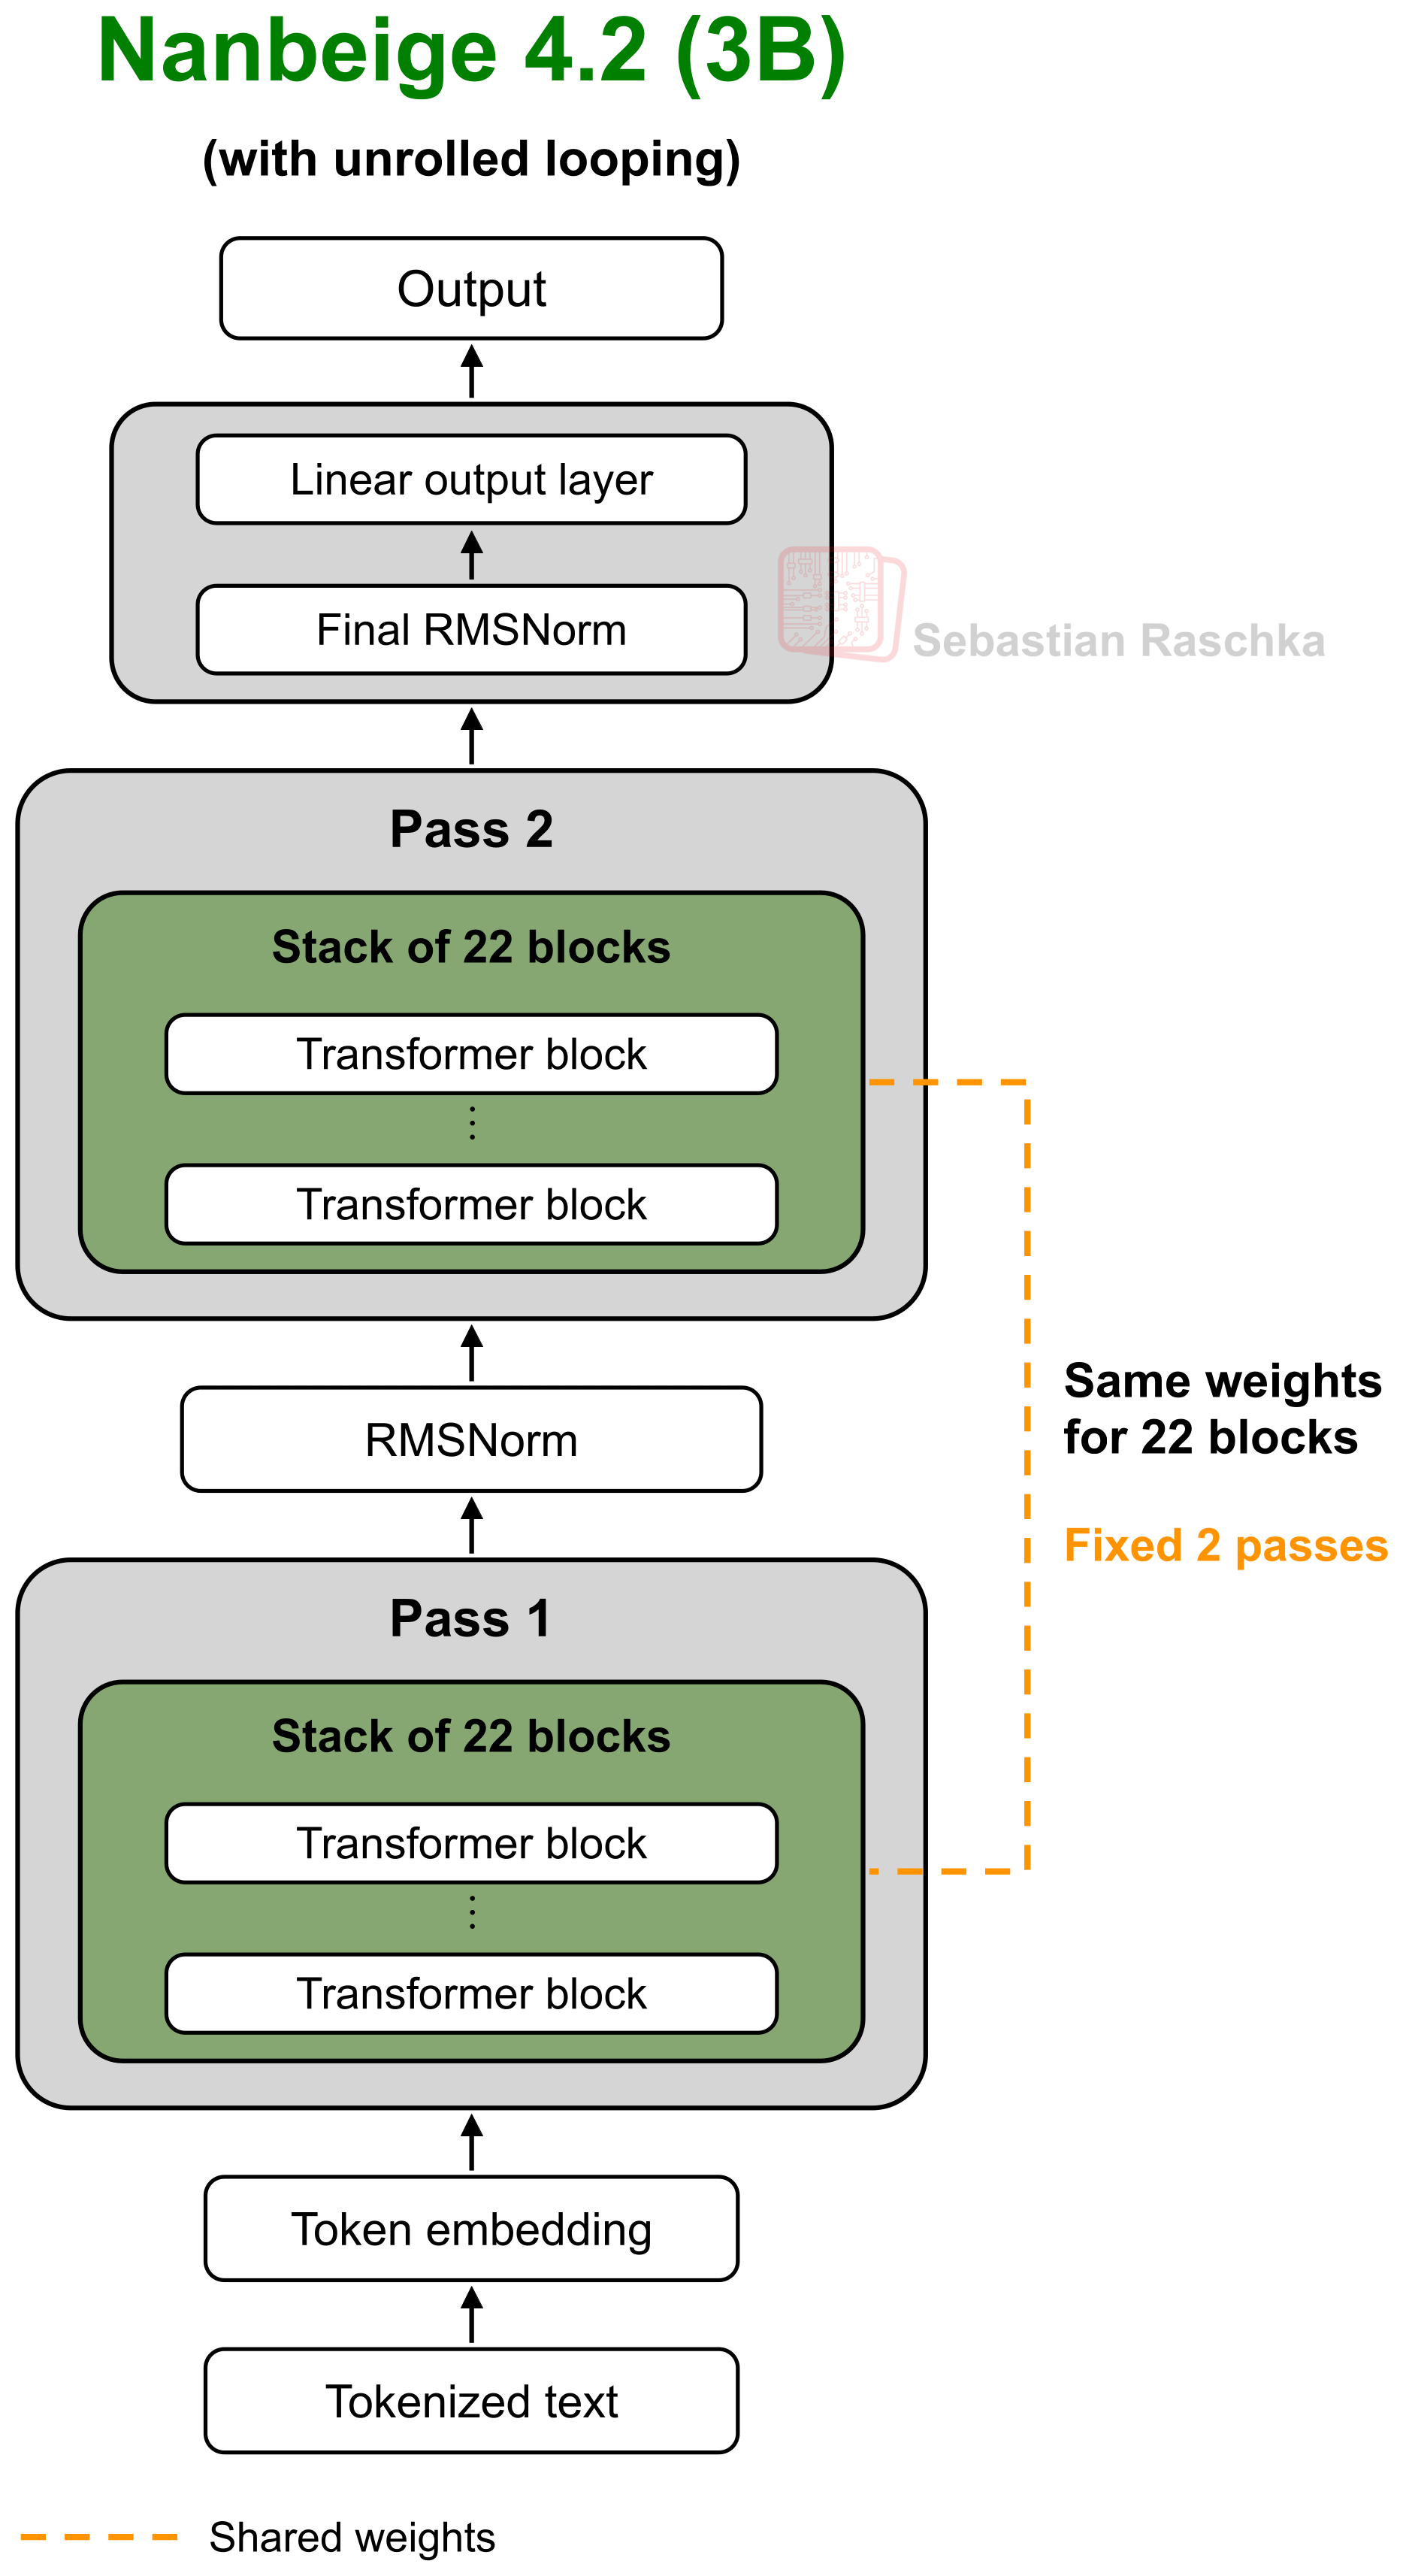
nanbeige-two-passes
Figure 6. Nanbeige4.2-3B unrolled into two passes through the same 22 transformer blocks, giving 44 block applications.

So, the whole idea here is that we increase the effective depth from 22 to 44 block applications without adding another set of transformer weights.

By the way, why 2 rounds, not 3, 4, or more? There are not many details in the Nanbeige paper, but they say that this was essentially the most efficient setup. Increasing the loops from 2 to 3 can increase modeling performance, but the extra computational cost wasn’t worth it.

2.2 Looping costs

So, why would we do this looping in general? This is essentially an alternative to just making the model bigger by adding more transformer blocks.

So, for instance, a model that uses 22 transformer blocks twice has roughly half as many (transformer-block) parameters compared to a model with 44 conventional blocks.

This then reduces the memory needed to store the weights. As a side note, note that the embedding and output layers, which are usually large and make up a substantial portion of the total, are separate from this comparison. (In the case of Nanbeige 4.2 3B, the embedding and output layers make up ~25% of the total 3B parameters; with weight sharing between those two, we could reduce that to 12.5%.)
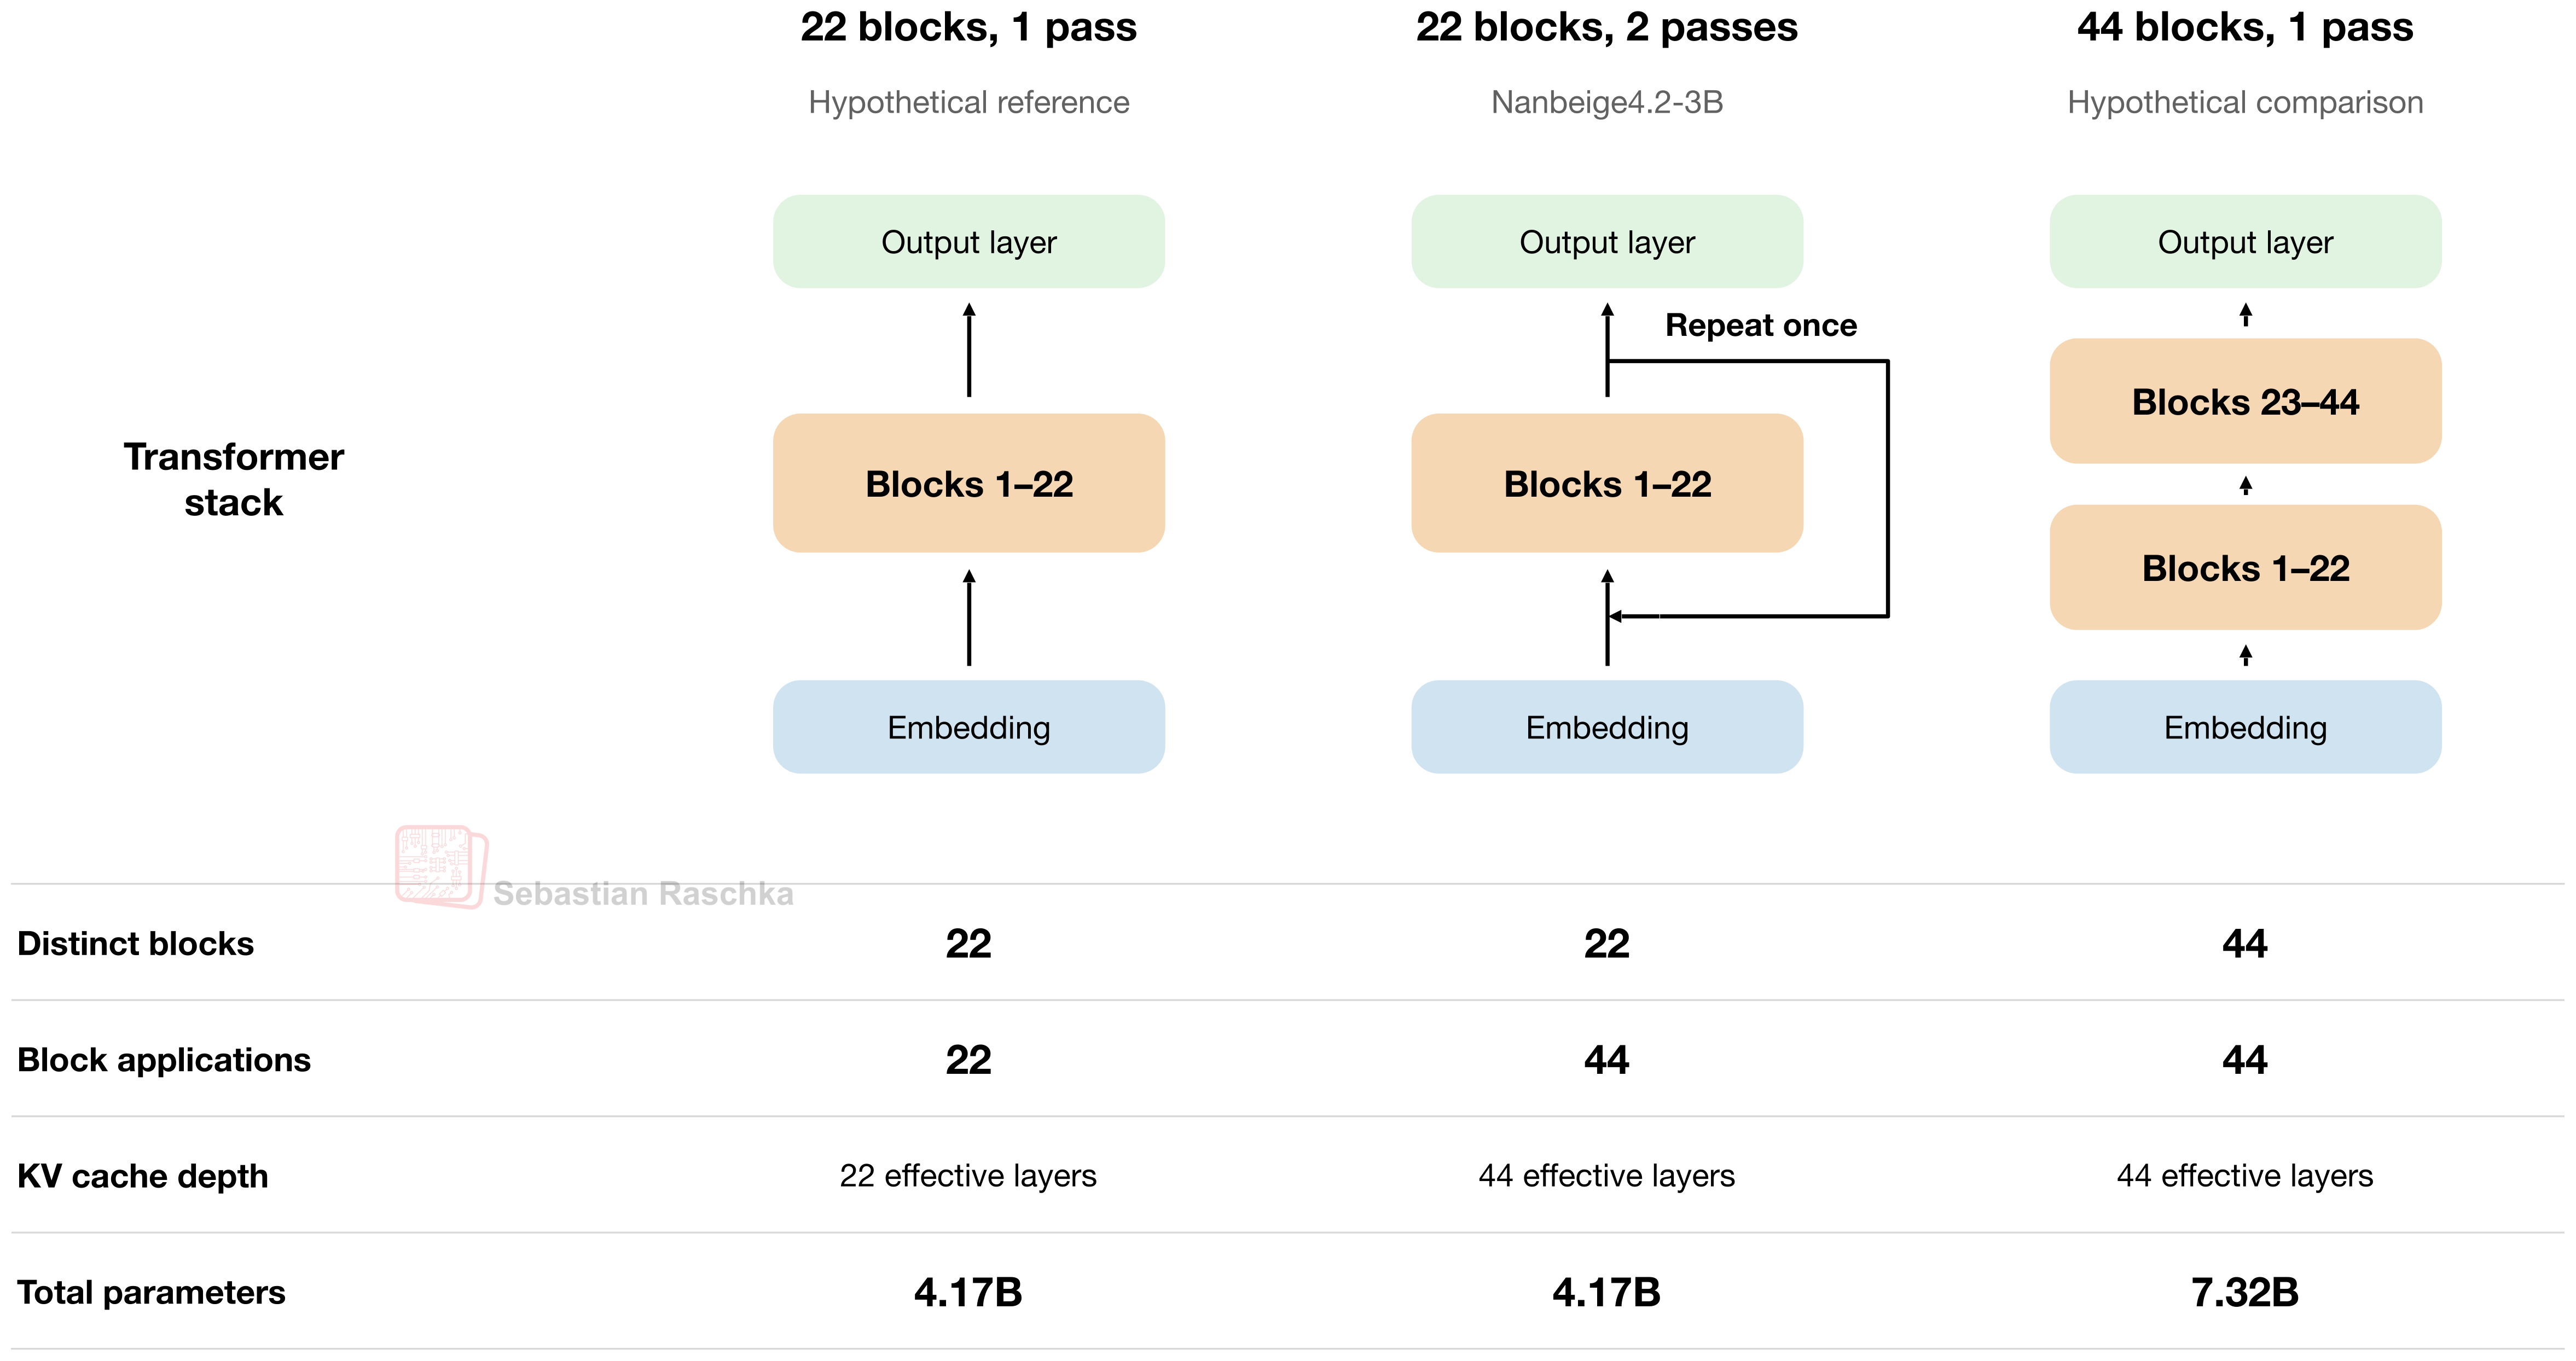
hypothetical-size
Figure 7: Side-by-side comparison showing how many parameters would be required in traditional versus looping scenarios.

Of course, reusing the same blocks in a loop still requires computation. More precisely, we pass the intermediate inputs through 44 block applications during the forward pass. And, during training, gradients flow backward through both repetitions of the shared stack. So, compared to using the 22 blocks only once, this adds substantial work. Actually, it’s similarly expensive as having 44 distinct blocks (except the optimizer has fewer distinct parameters to update; backprop still runs through all 44 block applications).

There is also the KV cache, which stores the attention keys and values of previous tokens for reuse in conventional and looped transformers in each next-token generation step. By the way, I have a standalone article on KV caching here if useful:

But back to the topic. Even though there is weight-sharing in looped transformers, the intermediate states that enter a block are different on the second pass. Consequently, in KV caching, the resulting keys and values are also different between these two transformer stacks (just like in the no-looping case). So, there are no KV cache-related savings either.

To make this more concrete, for example, consider block applications 1 and 23, which both use block 1 in the looped transformer setup. But each application still needs its own KV cache entries. So, since we have to keep separate caches for both passes, the repeated stack of 22 blocks has the same KV cache requirements as a conventional transformer with 44 distinct blocks.

Interestingly, the Nanbeige researchers reported in the paper that they tried sharing the KV cache between passes. This, of course, halved the KV cache size, but the model performed worse than the version with separate caches (which is the version they released).

Just to complete the Nanbeige discussion before moving on and looking at some other looped transformer designs, their technical report also discusses two other choices or trade-offs.

  1. Training the looped architecture from scratch worked better than converting an already pre-trained transformer through upcycling.

  2. And two passes gave their preferred trade-off, as mentioned in the previous section. More passes brought only small additional gains while slowing training and making optimization less stable.

So, the number of passes is another architectural choice we have to make. As mentioned before, in Nanbeige, this is fixed at two. But we can also make it depend on the token, as we will see next.

2.3 Universal Transformers and flexible loop counts

Now, let’s come back to Universal Transformers. In Nanbeige, we apply a stack of 22 transformer blocks twice. In the Universal Transformer paper from 2018, we repeatedly apply the same transformer block instead of repeating a stack of transformer blocks. The main idea is similar, though.

Also, the number of steps can be fixed, but the paper also explores adaptive halting. For example, a token at a particular position may only go through one or two loops. Another may go through three or four loops, and so on. This gives the model flexibility to allocate the compute to those tokens that benefit from extra computation.

How is the looping number decided? Here, the model uses a small, trained function that outputs a so-called halting probability for each position at each step. It adds up these probabilities over these successive loops and then stops looping at a given position once the sum exceeds a threshold value. In addition, a maximum loop count also limits the computation just in case.
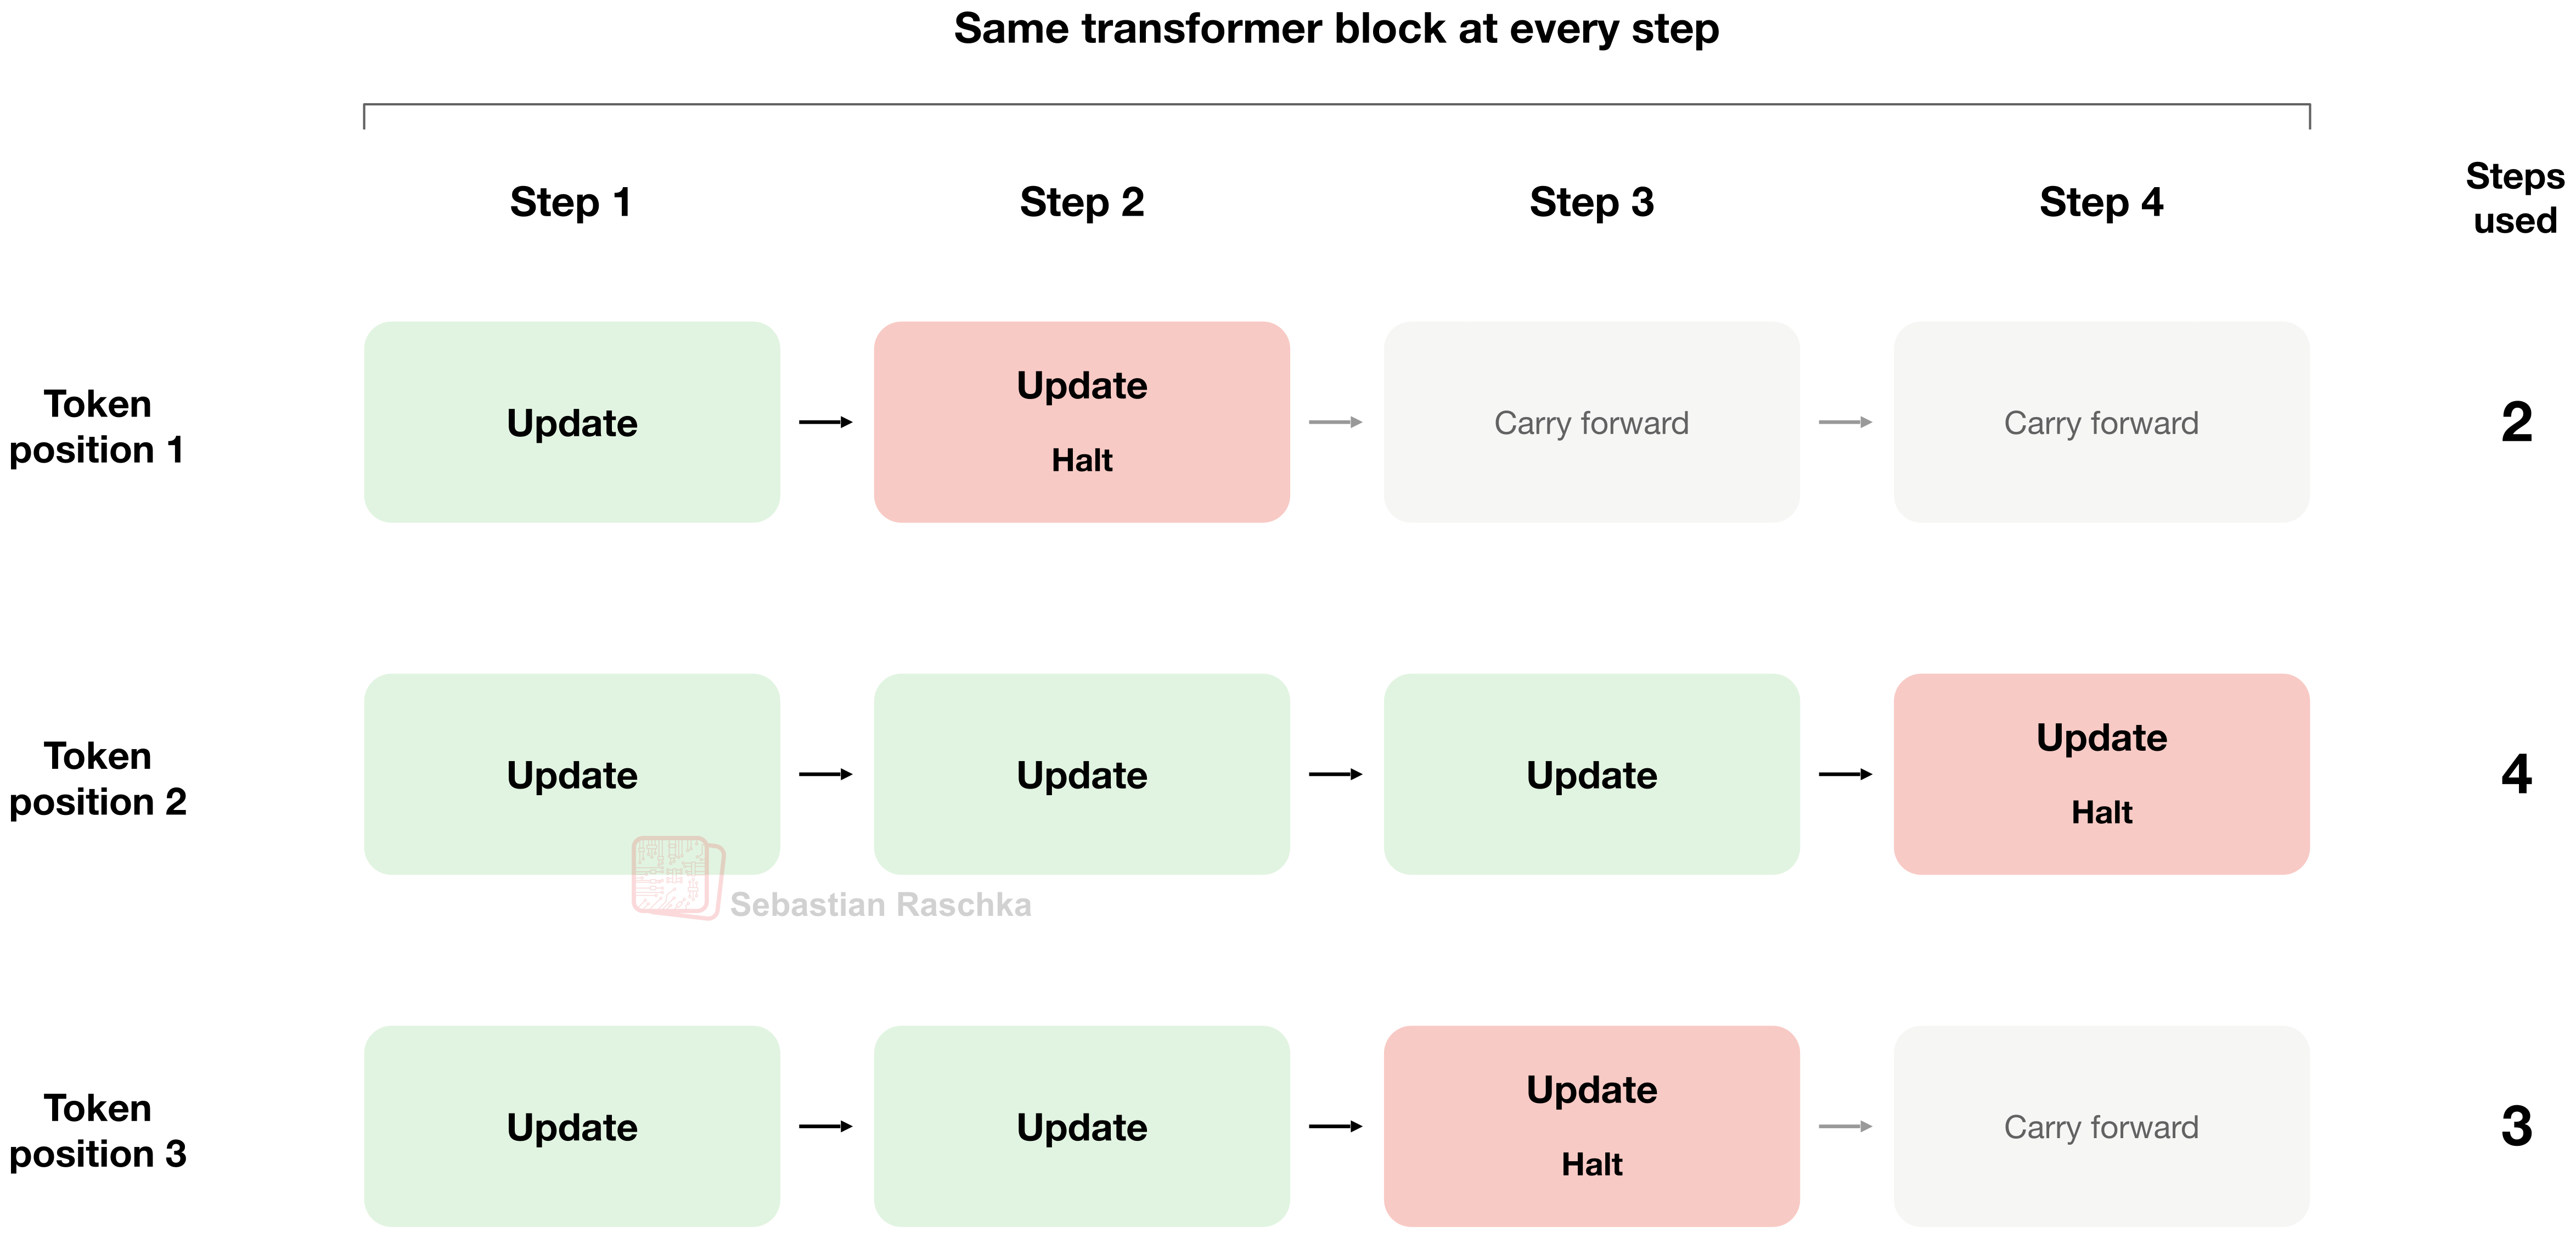
adaptive-halting
Figure 8: Adaptive halting in a Universal Transformer.

Another example of a looped transformer is ByteDance’s Ouro, which I also covered in my LLM Architecture Gallery. For instance, Ouro-Thinking 2.6B applies the same stack of 48 transformer blocks four times. That’s 192 block applications while storing weights for 48 distinct blocks. Basically, that’s a more extreme case than Nanbeige. Additionally, a learned exit gate assigns probabilities to the different exits, and a threshold on the cumulative probability determines which pass supplies the output. So, it’s also borrowing the adaptive halting idea from Universal Transformer, which Nanbeige didn’t use. (However, there is a practical caveat here. The released Hugging Face implementation computes all configured passes before selecting an output, so it seems like the number of loops is effectively hard-coded to 4).

2.4 Routing flexible loop counts

Another approach is Mixture-of-Recursions, a paper from 2025 that is essentially a more sophisticated version of the Universal Transformer discussed earlier. Similar to the Universal Transformer, individual tokens pass the transformer blocks one or more times as illustrated in the figure below. However, the innovation is how this looping number is determined on a per-token basis.

In the following figure from the paper, the looped (repeated) stack is called a recursion block here. This contains several transformer blocks, and it sits between separate first and last transformer blocks (labeled Layer 0 and Layer L-1).
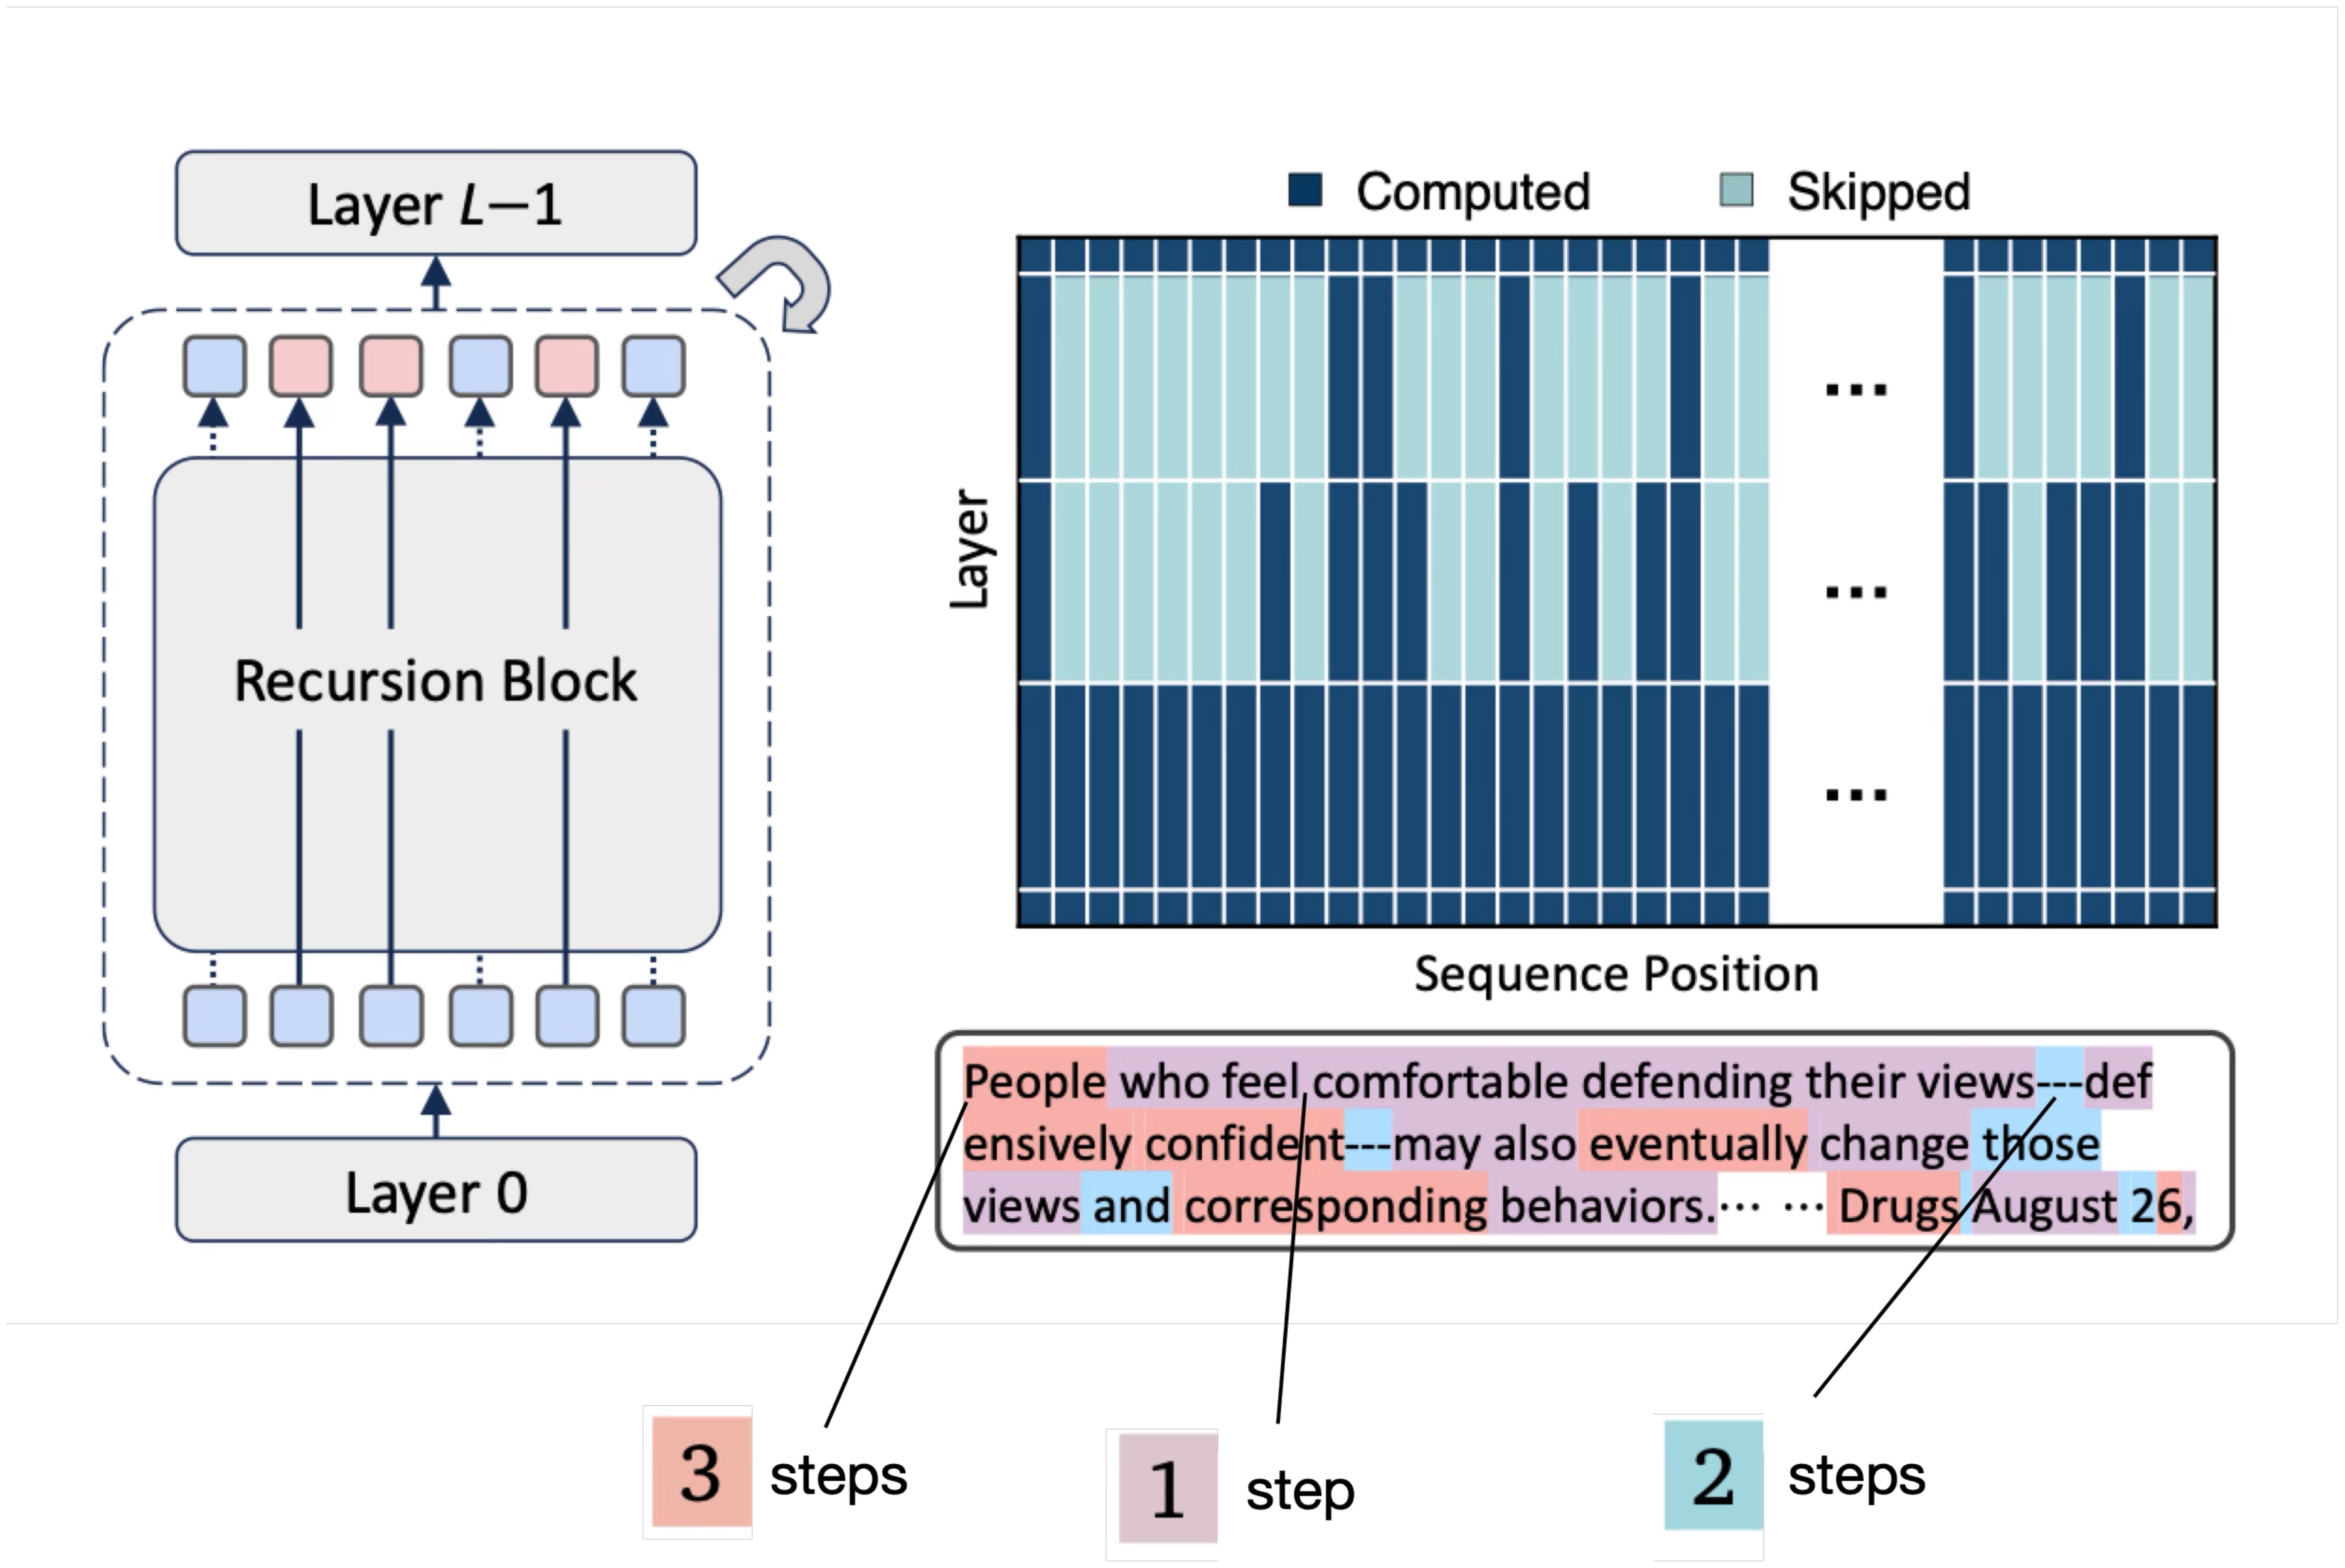
mor
Figure 9. Mixture-of-Recursions applies a shared stack a different number of times at different token positions. The highlighted text shows an example with 1, 2, or 3 passes. Figure adapted from the Mixture-of-Recursions paper.

How does the model decide how many times a token should go through the recursion block? In the previously discussed Universal Transformer, it’s based on a learned halting probability at each step. This Mixture-of-Recursion approach here uses a small, learned router. This is similar to the routing idea in a mixture-of-experts model, except that here the routing decision determines how many times to apply the shared stack.

The router operates on a token’s hidden representation, which also contains information about its context. So, we shouldn’t think of this as assigning every occurrence of a particular token the same number of passes (i.e., the word “People” in the figure above doesn’t always go through a loop of 3). The decision can change depending on where that word appears and what came before it.

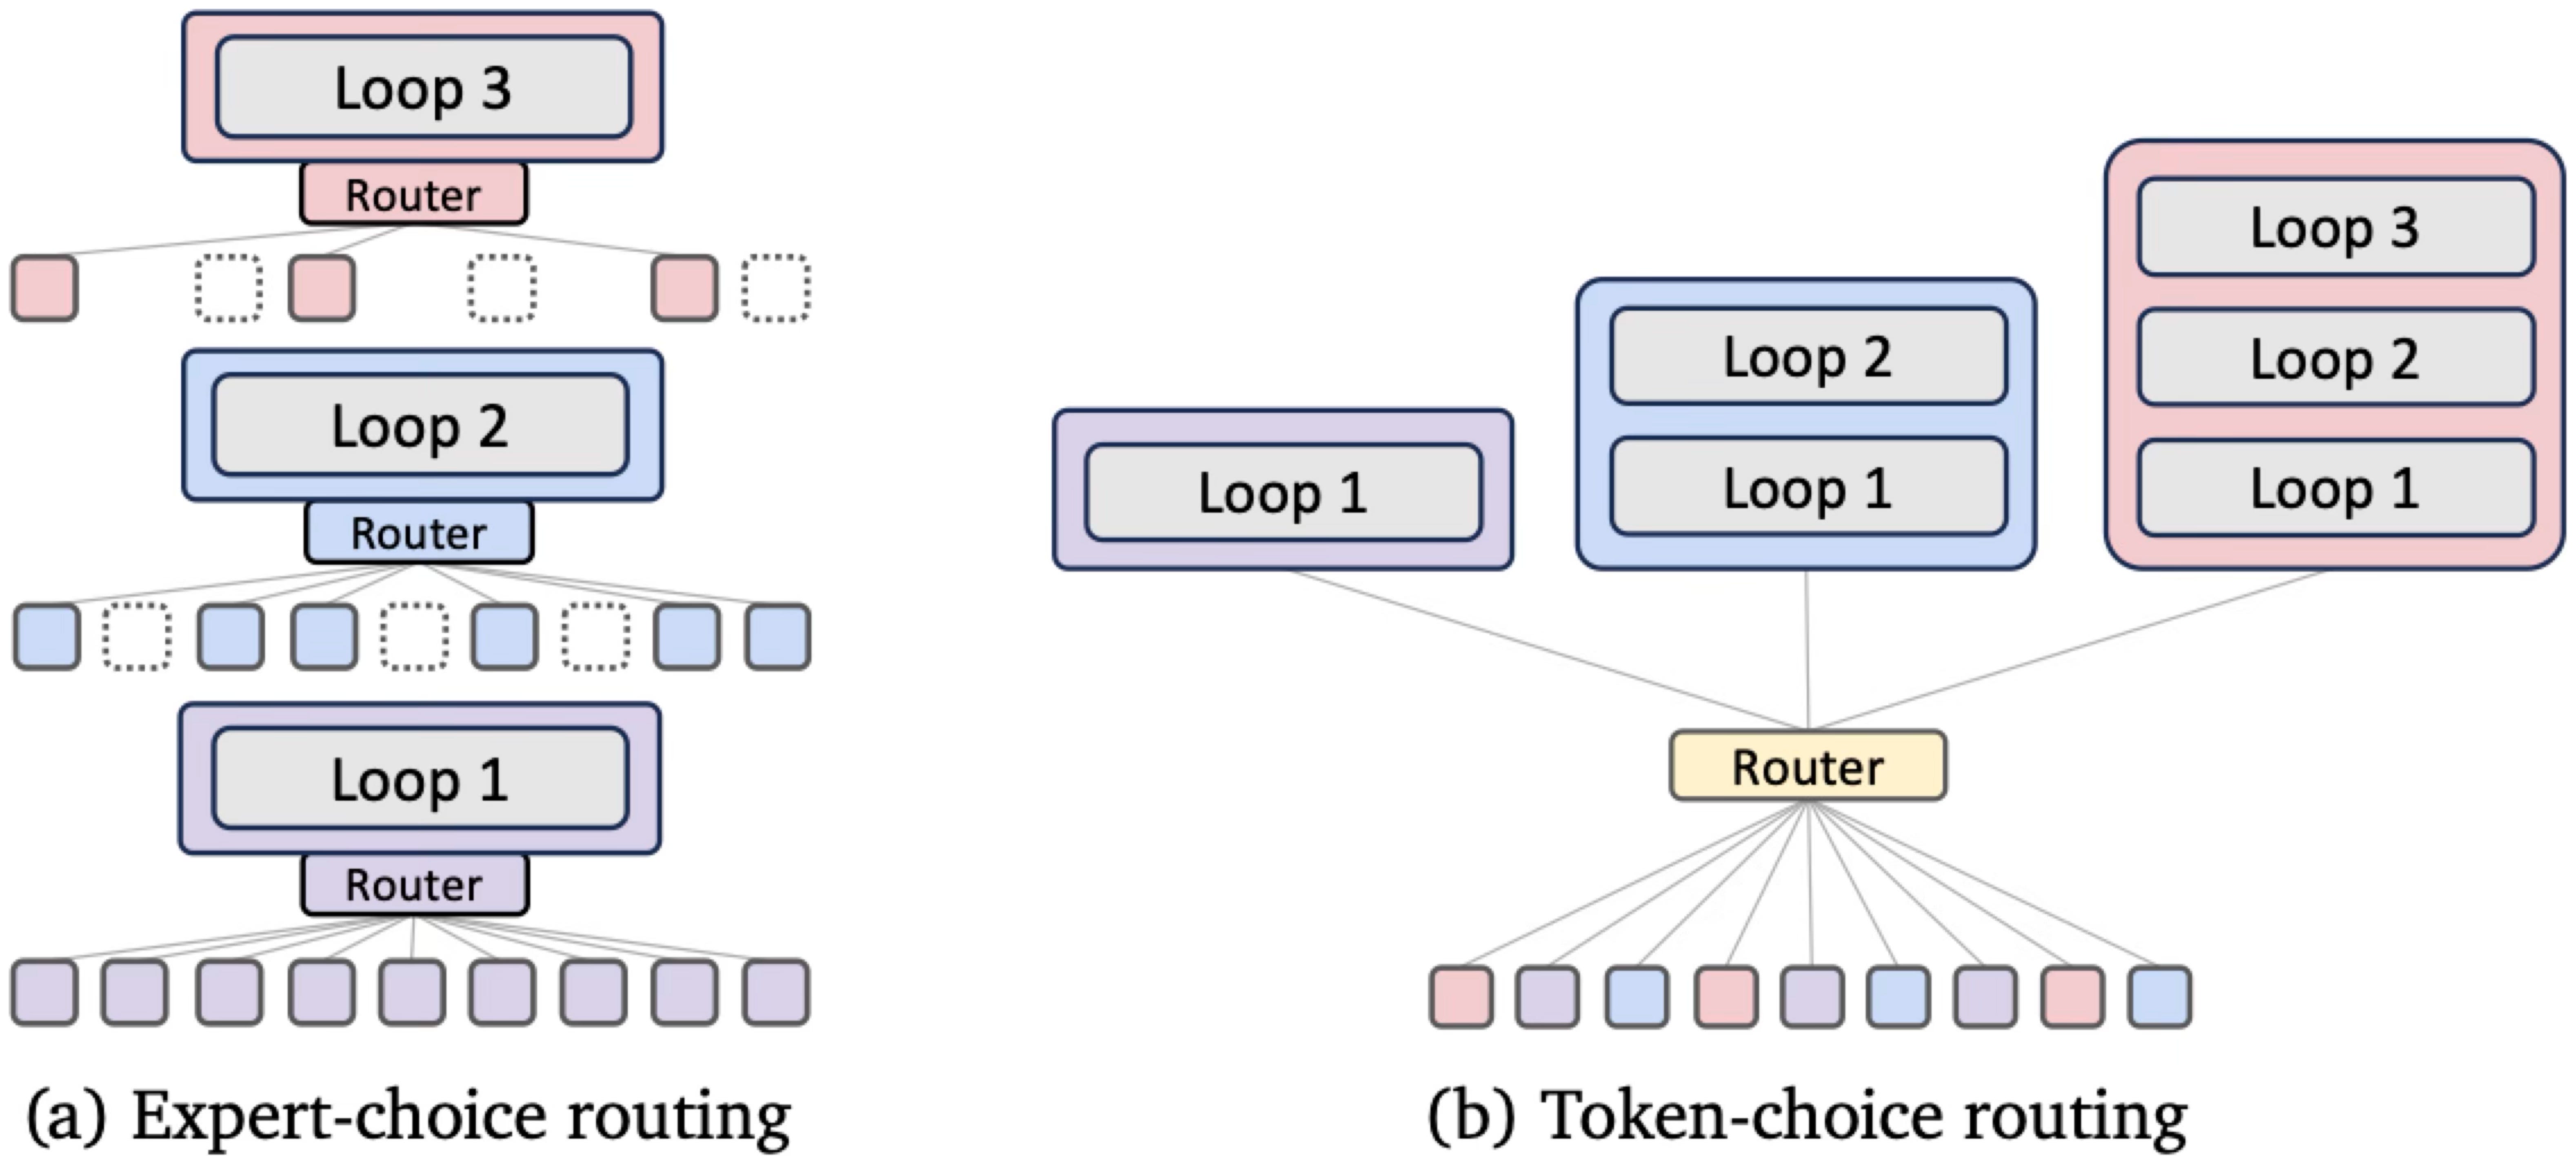
Now, how does the routing work exactly? The paper explores two ways to make this routing decision, as illustrated below.
mor-routing
Figure 10. Two ways to choose the recursion depth. On the left, routers select which tokens continue at each step. On the right, a single router assigns the number of passes at the beginning. Figure from the Mixture-of-Recursions paper.

In expert-choice routing, which is shown in the left subpanel in the figure above, each recursion step selects which tokens it will process. Tokens that exit are excluded from later steps. In token-choice routing, shown on the right, the router makes one decision at the beginning, assigning each token to a path with one, two, or three passes.

In both cases, the transformer weights are reused across passes, similar to Nanbeige, etc. But the additional flexibility comes from choosing how much computation each token receives. The model and its routers are trained together, so the model learns to work with these different paths during training.

2.5 How well does this work?

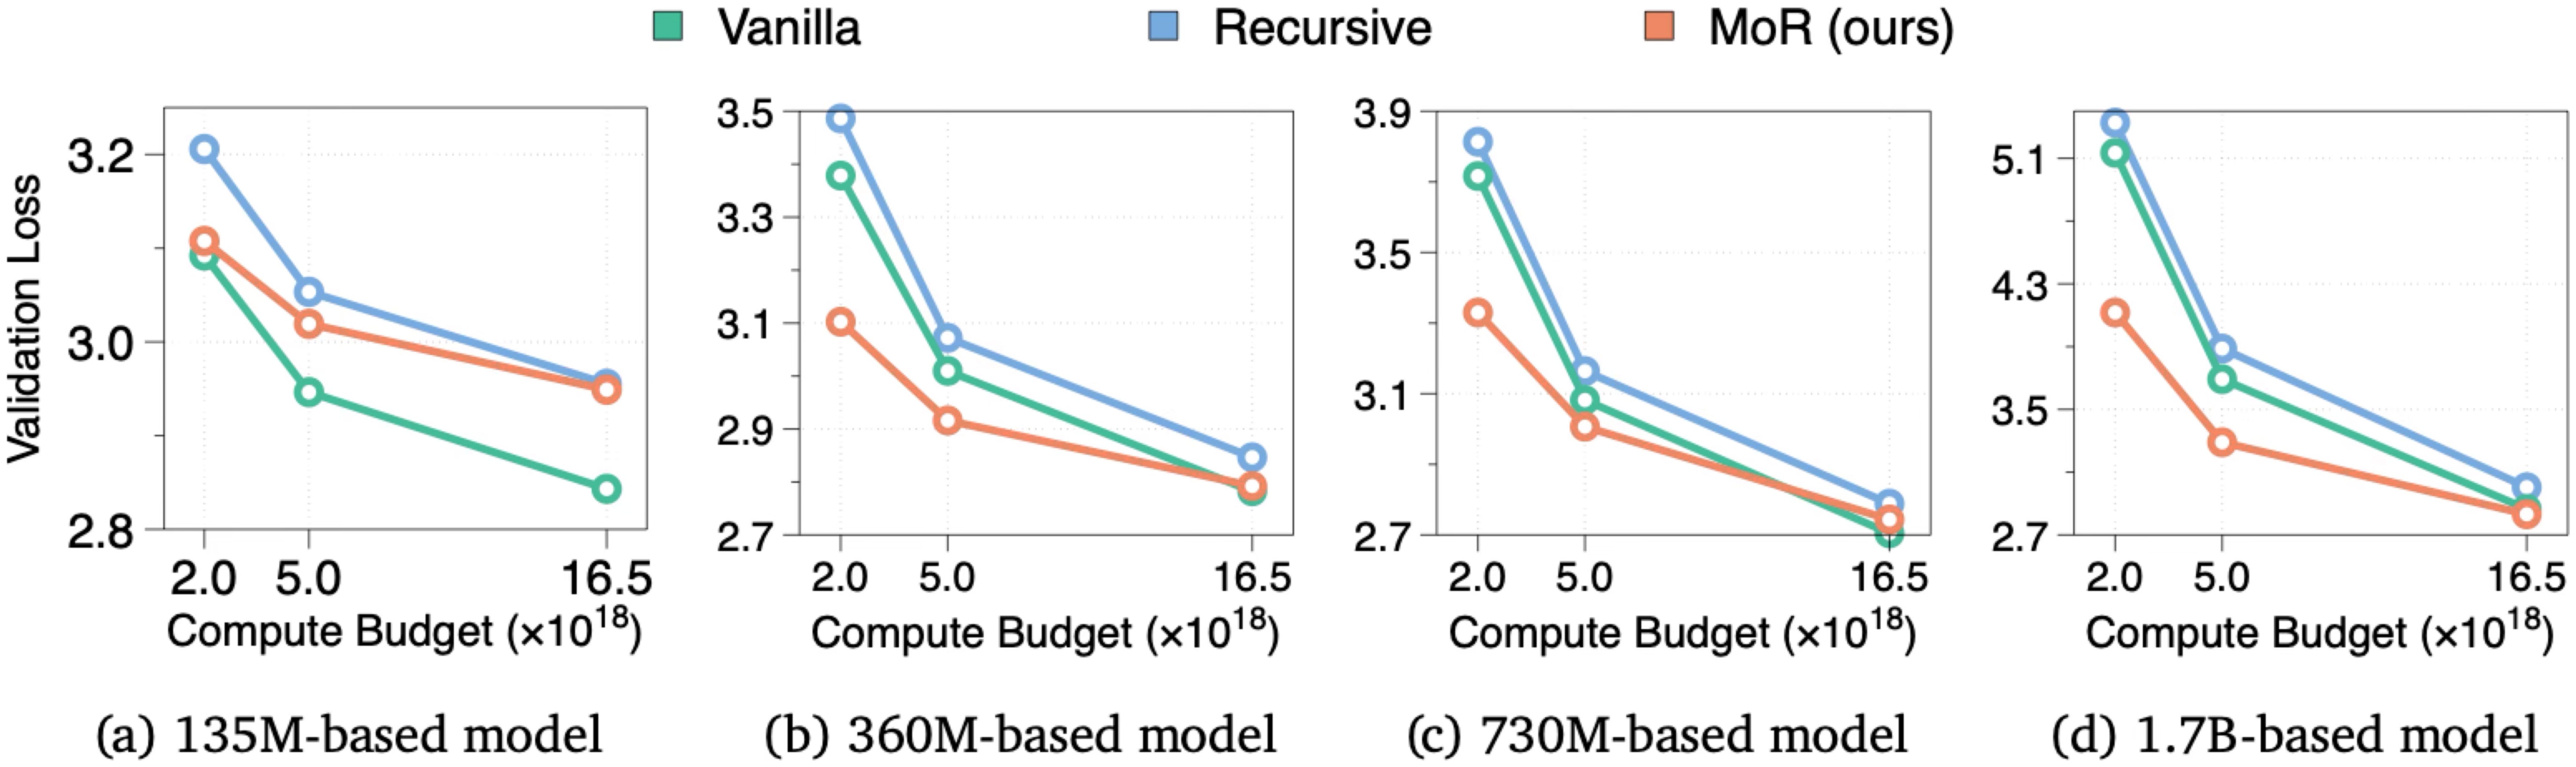
The plot from the Mixture-of-Recursions paper below compares a regular transformer (Vanilla), a transformer with fixed recursion (Recursive), and Mixture-of-Recursions (MoR) for different model sizes and compute budgets (x-axis).
mor-results
Figure 11. Validation loss across four model scales and three training compute budgets. Figure from the Mixture-of-Recursions paper.

At the smallest model scale, the regular transformer performs best. For the larger models, Mixture-of-Recursions catches up and often performs better, especially at the smaller training budgets. At the largest budget, several of the curves are very close. So, the advantage depends on the model size and how much compute we spend on training.

Another detail here is that equal training compute doesn’t necessarily mean an equal number of training tokens. By skipping some computation, Mixture-of-Recursions can process more tokens within the same budget.

I think this is an interesting example because it shows that there are several choices within the looped-transformer idea, that is, how many loops there are at each position and how that’s decided.

So, in short, we can say that using looped transformers can improve model quality at a fixed compute budget if the model is large enough. (It also illustrates the importance of running some experiments at scale; e.g., just looking at the smaller 135M parameter model, we would have drawn the opposite conclusion.)

3. Side note: Recurrent Neural Networks (RNNs)

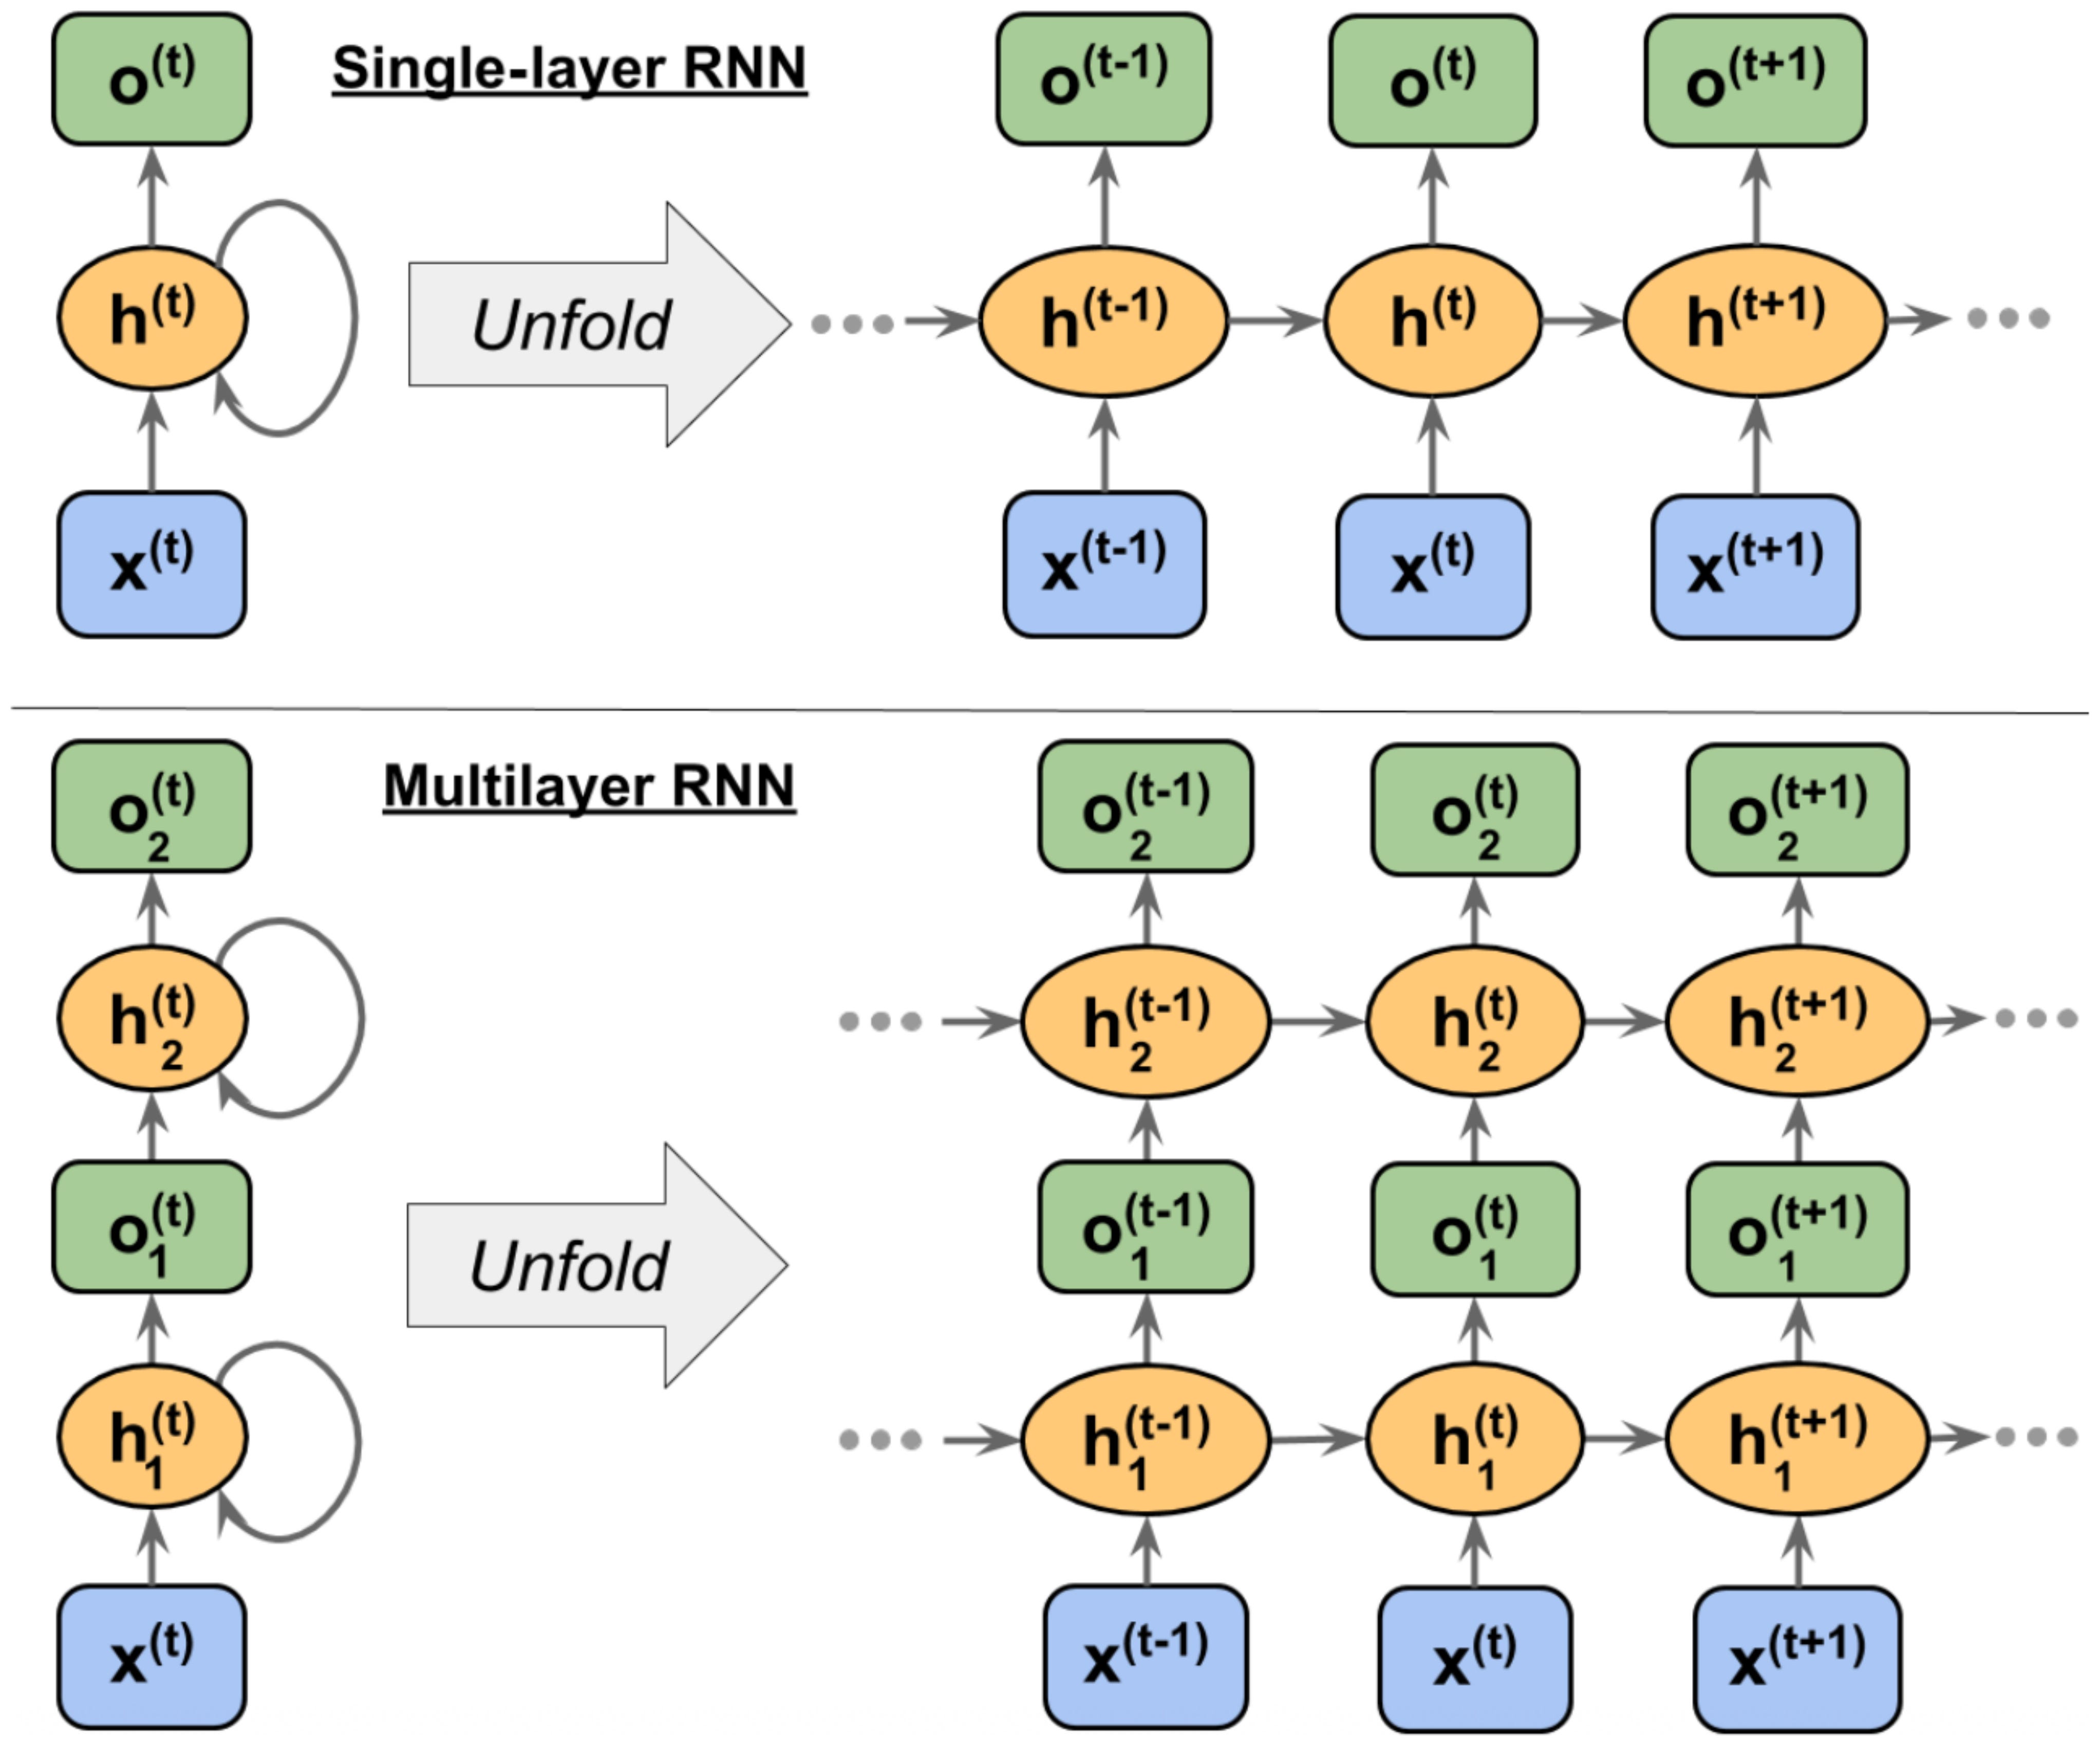
By the way, if you have a background in deep learning (or even artificial neural networks in the 1990s), the looping or “recurrent depth” idea should be somewhat familiar. Remember recurrent neural networks (RNNs)? The whole idea in RNNs is to reuse the layers (weights) from a previous iteration.
rnn
Figure 12: Illustration of an RNN (from my 2022 “Machine Learning with PyTorch and Scikit-Learn book”, https://amzn.to/3YzRnPR)

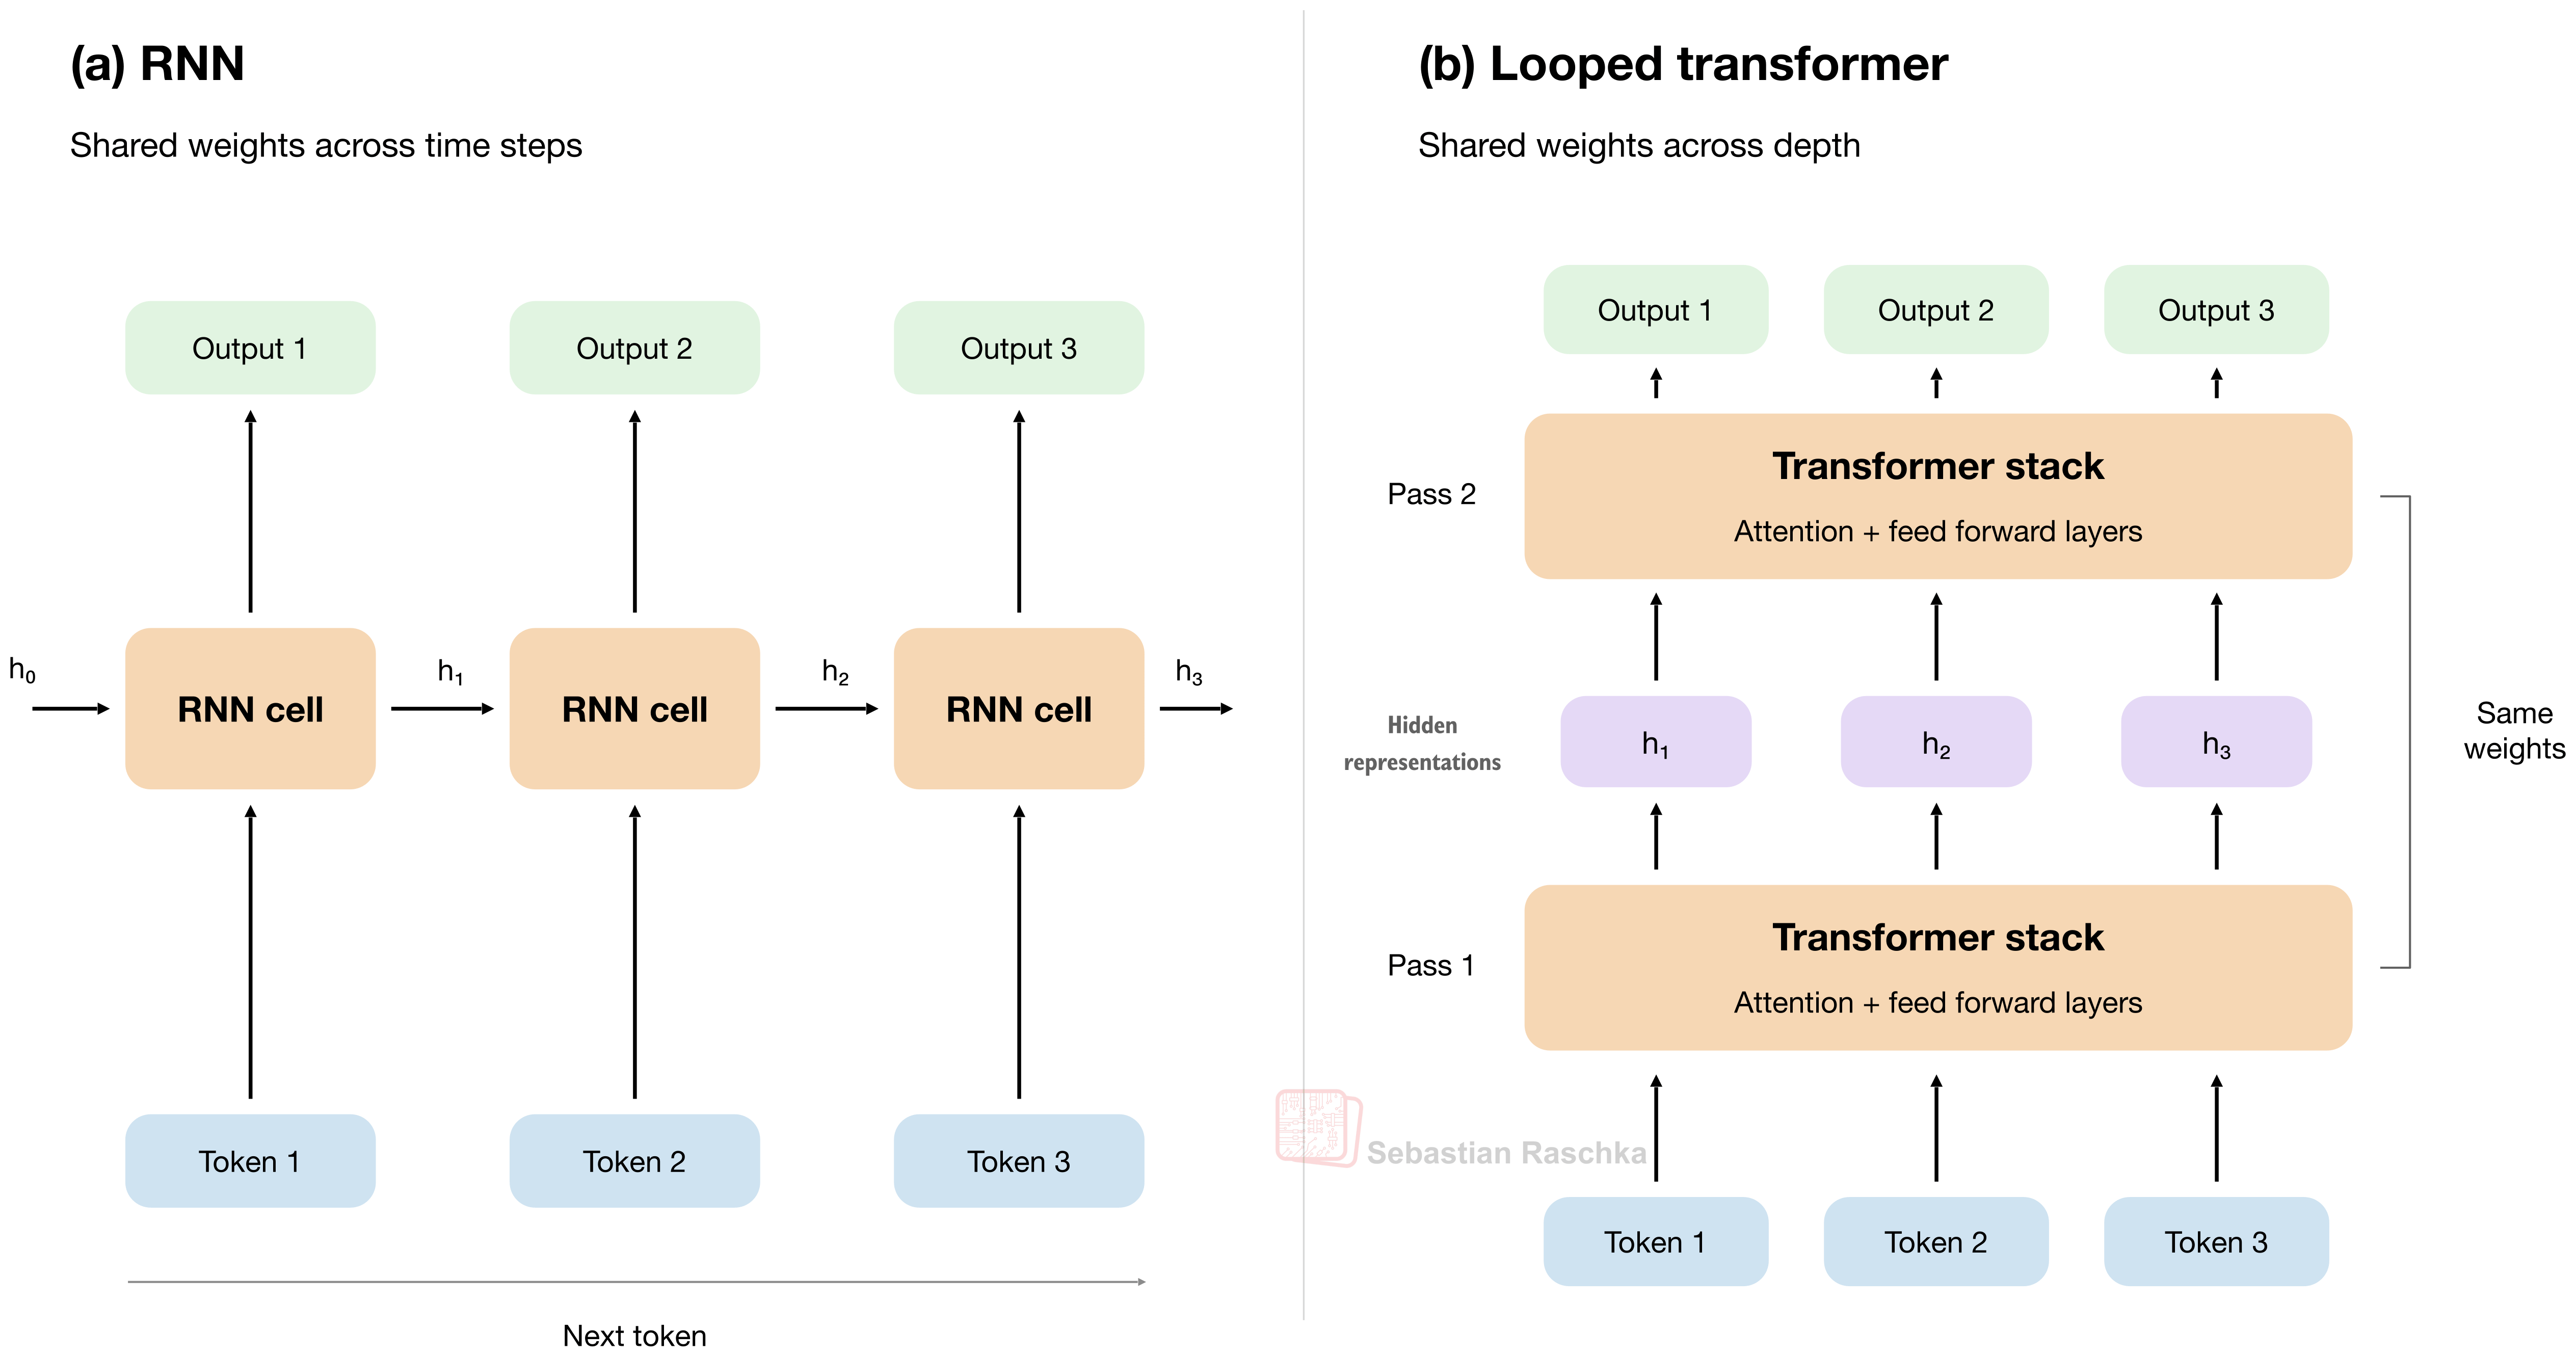
The main distinction is that RNNs reuse their weights across time steps. That is, the hidden state is carried forward from one token to the next. In the looped transformer, the looping of a token is across the architecture depth.

Or, in other words, in a conventional RNN, each step takes the next element in the input sequence and the hidden state from the previous step. So, when the RNN is processing a chunk of text, it reads one word or token at a time and carries information from the earlier words forward in its hidden state.

In a looped transformer, the intermediate representation of a given token goes through the transformer stack multiple times. The model still uses attention to pass information between tokens.

If this analogy is a bit too confusing, don’t worry about it too much. A perhaps simpler way to think about looped transformers is to think of them as reusing transformer blocks, similar to making the model bigger but with weight sharing.
rnn-vs-looped-transformer
Figure 13: Side-by-side comparison of the “recurrence” in an RNN and a looped transformer.

4. Does Astra even use looped transformers?

Before we discuss whether the looped transformer mechanism obscured reasoning traces, as rumored in The Information quote from earlier, does GPT-6 Astra even use the looped transformer concepts?
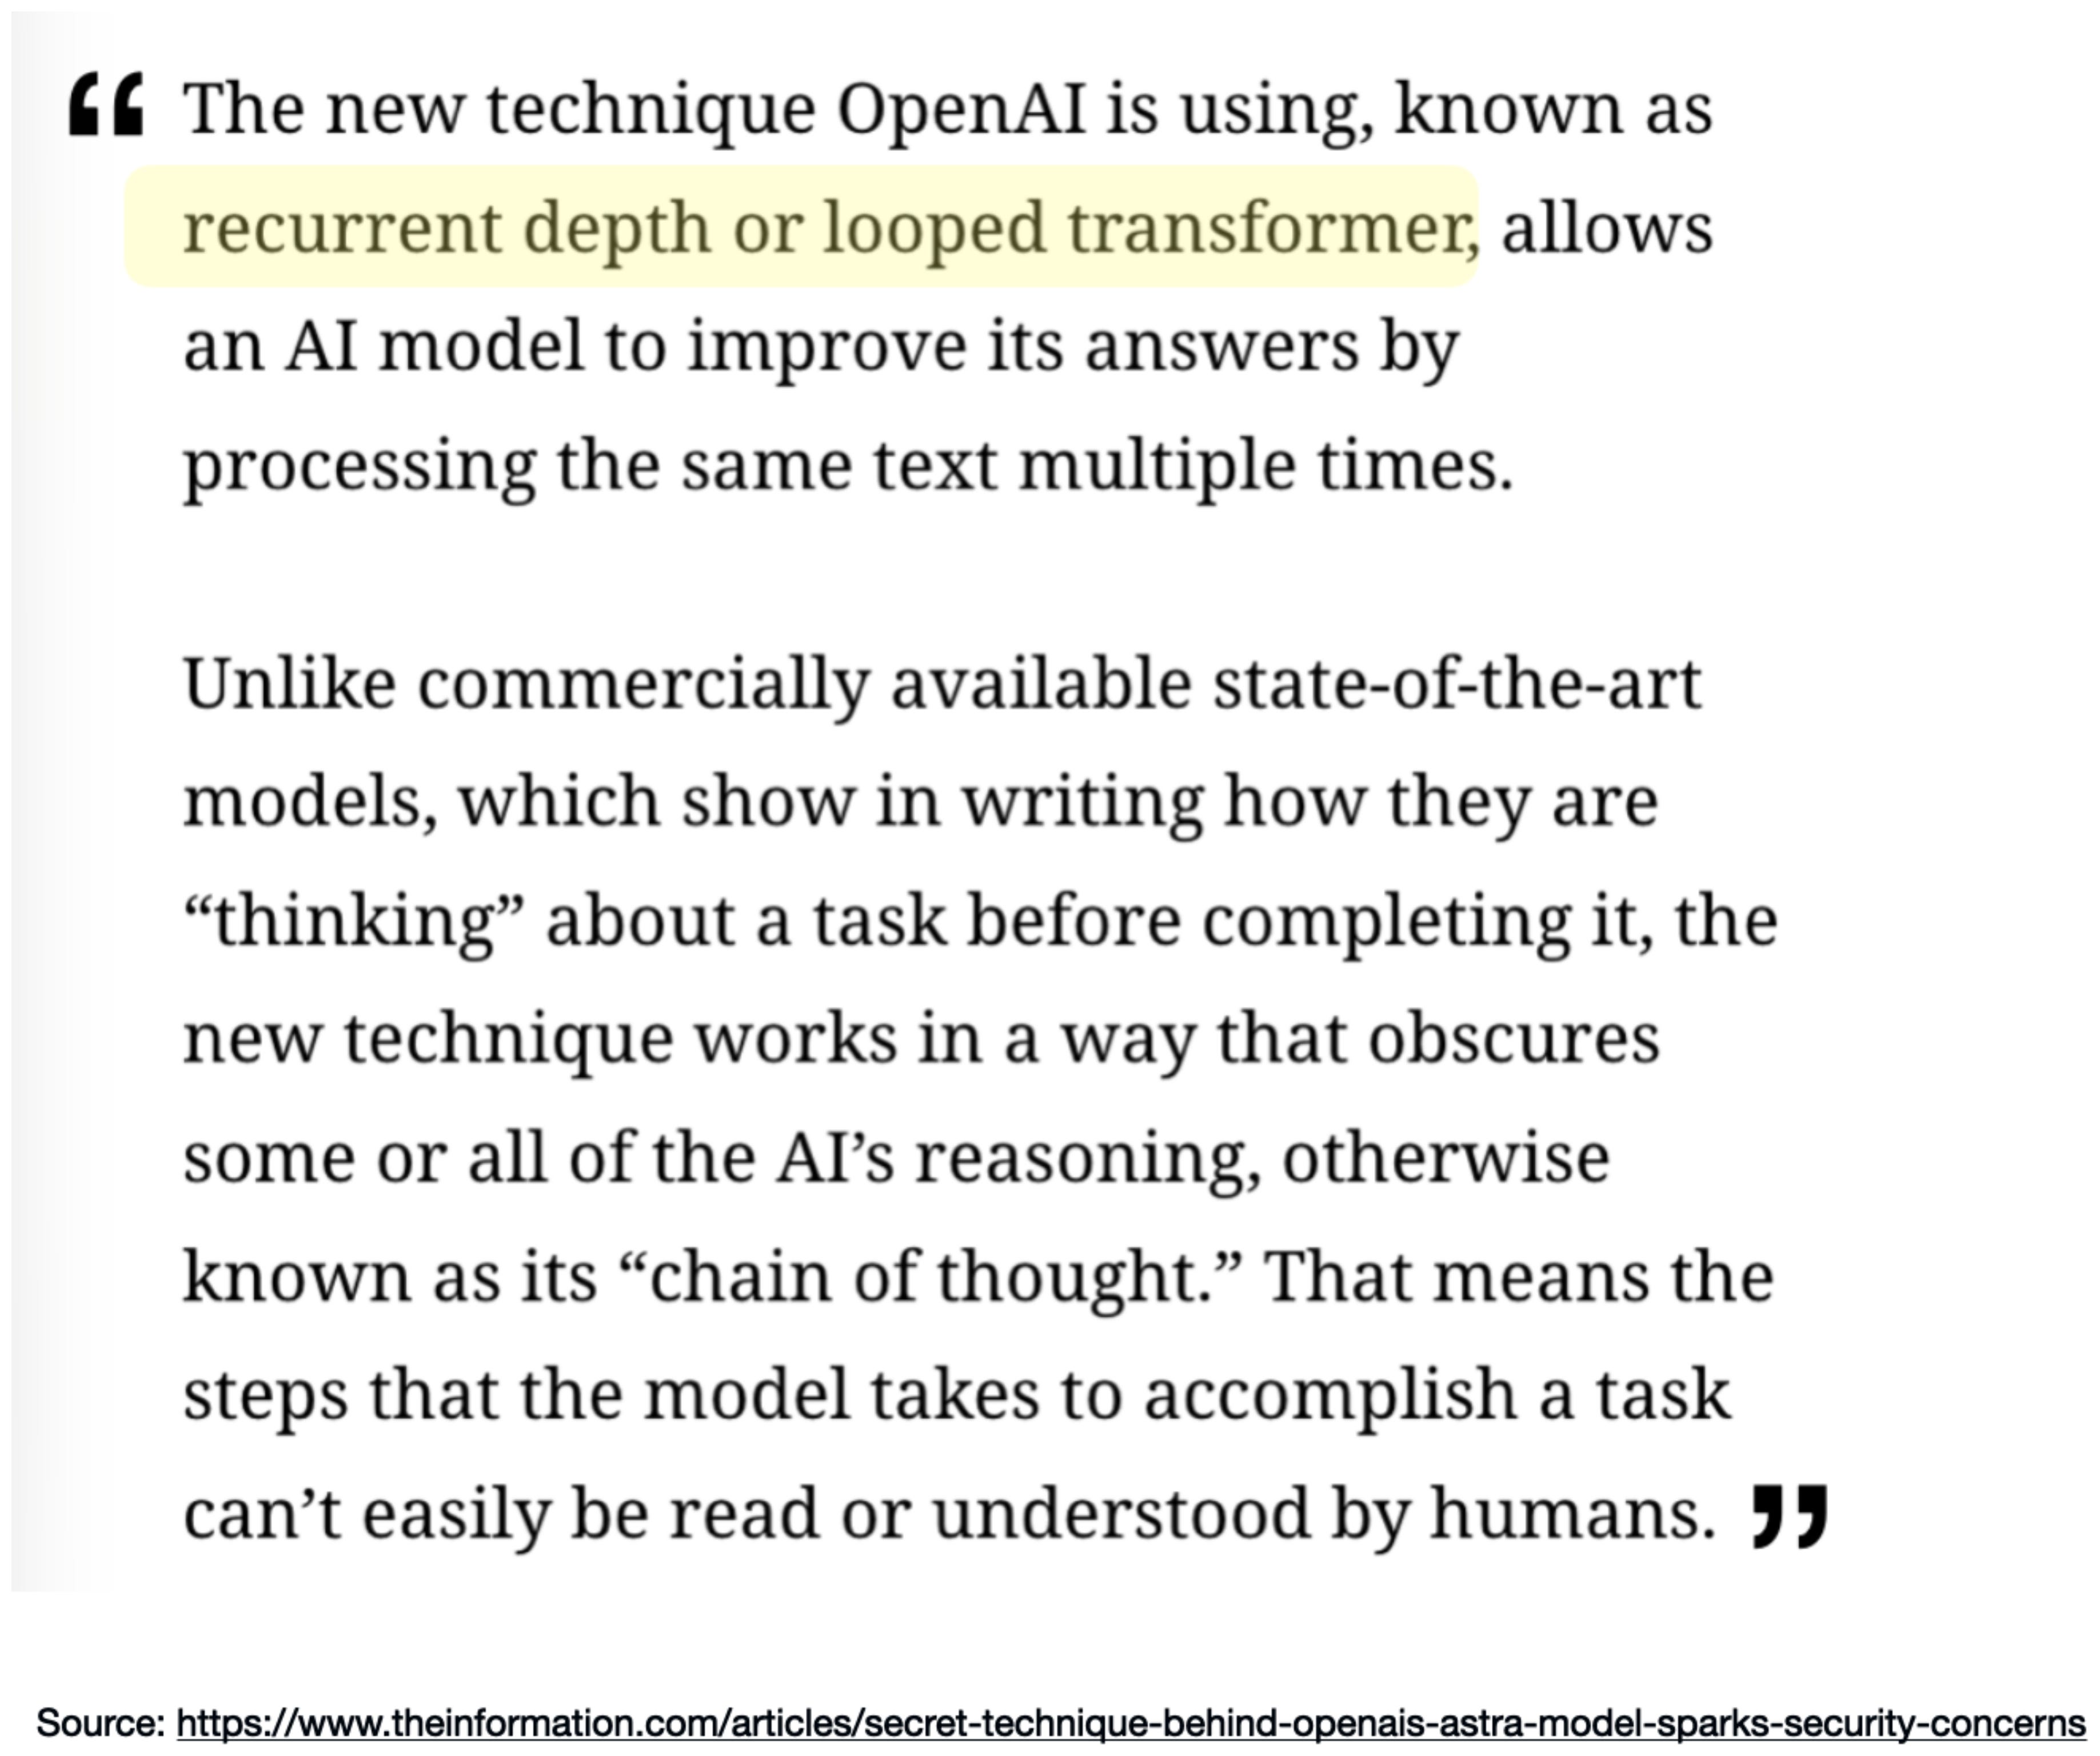
We have to keep in mind that this is still just a rumor or scoop, with no official confirmation. If the model were open-weight, we could double-check this ourselves, of course, but in this case we have to rely on unverified reporting.

However, I think it’s highly likely that GPT-6 Astra uses looped transformer aspects. First, there is the reporting mentioned above. Second, it’s a technique that has shown promise in past studies (as discussed earlier), so why not? Third, OpenAI’s chief scientist said the following.

[...] The depth of the computation graph for our present frontier models, including Astra, is within a factor of two of GPT-4. [...]

However, this doesn’t confirm the looped transformer architecture explicitly, and it could also just mean they use twice as many regular transformer blocks.

In my opinion, the success (i.e., good modeling performance) behind Astra is likely primarily due to other reasons, namely improved training recipes and training data.

The looped transformer tweak might help a bit, but I think that The Information is overestimating its contribution.

5. Hiding chains of thought

Next, let’s finally address the elephant in the room: does looped transformer obscure the reasoning traces?

First, OpenAI has been hiding (most of) the reasoning traces from users from the very beginning, since OpenAI o1, anyway. So, for the end-user, there shouldn’t be a big difference.

So, the interpretation-concern is mostly with respect to the model developers.

Either way, I don’t think that looped transformers are significant contributors towards hiding or obscuring chains of thought. To explain my own reasoning (no pun intended), let’s take a step back and explain how reasoning models work.

5.1 Reasoning in brief

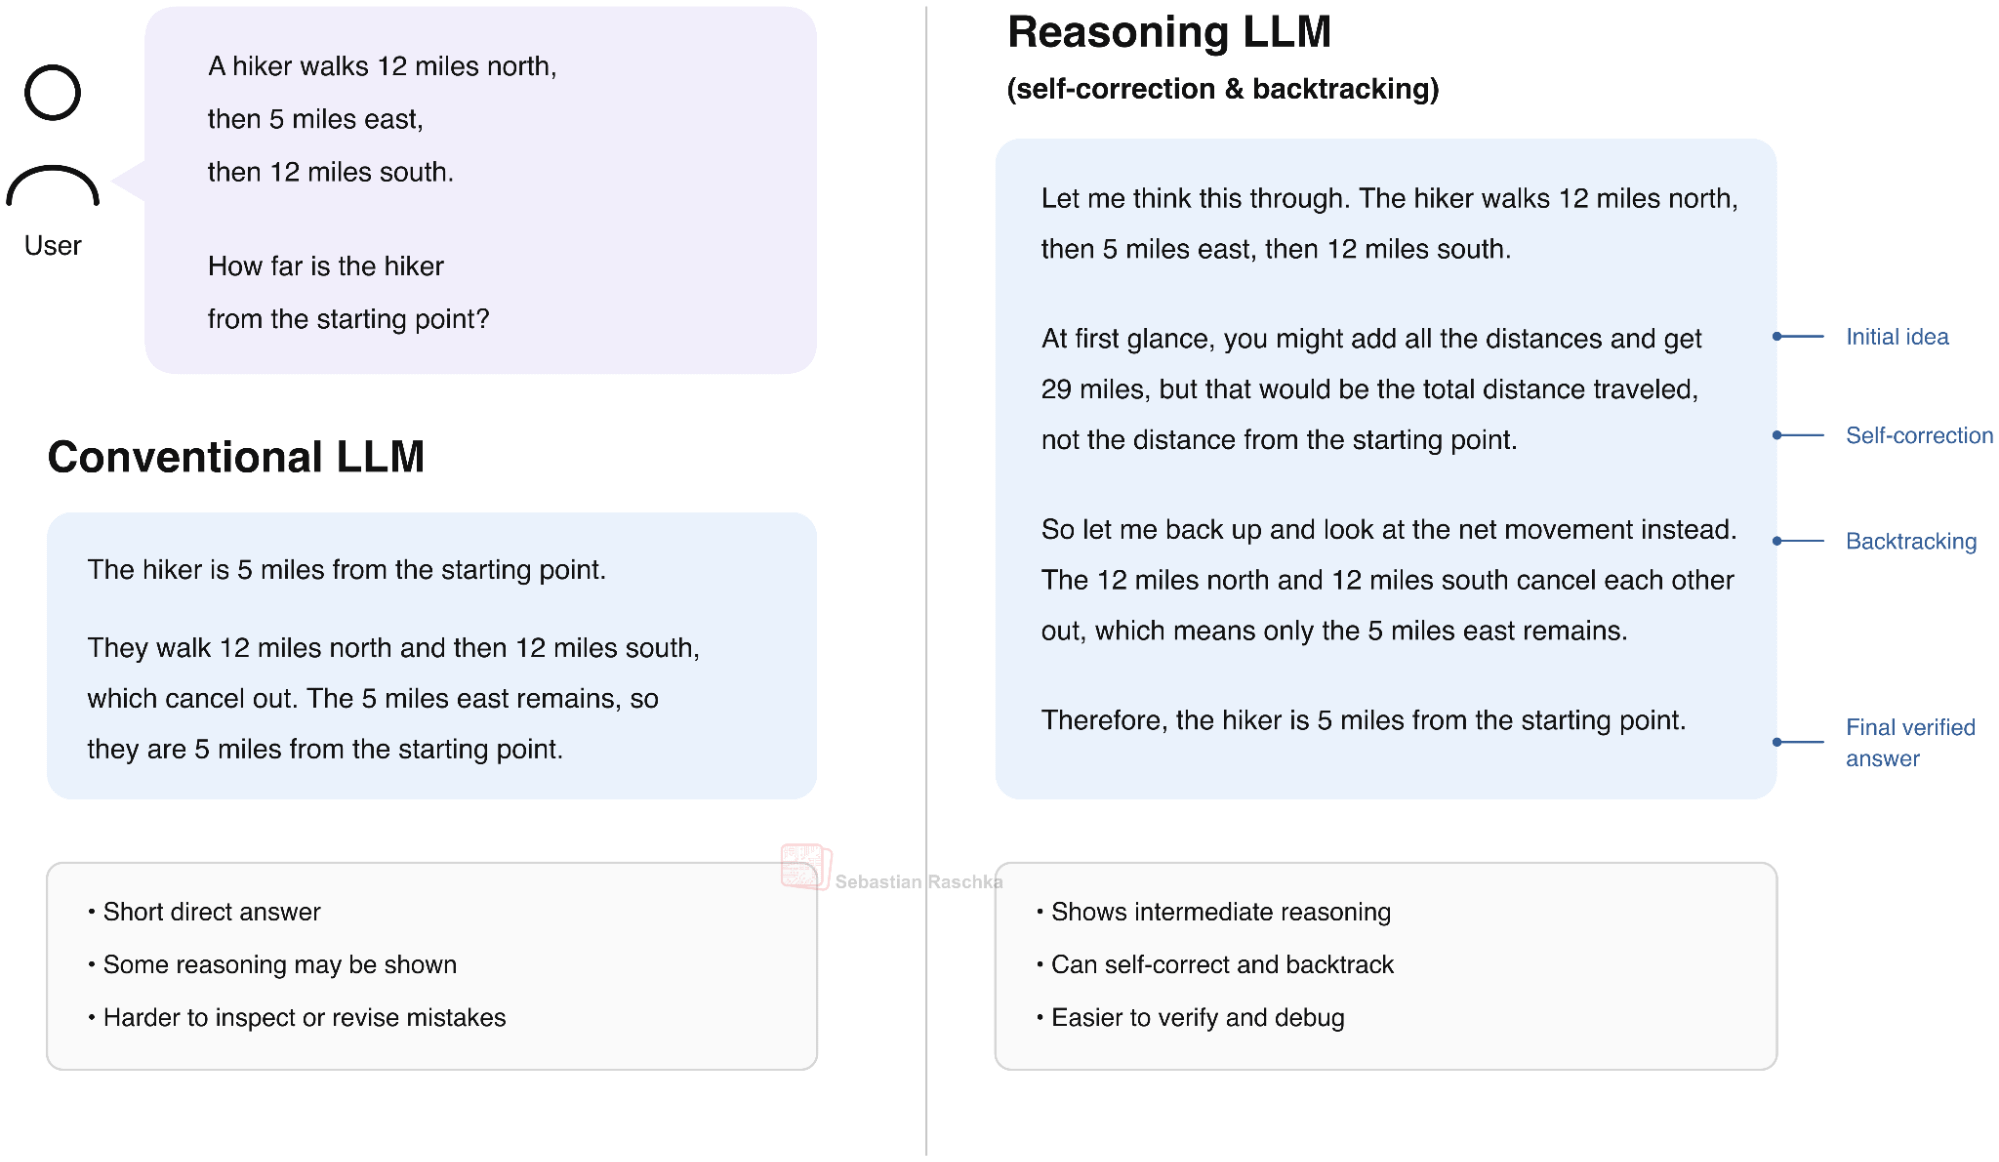
Reasoning models typically generate intermediate steps before producing a final answer. These steps use regular text token (that are optionally hidden from the user in some user interfaces) and called a reasoning trace or chain of thought.

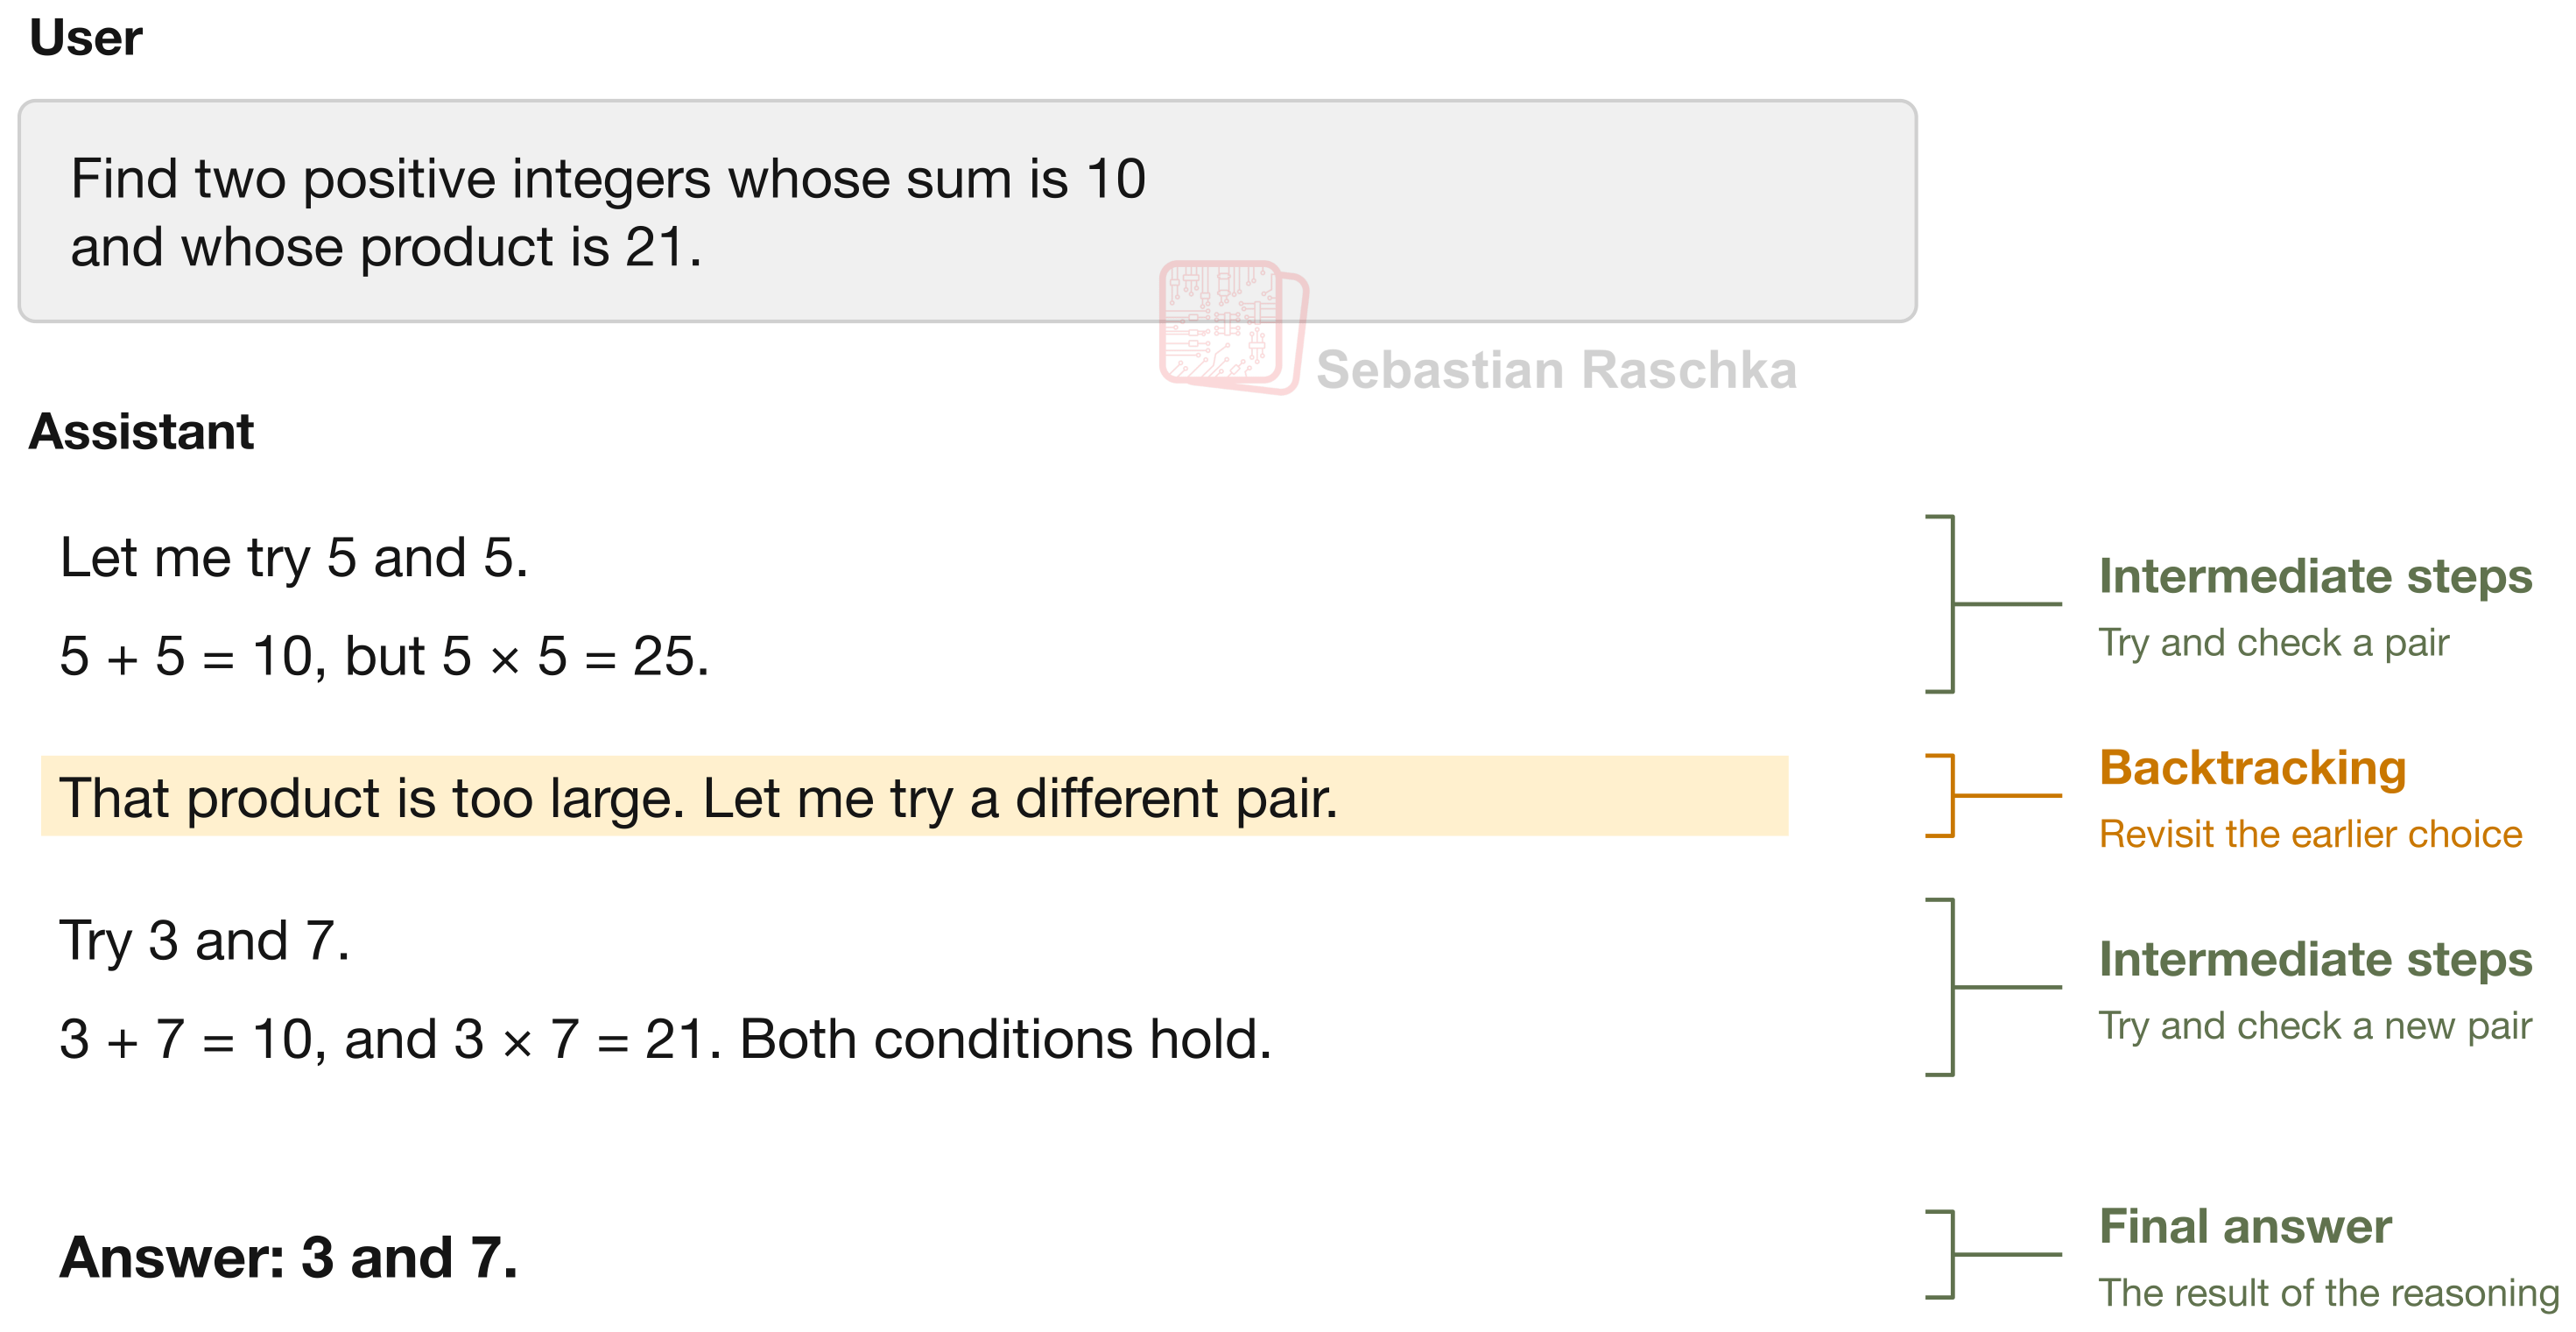
For example, say we ask for two numbers whose sum is 10 and whose product is 21. In the figure below, the model tries 5 and 5 at first. While the sum is correct, the product is 25, not 21. Next, it then tries 3 and 7 and checks both conditions again.
backtracking
Figure 15. An illustrative LLM response annotated to show intermediate steps, backtracking, and the final answer.

The figure illustrates how a reasoning model “reasons,” including backtracking. That is, the model notices a mistake, then revisits an earlier choice, and then continues with a different approach.

Note that the model still generates one token at a time, using the prompt and previous tokens as context. So, these intermediate steps work as a scratch pad and add computation before the final answer.

The final answer can then be much shorter than the reasoning trace that preceded it, as shown in the example above. (OpenAI tends to hide most of the reasoning traces from the users.)

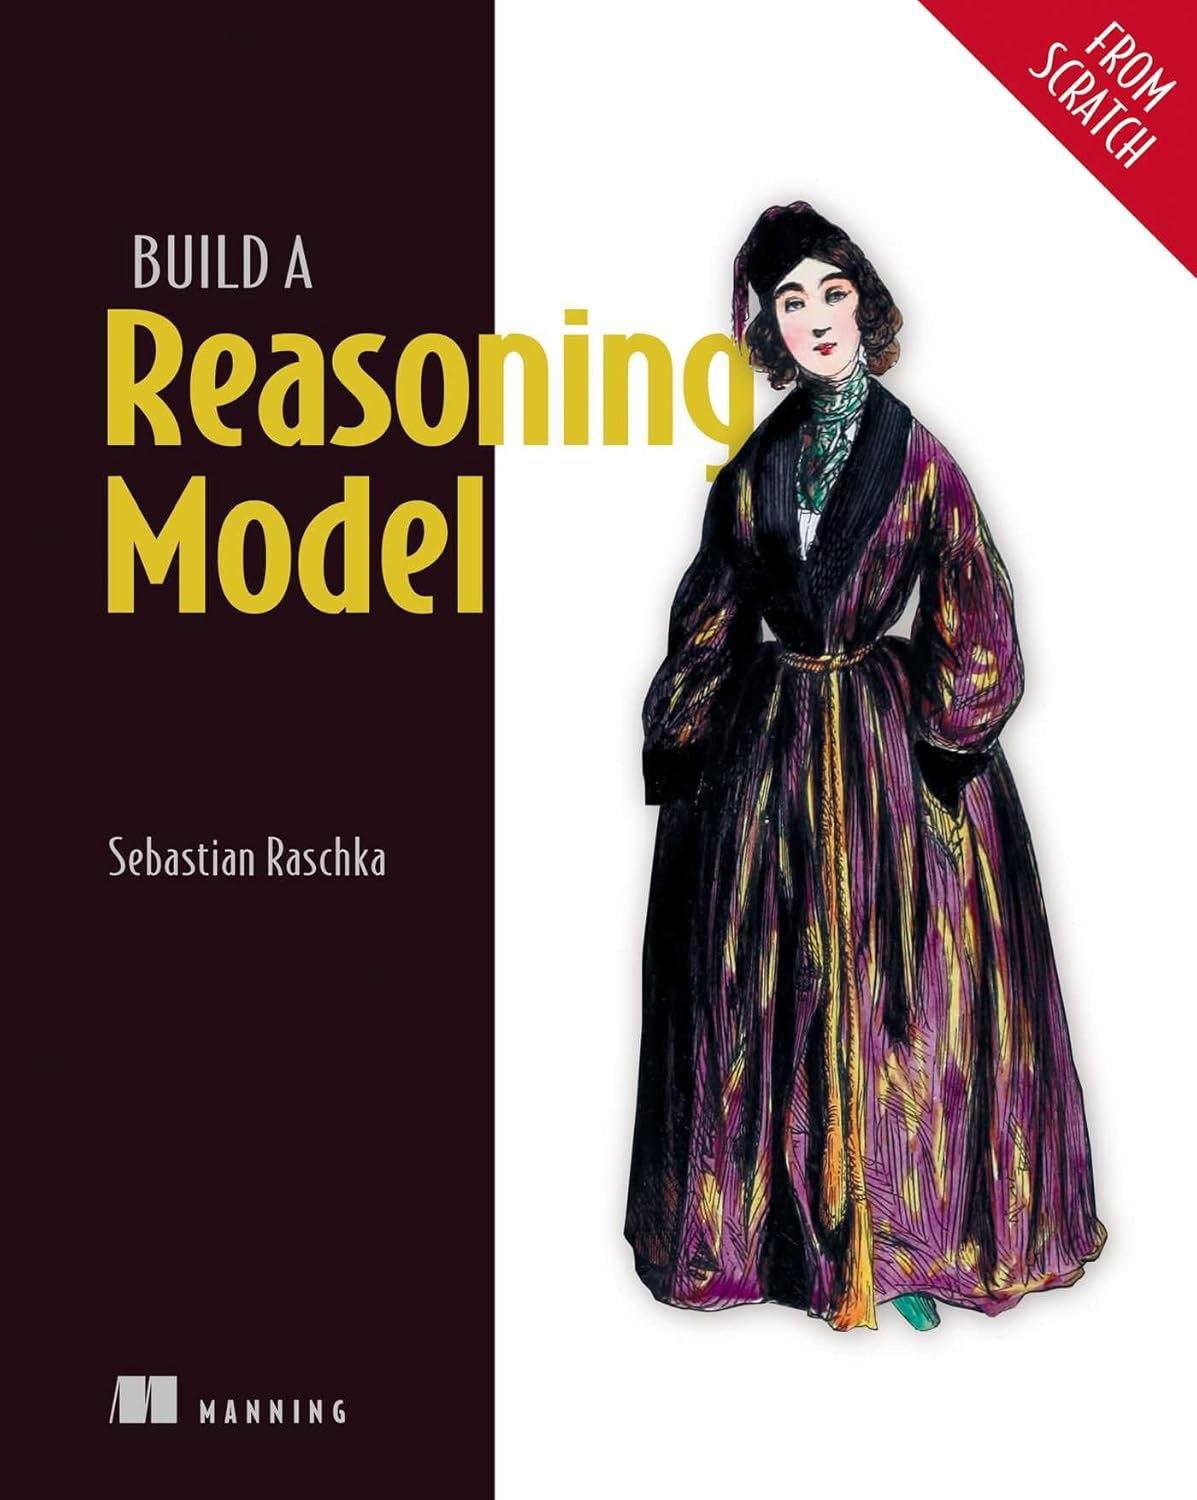
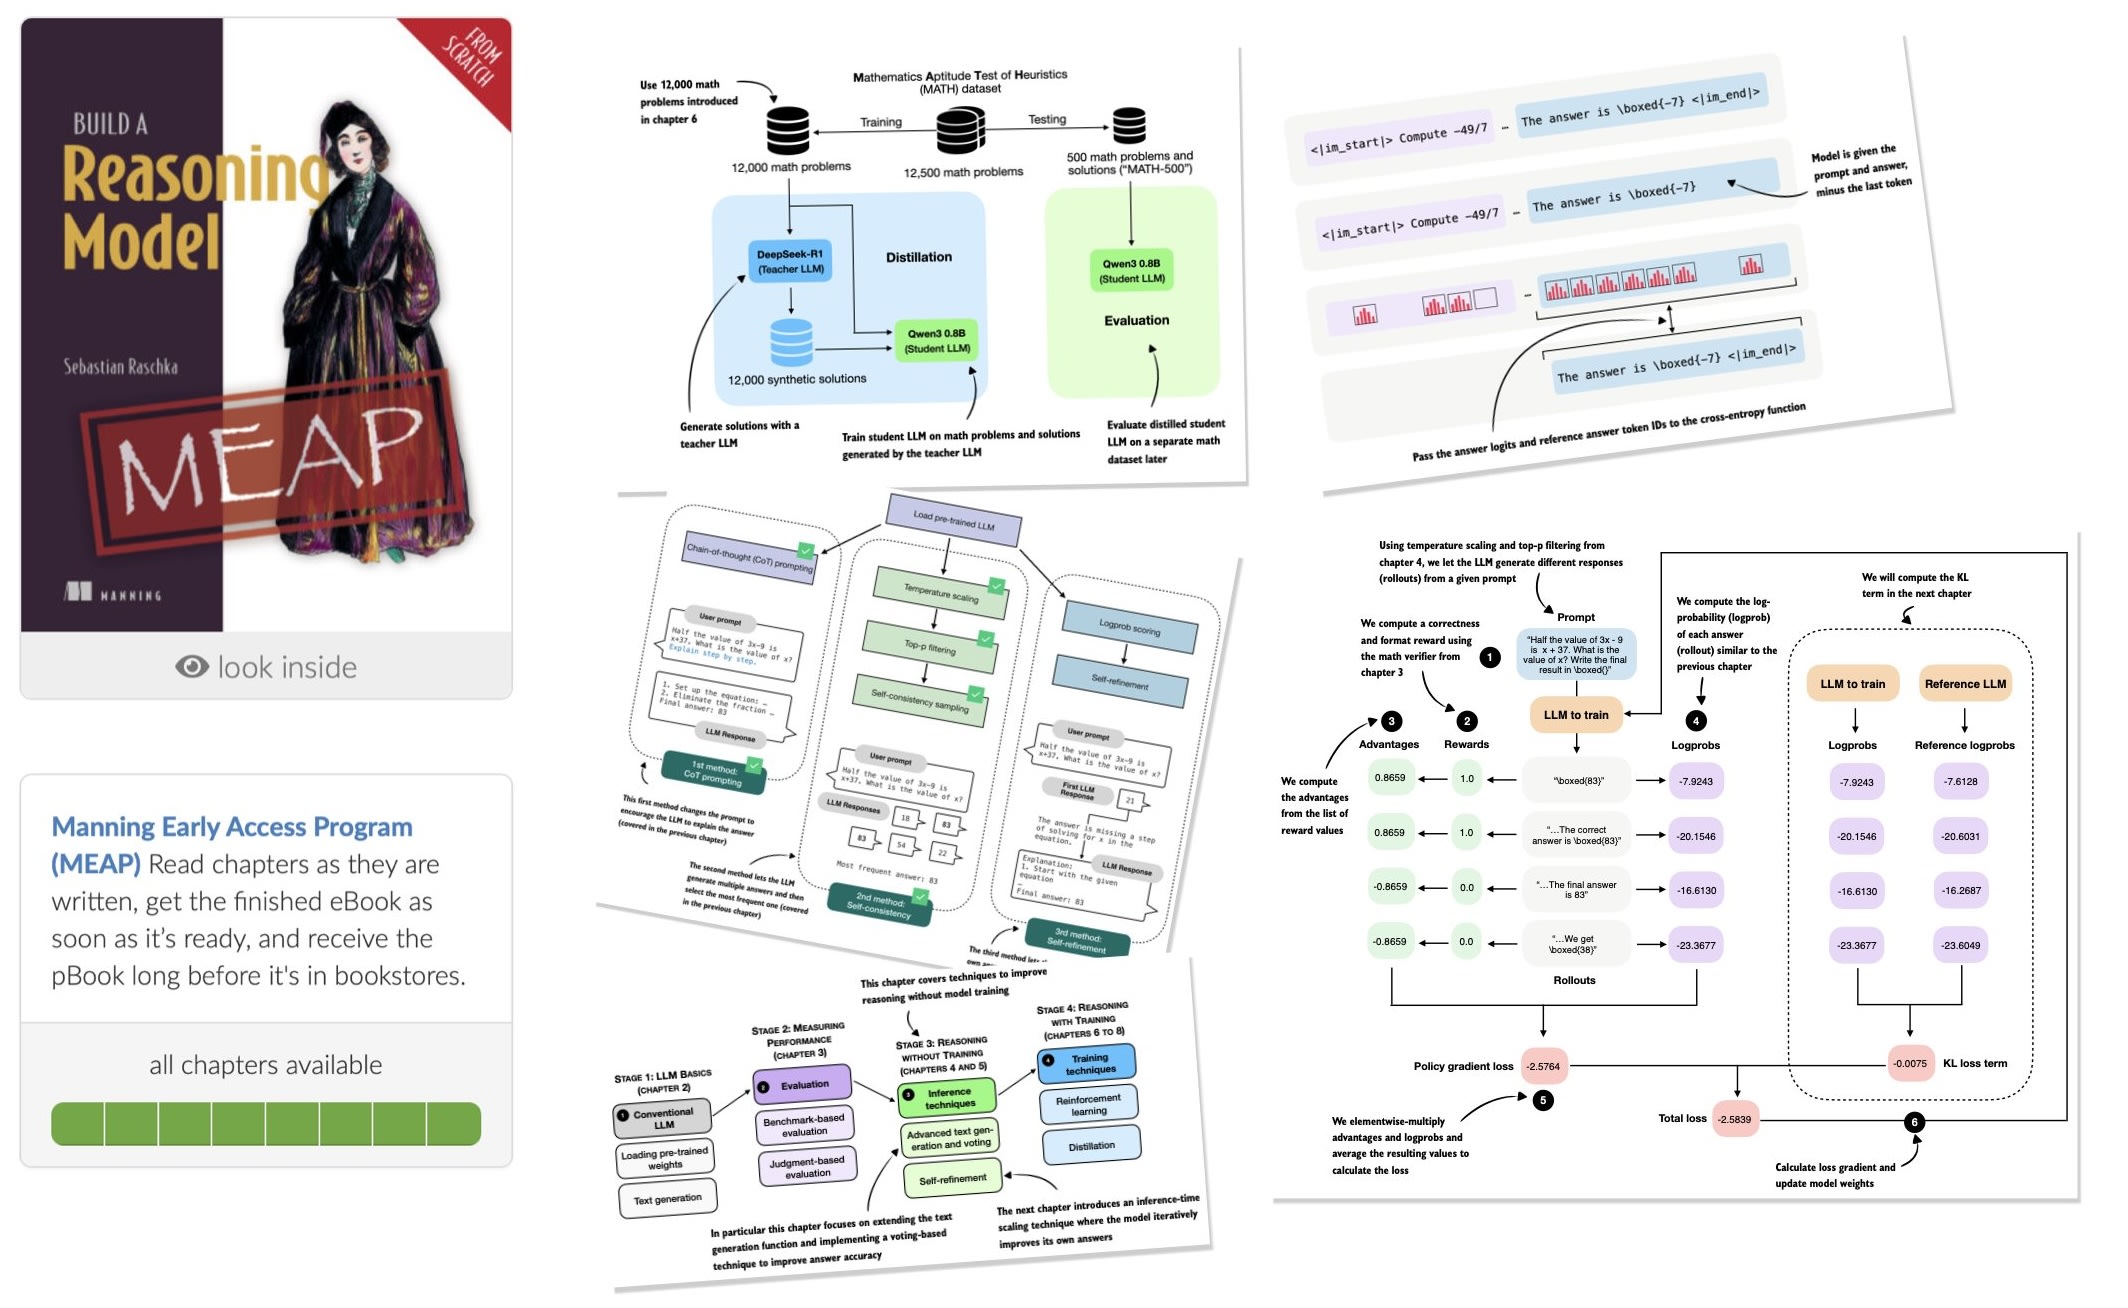
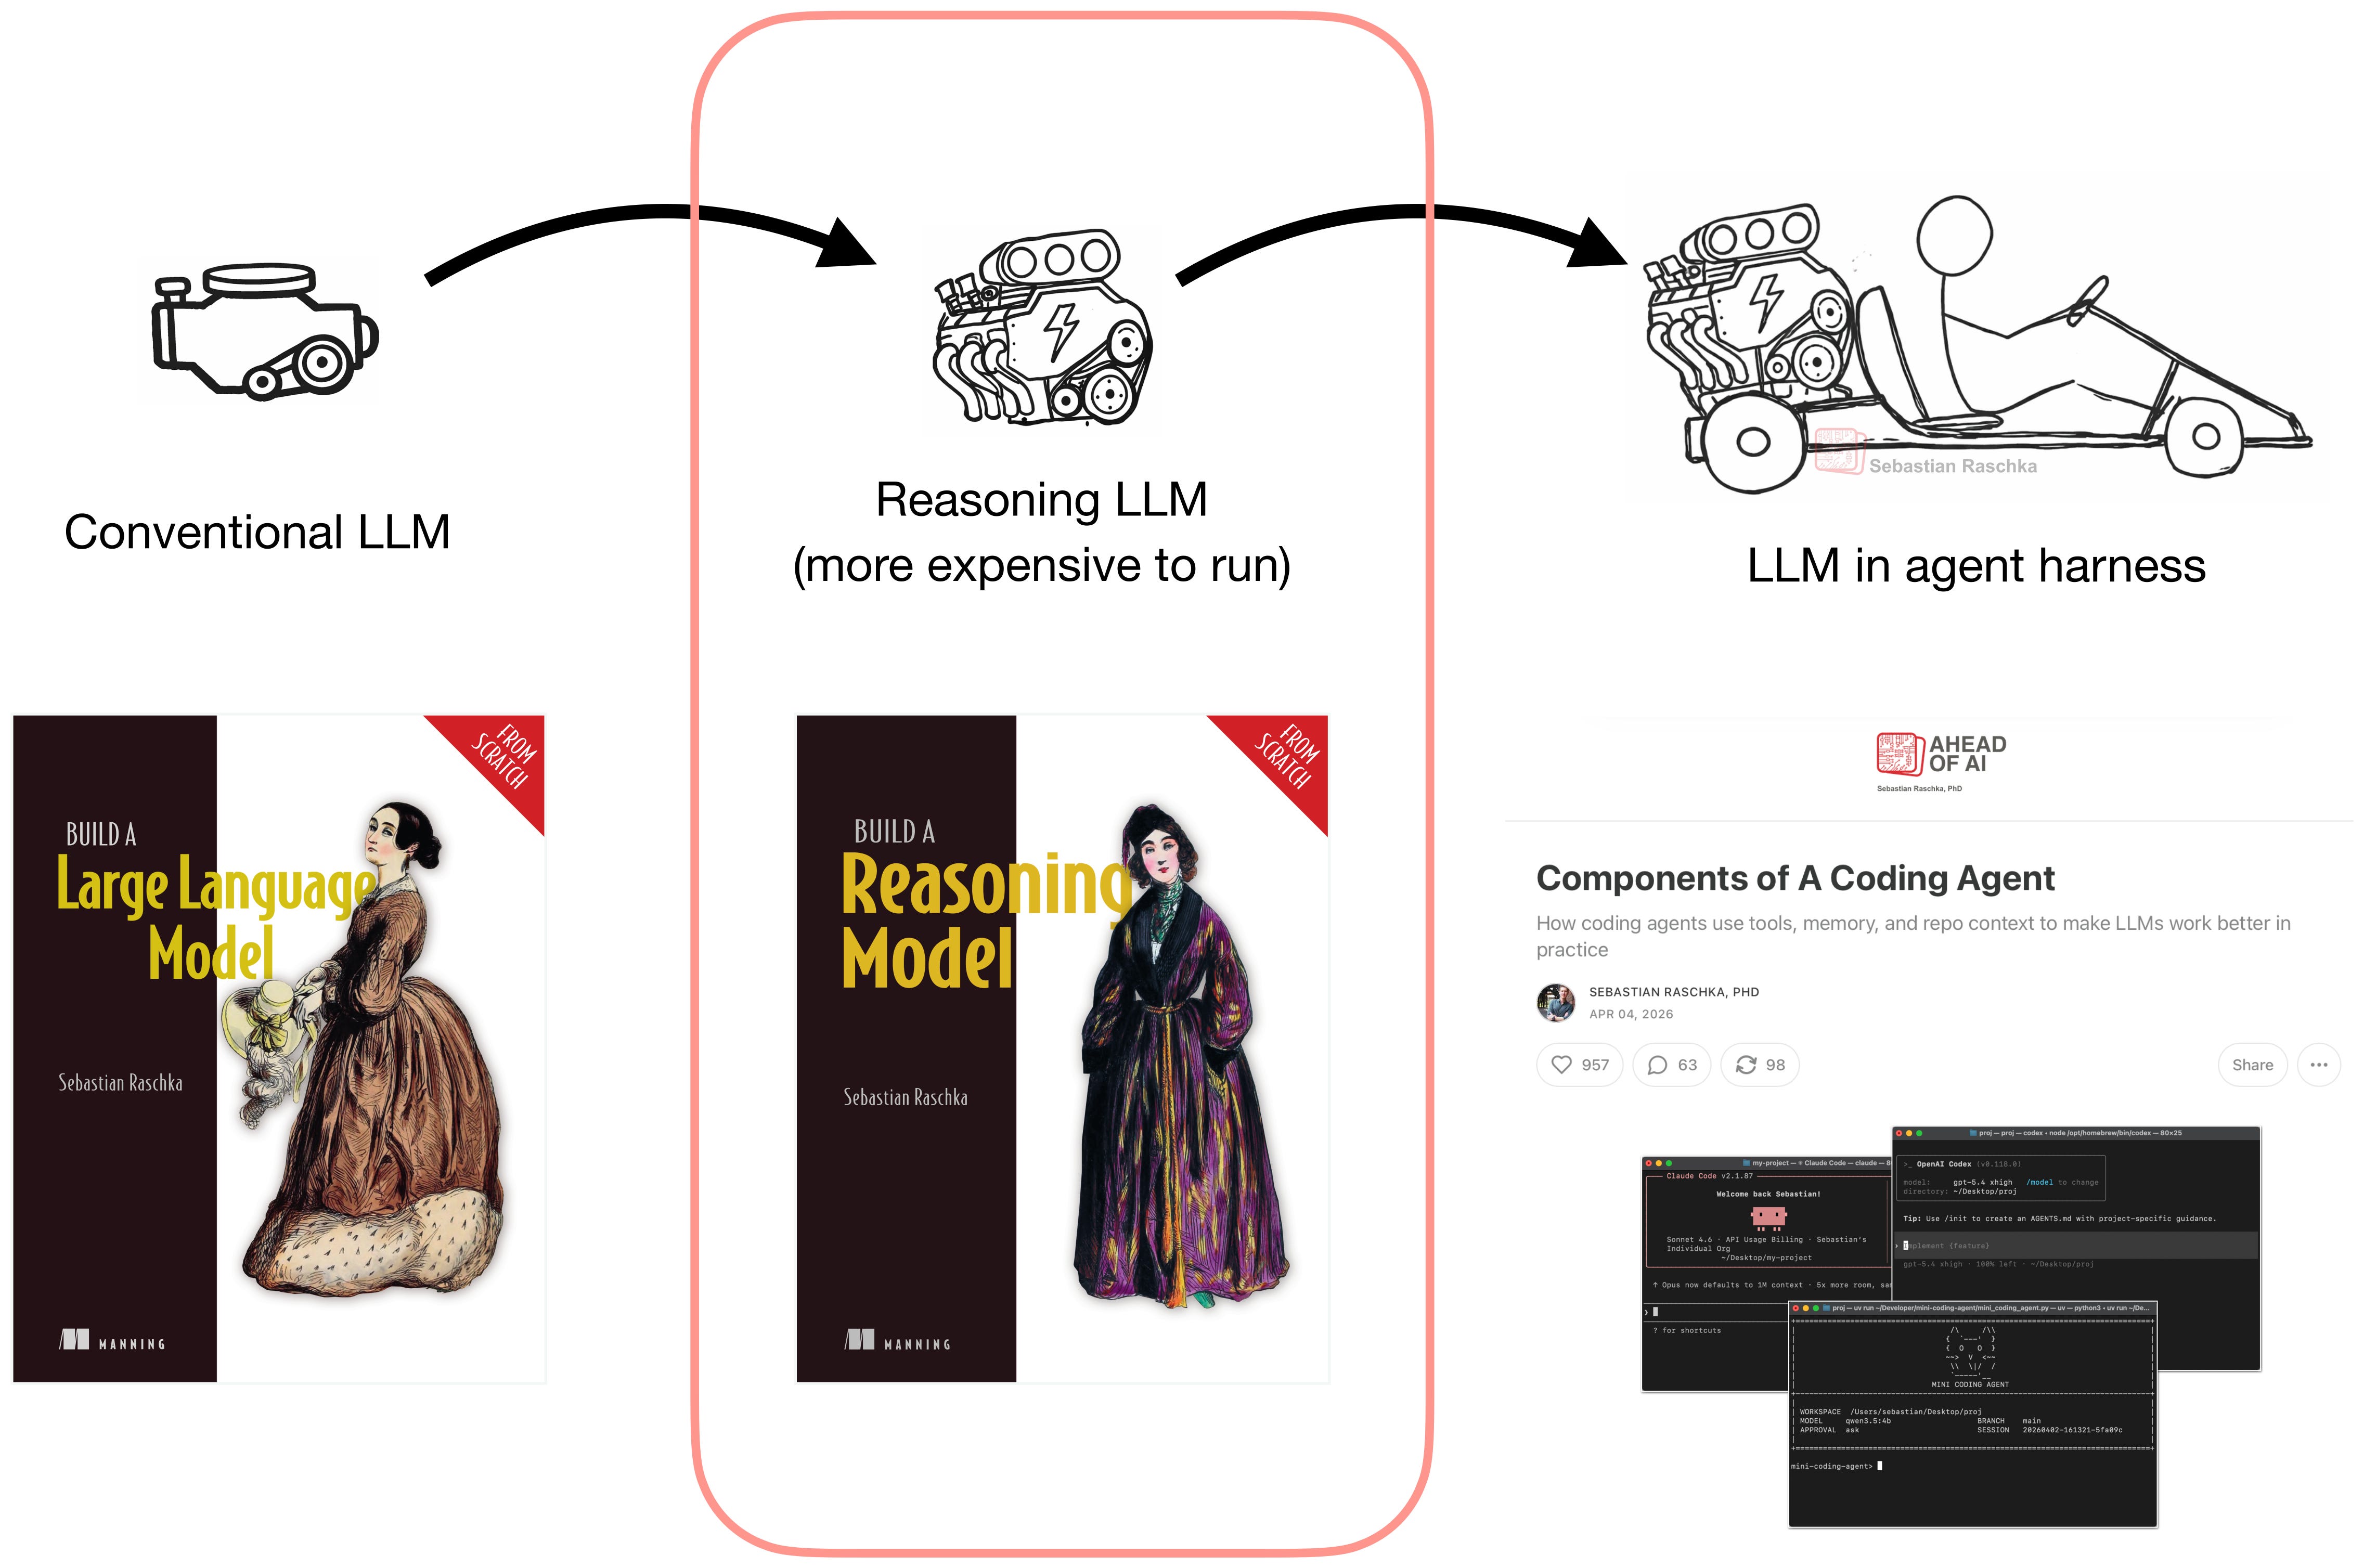
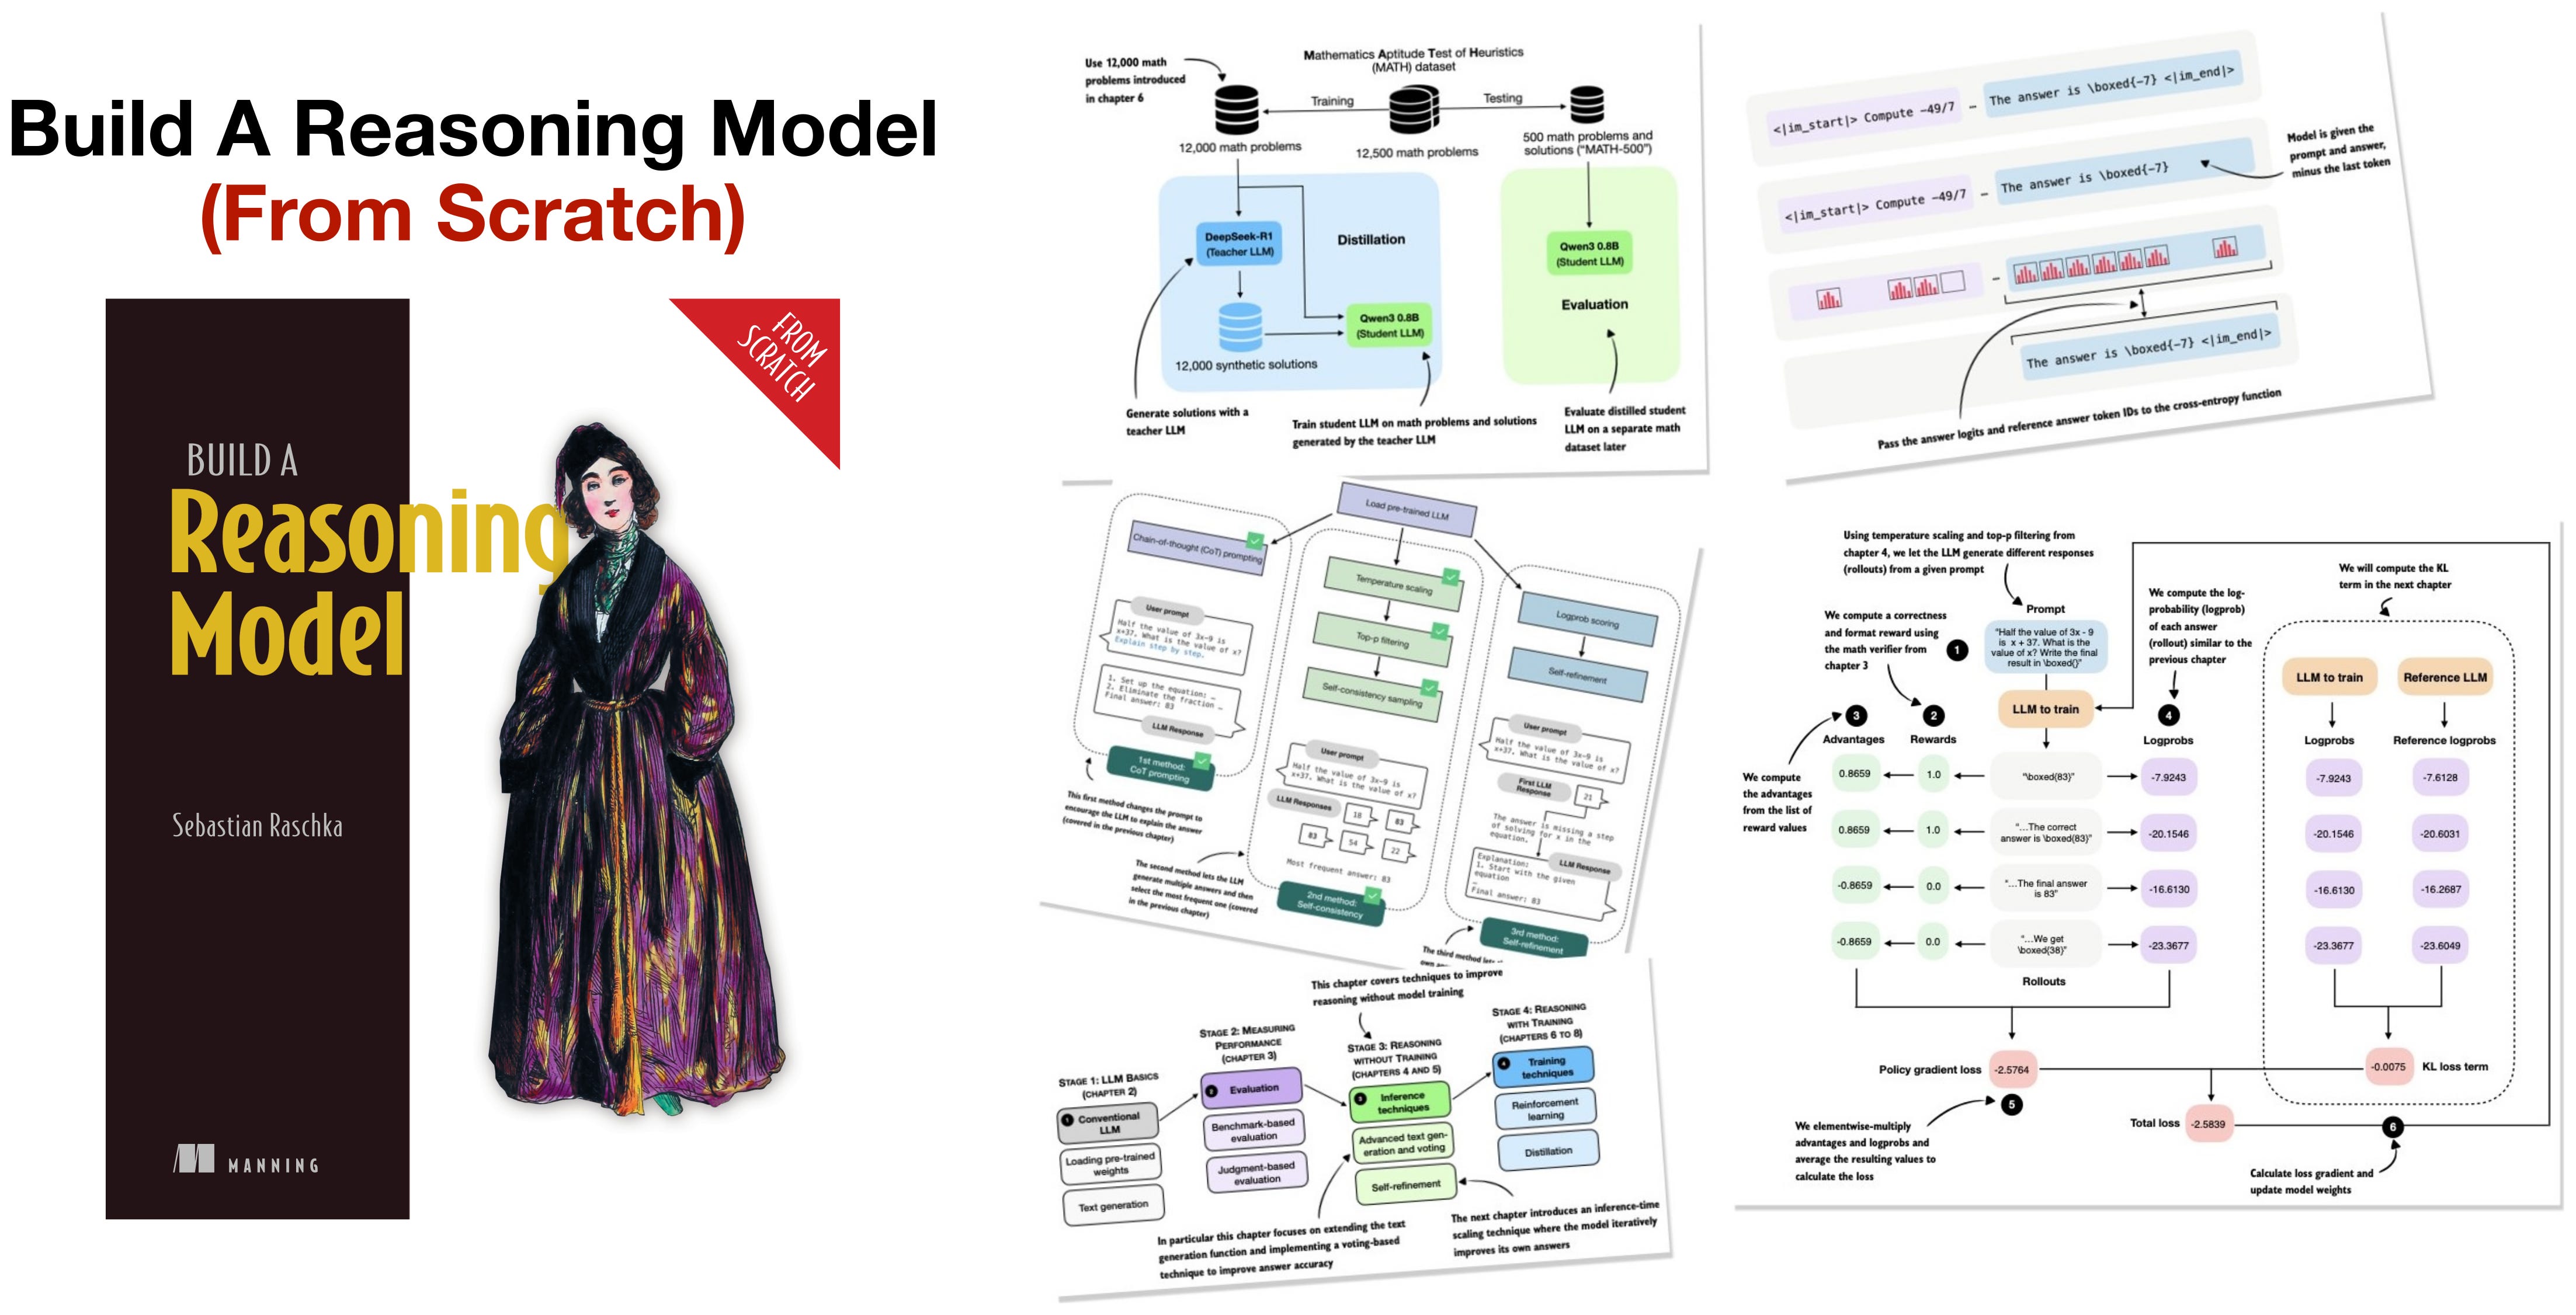
For more details on understanding and developing reasoning models, I recommend my book Build a Reasoning Model From Scratch.
reasoning-book
Figure 16: My Build a Reasoning Model From Scratch book covers the fundamentals of reasoning models.

5.2 Token usage and shorter chains of thought

Now, extra tokens in the reasoning trace add more computation. Looped transformers add more computation, because the tokens go through more transformer blocks. One might argue that a model with looping uses more computation internally, it doesn’t need as many external thinking tokens.

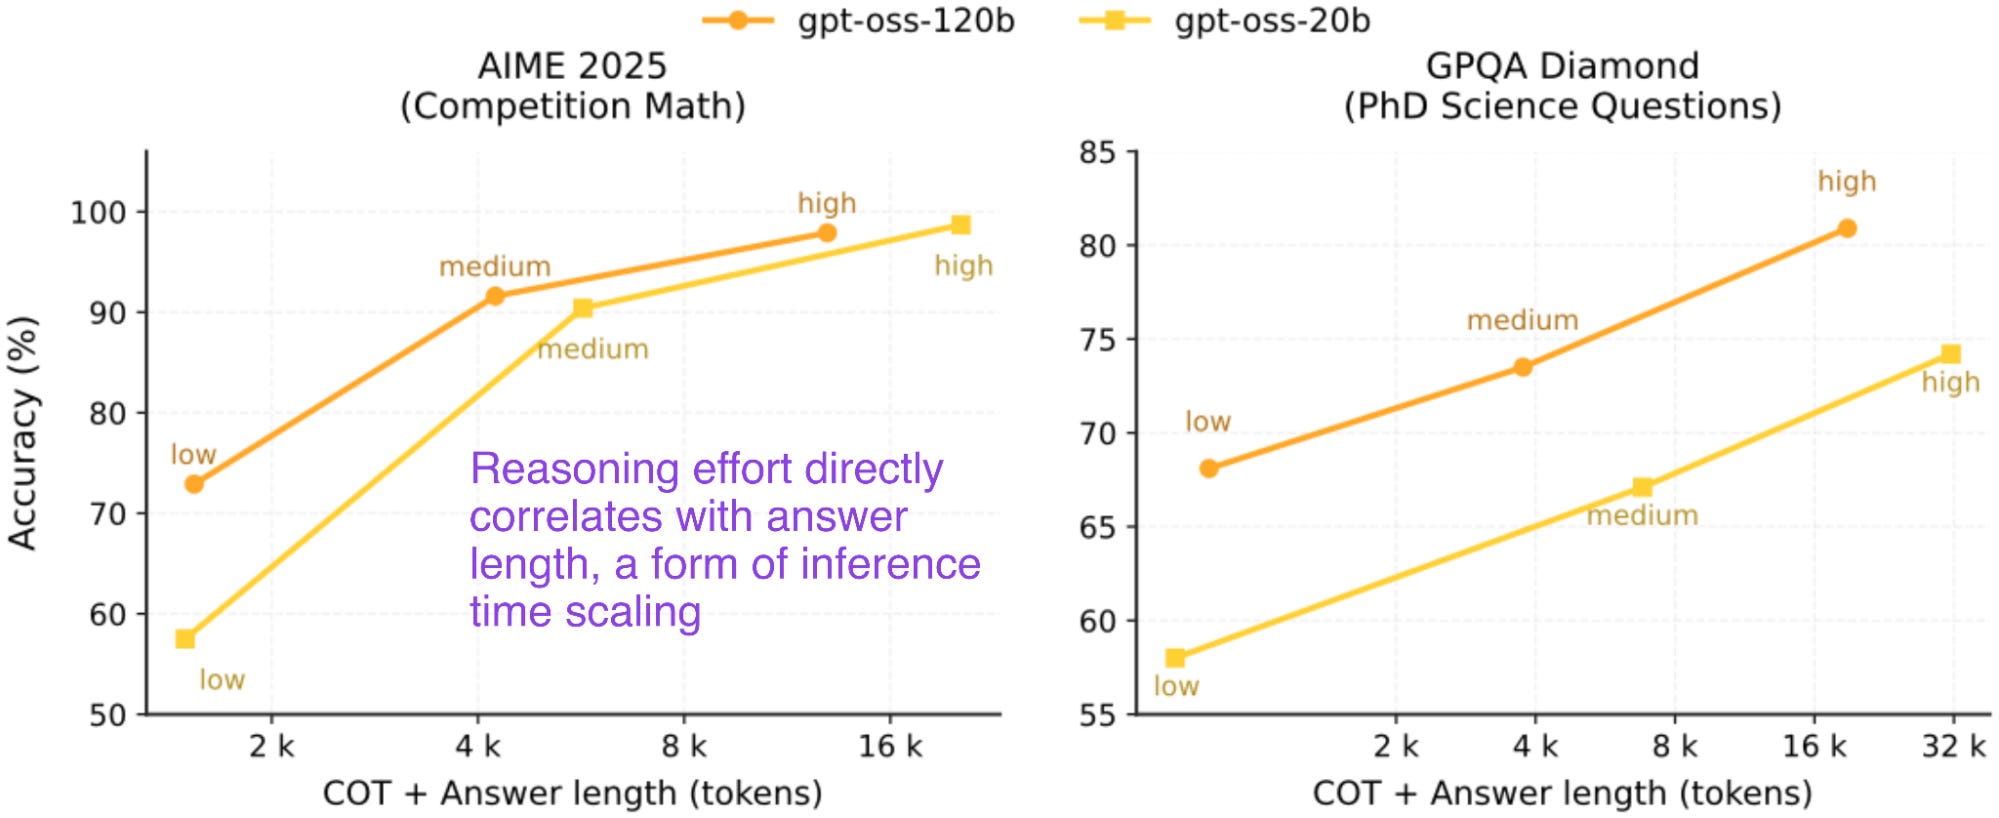
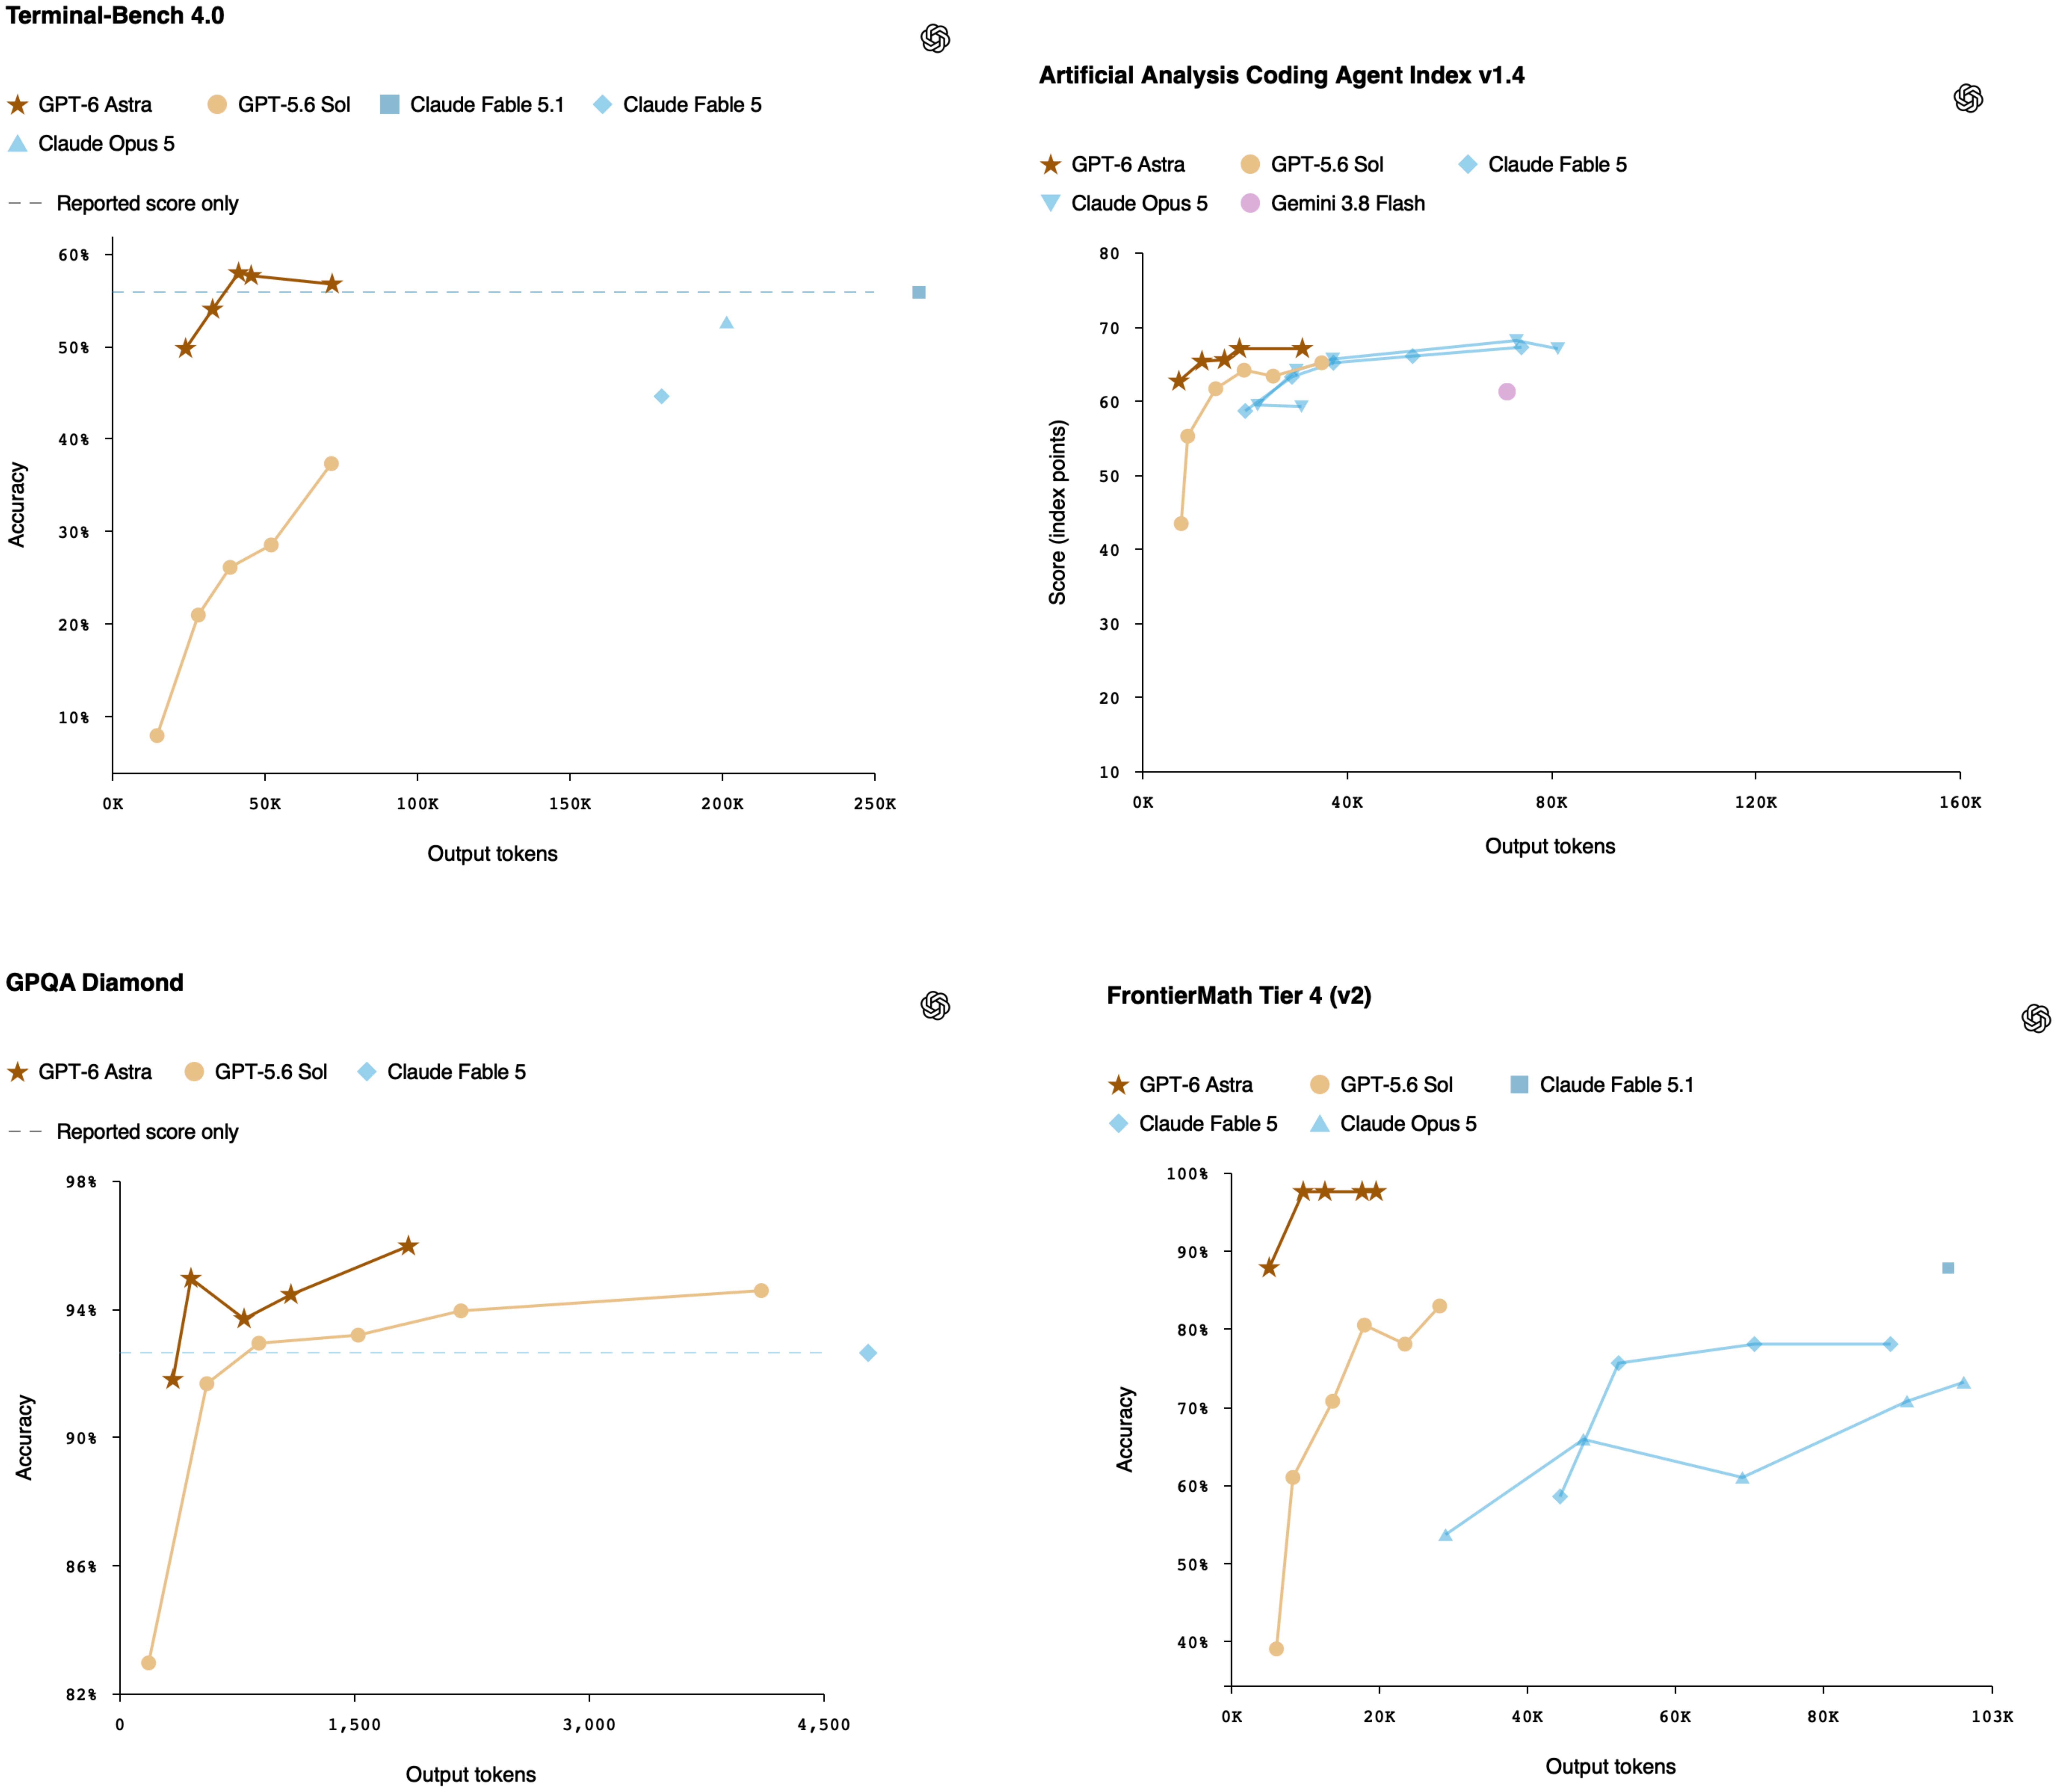
Below is a selection of the GPT-6 benchmarks with the output token number on the x-axis.
output-tokens
Figure 17: Selected GPT-6 Astra benchmarks from https://openai.com/index/gpt-6-astra/

We can see that GPT-6 Astra doesn’t necessarily use fewer tokens than its GPT 5.6 Sol predecessor across effort levels overall. However, at a fixed accuray, it is true that GPT-6 Astra uses fewer tokens than GPT 5.6 Sol.

Is this a concern for interpretability? Not necessarily. Using fewer tokens could just mean that the model is more capable and makes fewer mistakes, uses less backtracking, and so on. I.e., it might just get more things right on the first try. To me, that doesn’t raise an immediate concern regarding interpretability.

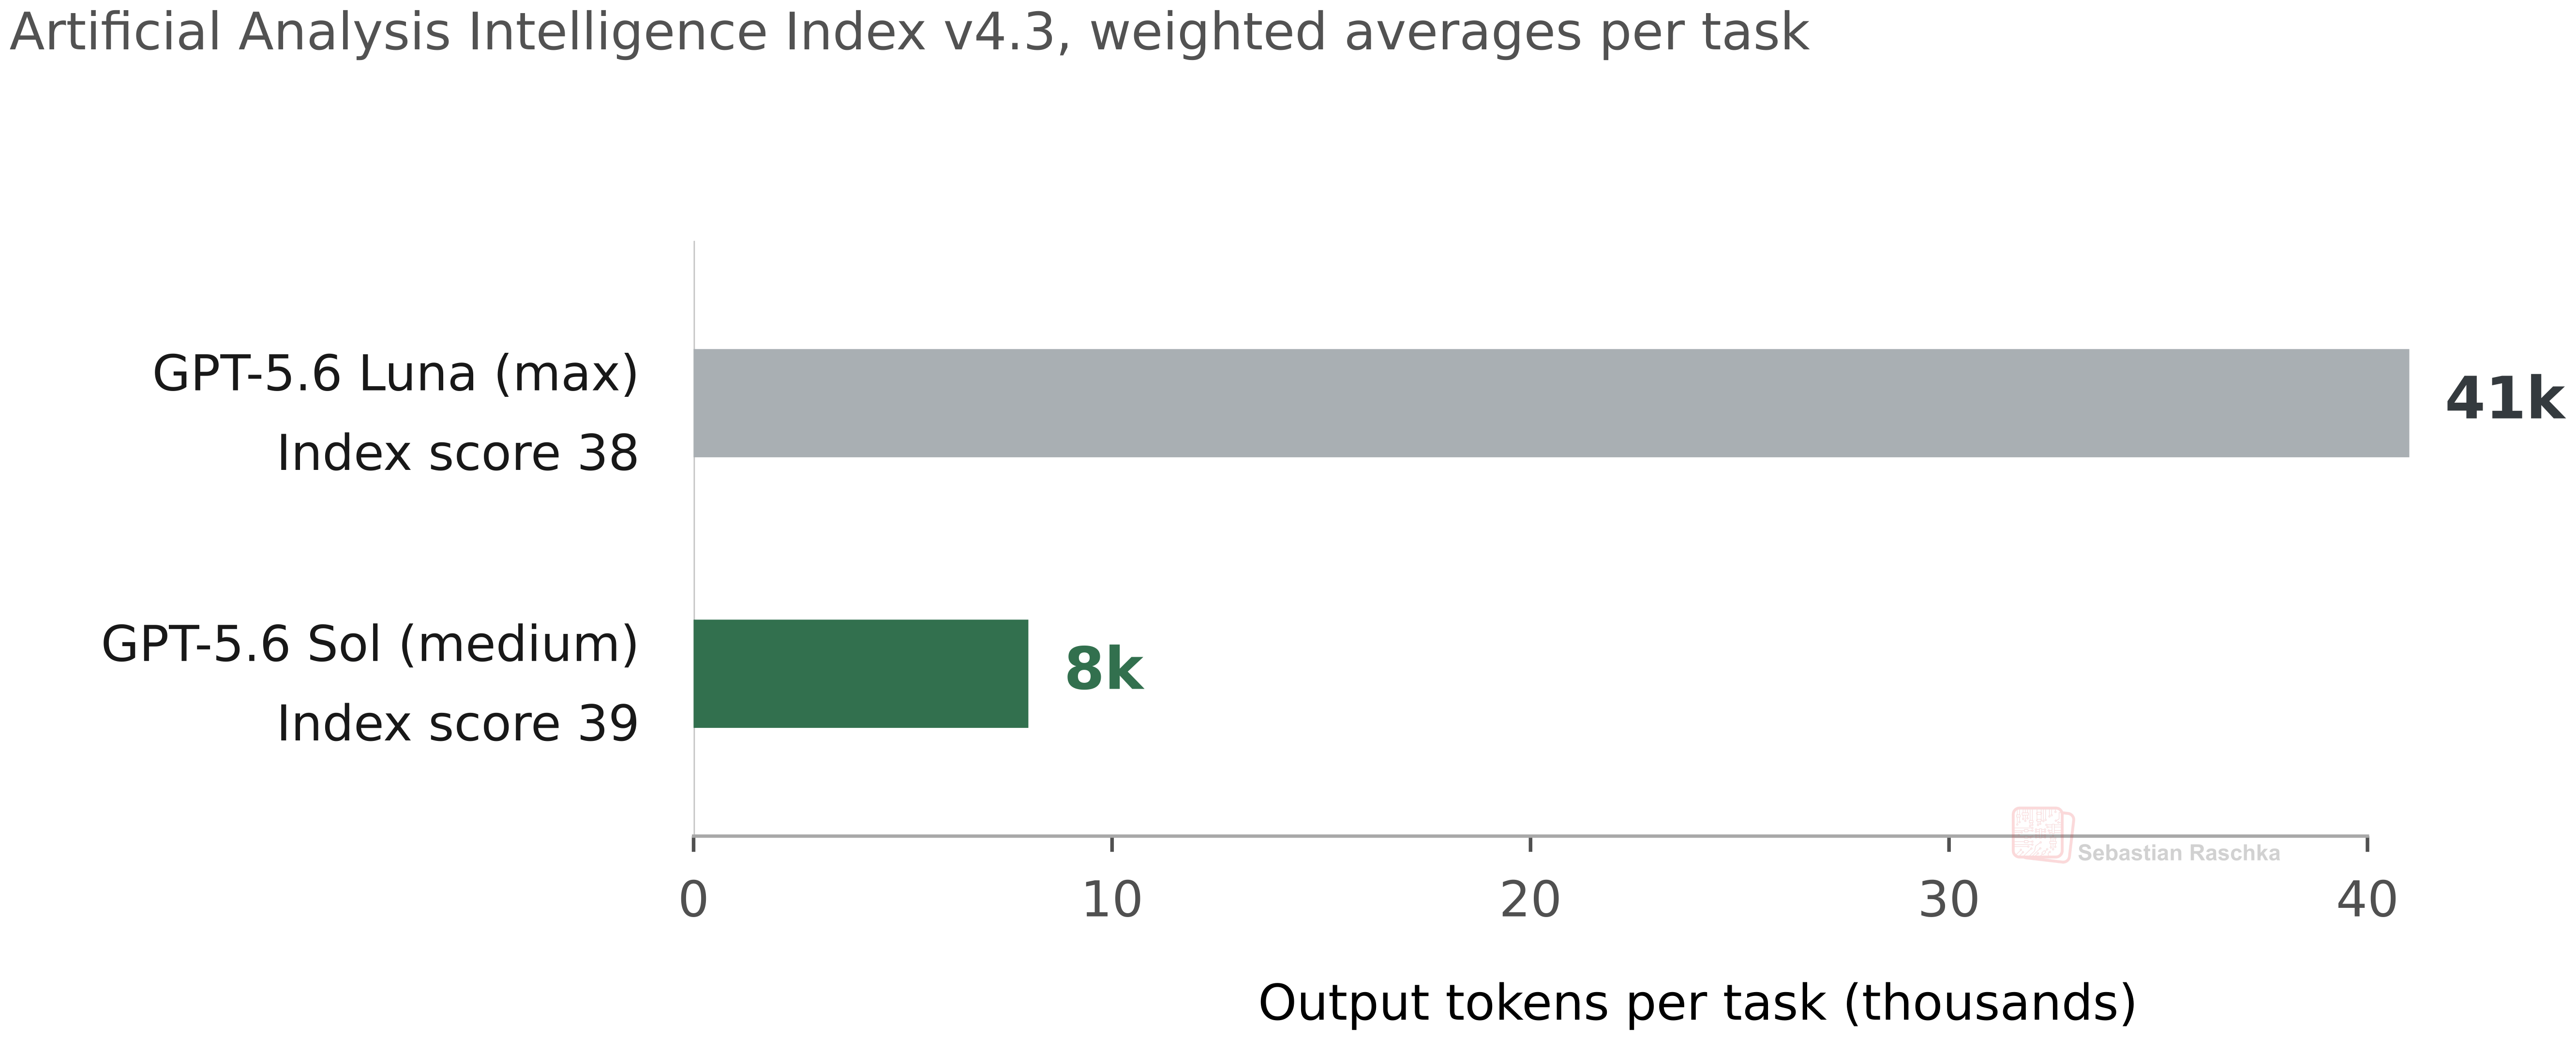
I mean, the same is true for previous models. I don’t think that anyone has strong concerns that GPT 5.6 Sol is so much less interpretable than the smaller GPT 5.6 Luna model, which uses many more tokens for the same task performance, as shown below.
luna-sol-token-usage
Figure 18: Token usage in Luna and Sol at similar task performance levels. Numbers from the Artificial Intelligence Index v4.3.

In fact, as we can see that Luna uses 80% more tokens than Sol at similar modeling performance. Does that make Sol that much less interpretable?

Rather, the more plausible answer here is that more capable (bigger, well-trained models that use more compute) can solve problems more efficiently, where “efficient” here means fewer tokens.

It’s also worth keeping in mind that a reasoning trace is not guaranteed to faithfully describe everything that happens inside the model. In my view, the only valid concern is that looped transformers purposefully mislead users by presenting “fake” reasoning traces more often than conventional transformers. But I don’t think we have any strong evidence that this is happening.

Now, Astra’s system card does state that there is also evidence of reduced monitorability of their reasoning traces, and there is a bit of regression relative to Sol. It’s mostly associated with shorter, less informative traces. But again, this doesn’t establish looping as the root cause. It could just be due to the shorter length in general, similar to the Luna vs Sol example above.

A few hours after I shared my thoughts about looped transformers with respect to hiding reasoning chains, Jakub Pachocki (OpenAI’s Chief Scientist) also shared the following clarification:

I want to prevent a race into unmonitorability kicked off by confused reporting. The depth of the computation graph for our present frontier models, including Astra, is within a factor of two of GPT-4. OpenAI has worked to preserve and utilize chain-of-thought monitoring since our very first reasoning models. We deeply care about this technique, as it can give us a view into how model alignment generalizes from its training distribution. I do think it is fragile and unfortunately trending in a negative direction, for reasons not contingent on architecture changes that I will write about soon. But there are things we can do to strengthen it, and it’s a core goal of our current research program.

The “confused reporting” likely refers to The Information’s aforementioned paragraph here, implying that the looping aspect does not have anything to do with chain-of-thought changes.

6. Looped transformer research

Lastly, I want to share some interesting papers related to looped transformer architectures beyond the ones we already discussed.

6.1 Latent reasoning

Related to the Universal Transformer, the 2025 Scaling up Test-Time Compute with Latent Reasoning: A Recurrent Depth Approach paper studies how a model can use additional loops at inference time. For this, they trained a relatively modest but also not super tiny 3.5B-parameter model on 800B tokens.

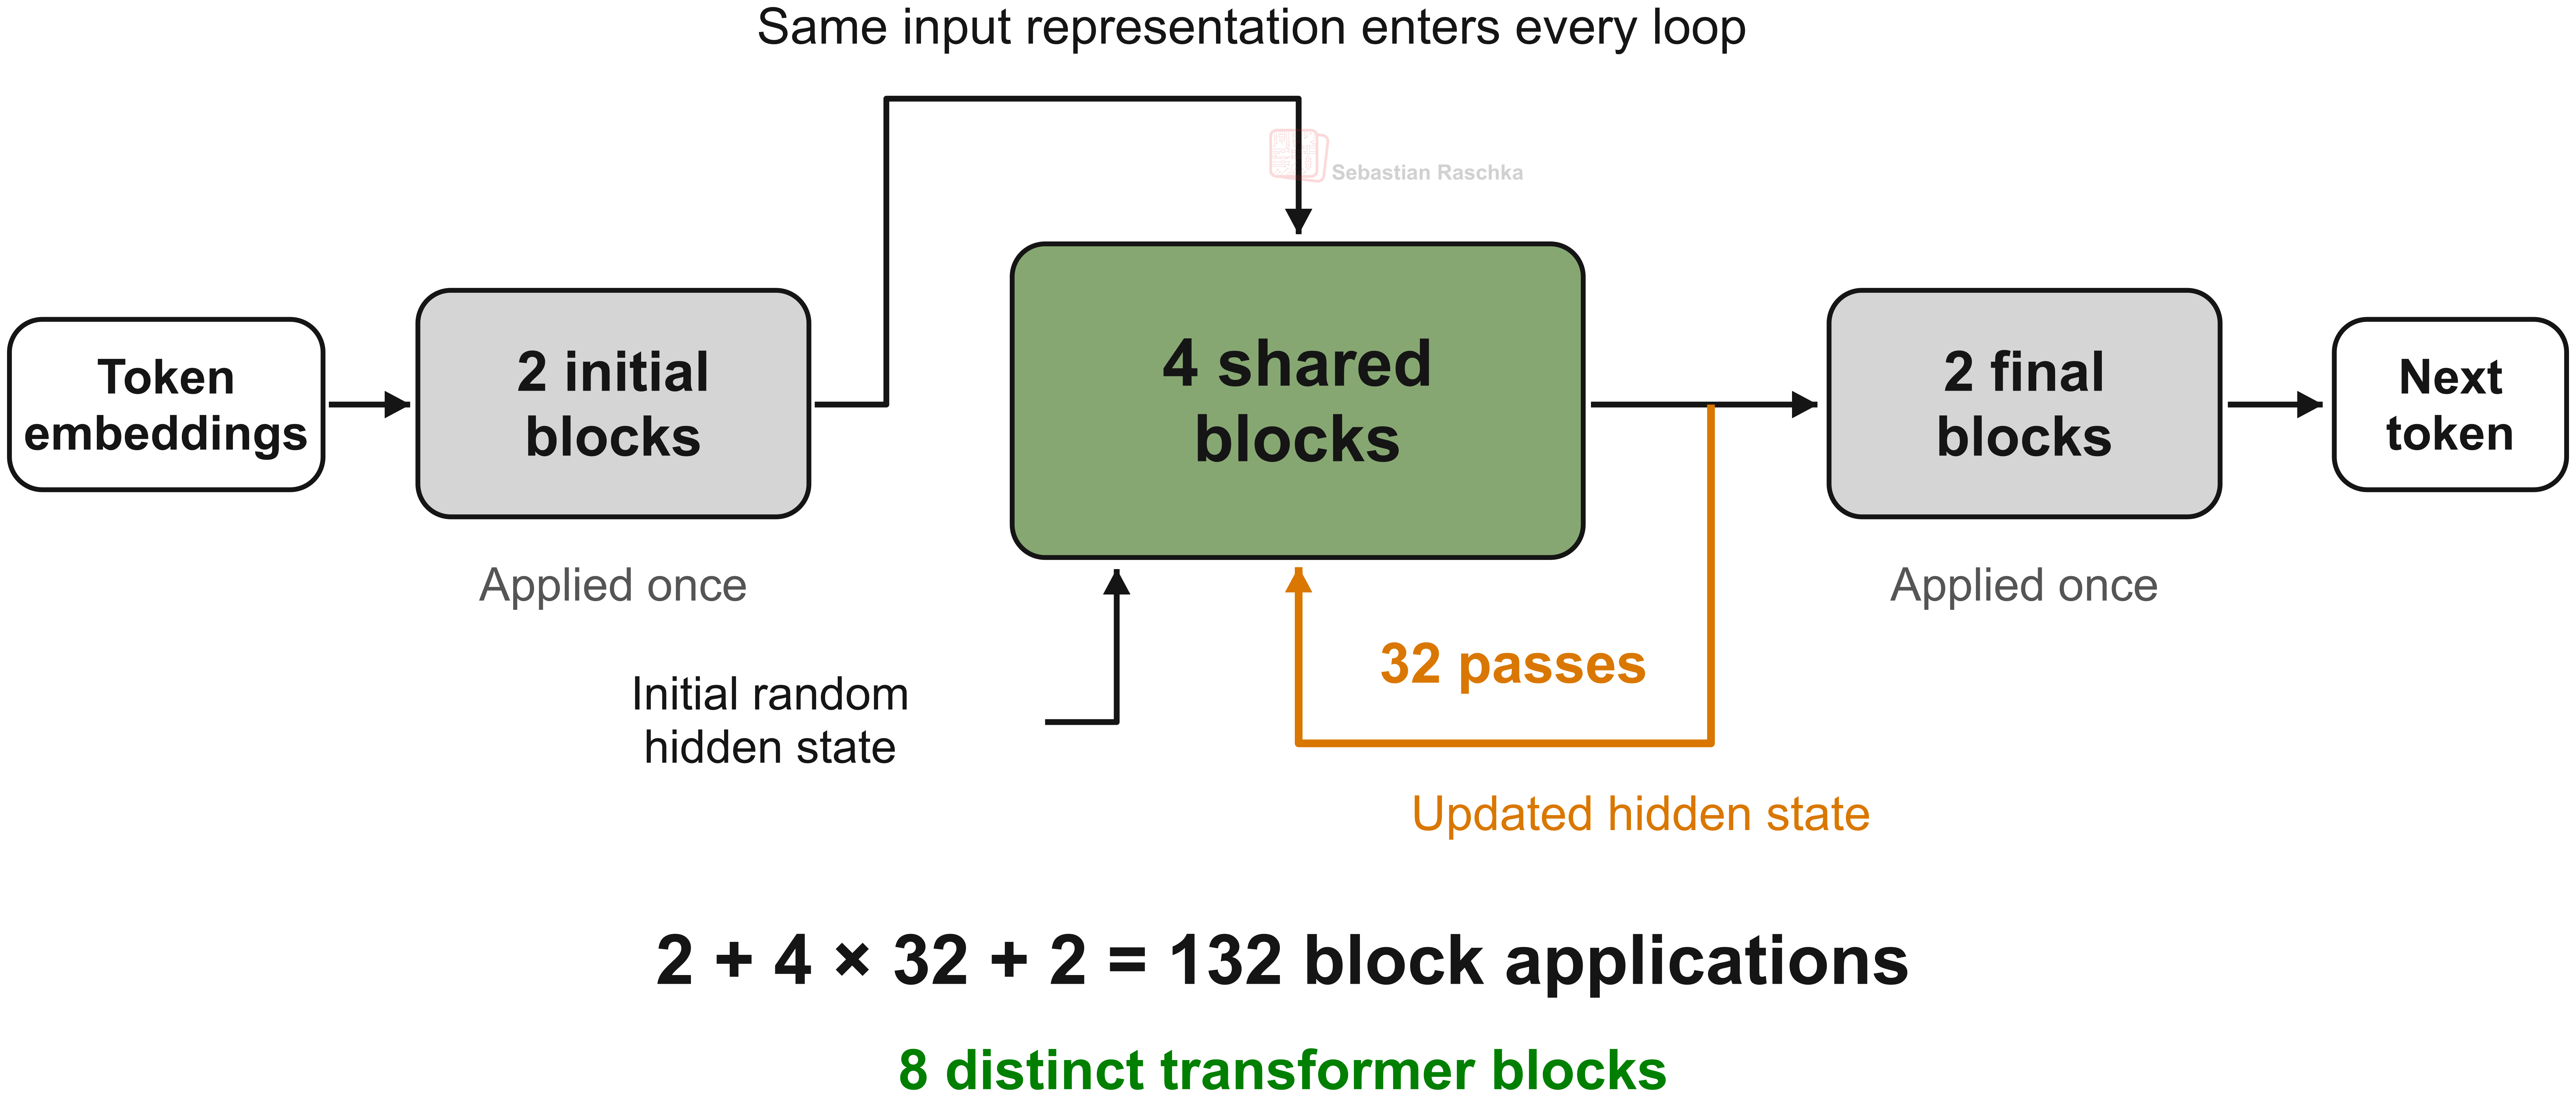
Instead of reusing the same block over and over again as in the Universal Transformer, it repeats a stack like in Nanbeige; however, in contrast to Nanbeige, it sandwiches this shared stack of four blocks between 2 initial and 2 final blocks.

Also, what’s different from Nanbeige is that the shared stack receives the output of the initial blocks at the start of every loop, in addition to the previous loop’s hidden state. These are concatenated and passed through a learned linear projection before entering the four shared blocks. You can think of this as giving the stack access to the same initial input representation on every pass. This whole layout is summarized in the figure below.

So, in short, this is an additional and interesting looped transformer variant.
latent-reasoning
Figure 19. Conceptual summary of the latent reasoning model in Geiping et al..

An interesting detail is that the researchers vary the number of loops during training. This prepares the model to work with different amounts of computation at inference time.

Here, during training, the loop count is randomly sampled. At inference, a fixed budget is chosen by whoever runs the model, such as 8, 32, or 64 loops. Additionally, they have an adaptive stopping mechanism for each token based on the next-token probability distribution. If the KL-divergence between 2 successive rounds is below a certain threshold, i.e., if the distributions are too similar, the looping is halted.

The overall benefit depends on the task. In their evaluations, HellaSwag performance largely levels off after about eight loops, while GSM8K and HumanEval benefit from more.

However, while the title of the paper mentions “latent reasoning”, the model can still generate a textual chain of thought. Looping just gives it additional computation before each output token.

6.2 Knowledge retrieval vs reasoning

There’s a useful distinction between storing information and using it to solve a problem. For instance, the Beyond Parameters: Exploring Virtual Logic Depth for Scaling Laws paper from June 2025 investigates this by measuring memorization and reasoning in an LLM separately.

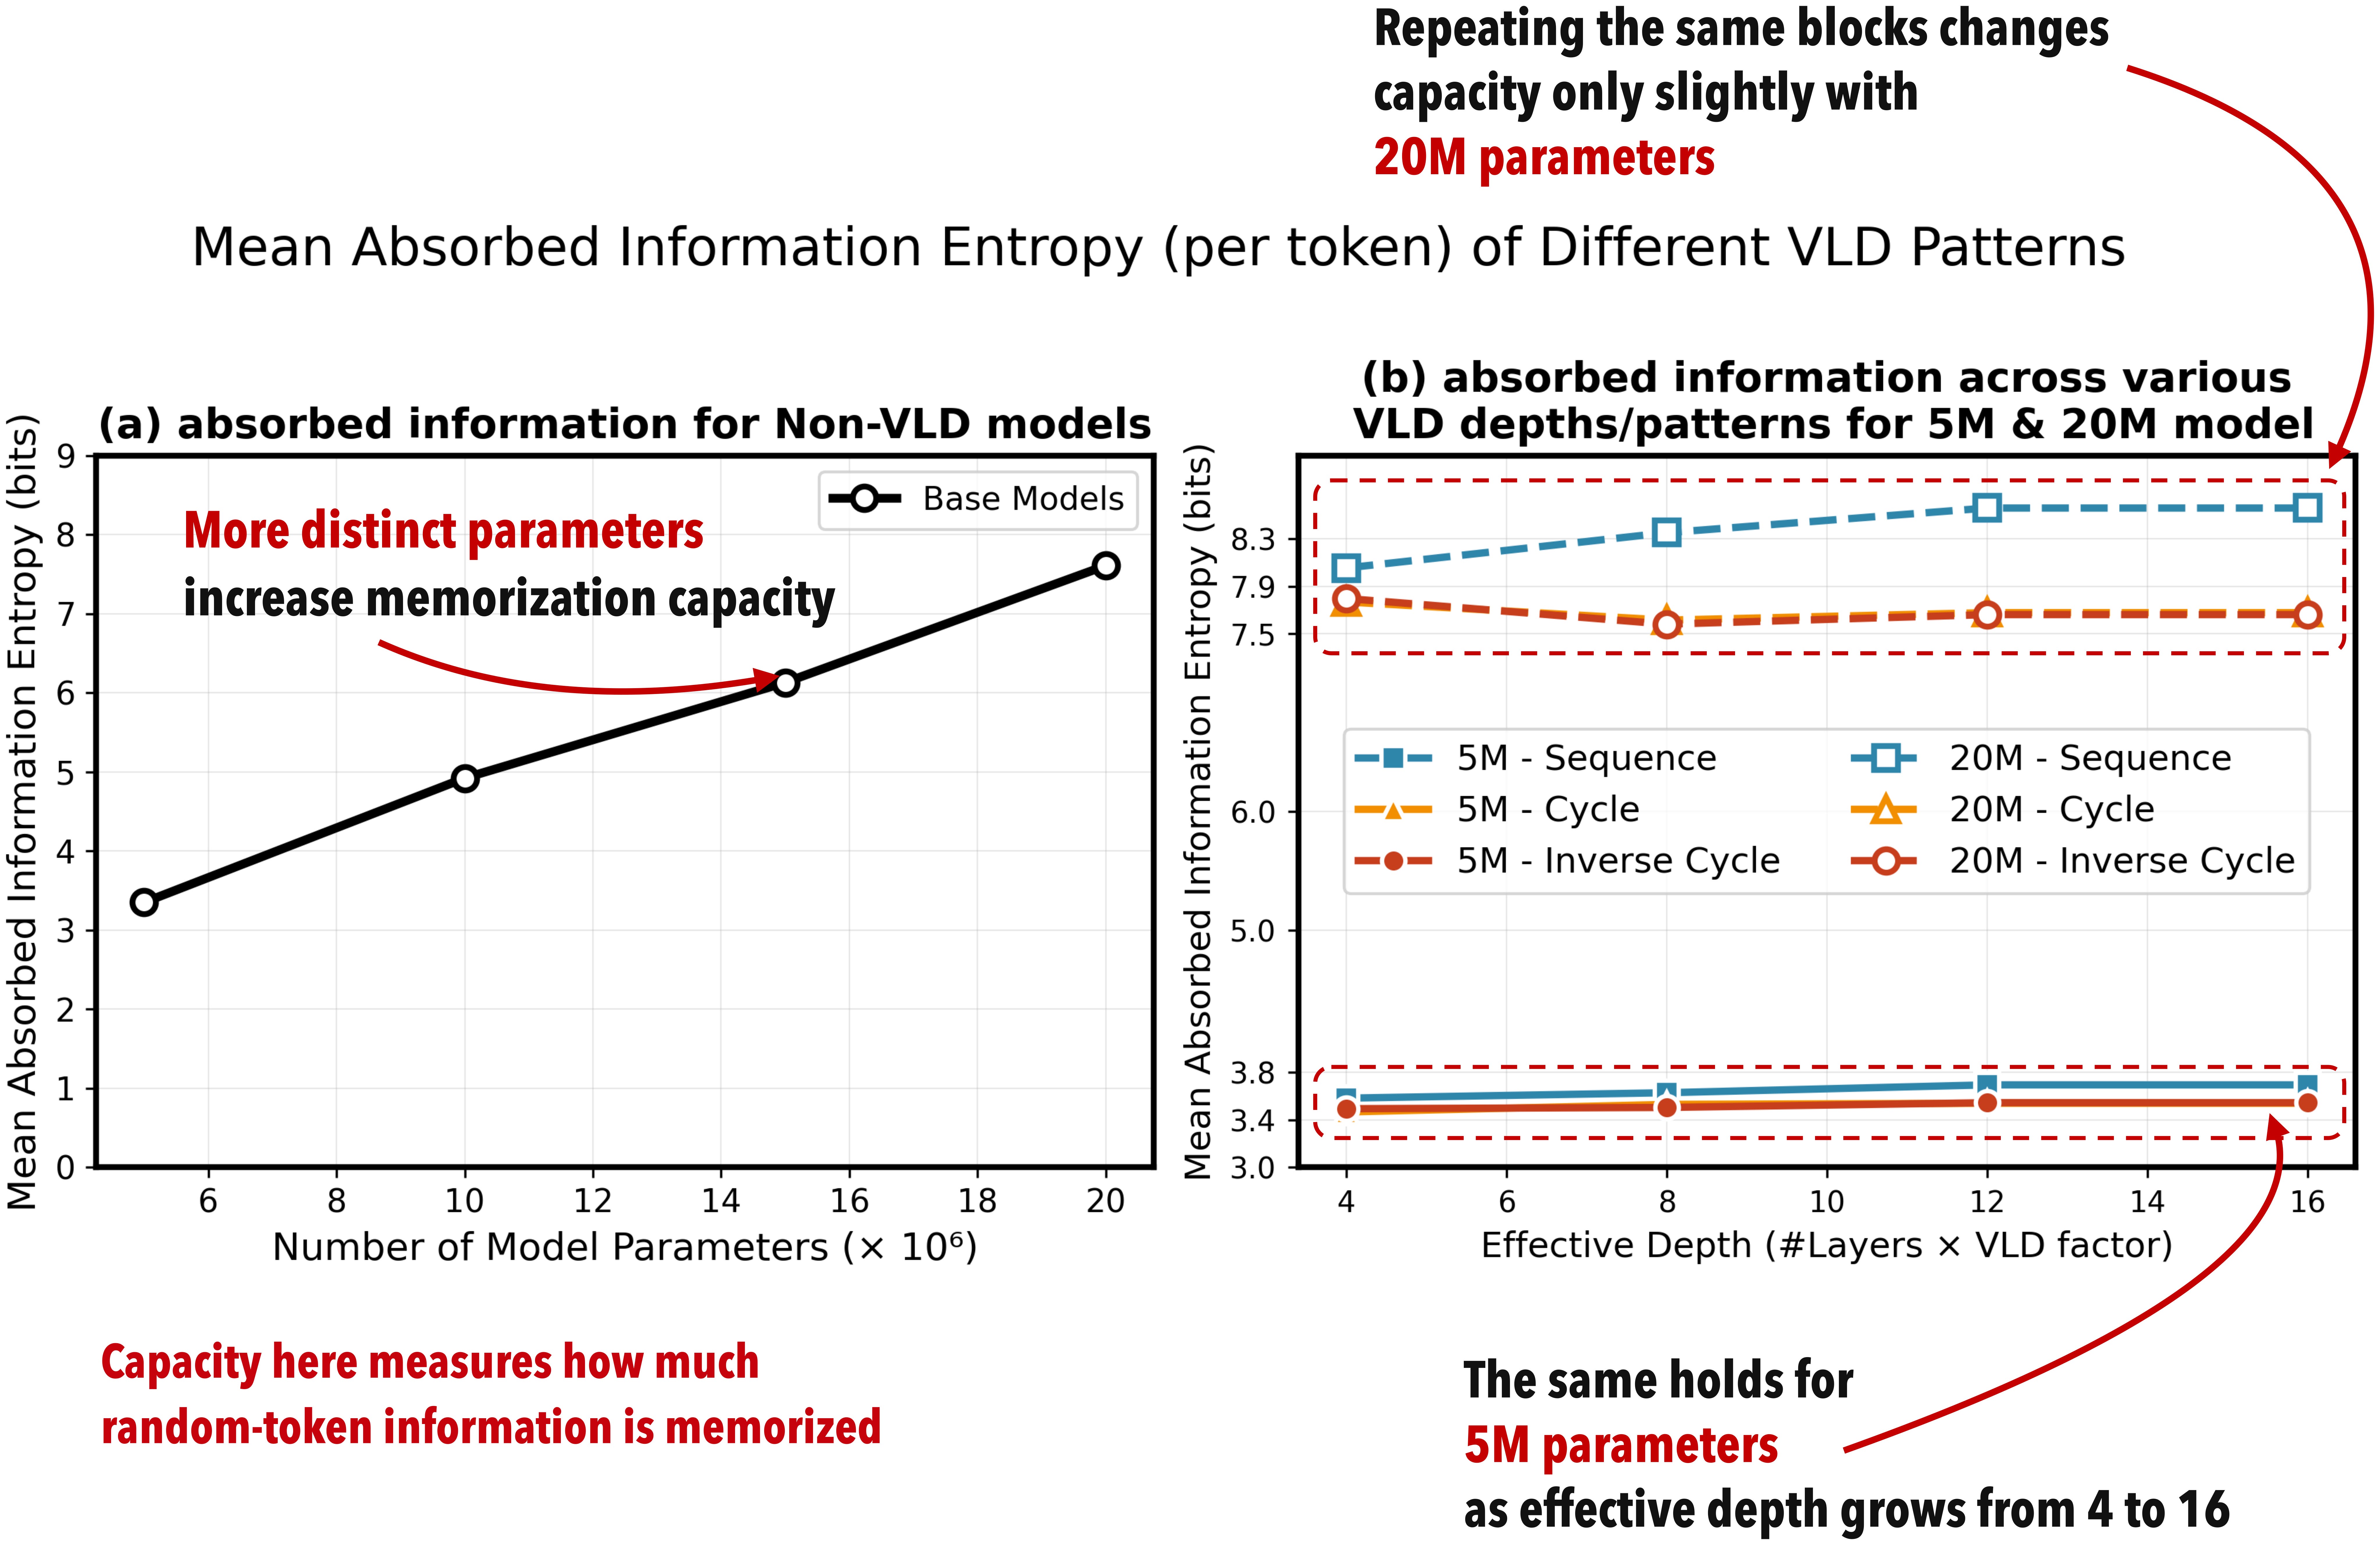
First, in the memorization experiments, looping leaves the amount of stored information nearly unchanged when the parameter count stays fixed. Increasing the number of distinct parameters does increase this capacity. From this, we can conclude that looping doesn’t add or let’s the model retrieve more knowledge. This makes sense. Information retrieval is a relatively simple task once the information is stored. Also, looping in itself is computing not “storing” mechanism.

Second, in separate reasoning experiments, reusing the blocks improves performance on multi-step math problems without adding parameters. This is interesting. Here, we can conclude that extra computation can help a model solve problems even when it doesn’t have more space to store information. But again, bigger models can also improve reasoning (although they add parameters as well).
capacity
Figure 20. In this memorization test, capacity grows with parameter count but changes little with additional block applications. Annotated figure from Zhu et al.

6.3 Looping at a matched compute budget

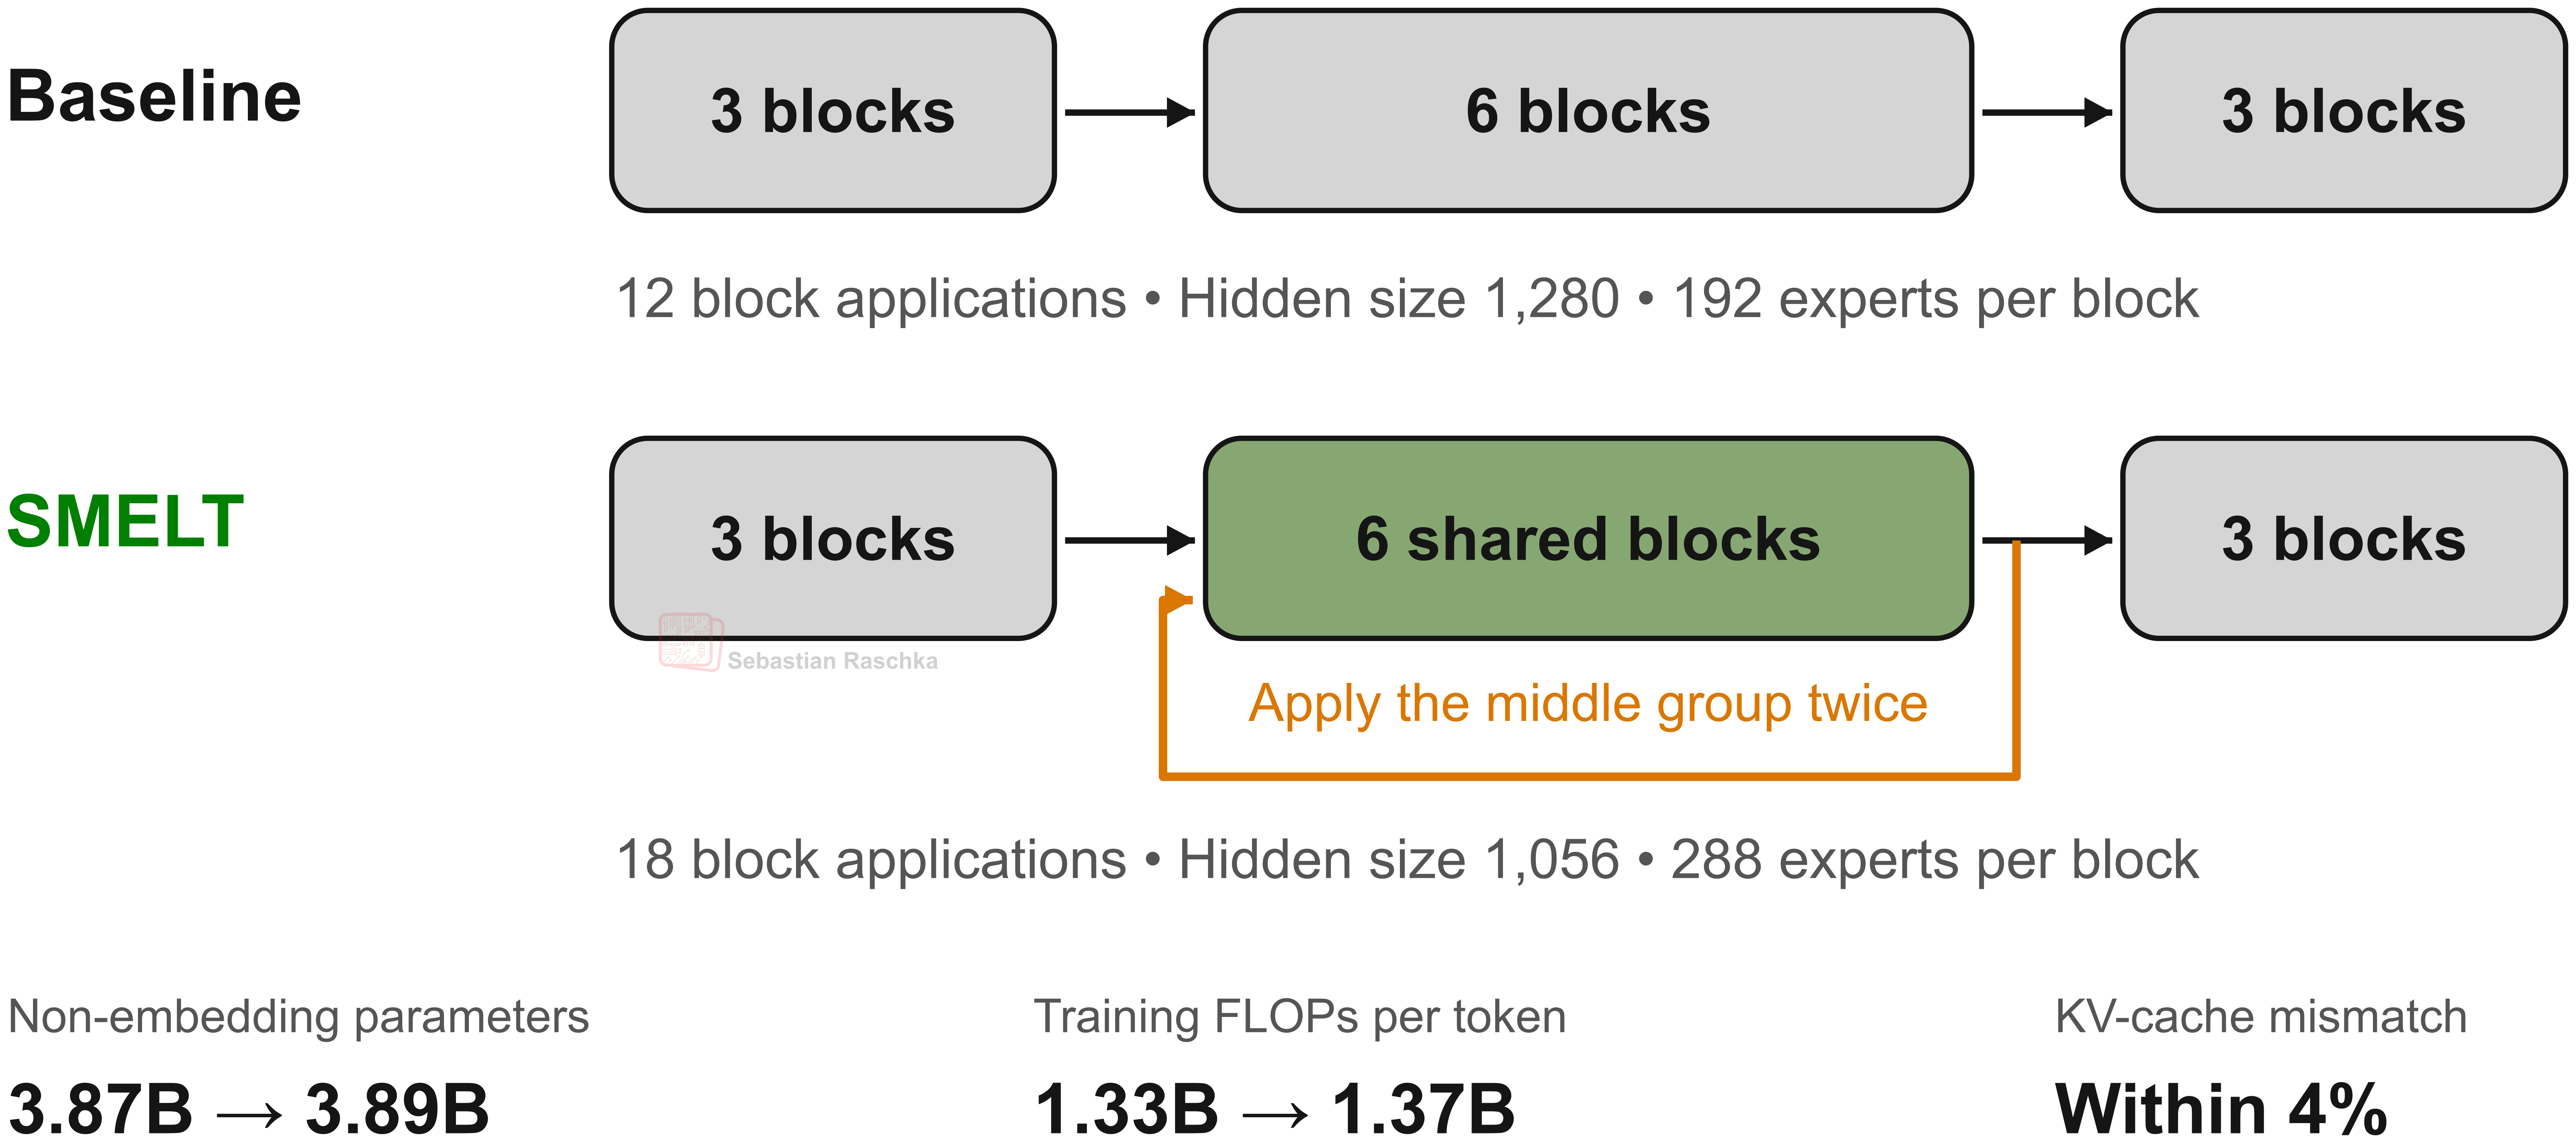
The just-released SMELT: Scaling Laws for Compute-Matched MoE Looped Transformers paper from September 2026 comes back to the cost comparison from section 2.2. What happens if we compare looped and conventional transformers with approximately the same compute per token, total non-embedding parameters, and KV cache requirements?

The researchers use a mixture-of-experts architecture and apply the middle half of the transformer blocks twice, kind of similar to Nanbeige except with the sandwiching in Latent Reasoning.

However, they narrow the hidden dimension to compensate for the compute needed for the extra block applications. And then, because that makes the parameter count smaller, they then add experts to recover the total parameter count. They also adjust the attention head configuration to keep the KV cache comparable.
SMELT worked example comparing model width, experts, block applications, parameters, compute, and KV cache
Figure 21. SMELT overview from the example given in SMELT, section 3.2.

The experiments scale up to 54B non-embedding parameters and so on. Then, from fitted scaling curves, the researchers estimate that SMELT requires about 6.8-18% less training compute to reach the same validation loss within the studied compute range.

So, this answers the question of whether looped transformers are worth it computationally: Yes! They give us a slightly better model when using the same compute budget.

6.4 Full-bandwidth transformer

Finally, the also very recent Full-bandwidth transformer paper from August 2026 studies recurrence across token positions. At each decoding step, it combines the previous token’s final hidden state with the newly sampled token’s embedding through a learned gate. This becomes the input for the next forward pass.

So, the next token’s computation has access to the previous token’s final representation from the bottom of the stack, which is somewhat similar to Latent Reasoning.

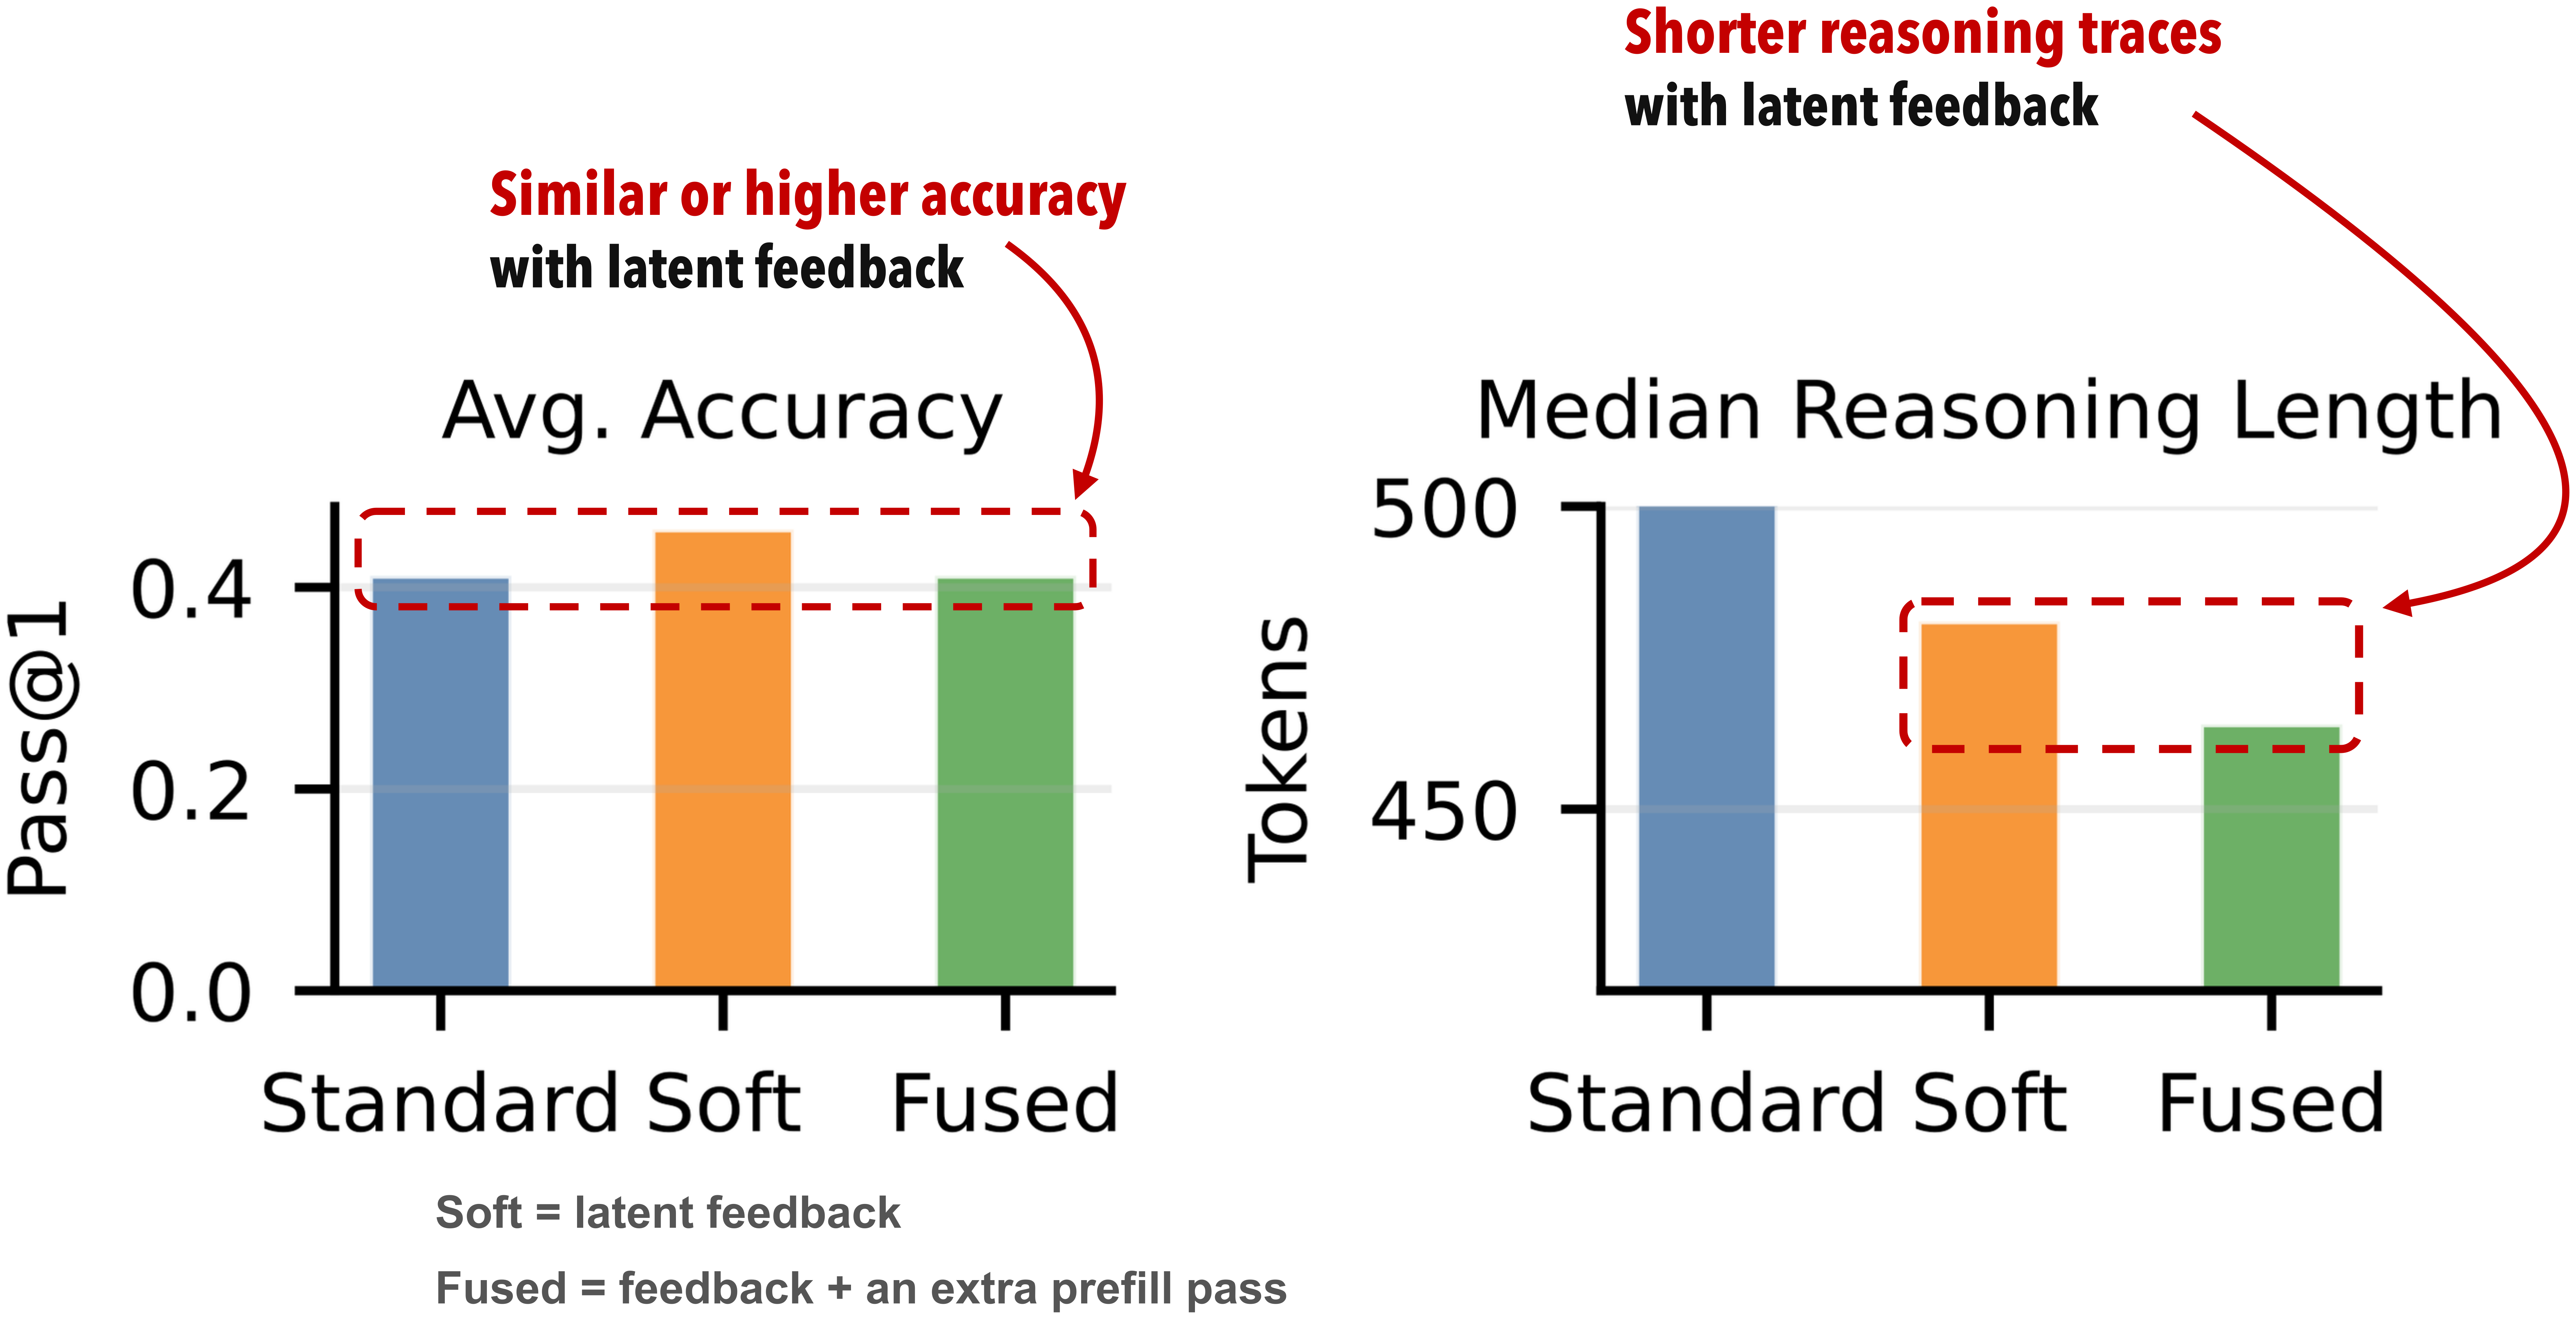
When using a 1B base model, they found that their latent feedback approach outputs shorter reasoning traces on MATH500 while maintaining or improving accuracy. However, the shortening effect disappears after instruction tuning.
length
Figure 22. Latent feedback shortens reasoning traces in the base model, but this effect disappears after instruction tuning. Adapted from Wang et al., Figure 6, CC BY 4.0. Definitions and caveats added.

Anyway, this is interesting because this connects directly to the earlier discussion about whether looping results in shorter reasoning traces. The result depends on both the feedback mechanism and how the model is trained, of course. Also, the experiment doesn’t establish whether those shorter traces are less faithful.

Also, the big caveat of the study is that they didn’t test whether increasing the size of the model in conventional ways (adding more transformer blocks instead of looping) has a similar effect on the reasoning trace lengths.

Conclusion

To wrap it all up, we can say that yes, OpenAI GPT-6 Astra is a very strong model. And it’s making a particularly large leap in computer use. I believe computer use will be the next big focus area for open-source and proprietary harnesses in the upcoming months. I find open-source especially important when it comes to computer use, as “with great power come great responsibilities”, and it’s nice to be able to audit the harness before giving it access to my main computer.

Besides, GPT-6 Astra is likely to use a variant of the looped transformer. Looped transformers simply give better modeling performance at a fixed compute budget.

Also, better modeling performance may decrease in shorter reasoning chains. But this is not a new trend. We have always seen that within a model family with models of different sizes (e.g., GPT 5.6 Luna versus Sol).

In my opinion, shorter reasoning traces are a side effect of more “intelligent” or capable models that make fewer mistakes and can access more compute internally inside their architecture versus using a reasoning trace as a scratchpad. In a sense, the same is true for humans. During an in-person college math exam, a smart and well-prepared student likely requires less use of the notepaper and needs to backtrack less often, and so on.


Thanks for reading and supporting my work!

If you’d like to learn how to build reasoning models yourself, check out my book Build a Reasoning Model (From Scratch). We start with a pre-trained LLM and add reasoning capabilities step by step, with code you can run and experiment with. It’s both fun and rewarding, and a good investment in future-self to build the fundamentals to keep up with the AI field.

Also, if you’ve read one of my books, I’d appreciate a short, honest review on Amazon. Reviews help other readers decide whether a book is right for them and are a simple way to support authors.
scratch
Figure 23: Selected illustrations from my Build a Reasoning Model (From Scratch) book, covering inference-time scaling, distillation, and reinforcement learning.

How Claude Watermarks AI-Generated Text

22 August 2026 at 11:11

I recently posted a Substack note about Claude’s new watermarking process and implementation. Since it’s such a popular topic and sparked such a lively discussion, I thought it might be interesting to go into a bit more detail when explaining how it works.

Instead of the usual text article, I recorded a little lecture on the topic (to change it up a bit from my usual articles). So, below is the video along with a transcript.

Originally, I planned to make 10 slides and record a short 10-min video. However, while putting it together, I added some crucial details here and there, resulting in >50 slides and a 48 min recording.

I hope that this now explains it well, though! Happy watching!

Subscribe now


Video Transcript

Note: The transcript below is slightly edited and cleaned up for readability but preserves the overall order and flow of the video lecture above.


0:00

How Claude’s Text Watermarking Works

Slide 2 of 52, time stamp 0:00

Hi everyone. So, a few days ago, Anthropic announced that they will watermark the text outputs of their Claude models. I then did a social media post briefly explaining how that works. And yeah, this was quite the popular post. So not the watermarking itself was popular, but I guess the explanation or the mechanism behind it. Then, it might be worthwhile expanding this a bit to explain it in more detail, because this post only had one figure, and there were a lot of questions and discussions.

So, I thought, well, let’s make a few more figures. I actually originally planned to do like 10 slides and walk you through it. It ended up being 50 slides, but I hope this really explains how this watermarking technique works well, how watermarking itself can fail or be removed, and so forth. So I think it might be an interesting topic because a lot of people use LLMs these days and also consume a lot of text on the Internet that might be generated by LLMs.

And now there’s going to be this watermarking, and there’s this, I guess, fear of watermarking making text worse, or what’s actually the benefit of this watermarking? And so what does it mean? And I think if we understand a bit better what watermarking is, that goes a long way, and then we can make up our own minds about whether that’s a good thing or not, and so forth, like the pros and cons.

So, my goal here is really to explain how the underlying mechanism works and how they are going to implement this type of watermarking, text watermarking.


Benefits of working "from scratch"
Slide 2 of 52, time stamp 1:41

It’s also a great example to illustrate why understanding things from scratch is actually quite useful. This watermarking technique is also a nice way to explain how conventional models or LLMs in general work under the hood. So yeah, you may know I like doing things from scratch. Like, I have my books: Build a Large Language Model From Scratch, Build a Reasoning Model From Scratch. I have some articles labeled from scratch.

So, for me, “ from scratch often includes coding. So this one will not be coding-related, but coding from scratch is actually a very, very useful technique because it really helps you understand how something is implemented. And then from that we can derive our understanding, figures, concepts, because if we don’t really implement things, if there’s no code, it’s really sometimes ambiguous. And of course, you know, as I realized, not everyone is coding from scratch anymore.

Like back in the day, coding something from scratch was all we had. I mean, there were only humans coding. Nowadays, coding can be done by LLMs. However, that doesn’t mean reading code is no longer useful, because it carries a lot of information. So in this case here with this watermarking, spending some time coding an LLM from scratch really makes you realize how this sampling inside is implemented. We still have some relevant code snippets.

And then that really, in turn, helps us understand, oh, the watermarking is applied at this position, and this has so-and-so consequences and so forth. So I think even though people may not be coding from scratch, at least not all the time anymore, it is still useful being able to, let’s say, build something from scratch for educational purposes to understand something deeply and then also for research purposes to manipulate this in a transparent way that is not hidden away in tons of layers of abstraction.

But that aside, I think it’s just a coincidental nice relationship here because, for this slide deck, I actually used a lot of figures from my from-scratch coding materials.


Anthropic announcement about Claude text watermarking
Slide 3 of 52, time stamp 3:58

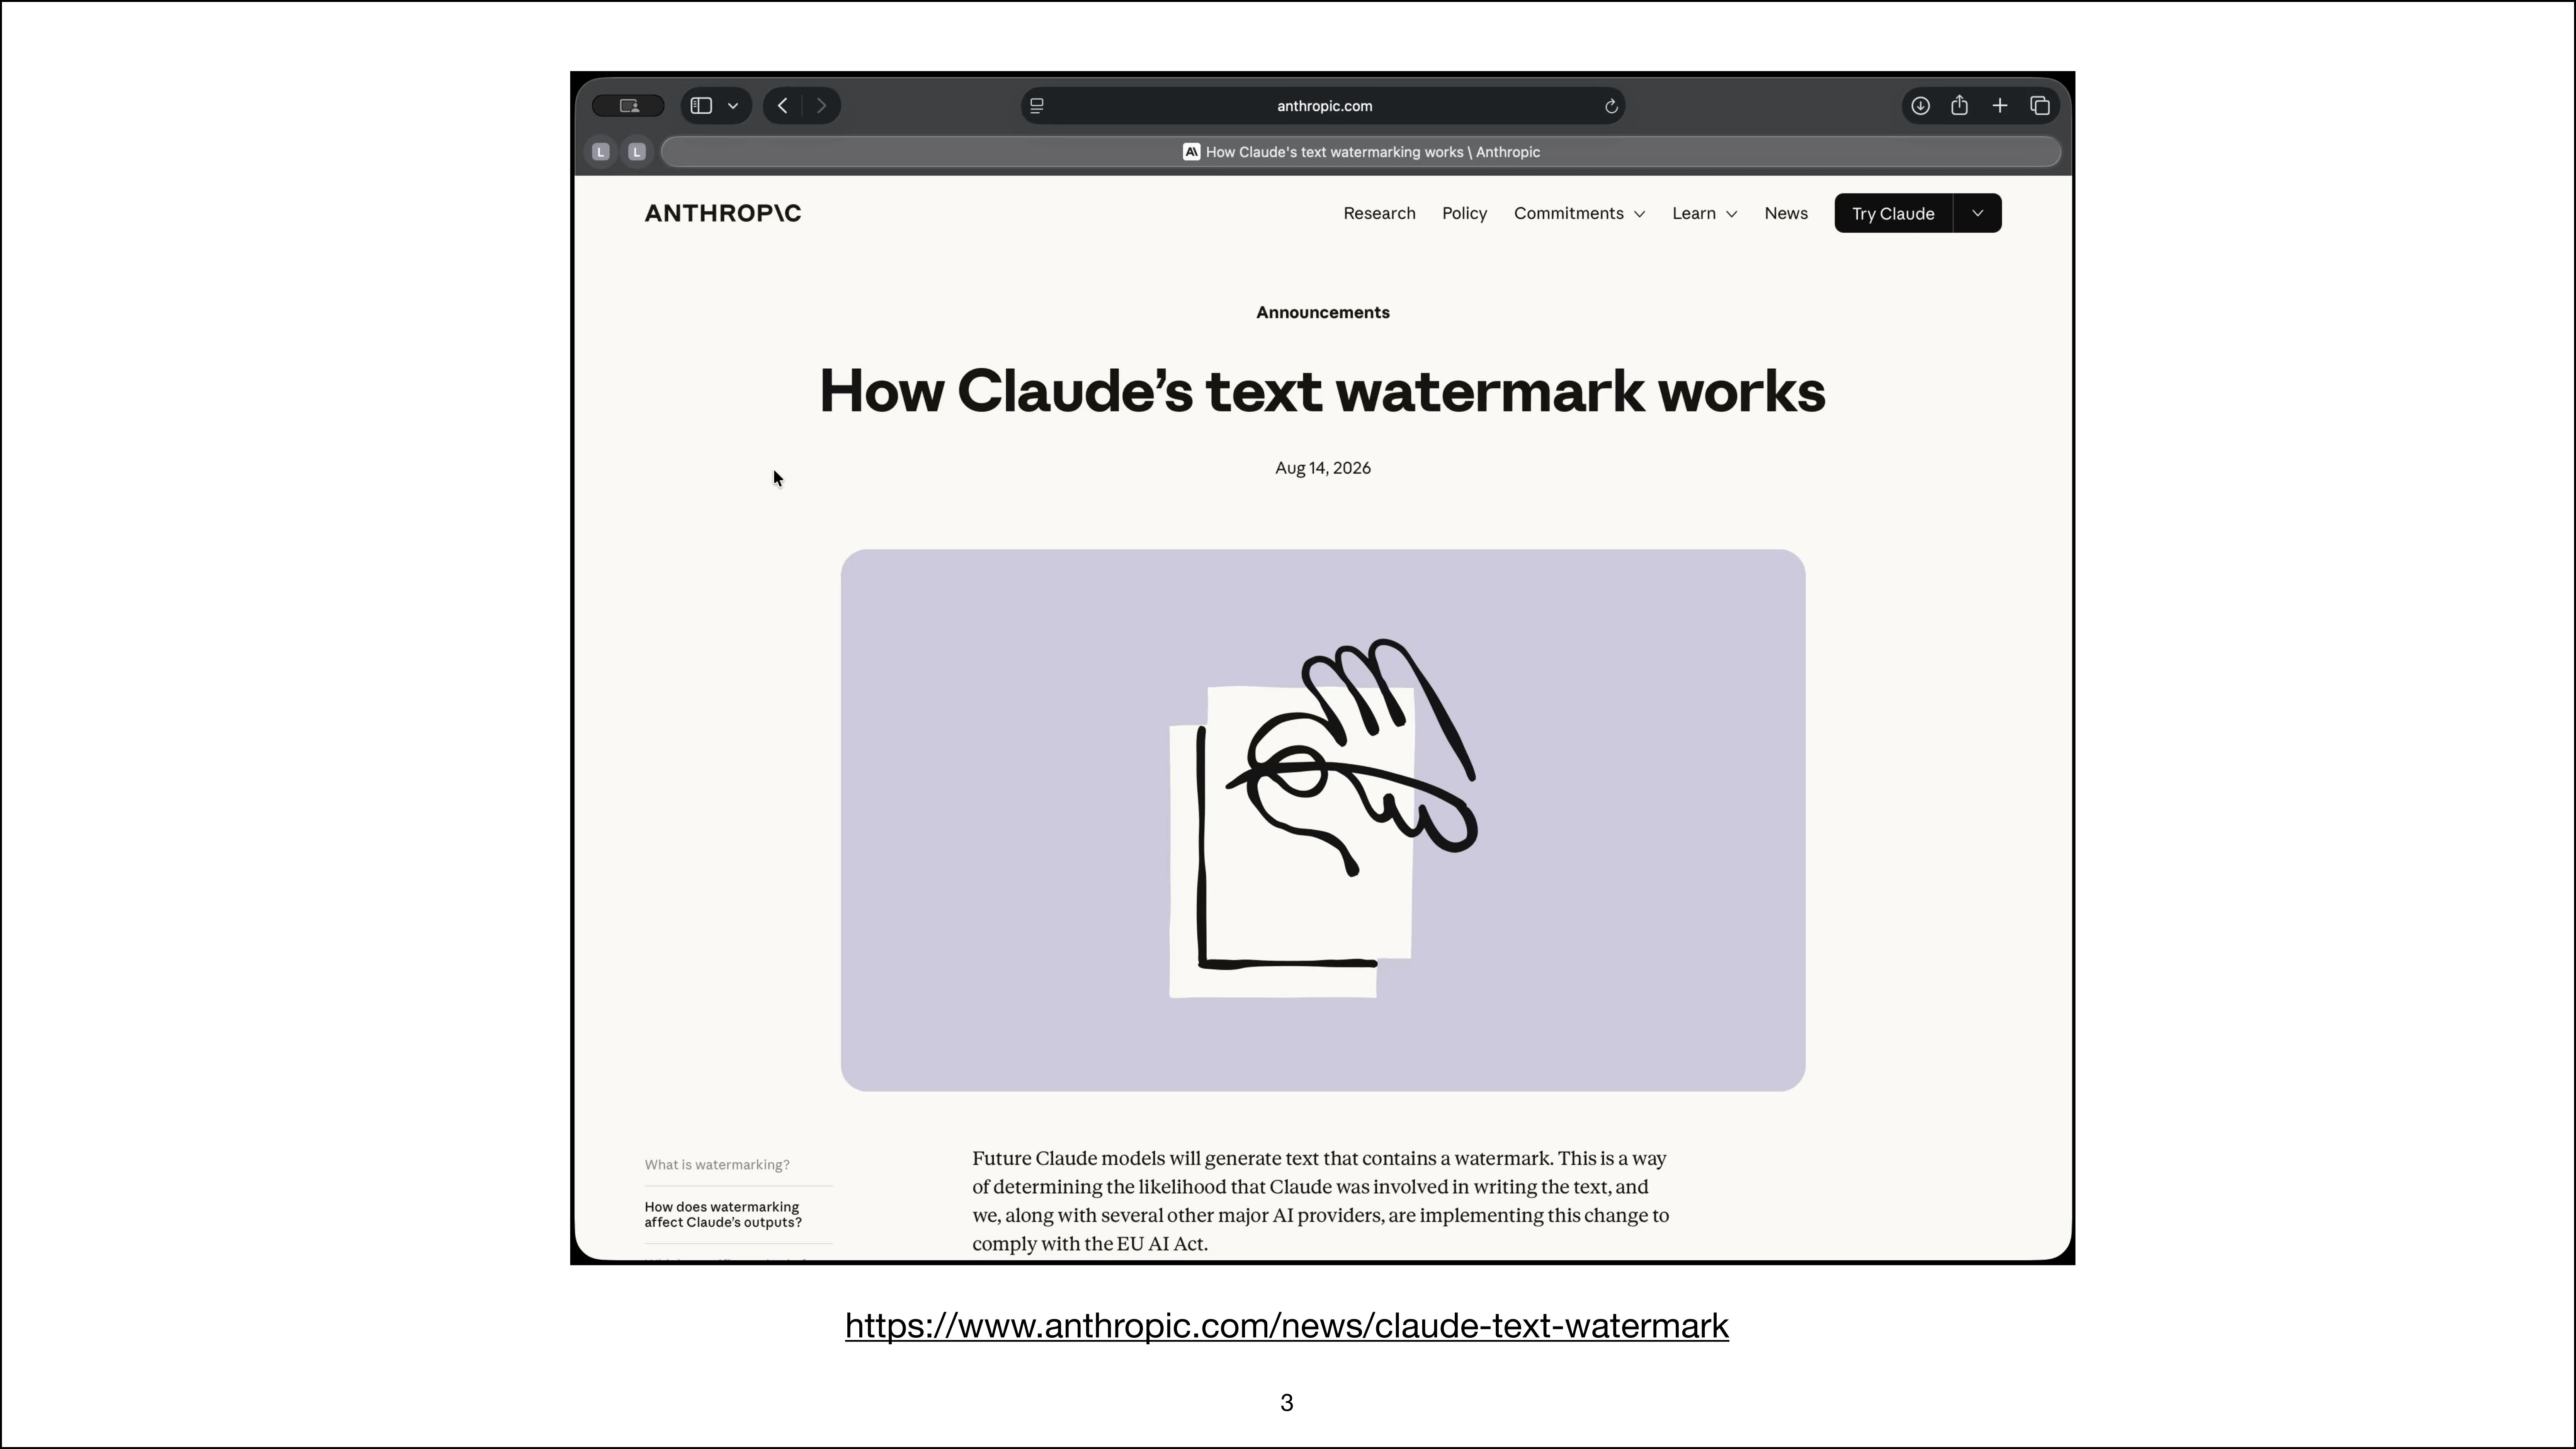
So a few days ago (this is August 14), there was this article, How Claude’s Text Watermark Works, and there was this article here; it’s just like a screen recording, so it can have everything in the slides, but there’s plenty of detail. They updated it actually a couple of times, so originally when I read this, it was a way shorter. Still, it is very, I guess, conceptual; there’s like this overview, and there’s, I mean, there’s not a single figure in there.

And so it’s kind of still hard to understand what they’re trying to do. So they explain a lot about why they’re going to do it, but they don’t explain how. They’re linking to one paper somewhere there, which is very technical also. So I do think it makes sense maybe to take a step back and start at the beginning to kind of understand what they’re trying to implement here with this watermarking technique.

And so the motivation, by the way, of watermarking is for them to identify if someone posts some text that they can say, oh, this text was generated by our Claude Opus 4.8 model, for example, so that they have a way to tell, OK, this text is AI-generated because it carries this watermark. And this watermark is invisible to users, so only they can decode it and find out whether the text has their watermark.

Why can only they do it? We will get to that later in this (hopefully not too long a video), but one thing at a time.


5:38

How LLM Text Generation Works

Prelude: text generation in LLMs
Slide 4 of 52, time stamp 5:35

So I wanted to start with a brief prelude to explain how text generation works in LLMs, because based on that we can then more easily understand how the watermarking works and that this is actually not a huge, expensive thing on top of it. It’s really just like a minor, I guess, tweak inside the regular text generation process.


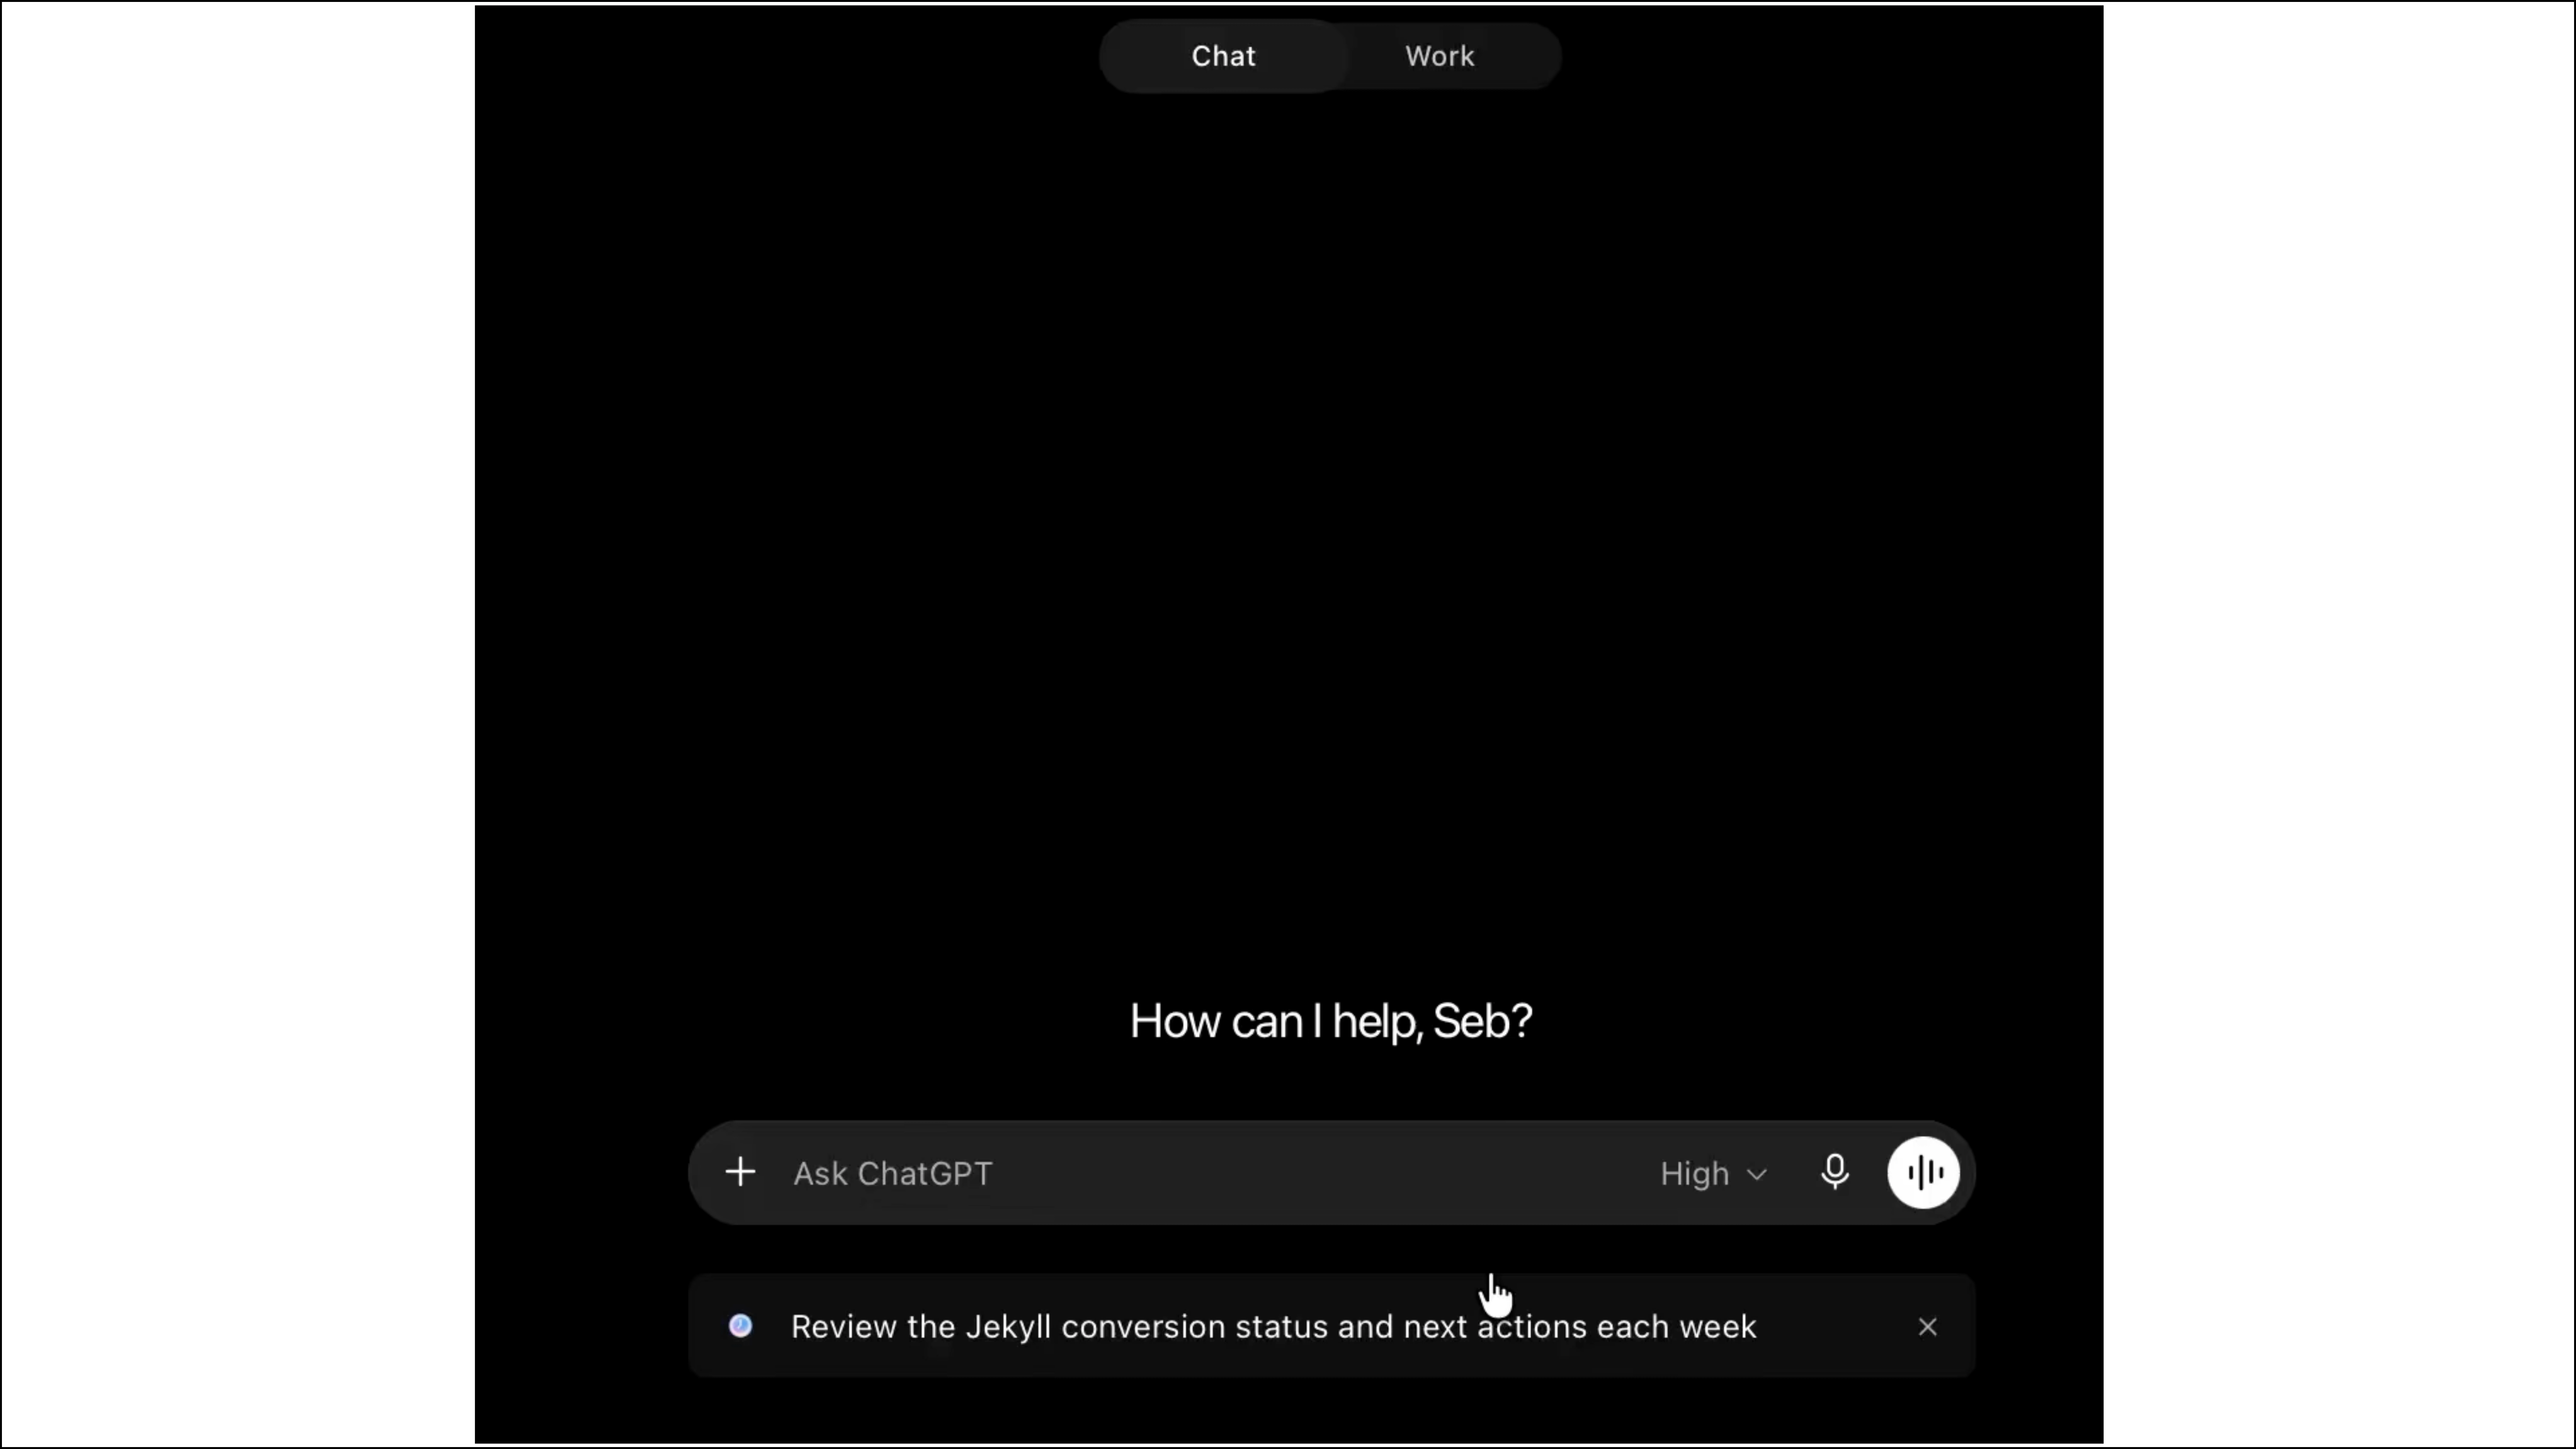
ChatGPT interface used as a text-generation example
Slide 5 of 52, time stamp 6:01

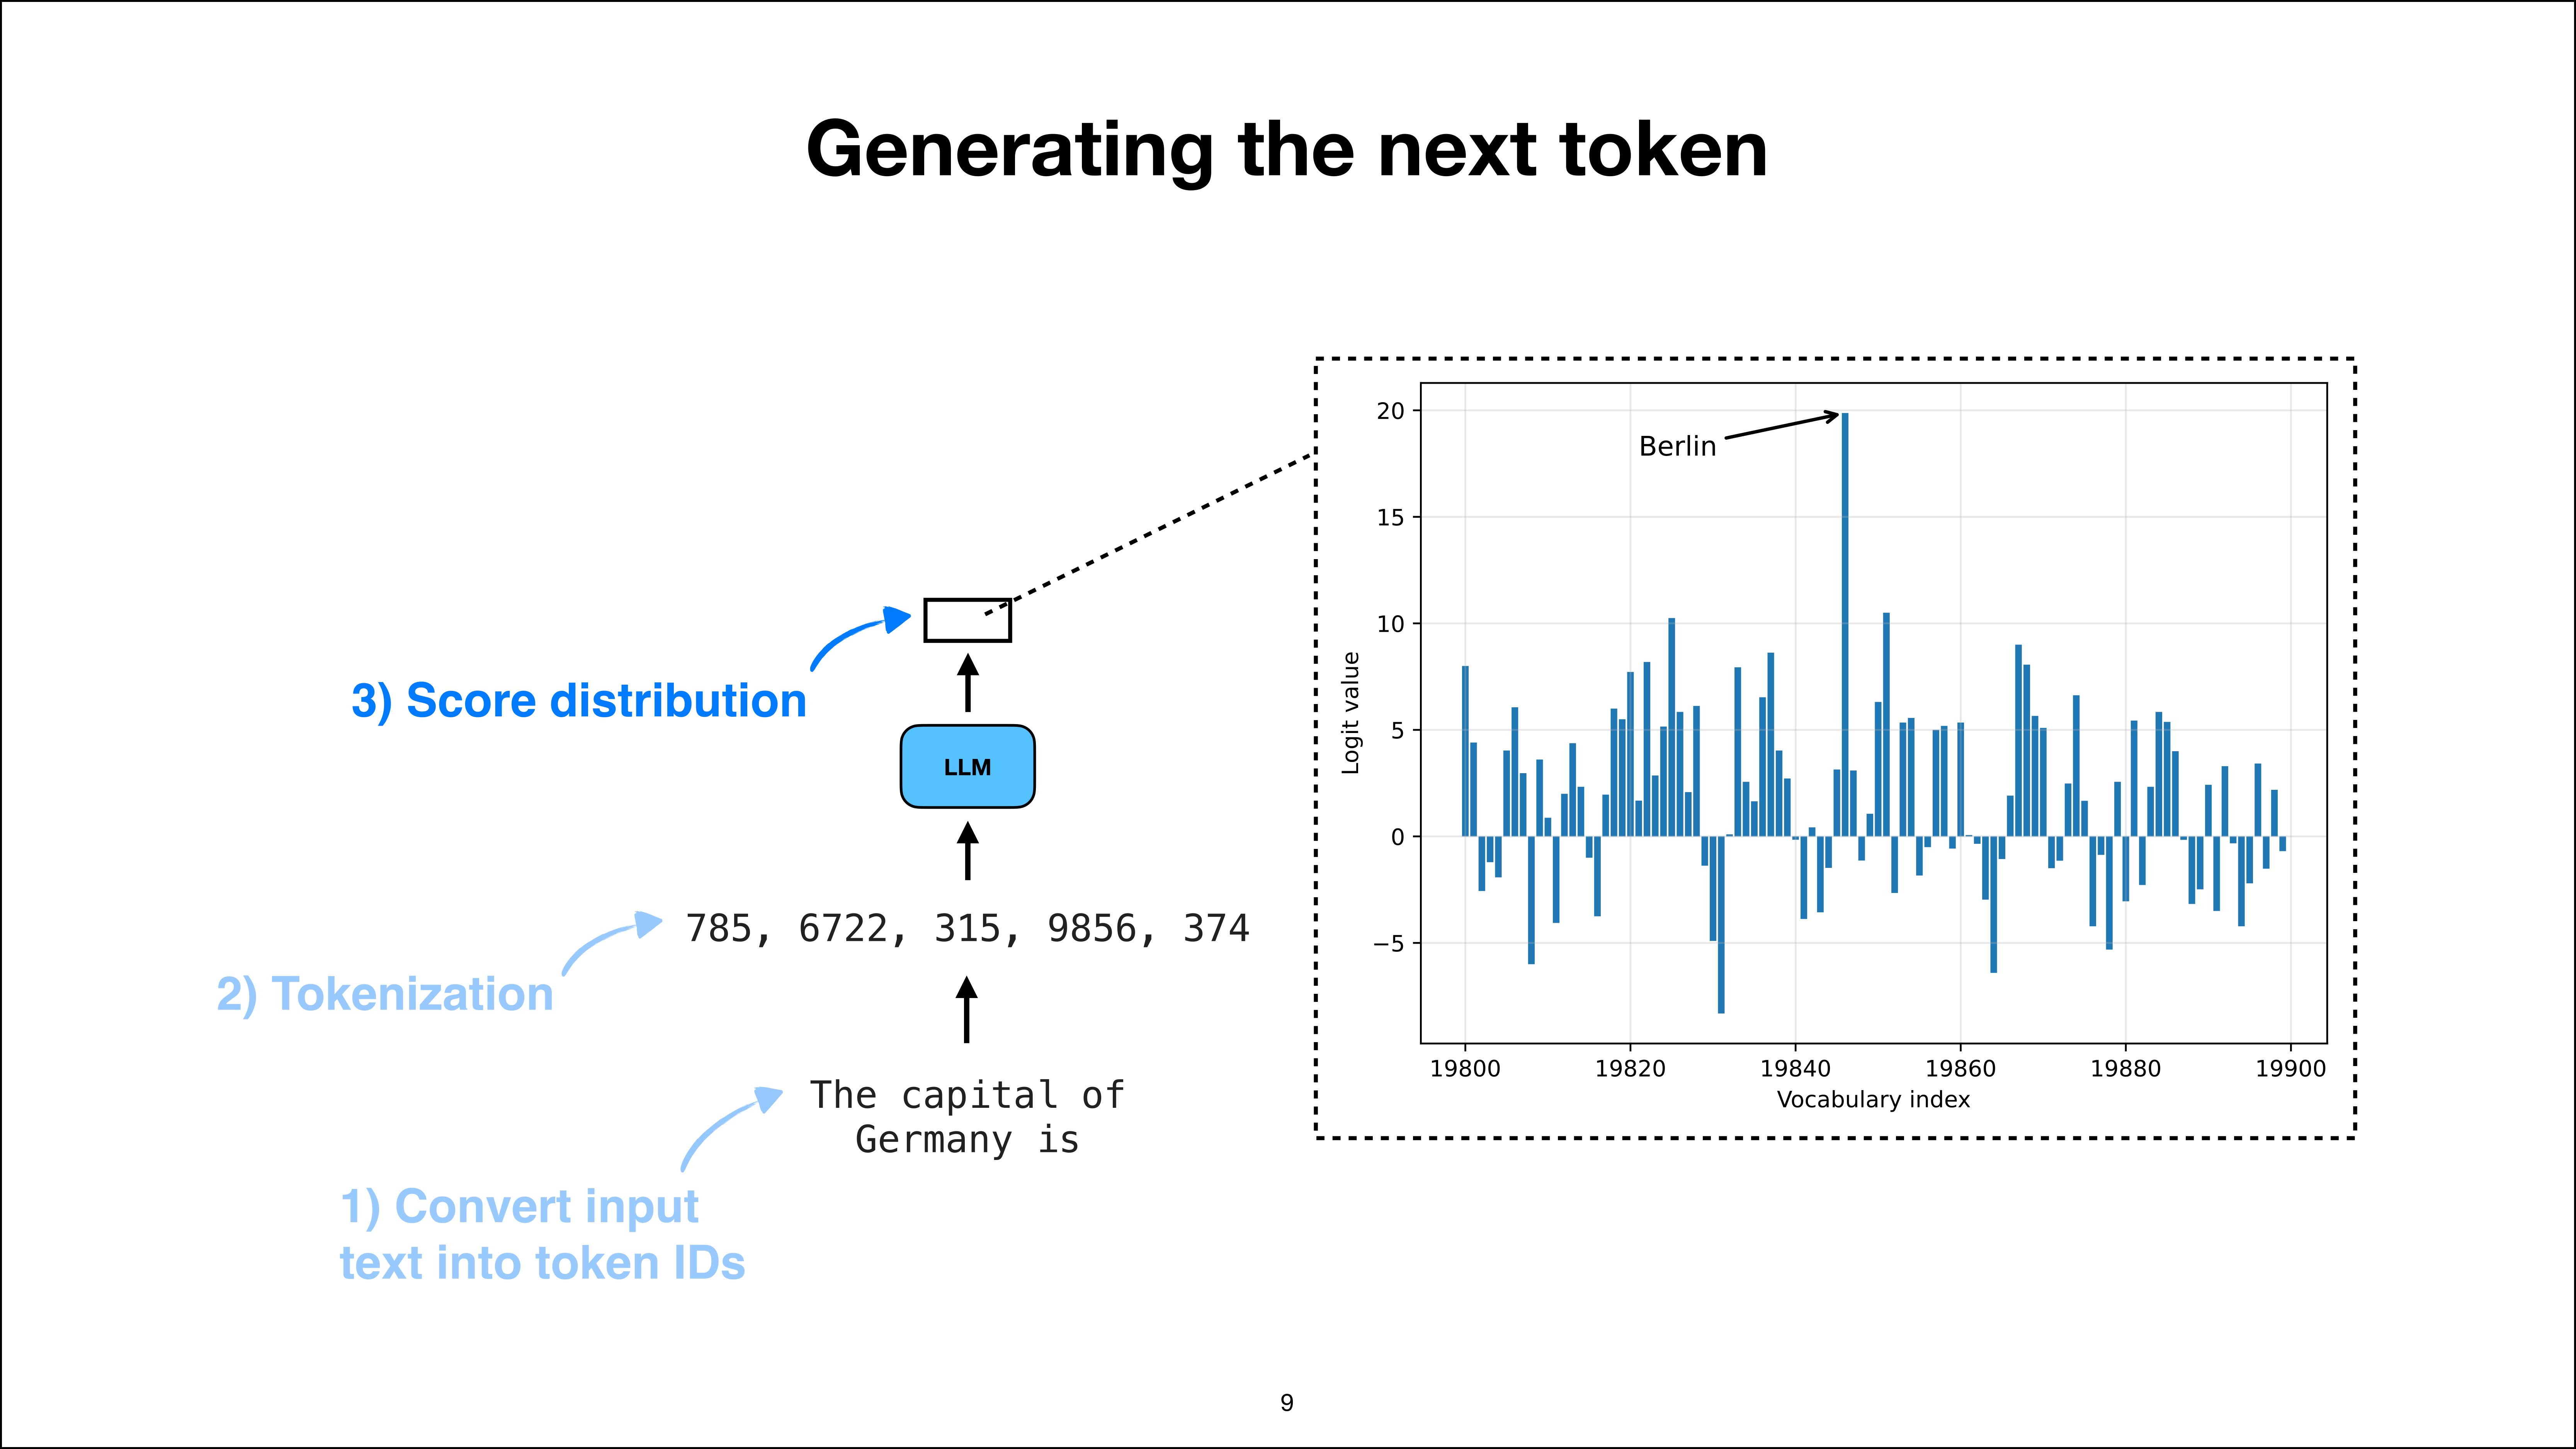
So when we are using something like ChatGPT, for example, let’s say I ask the question, the capital of Germany is, and yeah, ChatGPT or other LLMs, so this is just like an example would, for example, answer “Berlin”. So here, in this case, it’s generating two tokens, like “Berlin” and the period. But for simplicity, let’s assume it’s generating one token. So the next token is the “Berlin” token. How is this token generated internally?

What is happening under the hood when we type something here like the capital of Germany is and receive a token like “Berlin” back? What is actually going on there behind the scenes?


Question about what happens when the next token is generated
Slide 6 of 52, time stamp 6:41

So in the next couple of slides, I want to briefly talk about what happens under the hood when this next token is generated.


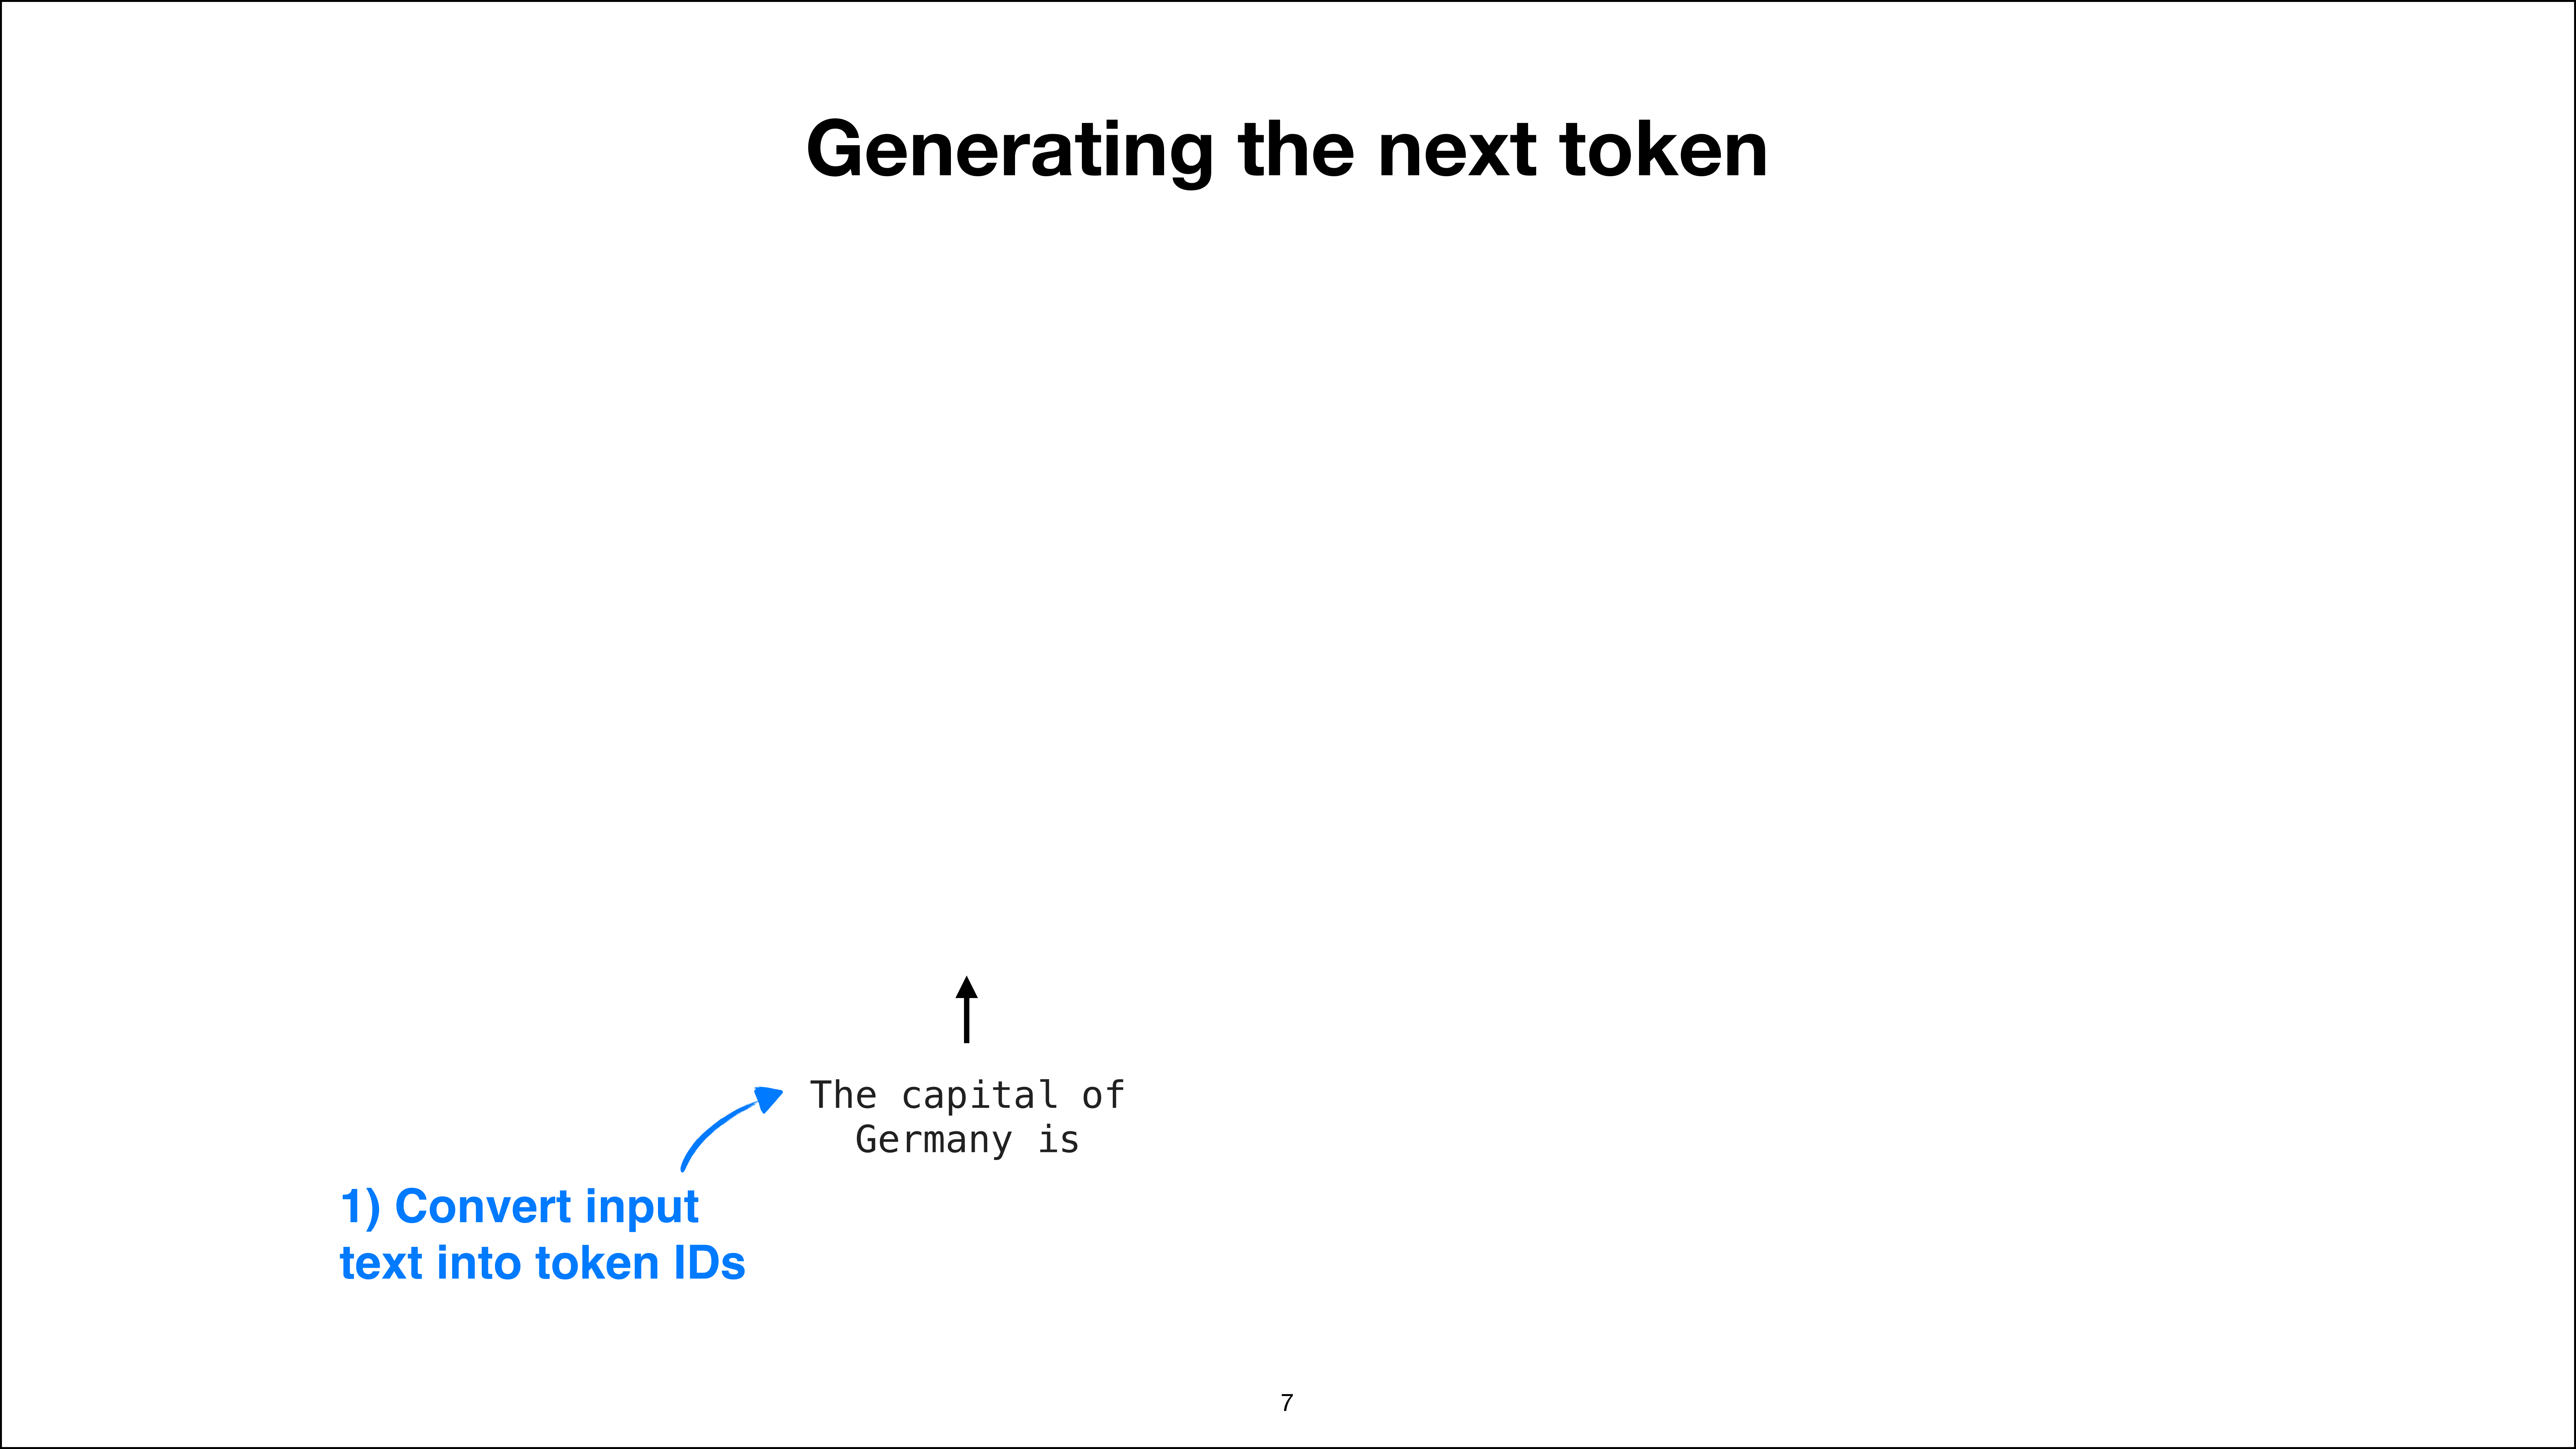
Step 1: convert input text into token IDs
Slide 7 of 52, time stamp 6:50

So assume again that our prompt is the capital of Germany is. And the first step here is to convert this into token IDs. So tokenizing it and converting it into token IDs is one of the main steps at the beginning. This is outside. It’s not inside the LLM; it’s outside of the LLM. So we are simply converting the text into token IDs. It’s just a format that embedding layers can work with.


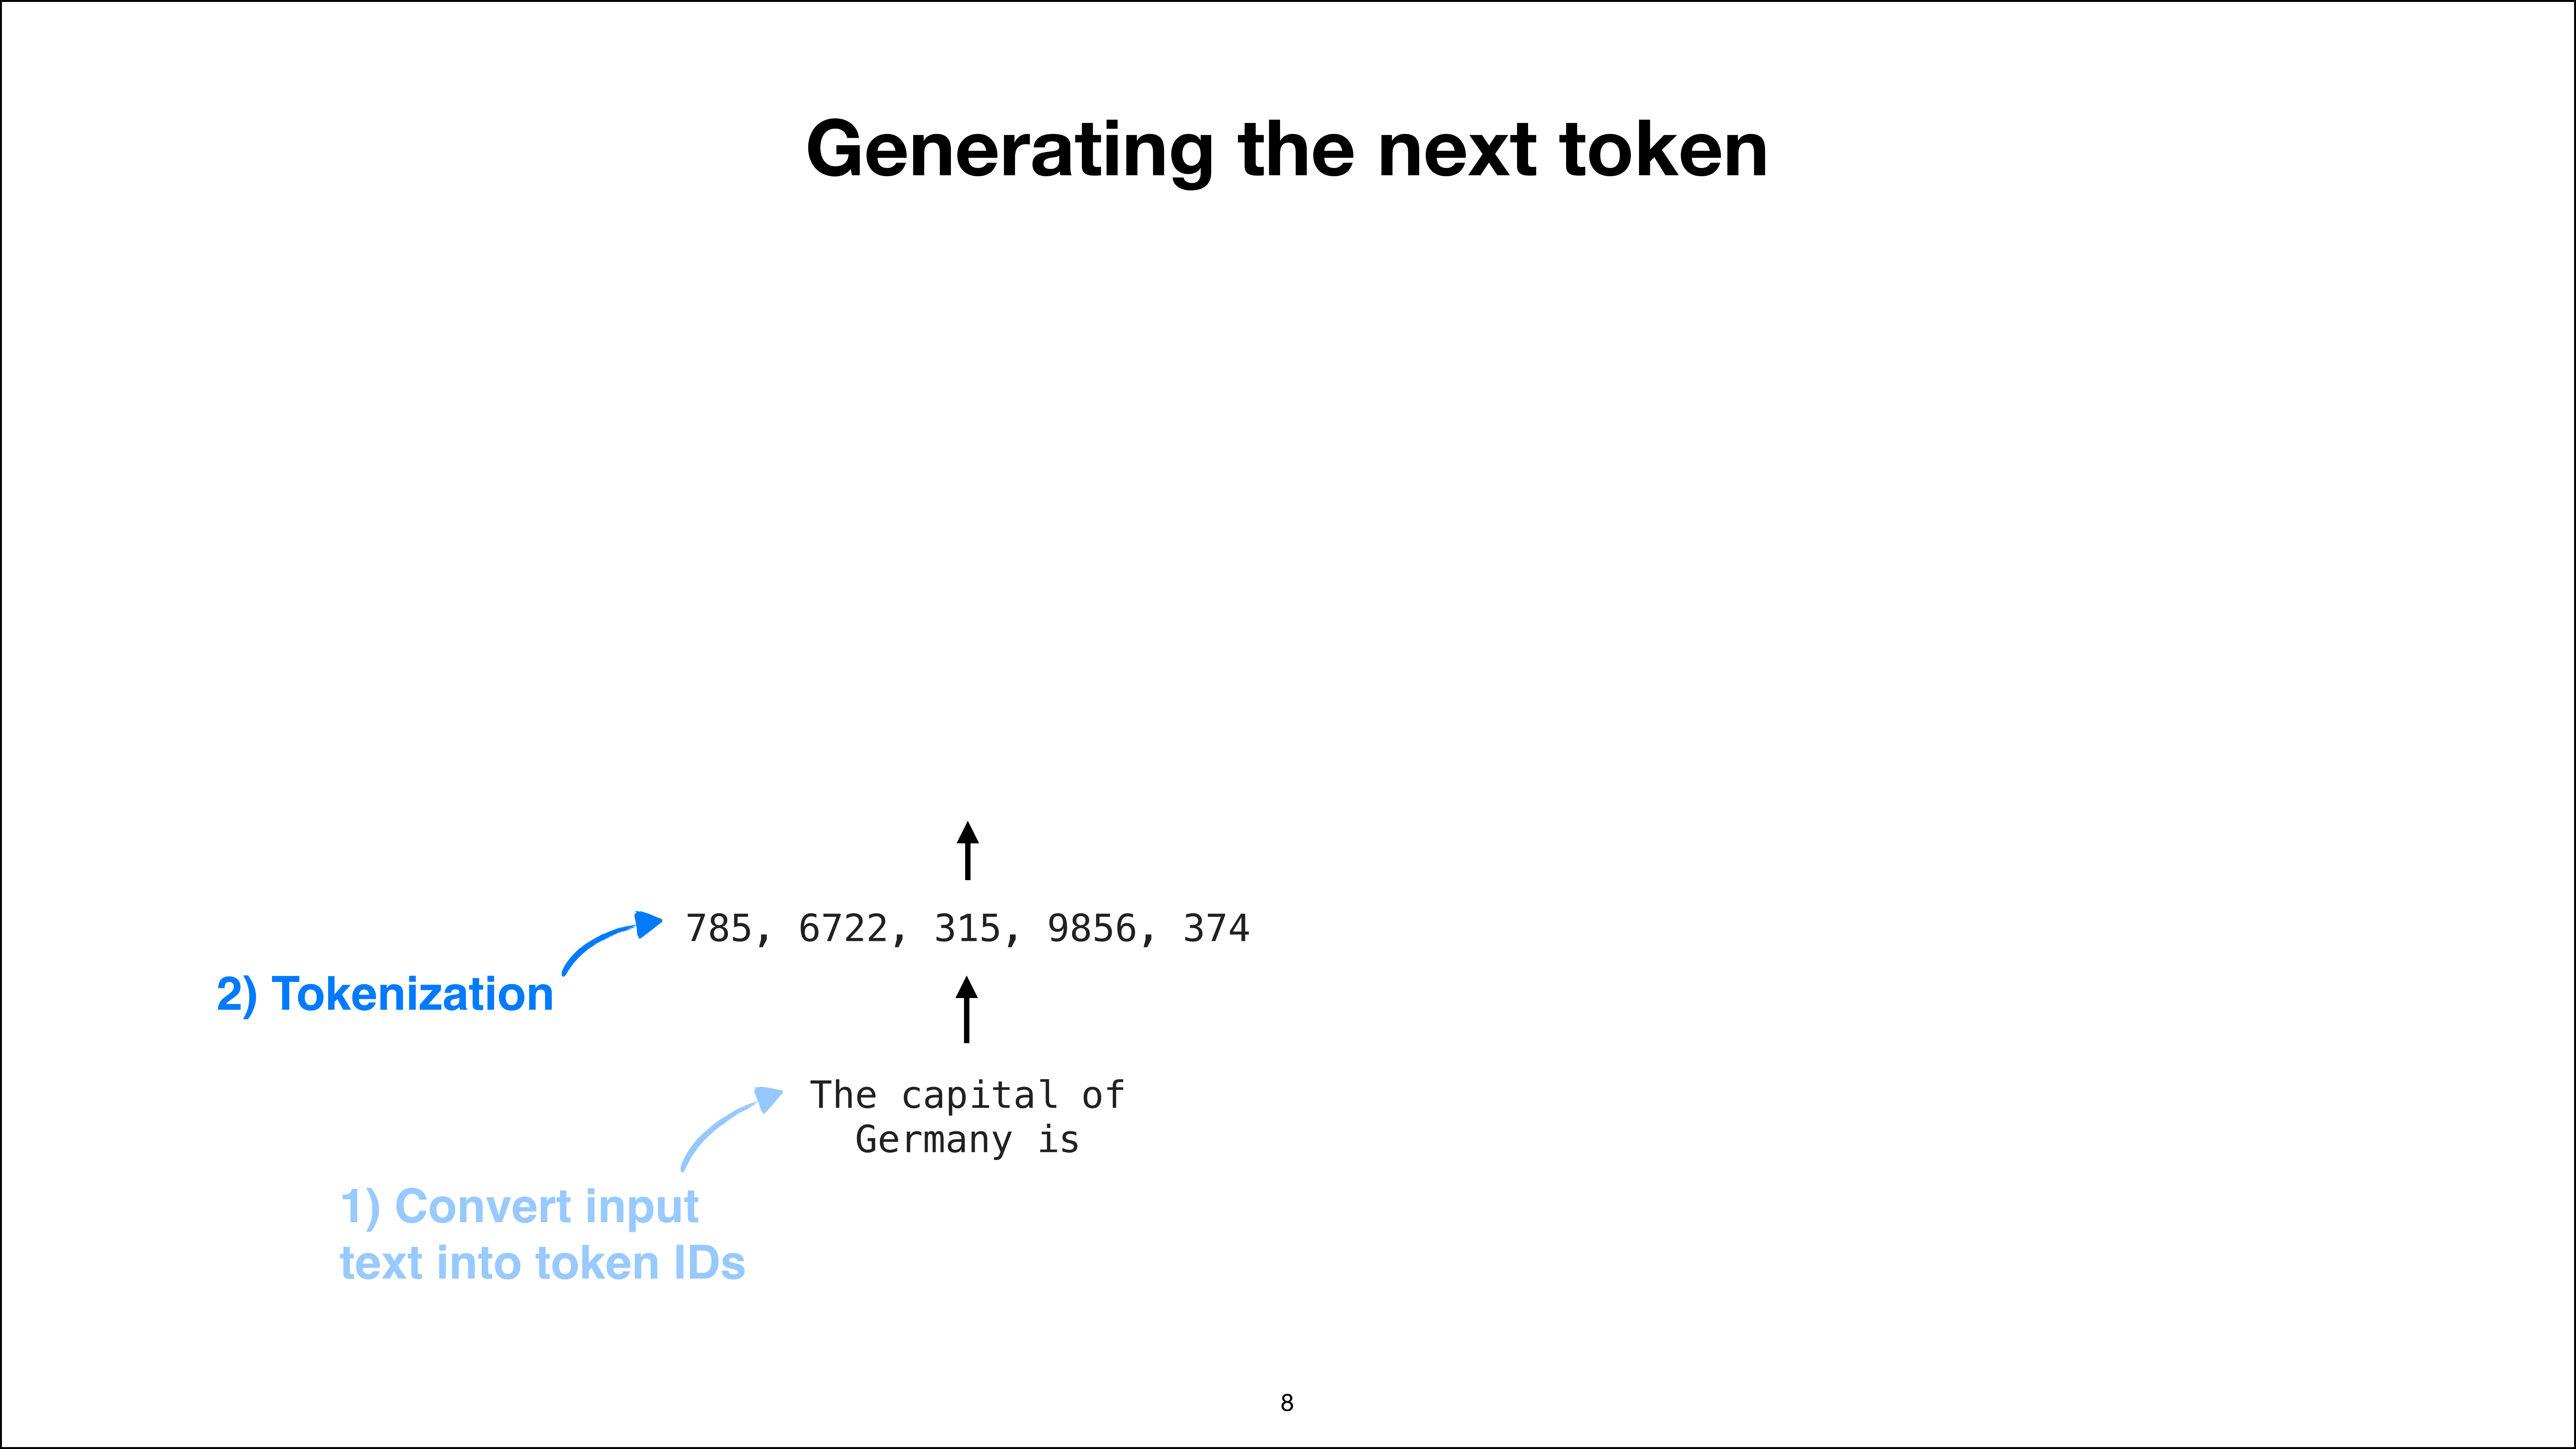
Step 2: tokenize the input text
Slide 8 of 52, time stamp 7:22

And then this passes through the LLM. And the LLM gives us a score distribution for the next token.


Step 3: obtain the next-token score distribution
Slide 9 of 52, time stamp 7:31

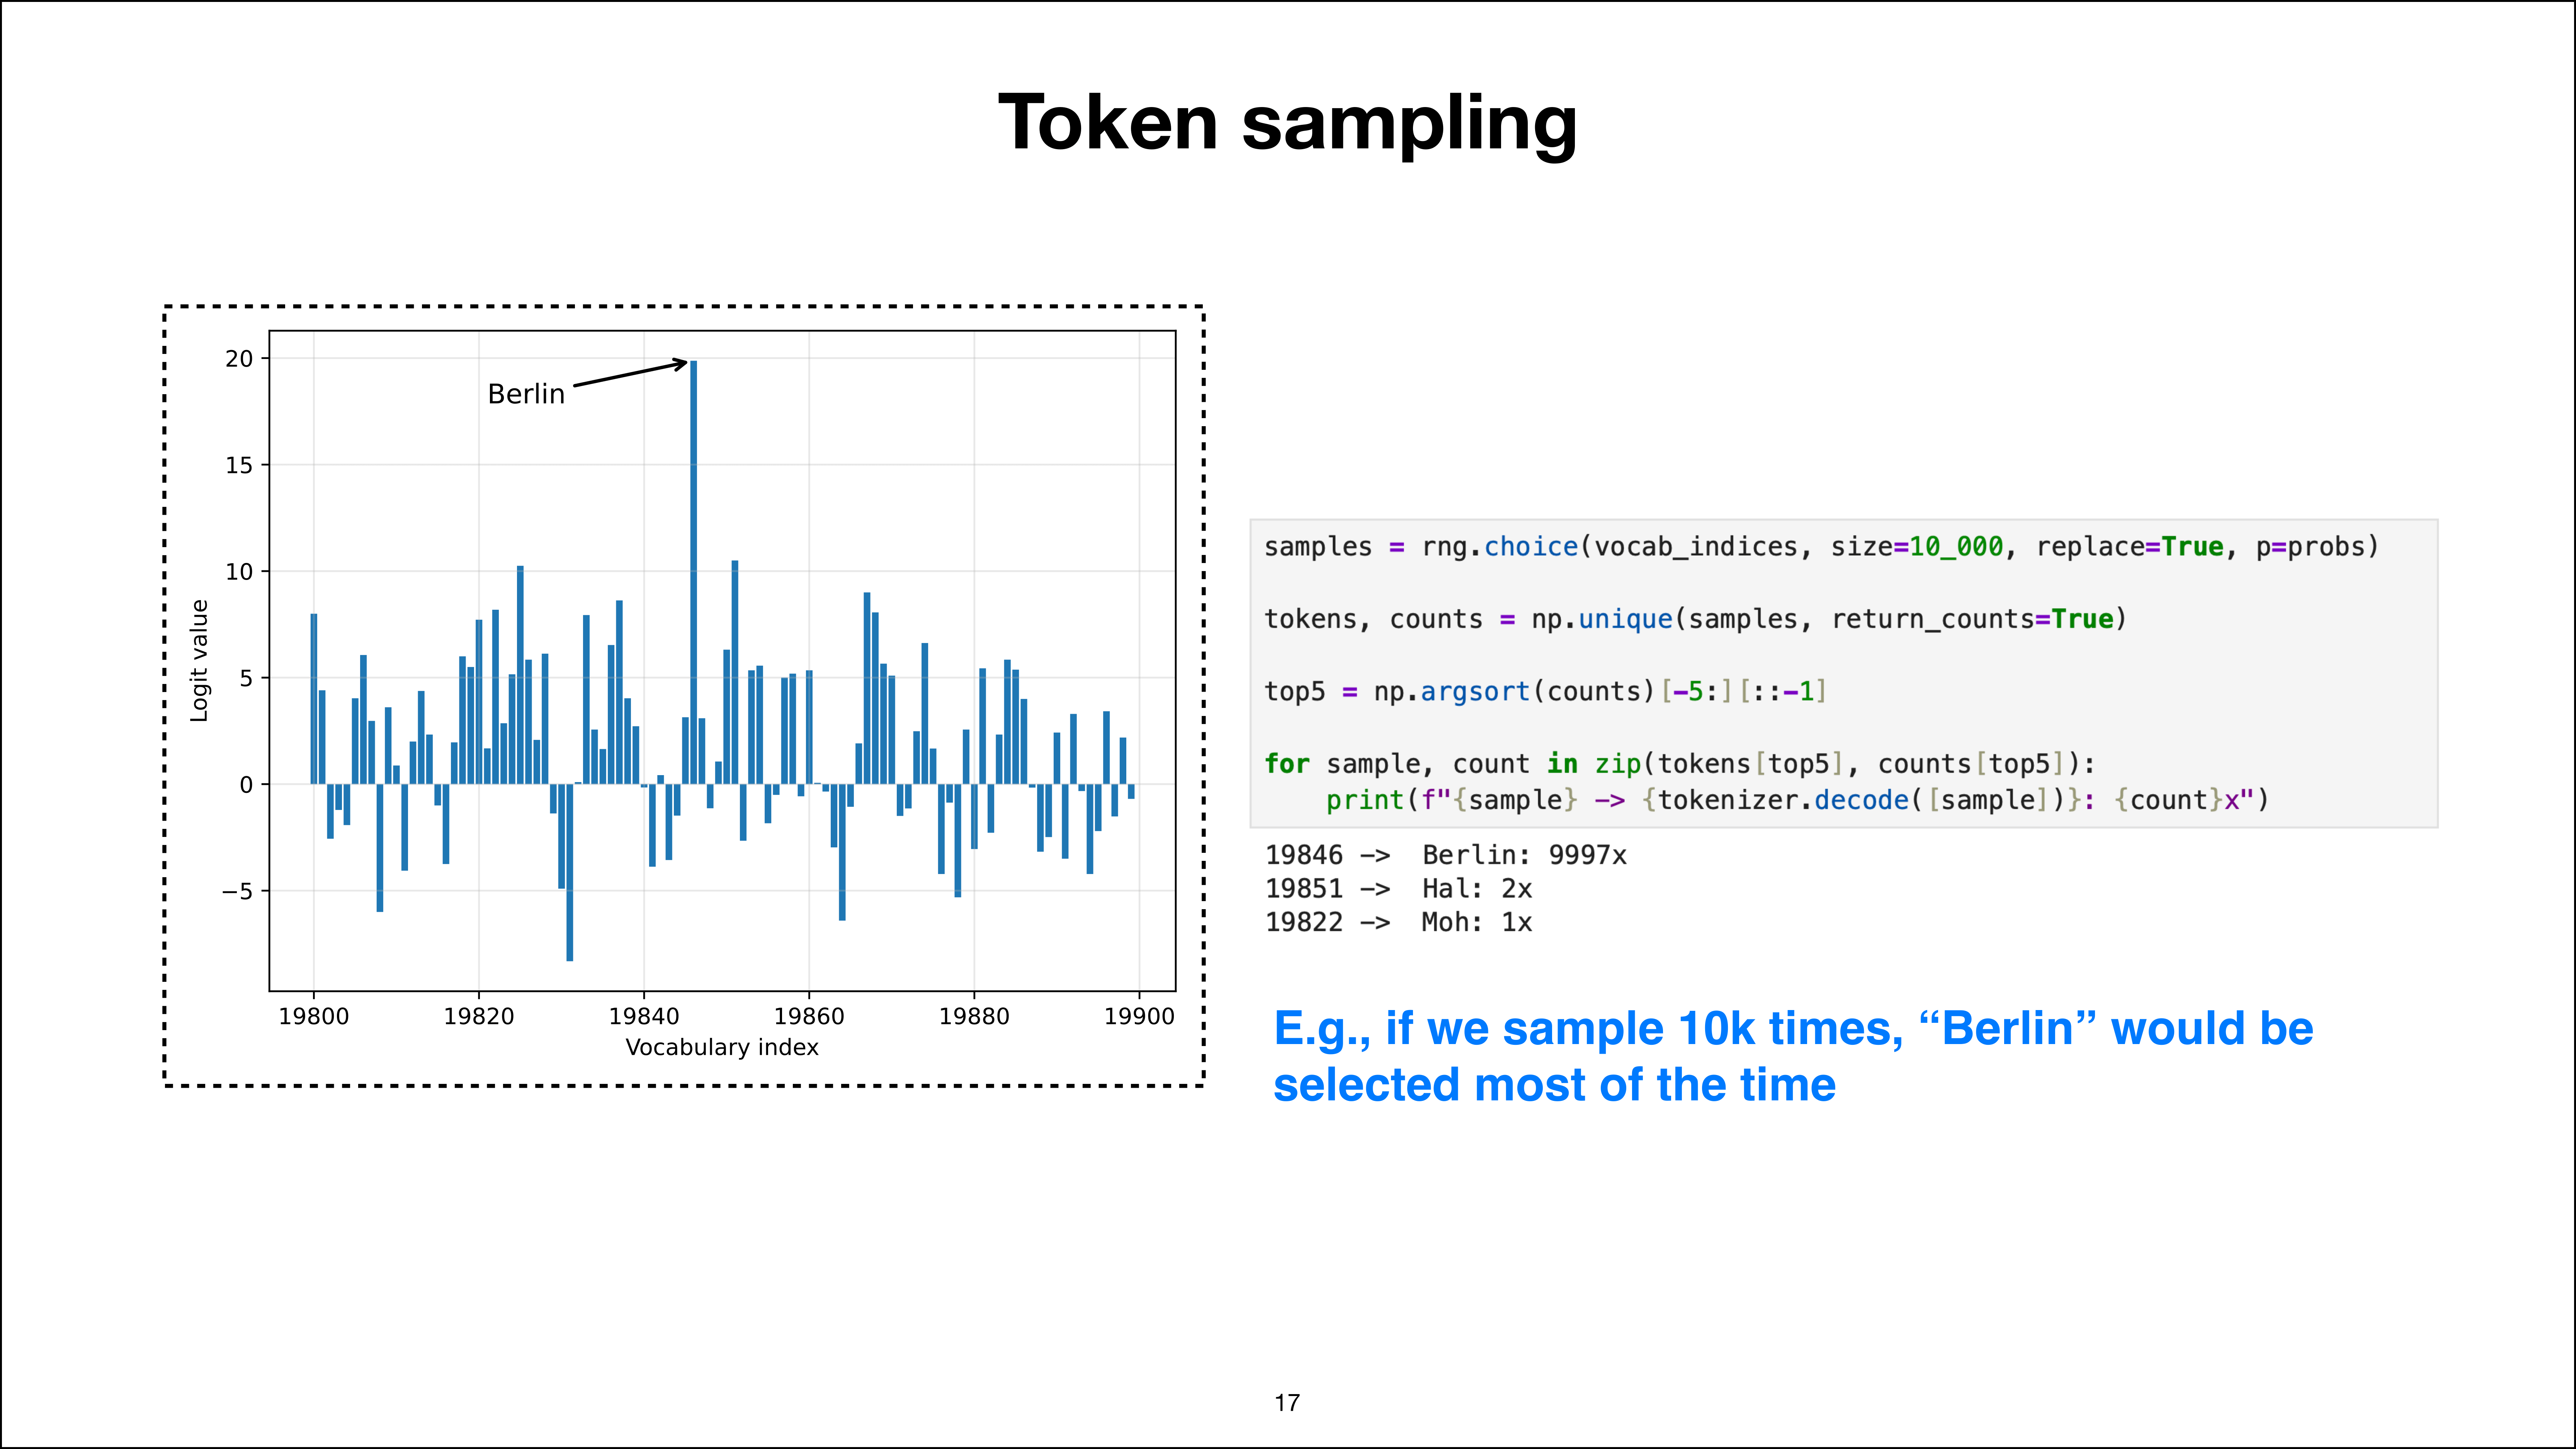
So again, this is just like a brief overview of how LLMs work internally. So I’m not covering the LLM machinery itself. I talked about it many times in my other From Scratch LLMs videos and books. The important part is that when we generate the next token (for example, “Berlin”), we have, at this point, a distribution of scores. So this is the output produced by the LLM.

Here in this case, we’re looking at logit values. So these are just scores from minus infinity to plus infinity, like a range of scores. Here’s an example, ranging from about -8 or -9 to 20. We could convert these into a probability distribution, but technically, it’s not strictly necessary depending on how we sample. But so you can think of the logit values as the raw scores.

And the raw scores go over the entire vocabulary.


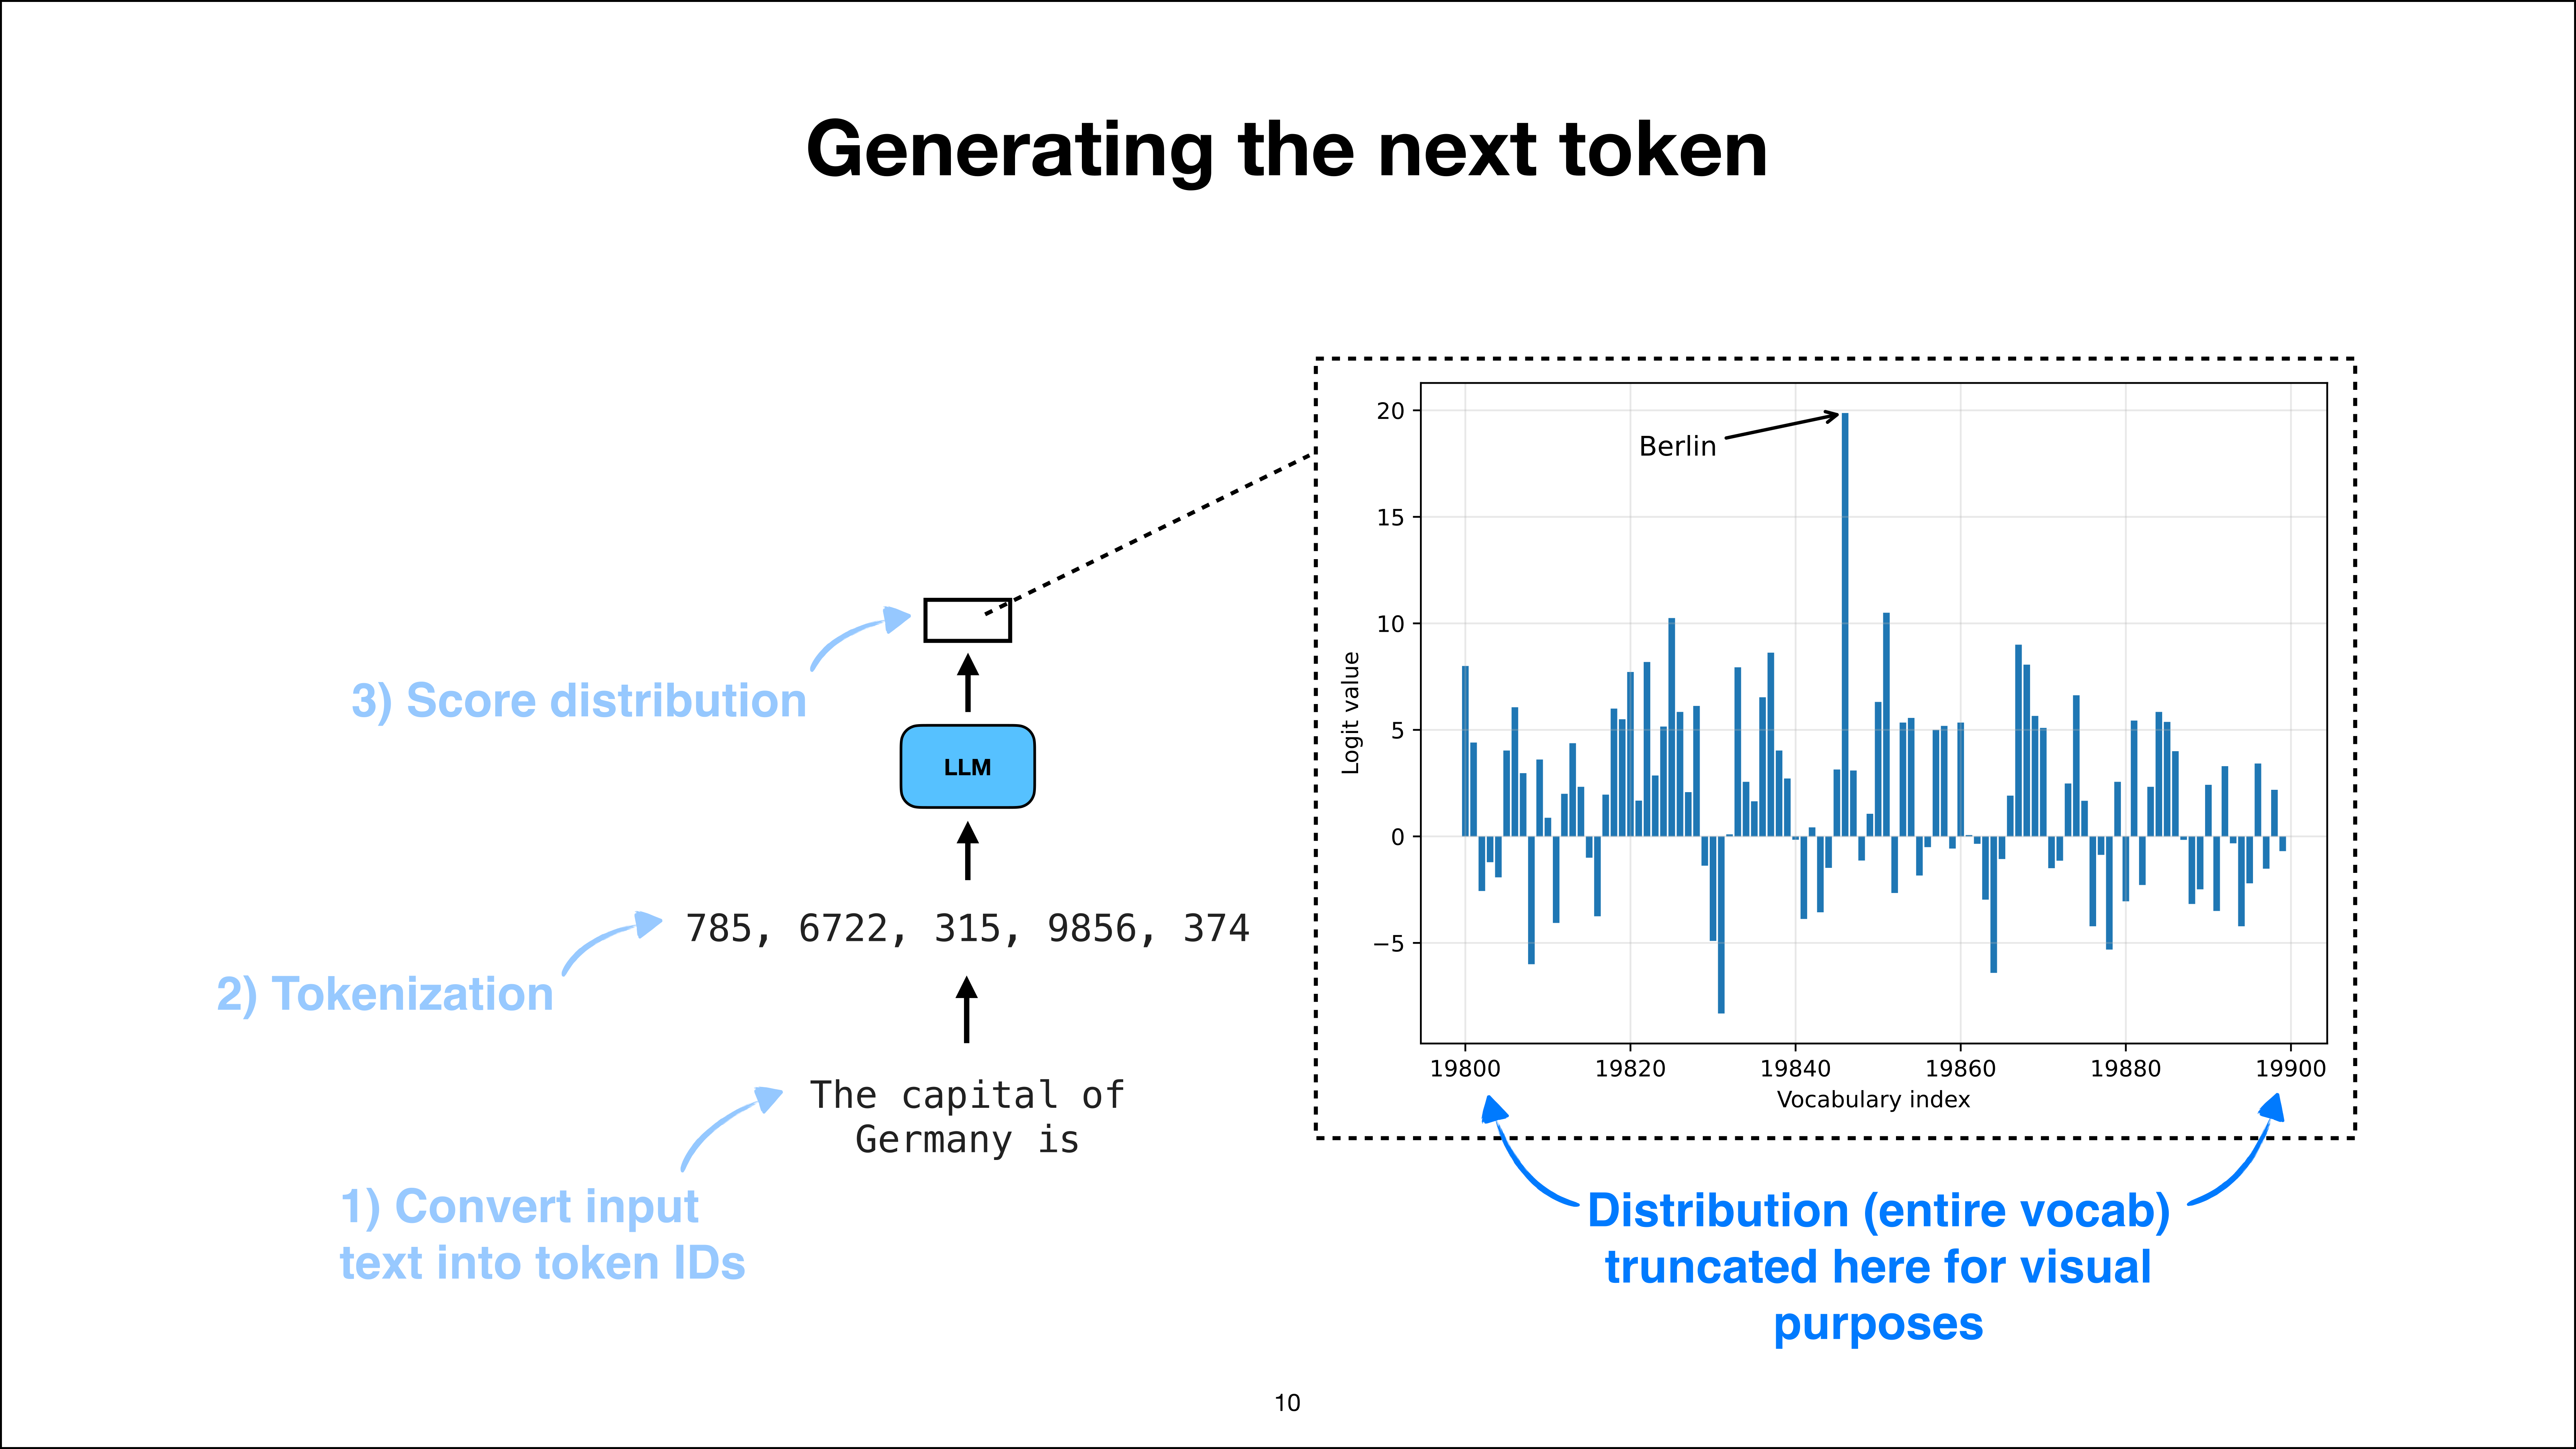
The score distribution spans the model vocabulary
Slide 10 of 52, time stamp 8:39

That means every possible word that the LLM could generate. Now here, in the vocabulary index, a certain value (index position 19,846) receives the highest score. So I spread out the distribution. If you would run this prompt through an LLM, you would even see something more extreme: that everything is, like, very, very, very close to zero. And “Berlin” would probably be much, much higher even.

But just to show you a few, you know, like peaks here so it looks a bit more interesting, I kind of zoomed in; in and spread out the distribution a bit. Now here, “Berlin” is the highest score because you can think of it as the most, I guess, probable or plausible next token if I have a very specific prompt like this. So the other ones, I mean, it could be something like Hamburg or Munich that the LLM might guess incorrectly.

But nowadays an LLM should be fairly certain that “Berlin” is the correct answer here. You are also seeing here the vocabulary index. So that’s like over the whole vocabulary. Nowadays, LLMs have like 250,000 possible tokens as output. I’m truncating it here from 19,800 to 19,900 because there’s just so much space here on this slide. If I would have a very realistic vocabulary of 250,000 words, everything would be so narrow that we would barely even be able to tell or see anything on this distribution.

So this is just truncated for educational purposes. The important point is that in regular text generation, we get this score distribution. Now, what we do is look at the highest score.


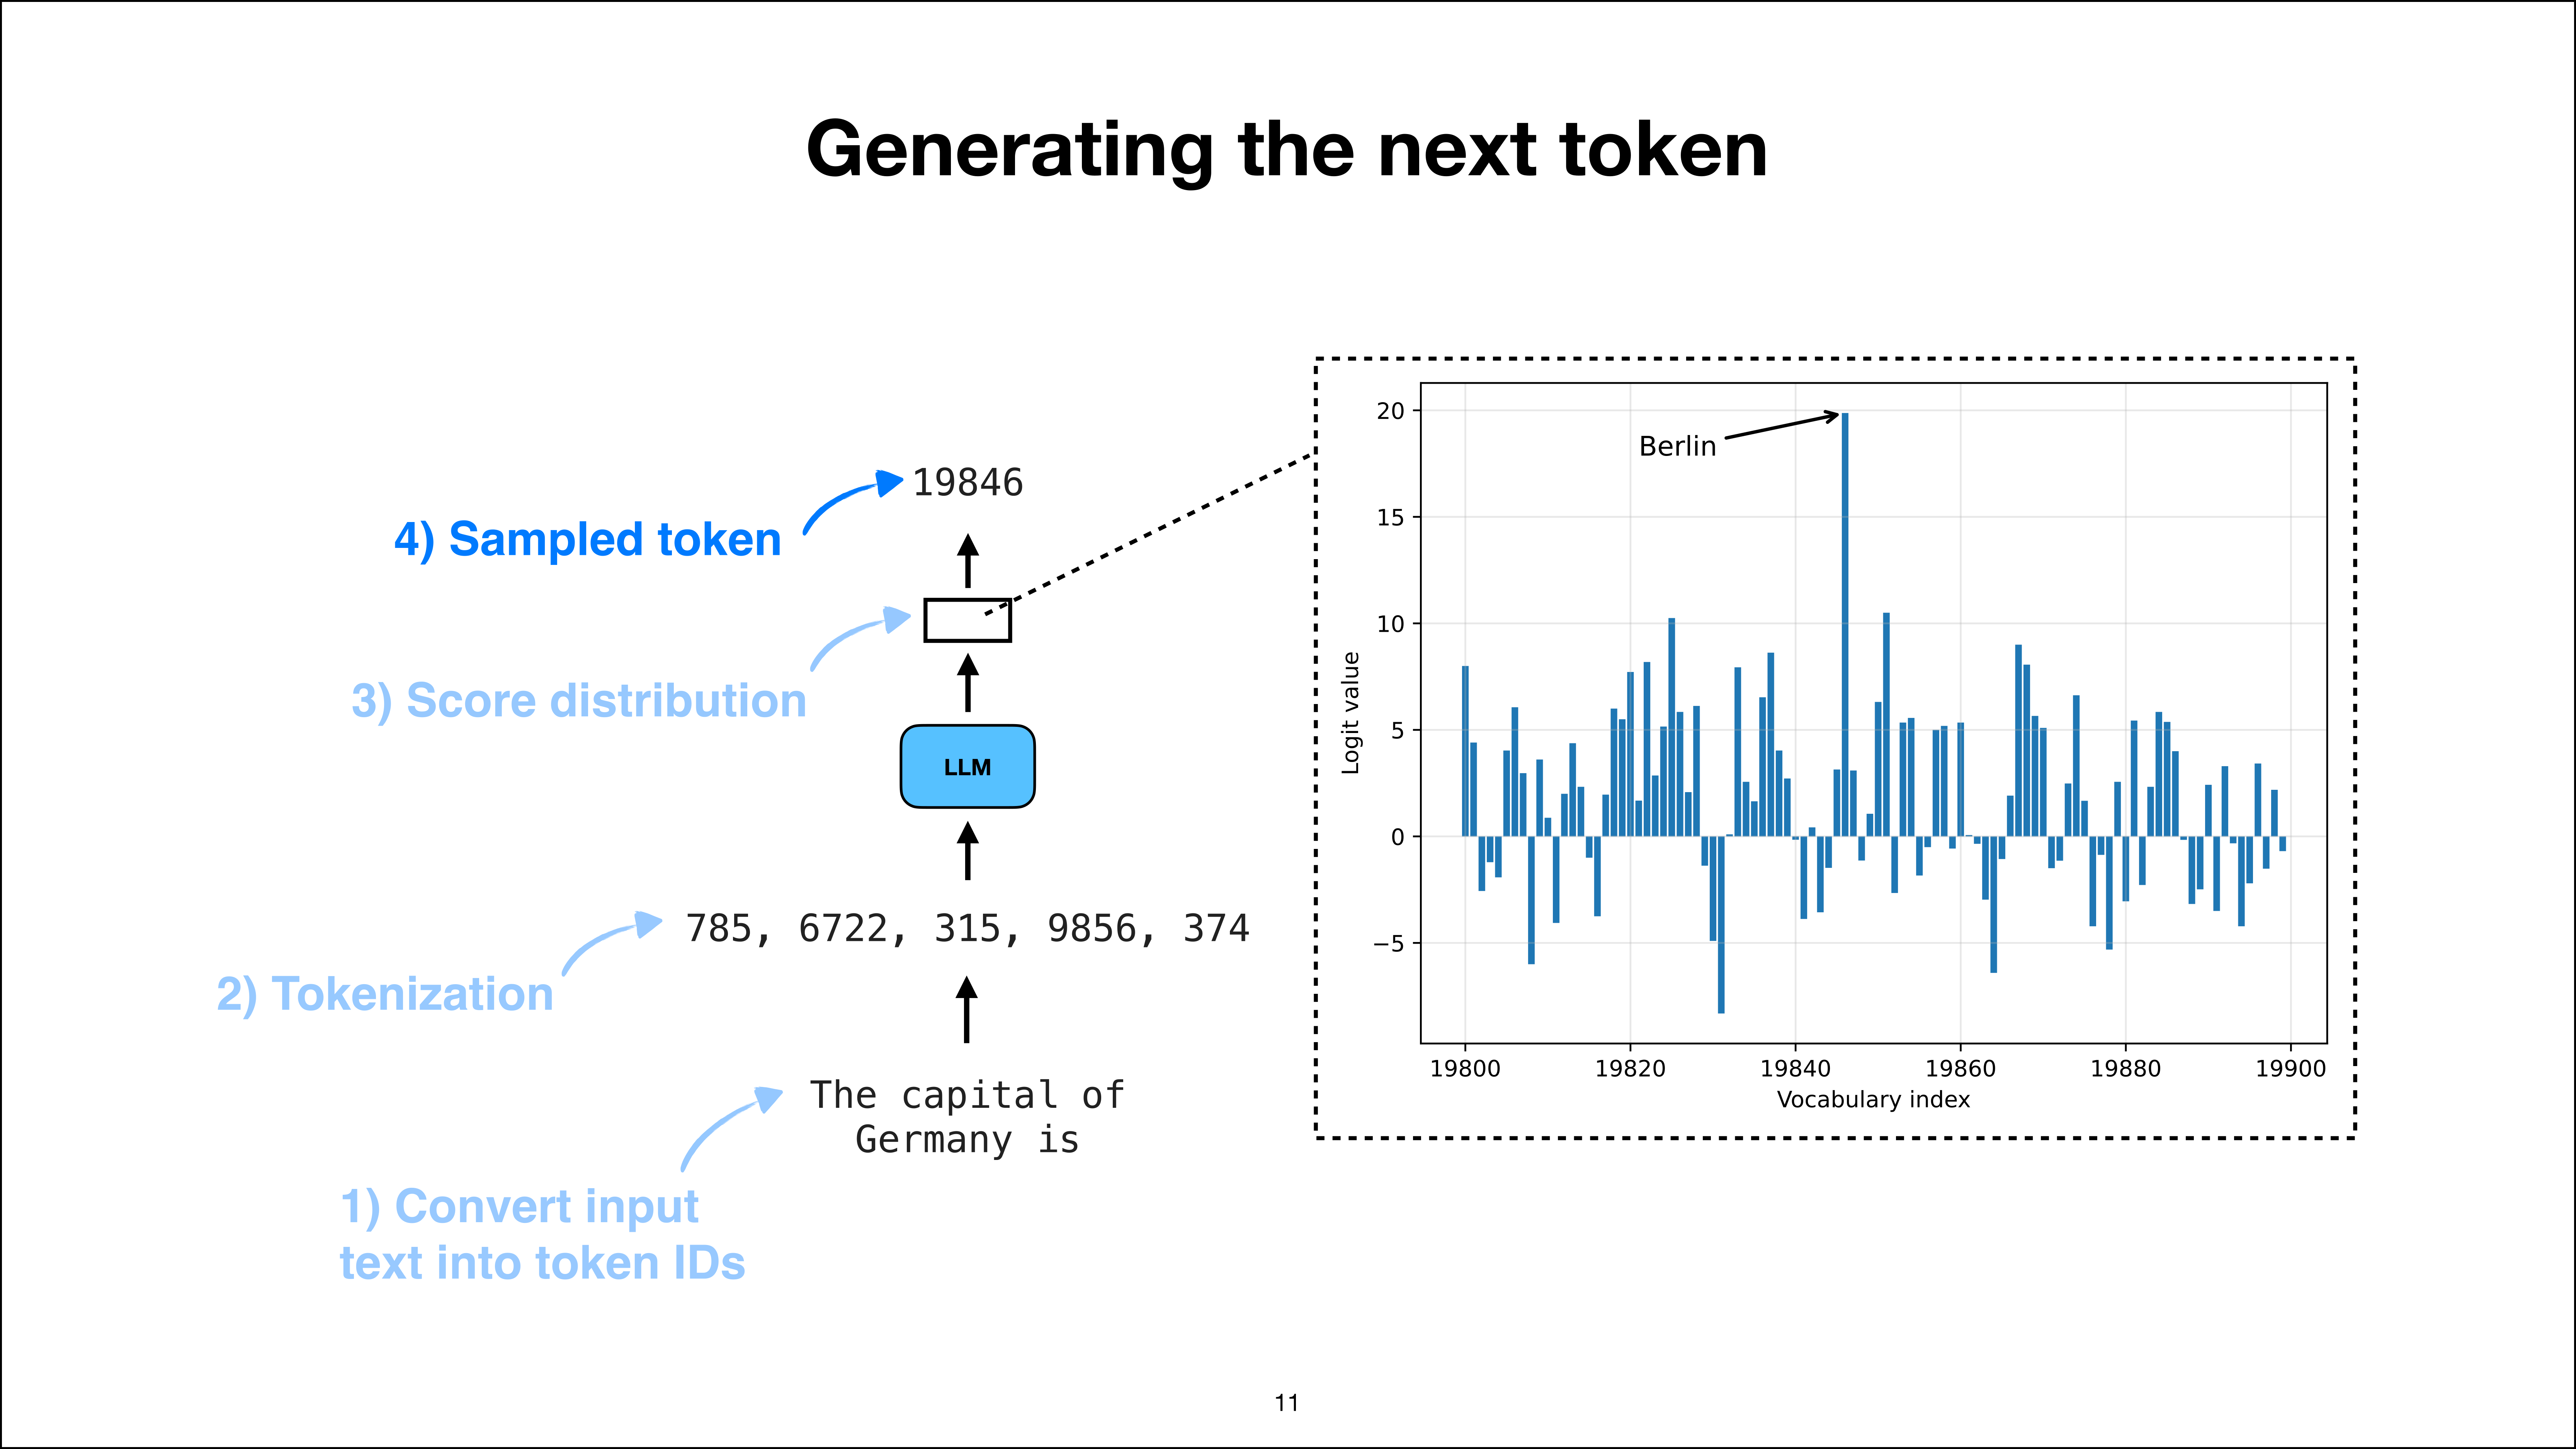
Step 4: sample a token from the score distribution
Slide 11 of 52, time stamp 10:33

I will get into more detail later on how this is selected. So it’s not necessarily precisely the highest one, but for simplicity, assume we are taking the highest score here. And in this case, it’s 19,846.


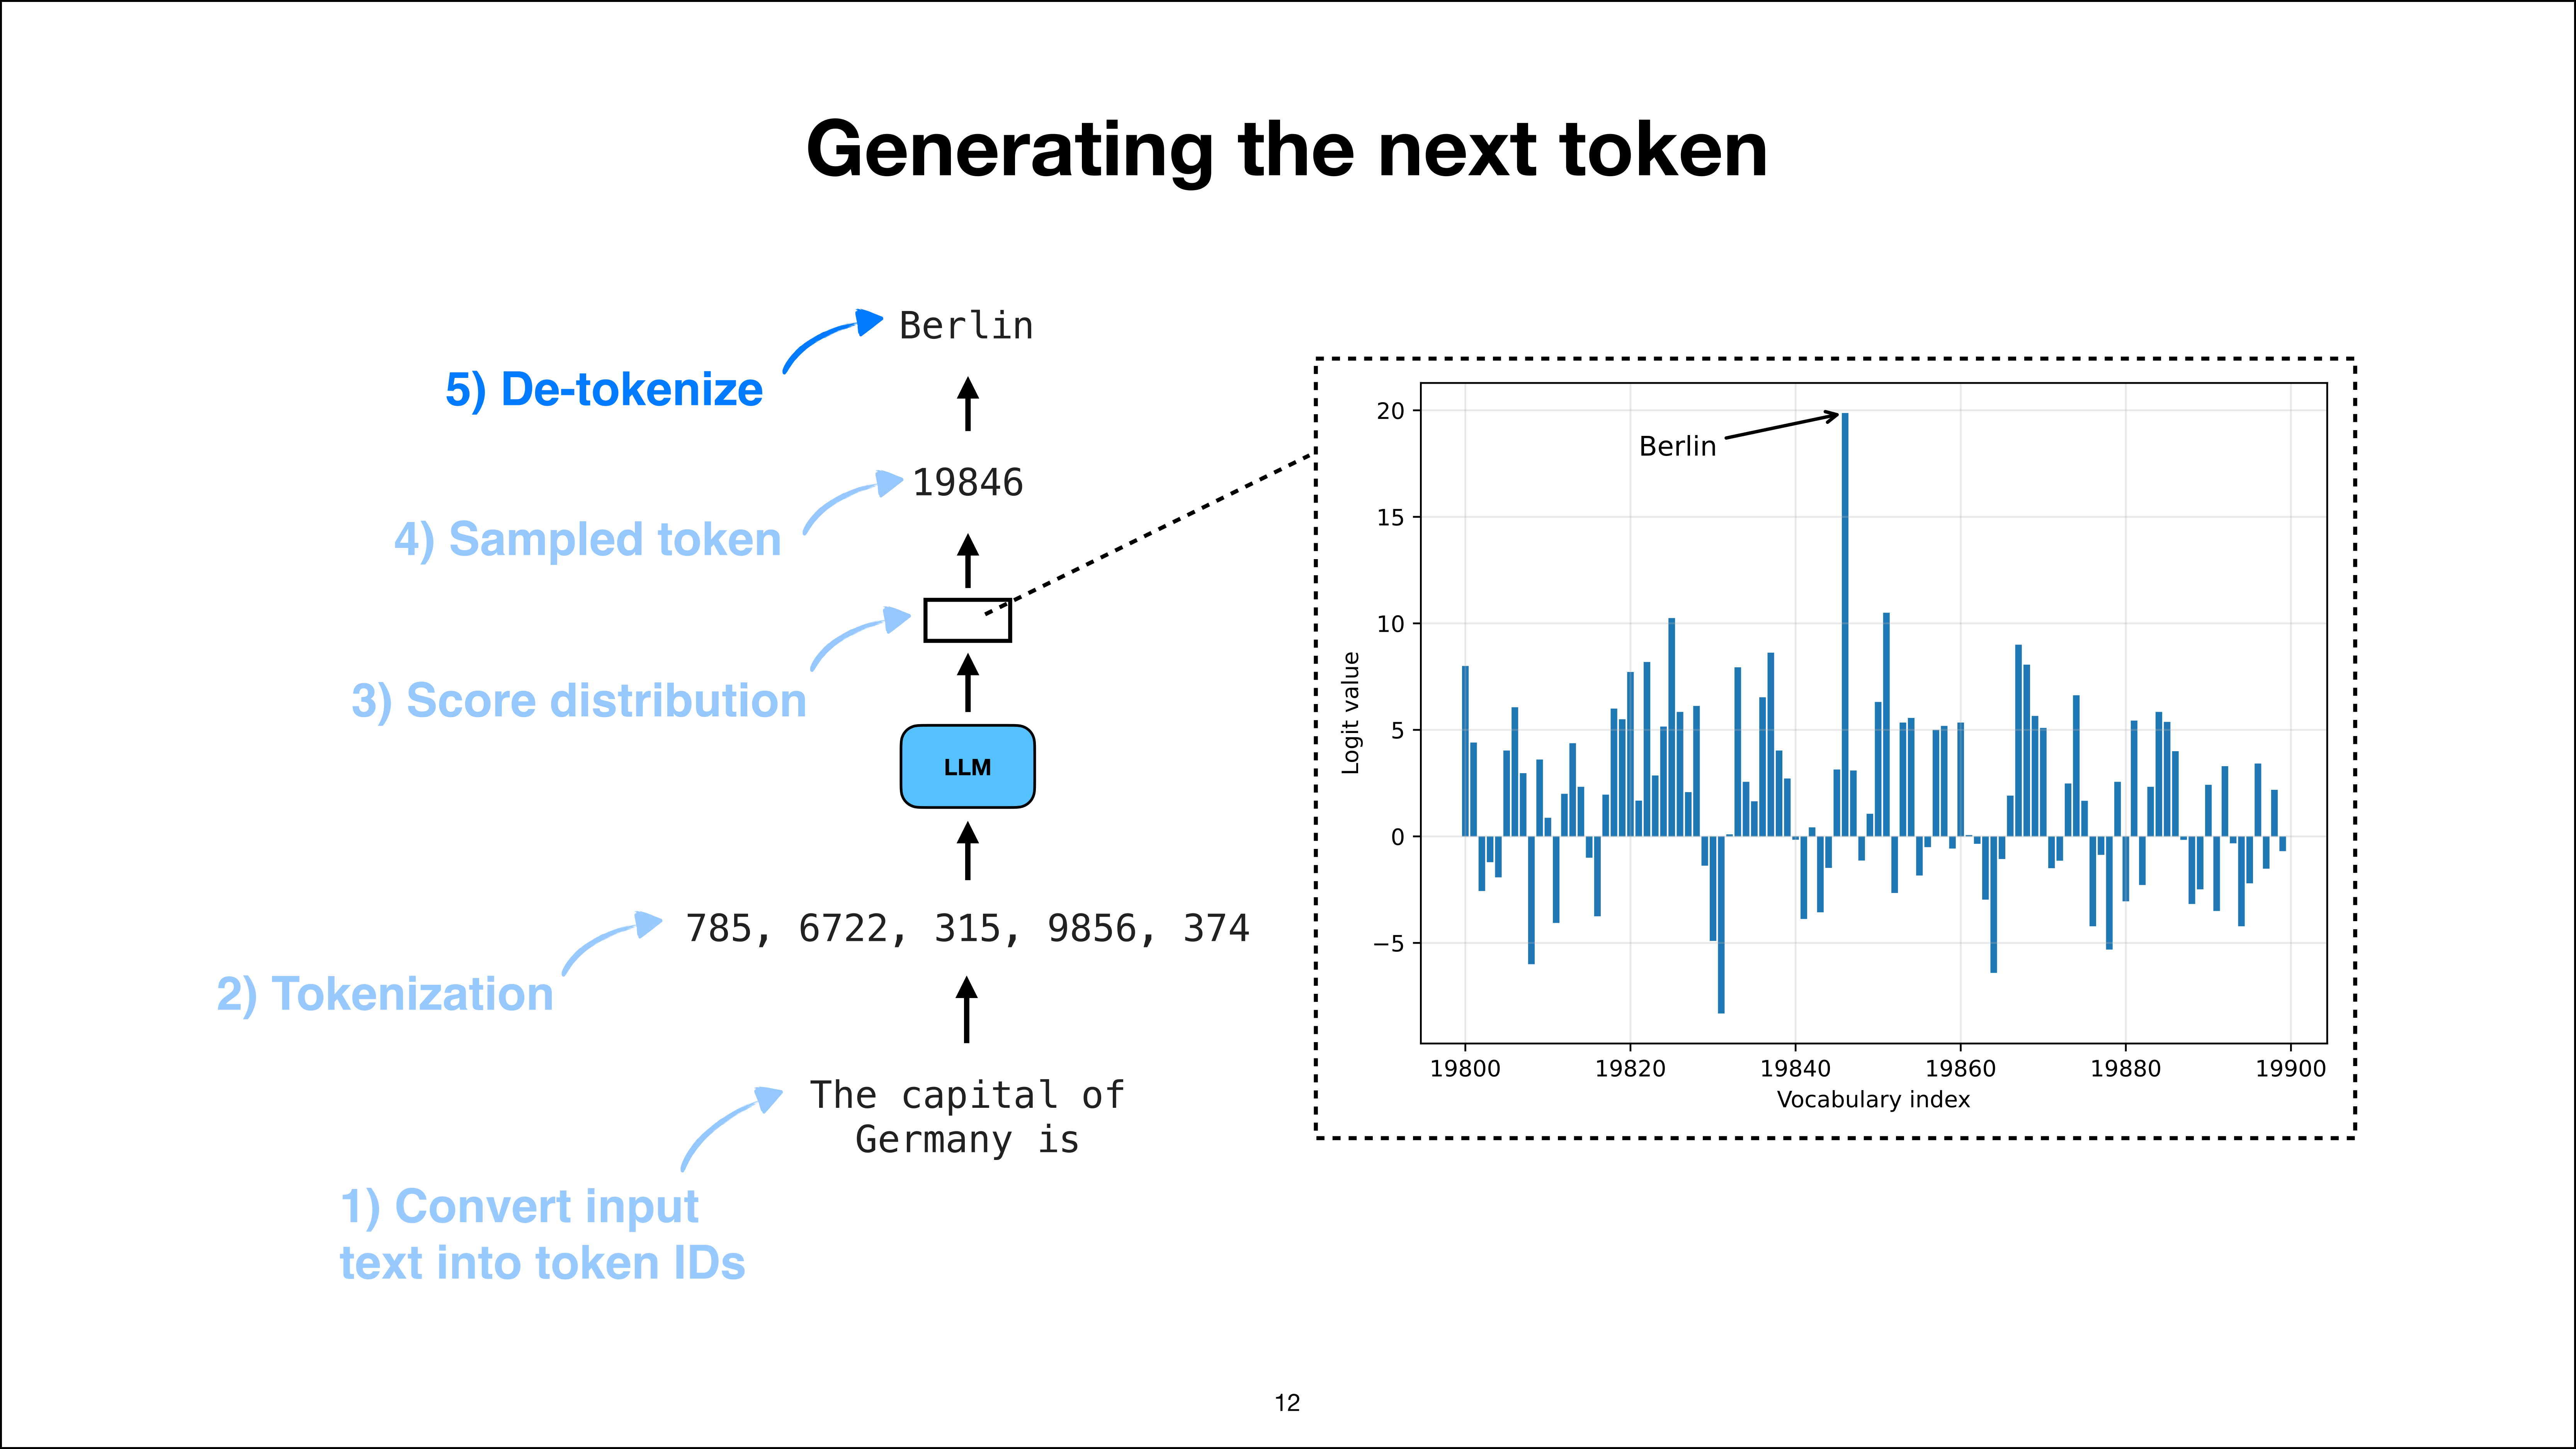
Step 5: detokenize the sampled token
Slide 12 of 52, time stamp 10:52

And this score is then detokenized, and we get “Berlin” back. So that is the process here on this slide: from an input prompt to conversion into token IDs and tokenization, passing it to the LLM, getting this score distribution, getting the next token, and converting it back into text.


Append the sampled token and repeat the generation loop
Slide 13 of 52, time stamp 11:12

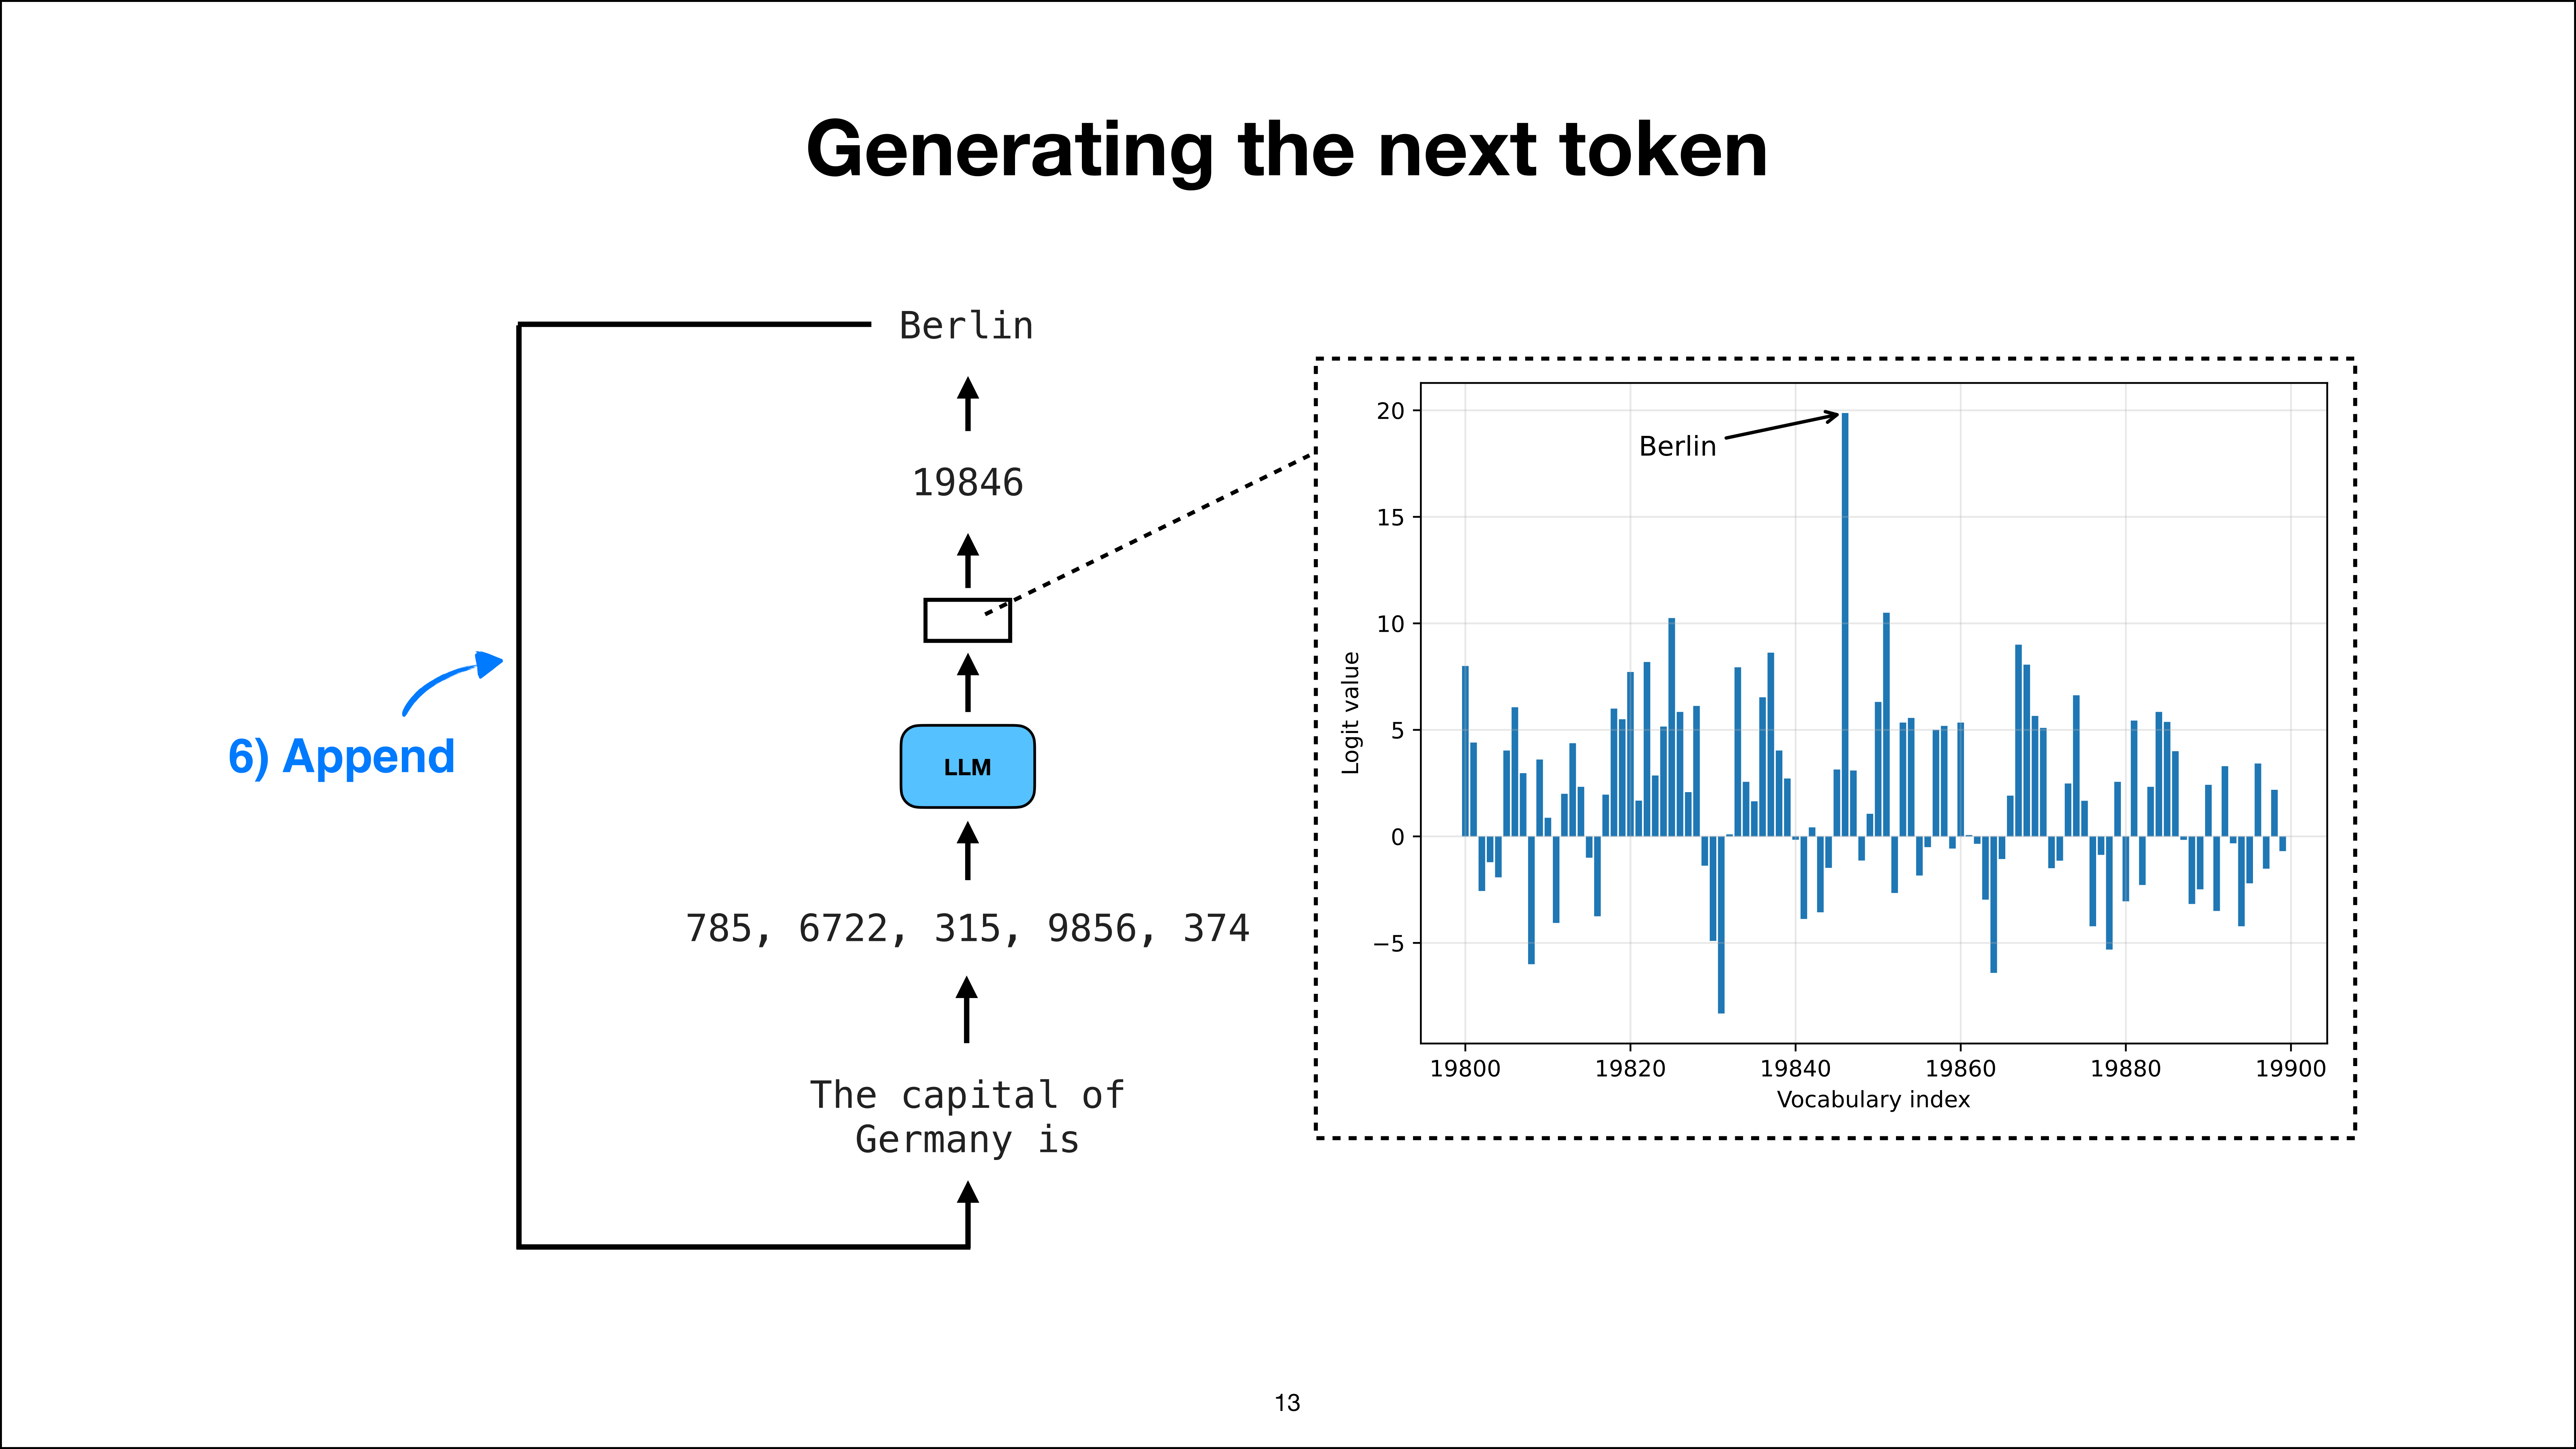
And then this text is appended to the input. So if we have a question that requires multiple output tokens, we keep going in this loop until the answer is complete. That usually means that the LLM generates an end-of-text token, for example, here. For simplicity, I’m showing you only one iteration where it generates one token. But yeah, as I said, it would kind of continue like that, where we are feeding back the modified input to the LLM for the next round.

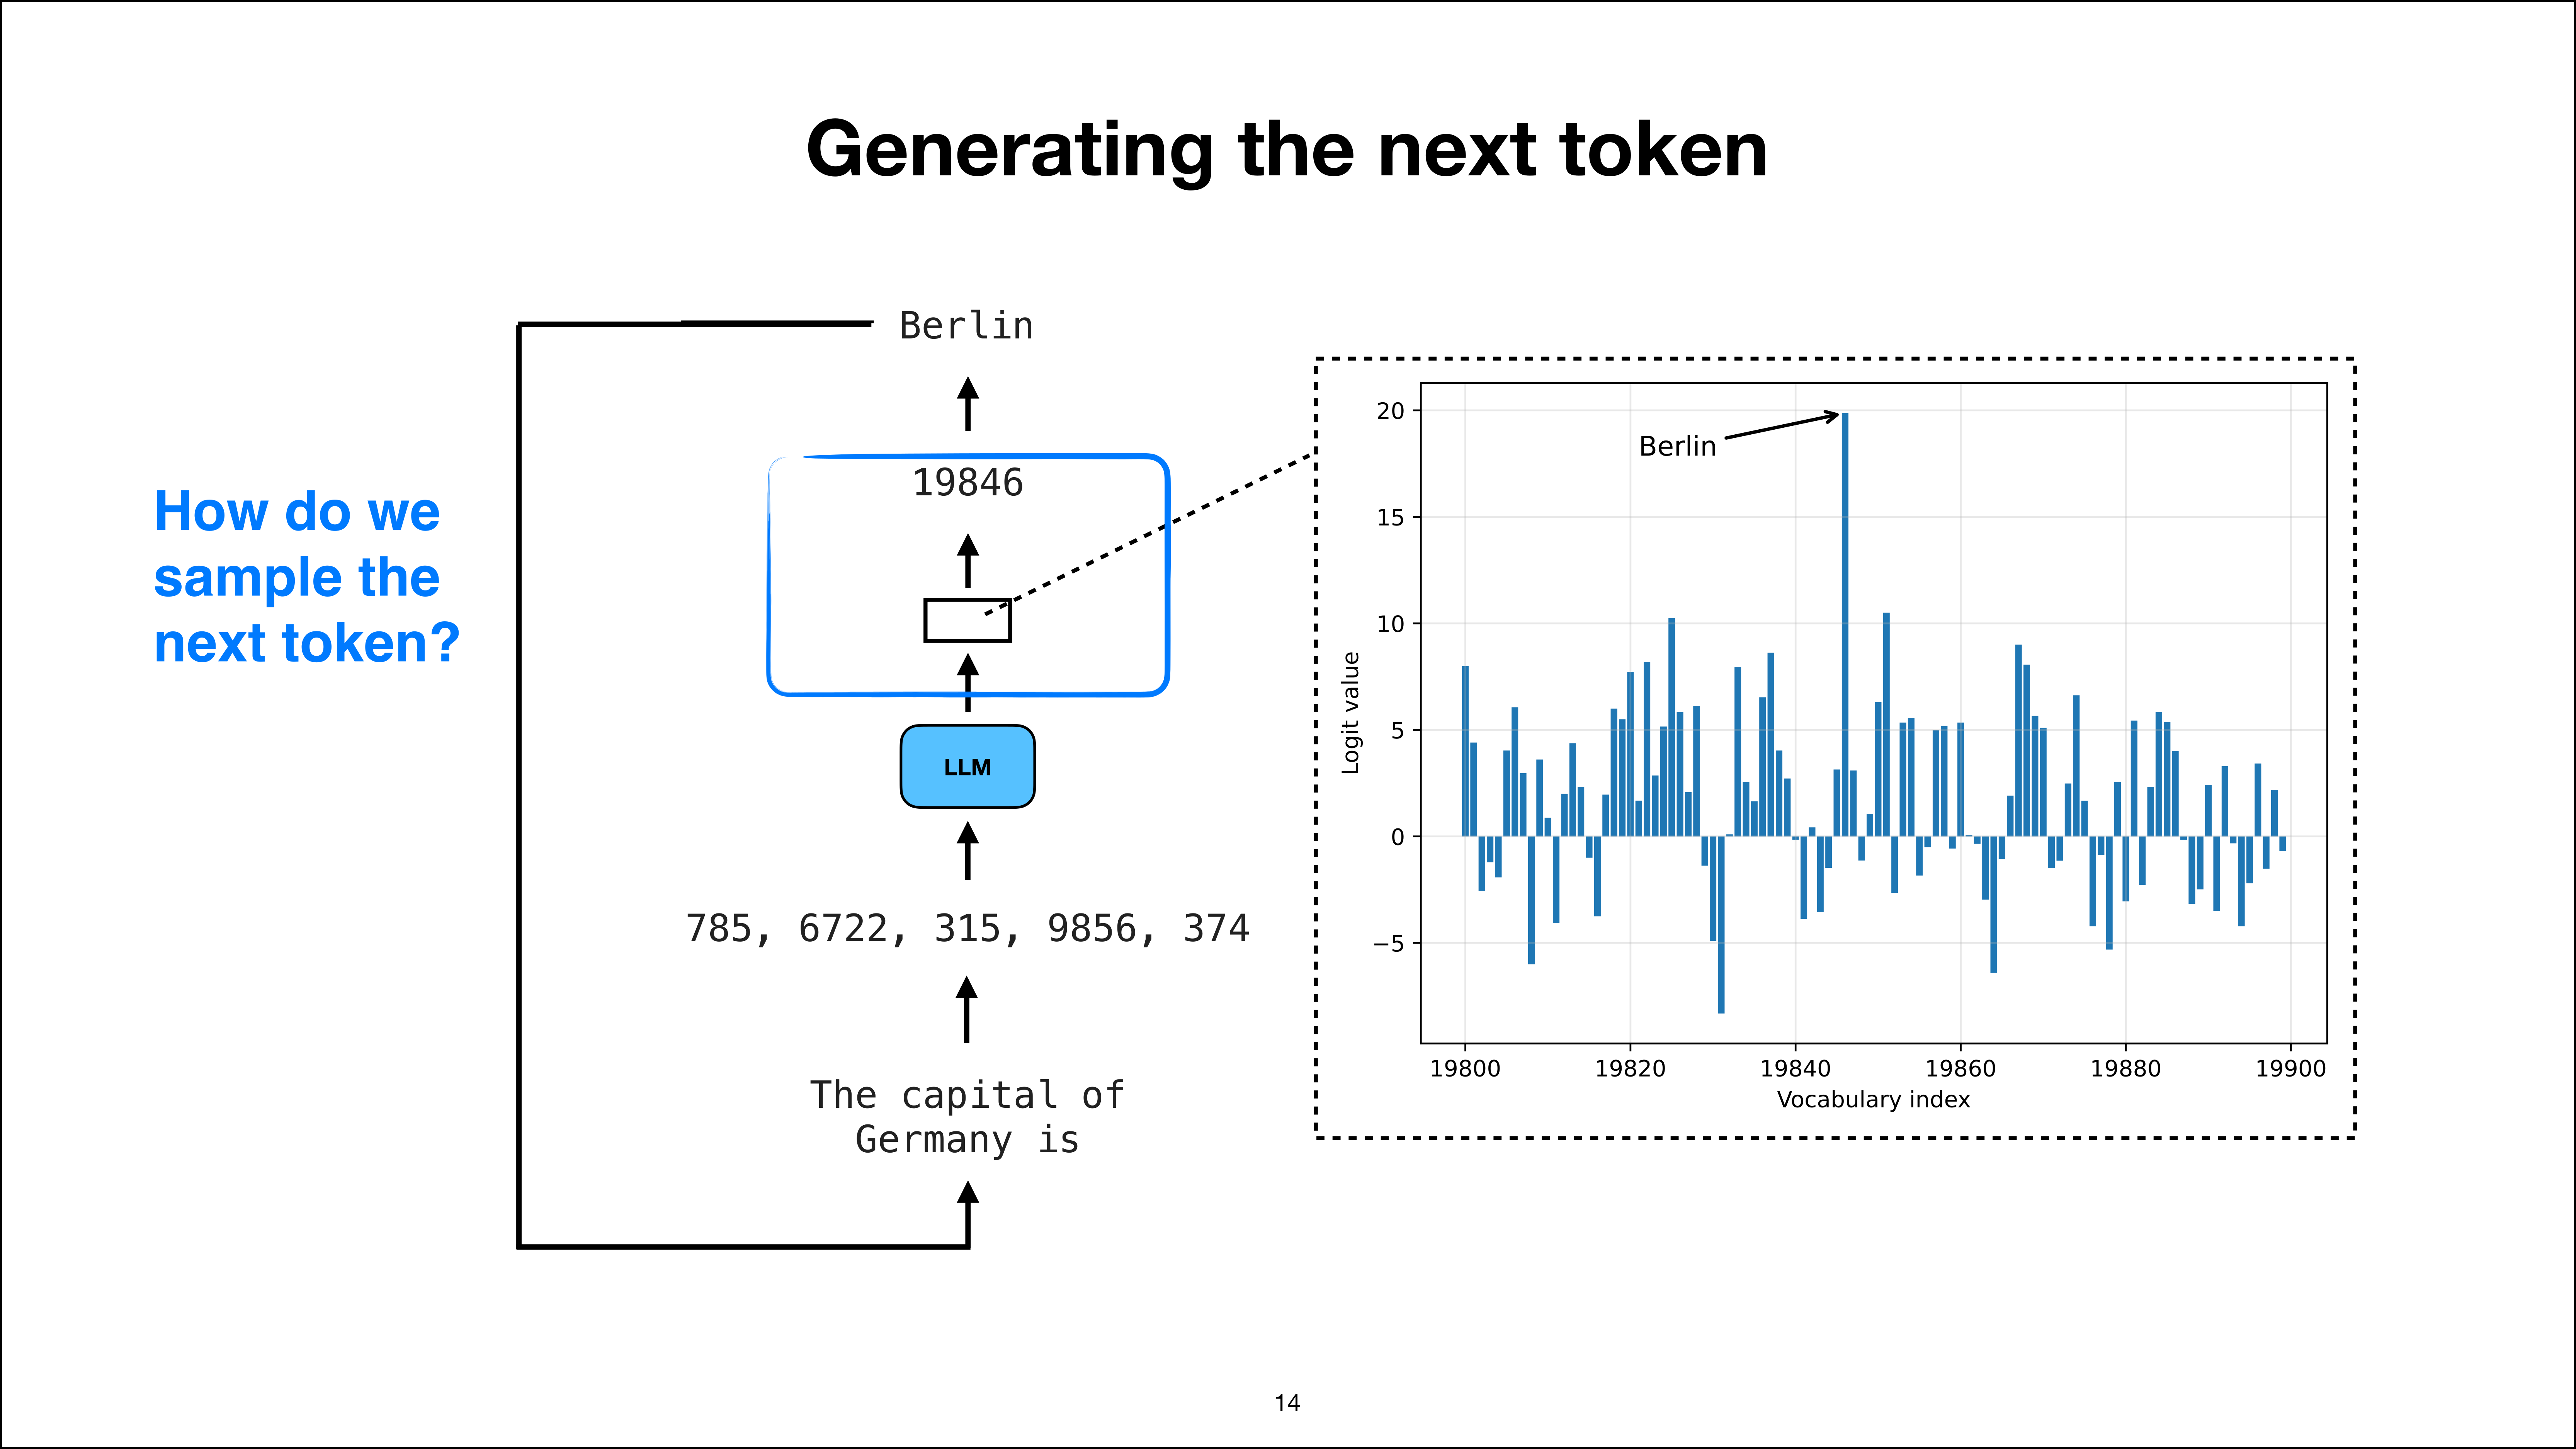
Now, how do we actually sample this next token here?


11:39

How Next-Token Sampling Works

Question about how the next token is sampled
Slide 14 of 52, time stamp 11:44

I briefly said, well, we could just technically select the highest one, the one with the highest score. This is called greedy decoding. That’s one way to do it. But most LLMs, like if you use them, they don’t do greedy decoding where they always pick the highest one. Because if you ask it on some other prompt, it might not be what we want to always have the highest score, because then it would memorize the training data.

It would always kind of give the same response and so forth. So we actually often want some variation in the outputs, but not so much that it generates random stuff. So how it works is that, when we sample here from this distribution, we first typically convert it into probability scores.


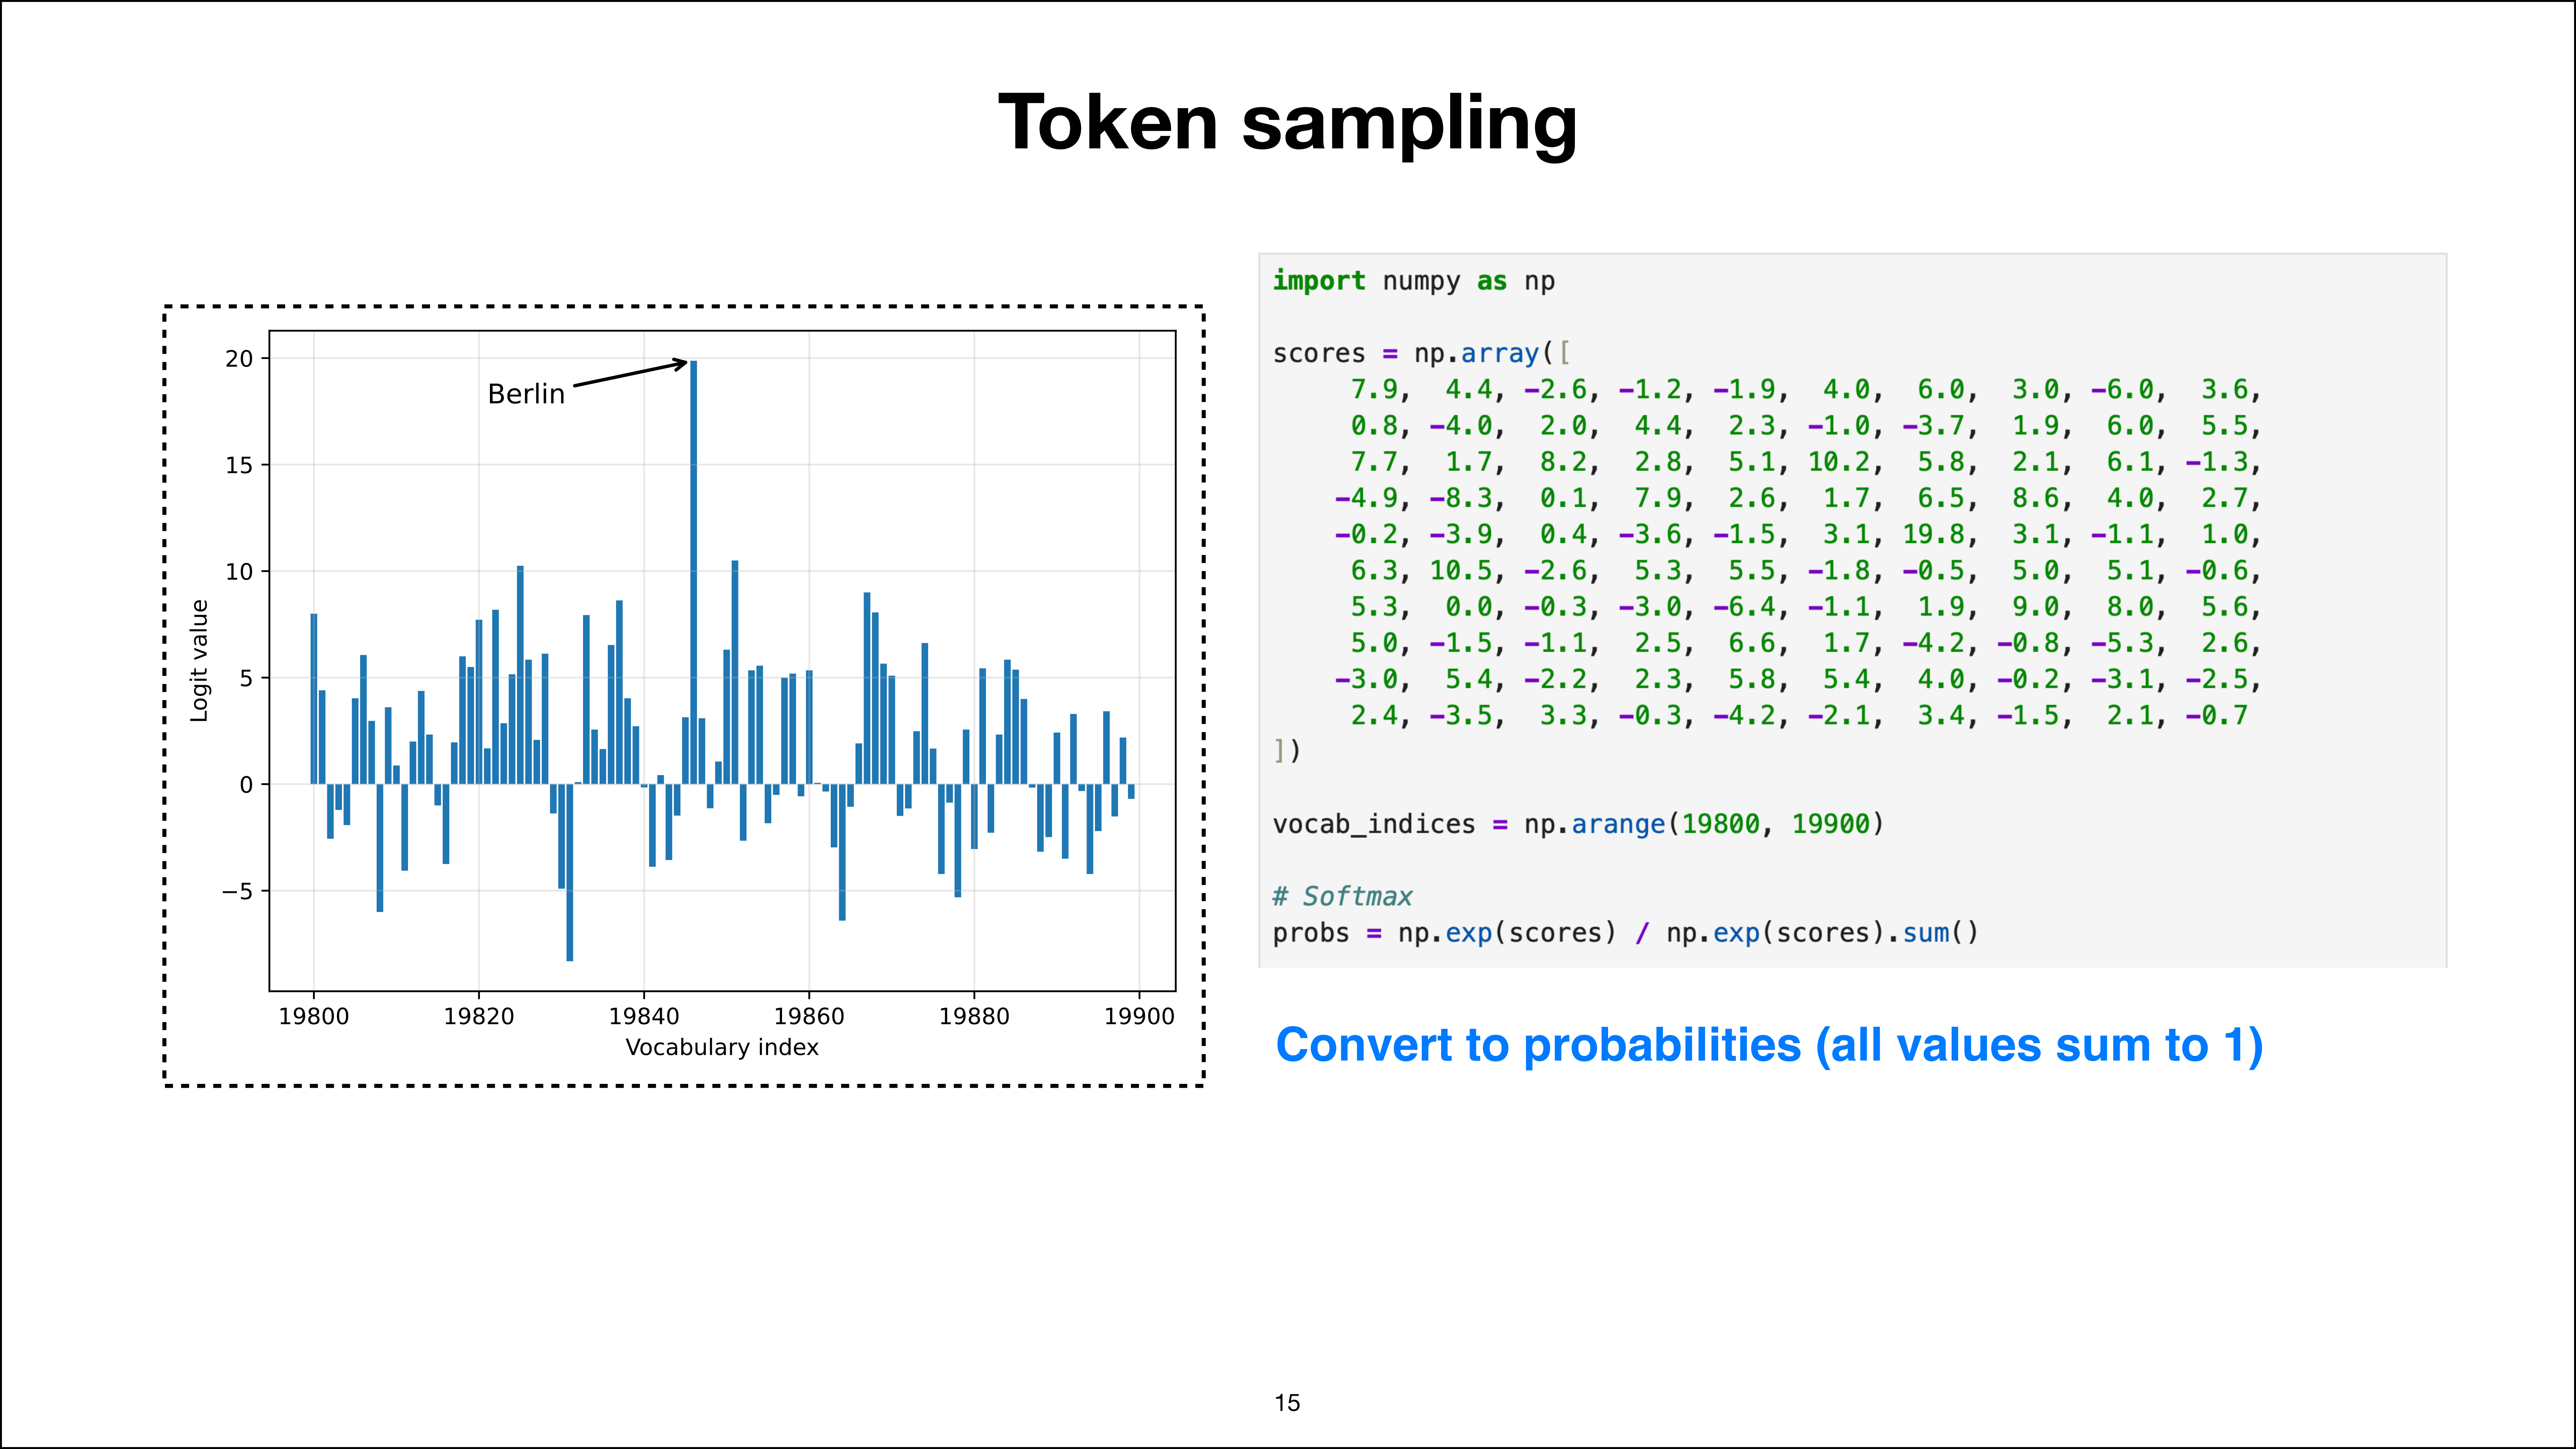
Convert token scores into probabilities
Slide 15 of 52, time stamp 12:28

So here I just have these scores shown in this plot. I’m just using NumPy for simplicity; whatever tool you use (e.g., PyTorch), the same concepts apply. But let’s assume we have the scores here in NumPy. So what I would do is I would compute the softmax. Technically, I would use a softmax function implemented in Torch or PyTorch, for example, that is numerically stable for both large and small values, including very high positive values, very low positive values, and very high negative values.

Here I’m just writing it out like that. That’s the canonical softmax, just to make it a bit more readable. But the details don’t matter here.


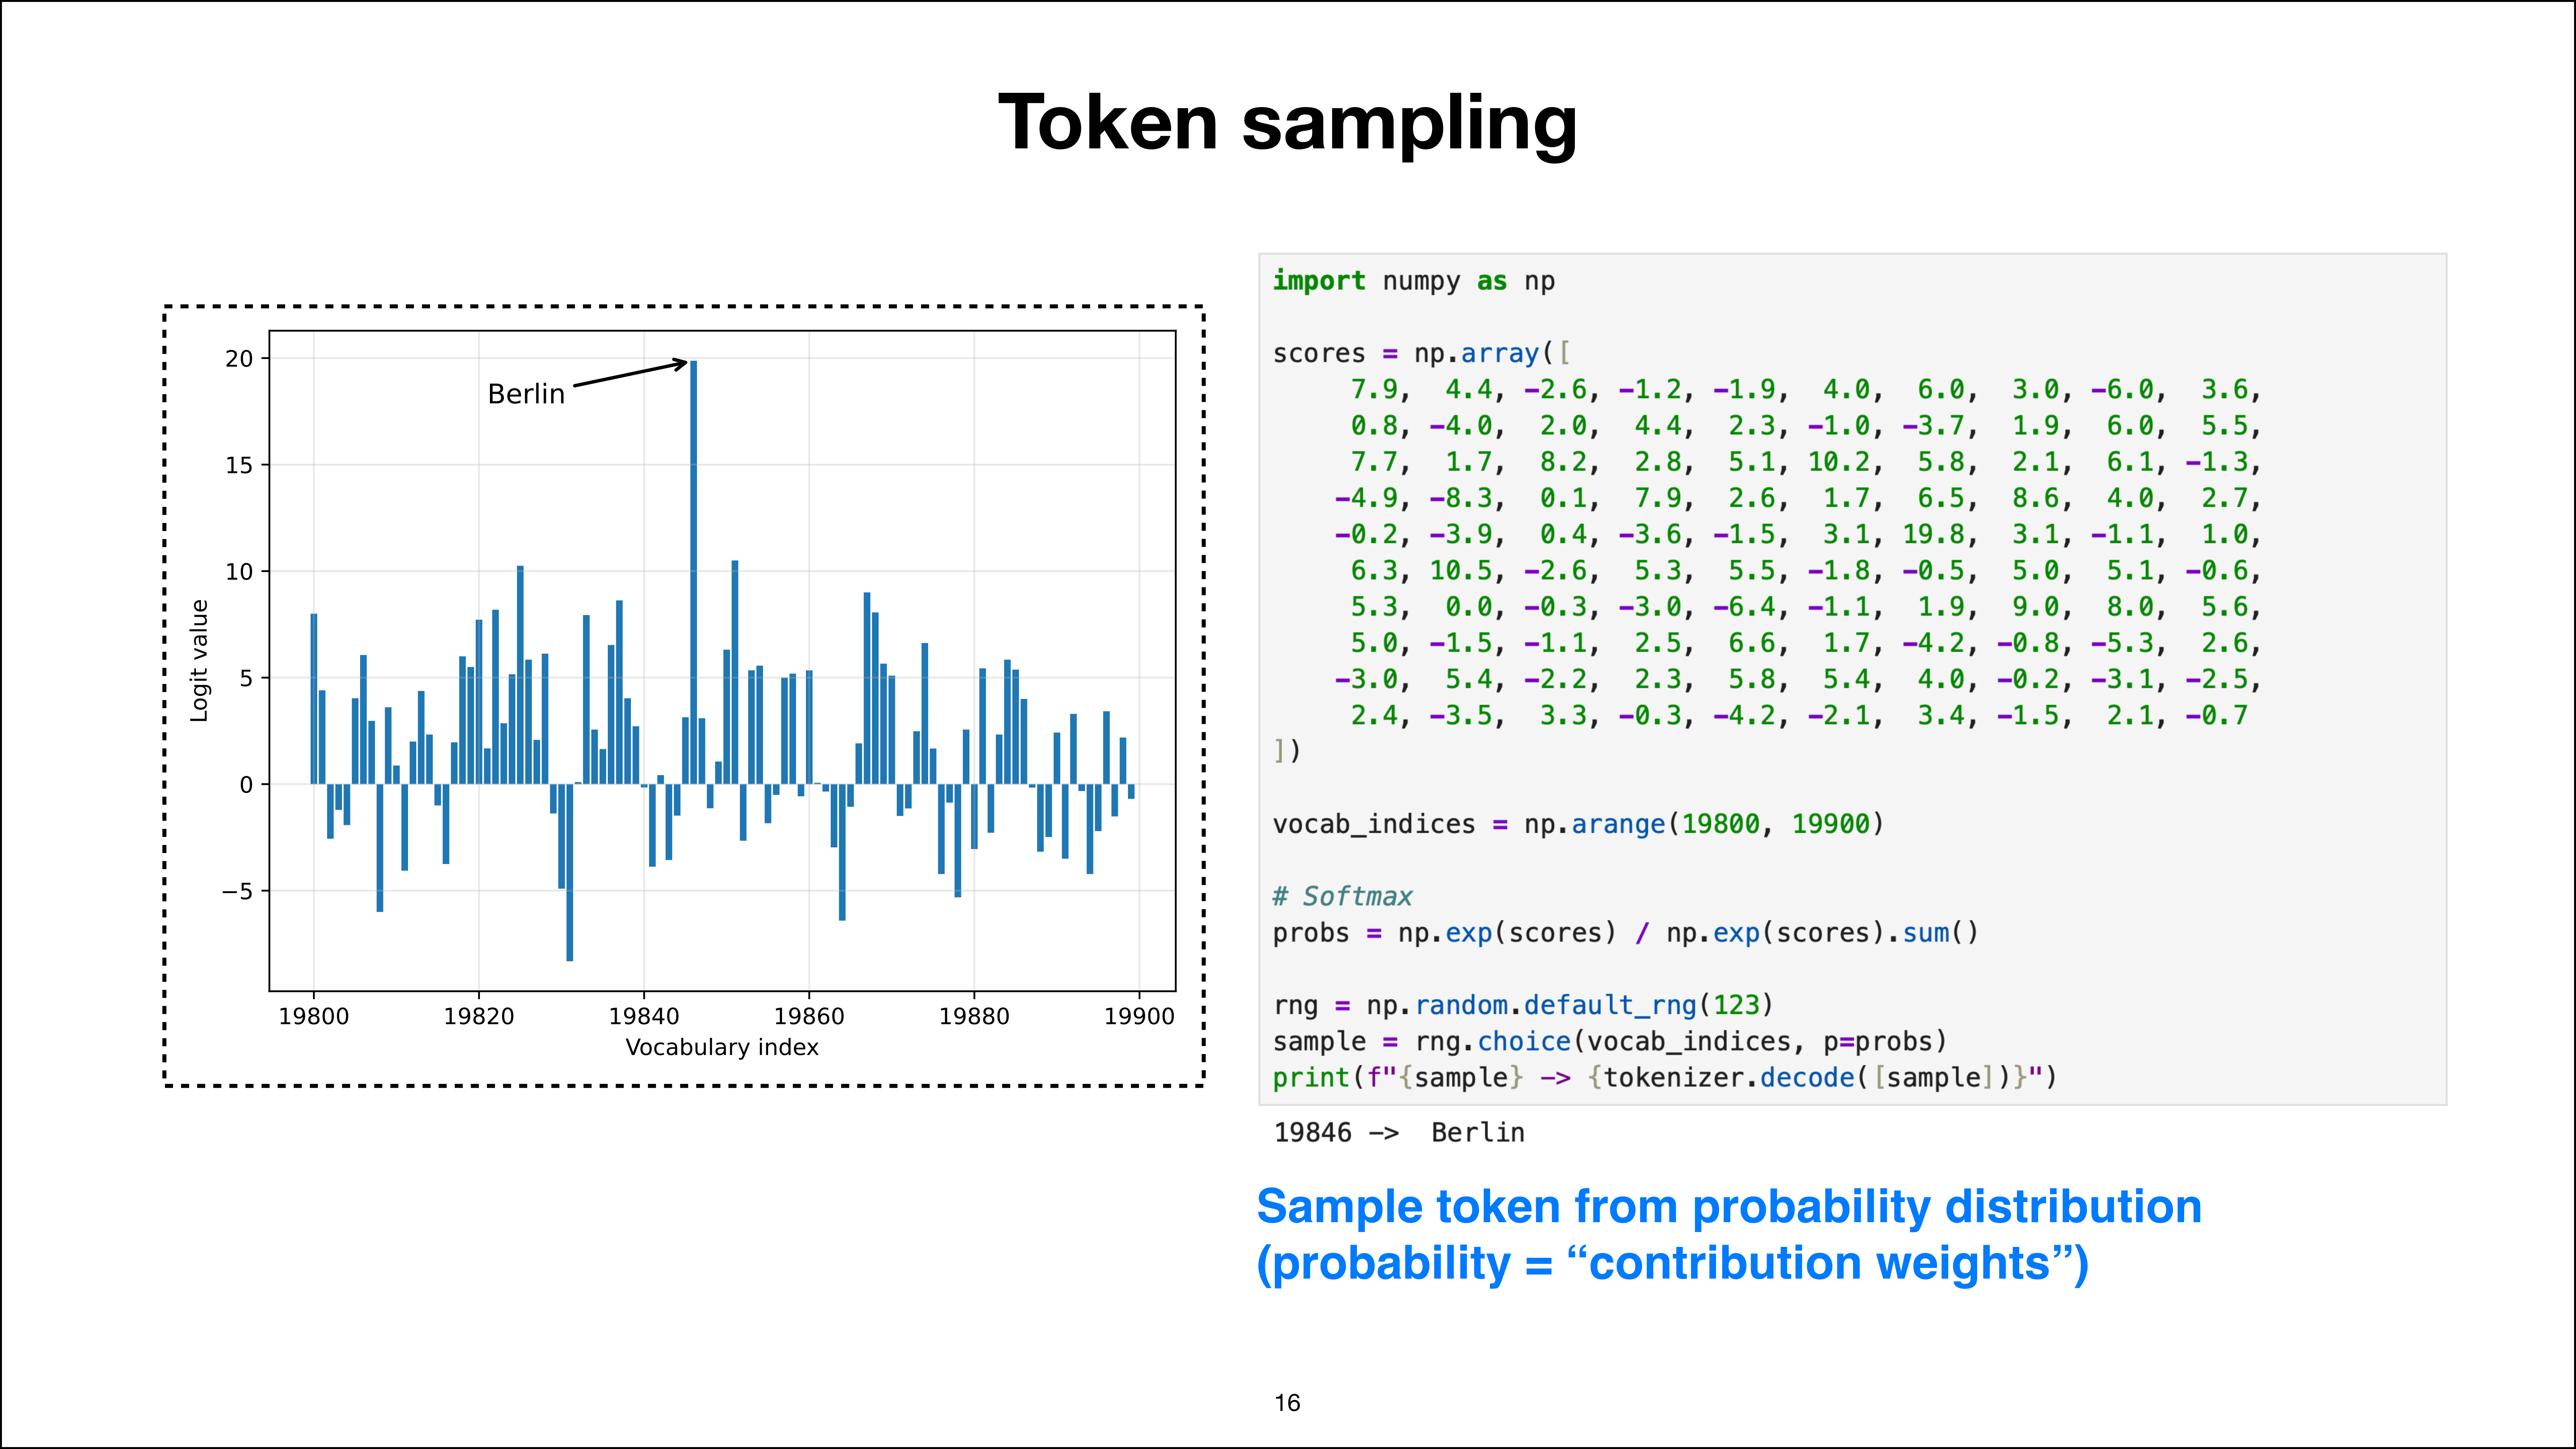
Sample from the probability distribution
Slide 16 of 52, time stamp 13:20

What matters is that after this conversion, the scores here, I mean, there’s only so much space on the slide, but the scores here, they would add up to one. So it’s essentially like a renormalization. So they would be normalized to sum up to one. That’s all that the probability conversion does: the softmax conversion. So then once we have these probabilities, we can use a random number or, like, a random sampling algorithm.

For example, here in NumPy, we could use the choice function or method. So this is with a specific random seed we are passing to the vocabulary indices. And then, and that’s the important part, we are passing the probabilities as the weights. So, these, essentially, yeah, are like: “How likely is a certain token to be selected?” So, for example, if “Berlin”, after this normalization step, the softmax step, has a 99% probability and the other ones together have a 1% probability, then if we would sample 100 times, 99 of the times, we would get “Berlin”.

In realistic LLMs, for example, that are well trained, “Berlin” might receive a probability of 99.999999 or something like that. So you’re almost certainly always sampling “Berlin” because it’s very confident that the answer is “Berlin” in this particular case. So yeah, that is how we would sample from this distribution. There are modifications like top-k sampling or top-p sampling where, let’s say, just for simplicity in top-k sampling, we would select the top 100 tokens and then apply this random choice only to the top 100, the 100 highest-scoring ones, so that we don’t get nonsense tokens in there.

For this example, it doesn’t really matter. I mean, it’s just like another thing to explain, so I’m skimming over this. So you can maybe assume that this is already the top 100 tokens using top-k or something like that.


Repeated sampling selects "Berlin" most of the time
Slide 17 of 52, time stamp 15:37

And so, for example, here’s an example. If we sample 10,000 times with a probability of “Berlin” being very high, 99.9, we would sample “Berlin” 9,997 times, sample the word “Hal” twice, and one “Moh”. And these are basically nonsense tokens. It rarely happens that, in this case, the LLM might produce nonsense because, as I mentioned before, I spread out this distribution a bit to make it more interesting.

A real LLM would probably, 10,000 out of 10,000 times, sample “Berlin” because the probability of “Berlin” is so high. But this is for illustration purposes.


16:19

From Sampling to Watermarking

Anthropic's explanation of Claude's text watermark
Slide 18 of 52, time stamp 16:21

Now we briefly talked about how LLMs work under the hood, which I think is kind of an interesting concept in itself. But I’ve talked about this many times before, so I don’t want to bore you. I just wanted to set up some context for now, explaining how this watermarking works.


Without watermarking, random sampling can choose overcast or grey
Slide 19 of 52, time stamp 16:41

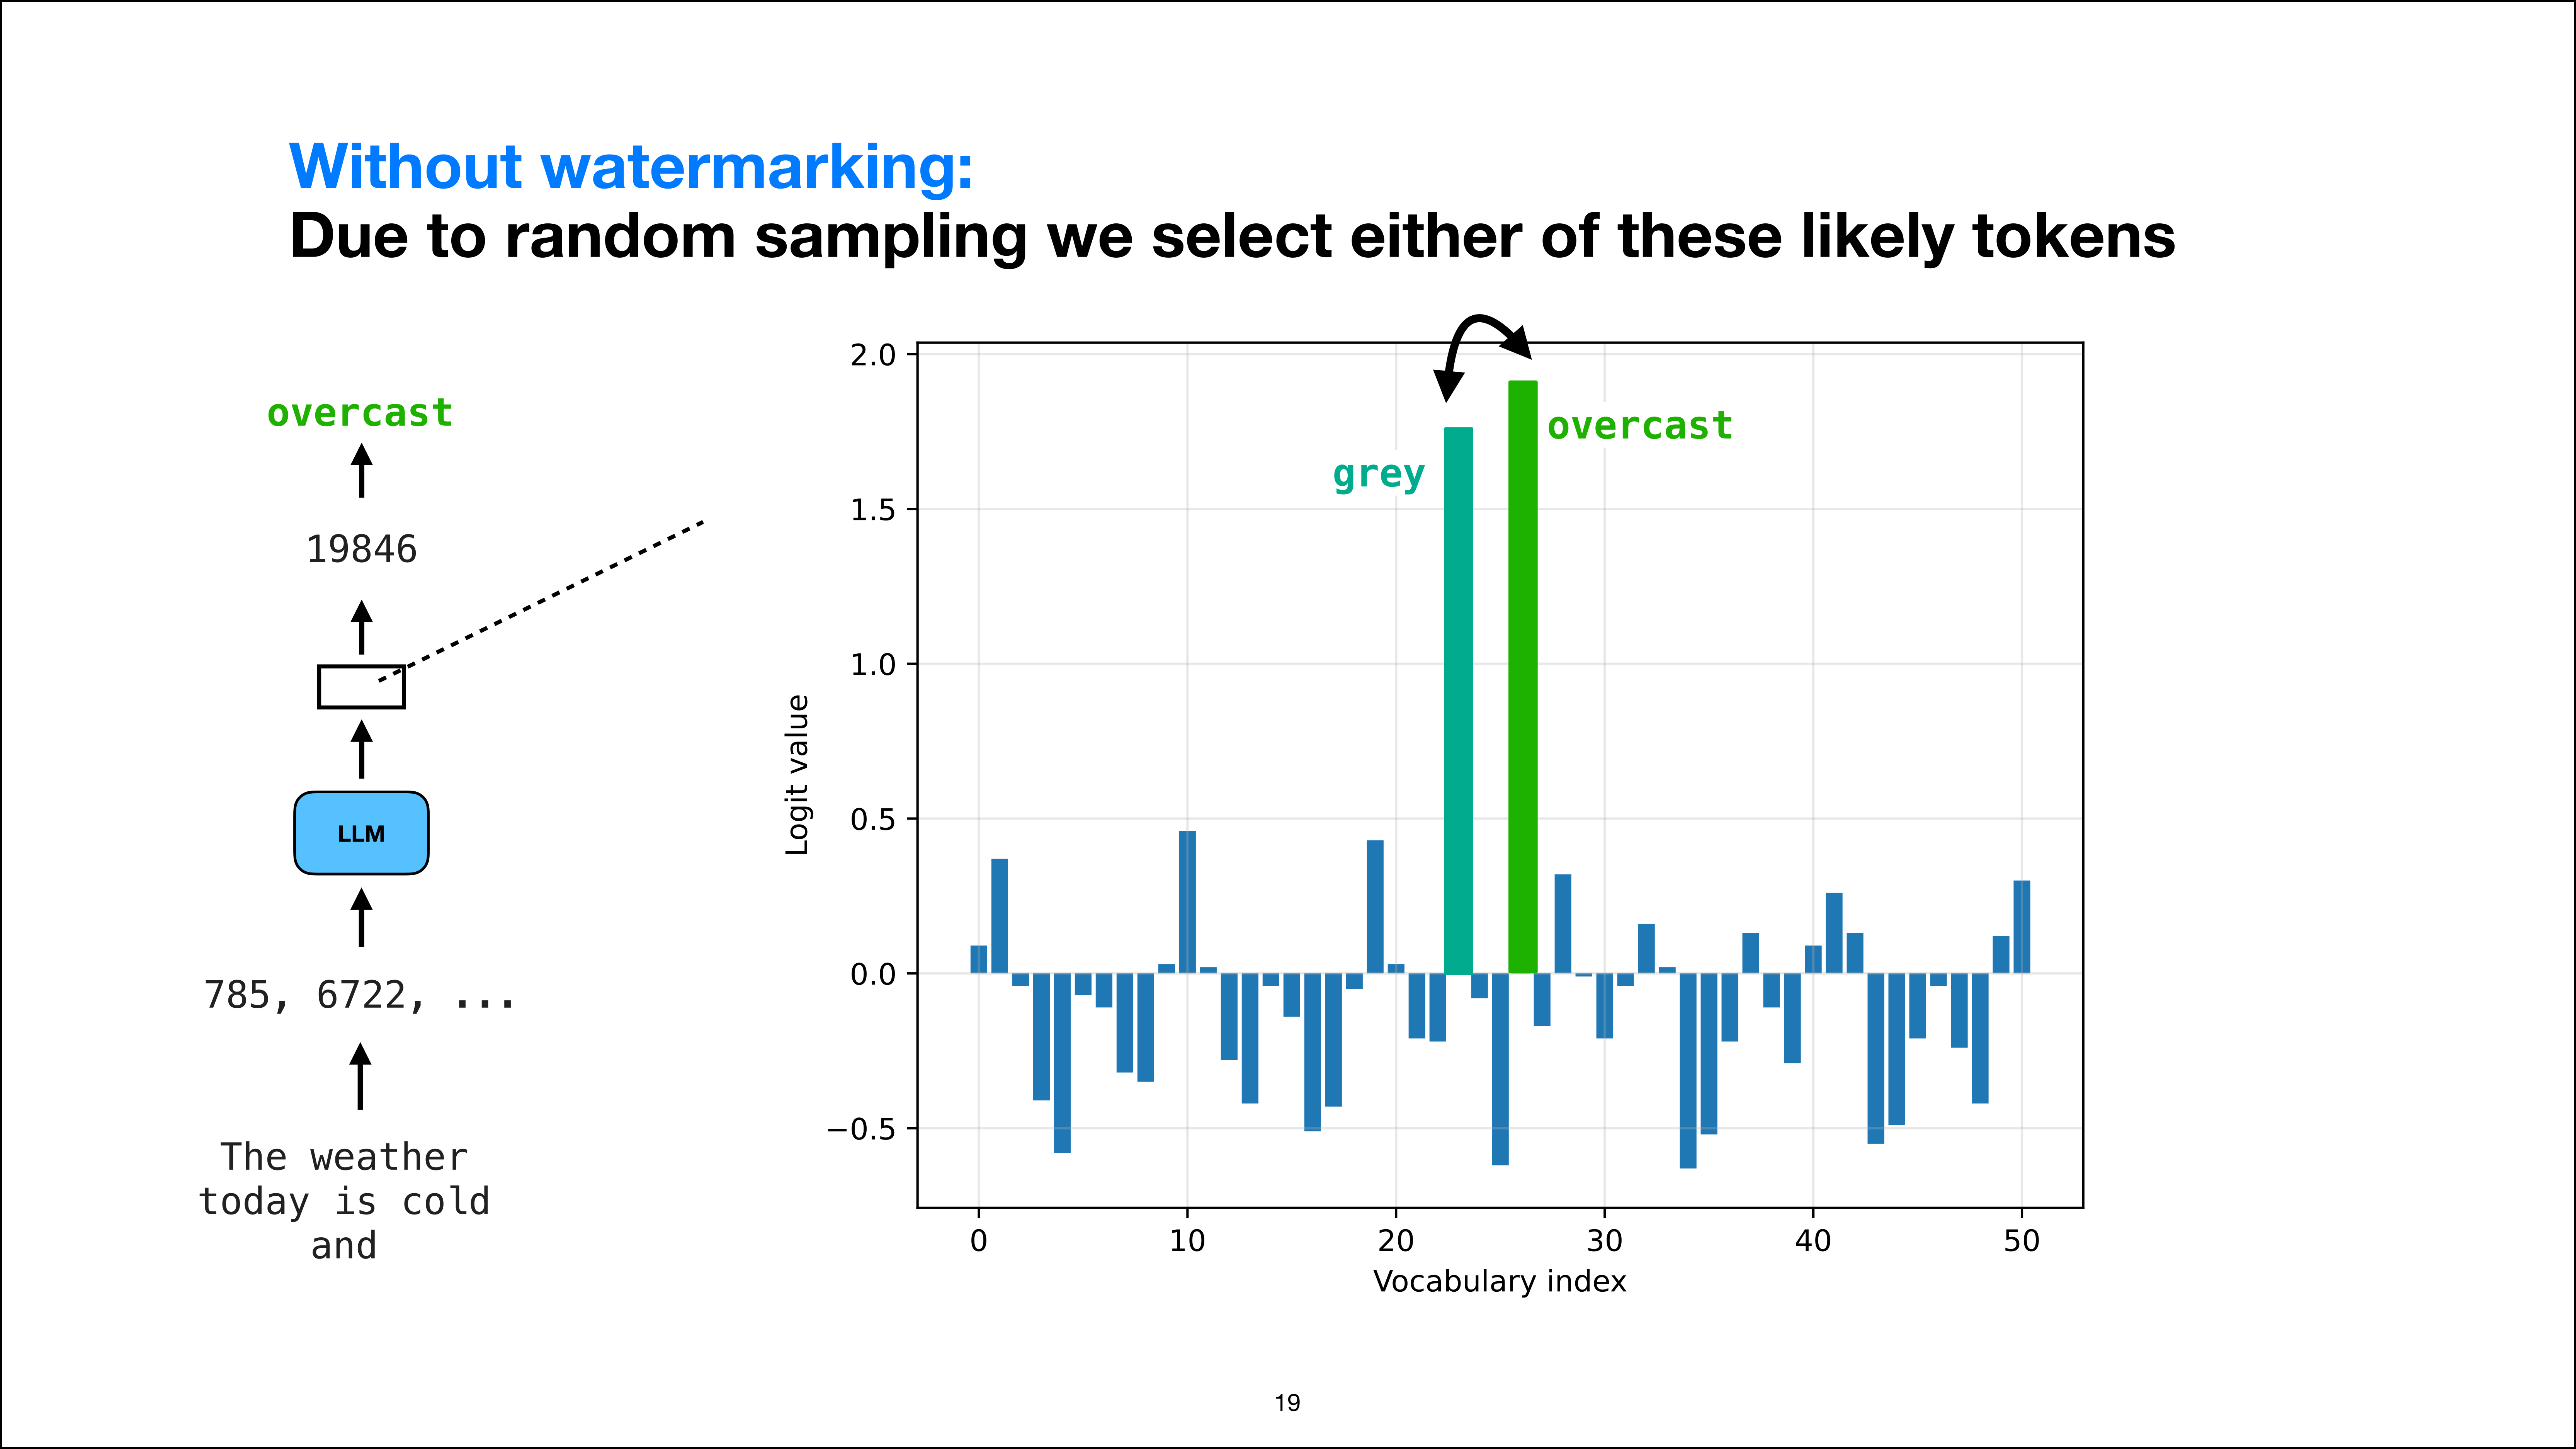
So, we mentioned that we select the highest-scoring token when sampling. Or we use this probability sampling, which will lead to one of the highest-scoring tokens being selected most of the time. Now here’s another example without watermarking. I changed the prompt slightly. Now the prompt is: today’s weather is “cold,” and a possible answer could be, for example, “gray” or “overcast”. So in contrast to the “Berlin” example, I would say “gray” and “overcast” kind of are interchangeable.

They are both reasonable next tokens for this prompt, given the goal of completing this text or writing the next token. So it’s almost like a coin flip which one we want to select. There is not really an objectively worse one of one or the other. So when we do the random sampling, because they also have relatively high scores and their scores are similarly high since they are both plausible tokens, we might get one or the other.

So almost half of the time we would get “overcast”, and almost half of the time we would get “gray” if we repeat the sampling multiple times. And that’s how LLMs often end up with different answers if you provide the same prompt. If you use the same prompt and you ask the LLM multiple times, you often get slightly different answers. And that’s because at certain positions, two possible tokens are almost equally likely, so it will choose one or the other.

And that token would then influence all subsequent tokens, and so forth.


18:23

Random Seeds and Deterministic Sampling

Random seeds add reproducibility
Slide 20 of 52, time stamp 18:25

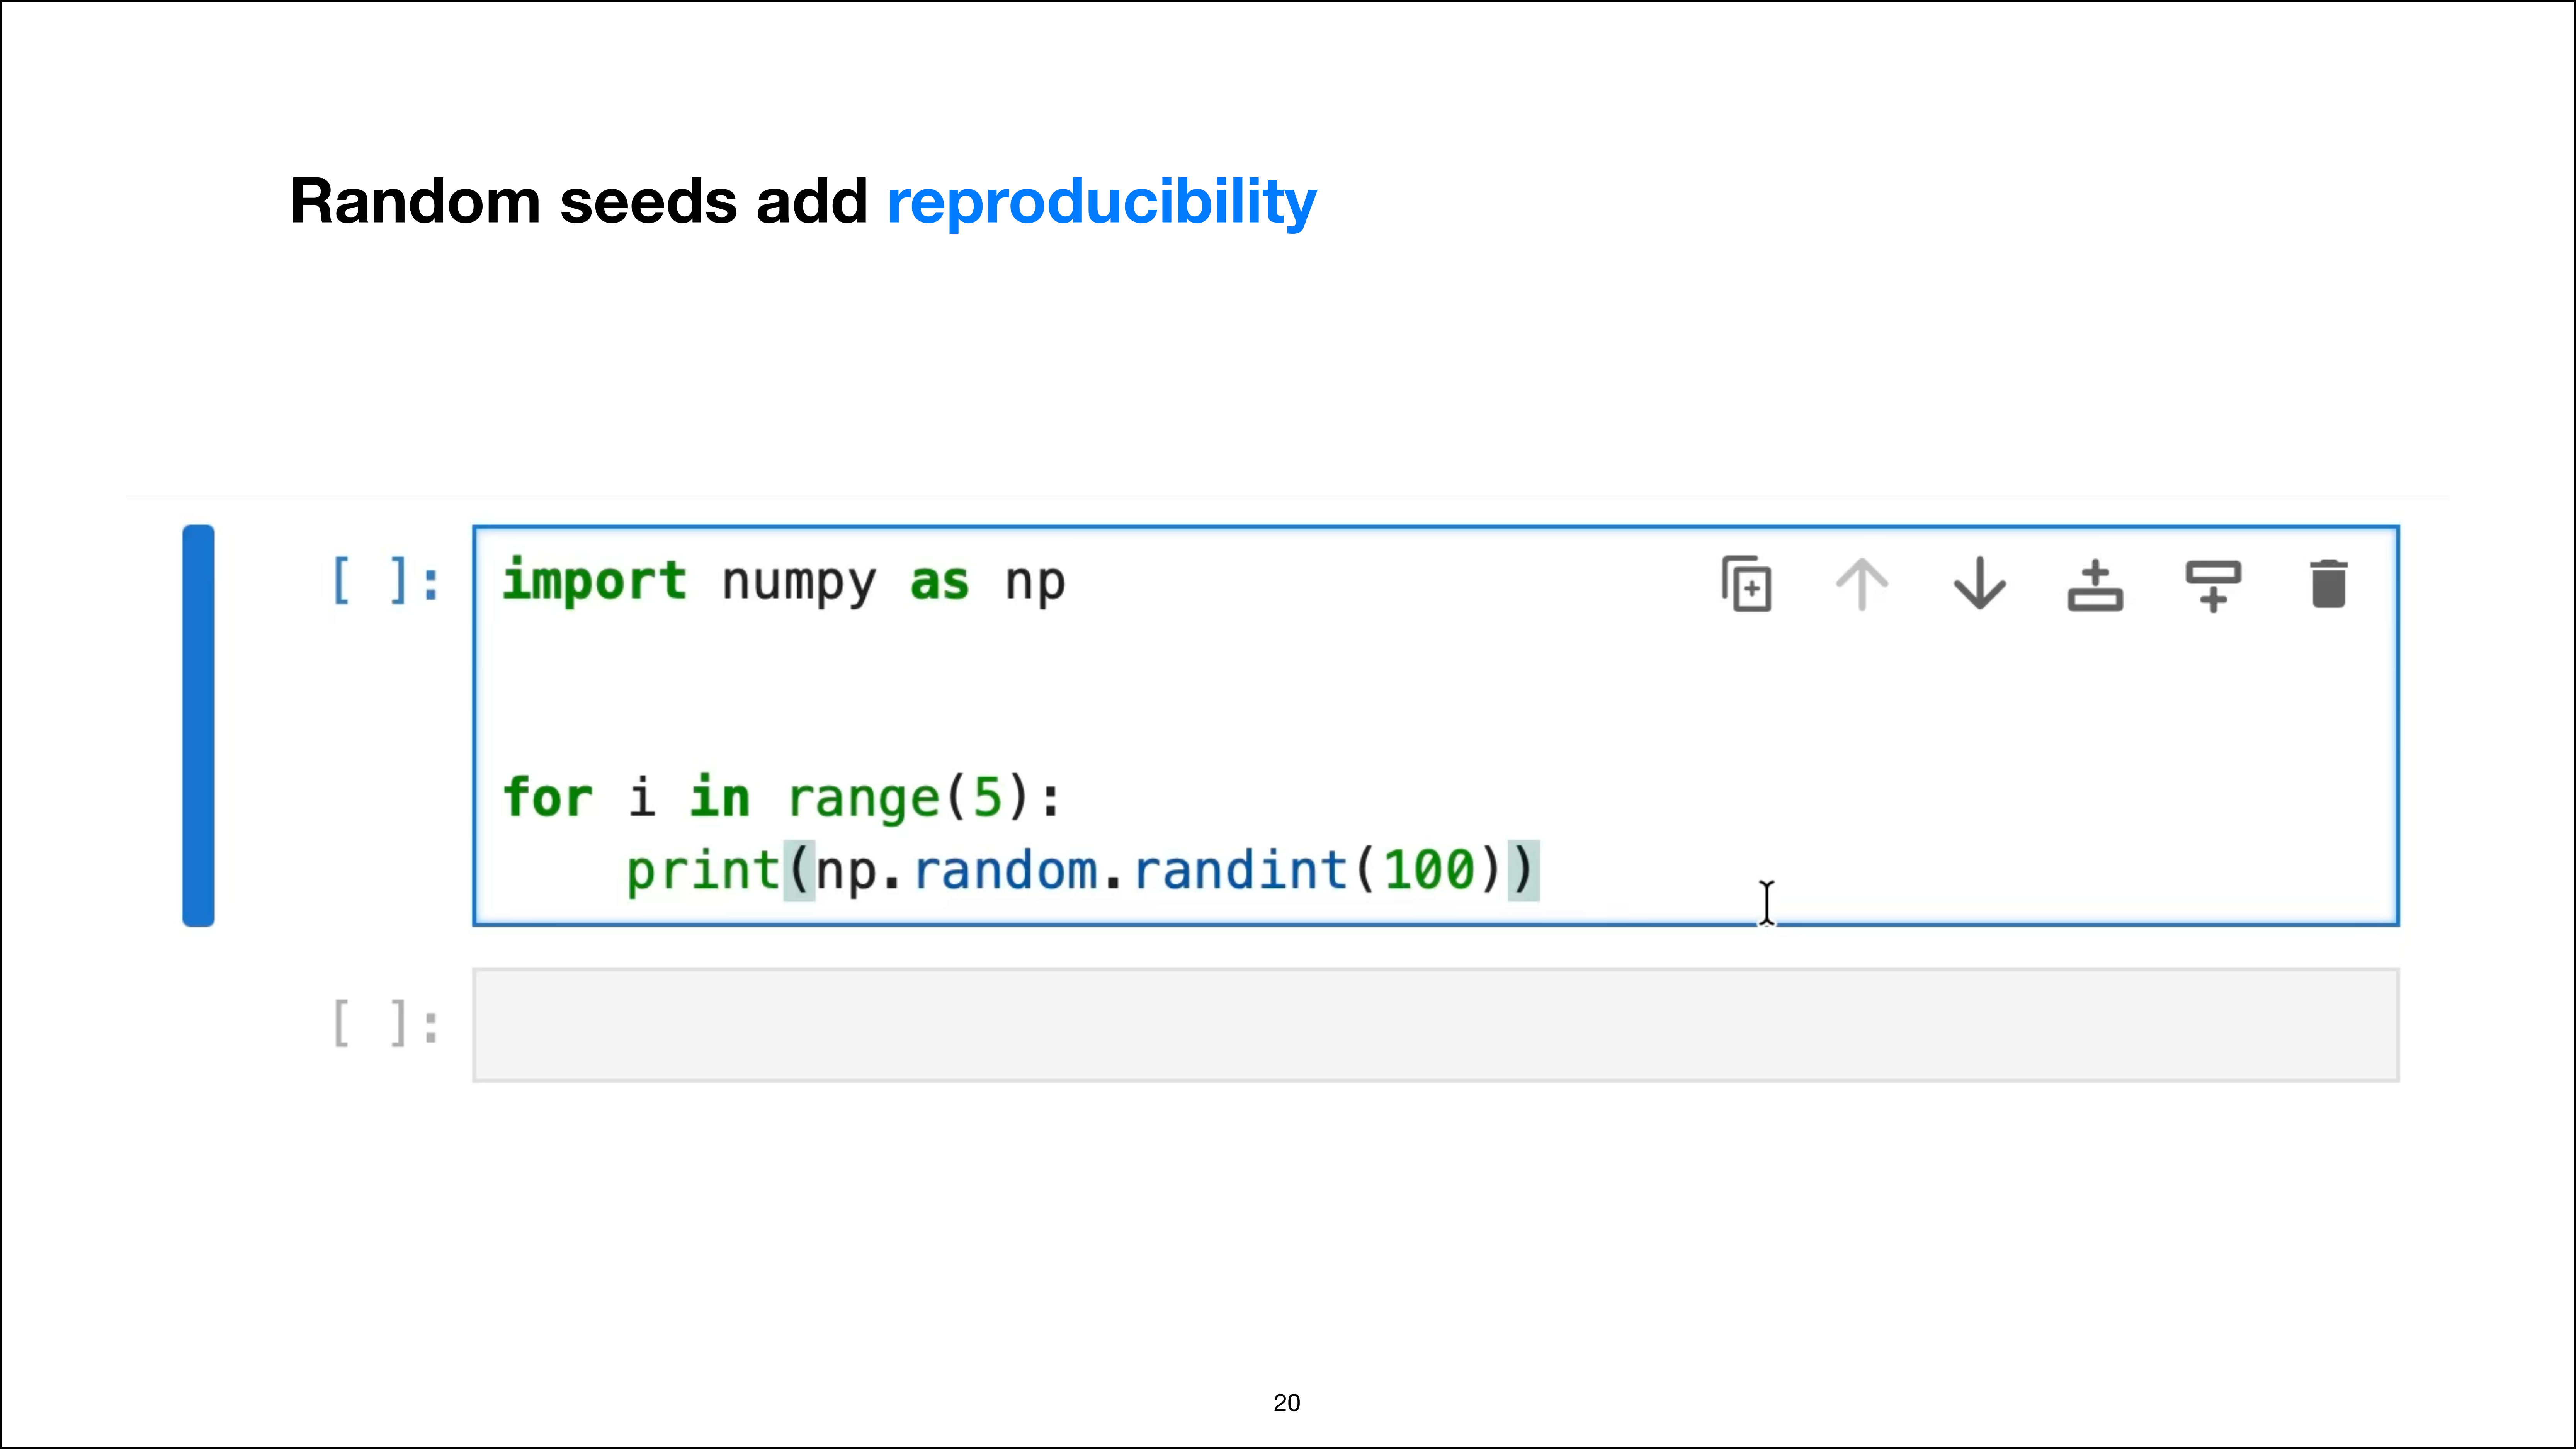
Now, I wanted to briefly talk about random number generation. So, for example, if we use a random number generator like this, it will generate a random sequence of numbers. If I run it again, the sequence of numbers is different here. So you can see every time we produce five numbers, they are different. If I set the random seed here, like one, two, three, and I run this multiple times, we still get random numbers, but they are now all the same, right?

So they are still random. If we use a random seed, we still get random numbers that are different from each other, but they are reproducible. So whether we use a random seed or not, we still get random numbers. But with a random seed, we get a reproducible sequence of numbers. So keep this in mind: this is just like a little primer, and we will use this concept in a few moments.


Random seed 42 consistently selects overcast
Slide 21 of 52, time stamp 19:26

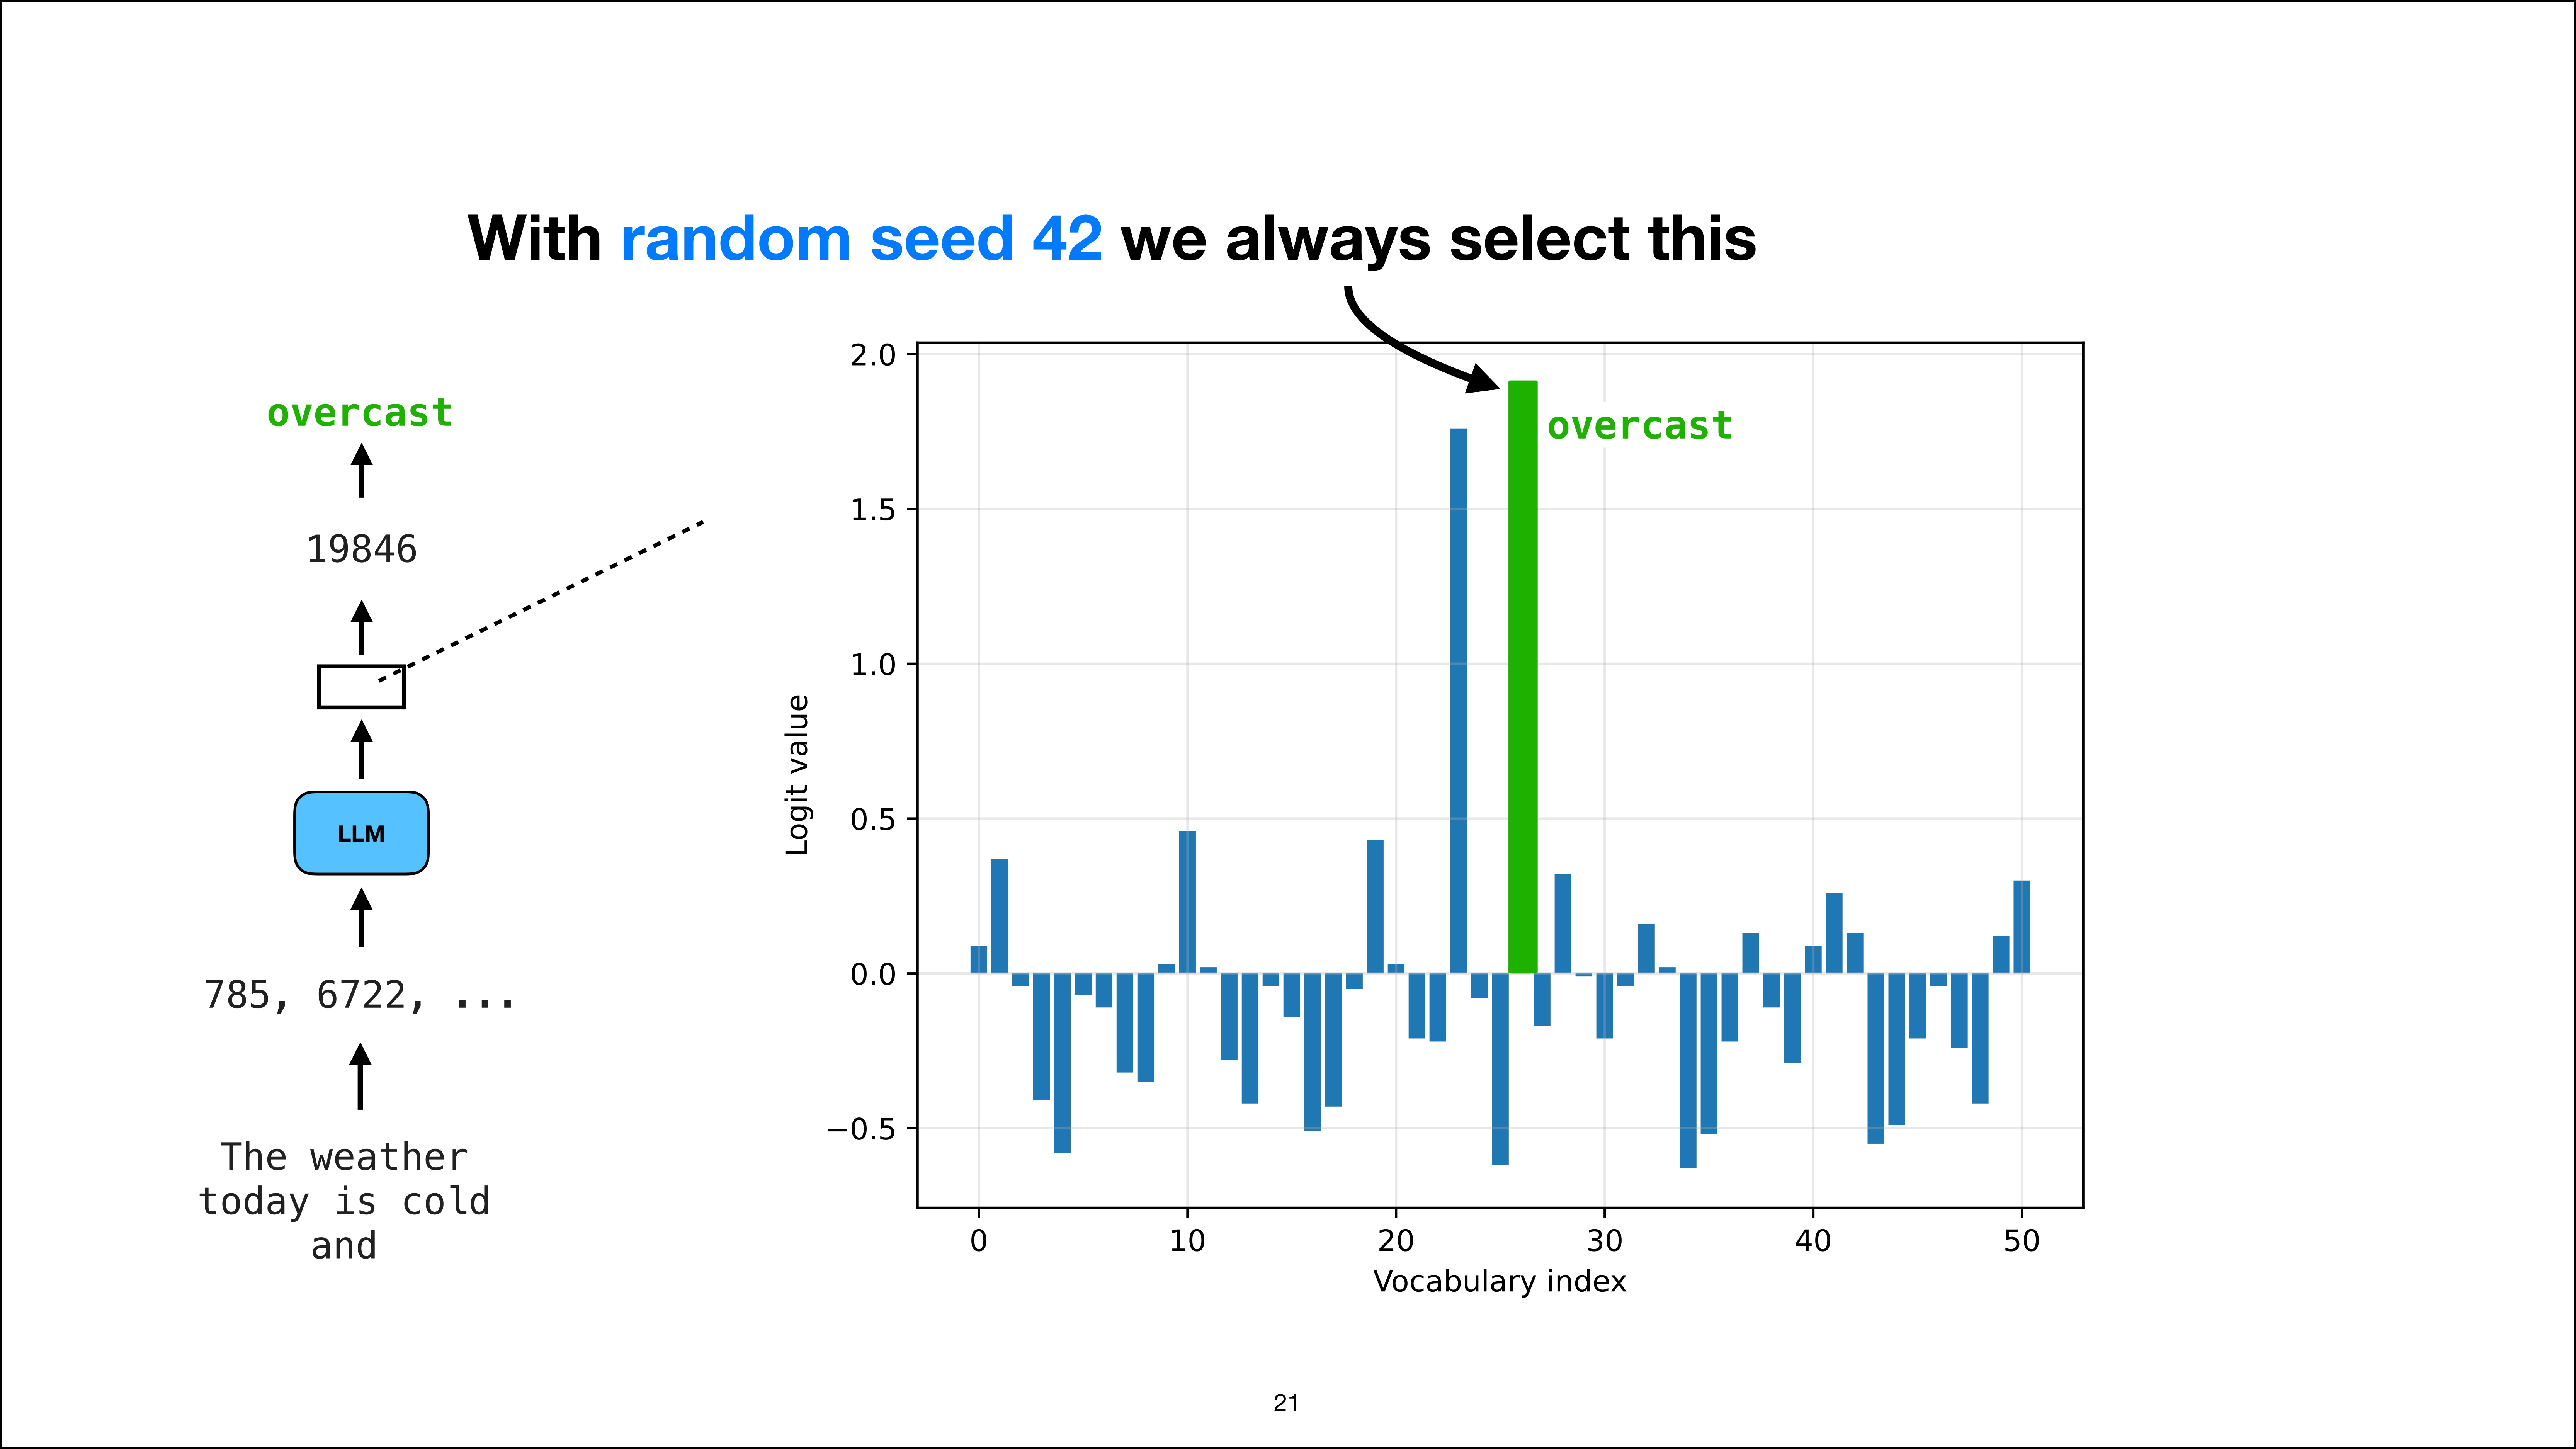
So, for example, I mentioned before that we might get either “gray” or “overcast” if we randomly sample. Now, if we use a specific random seed like 42, we would always, for example, select “overcast”. I mean, it’s still a random selection, but we make it deterministic. In this case, given this prompt, the model will always select “overcast”.


Random seed 99 consistently selects grey
Slide 22 of 52, time stamp 19:49

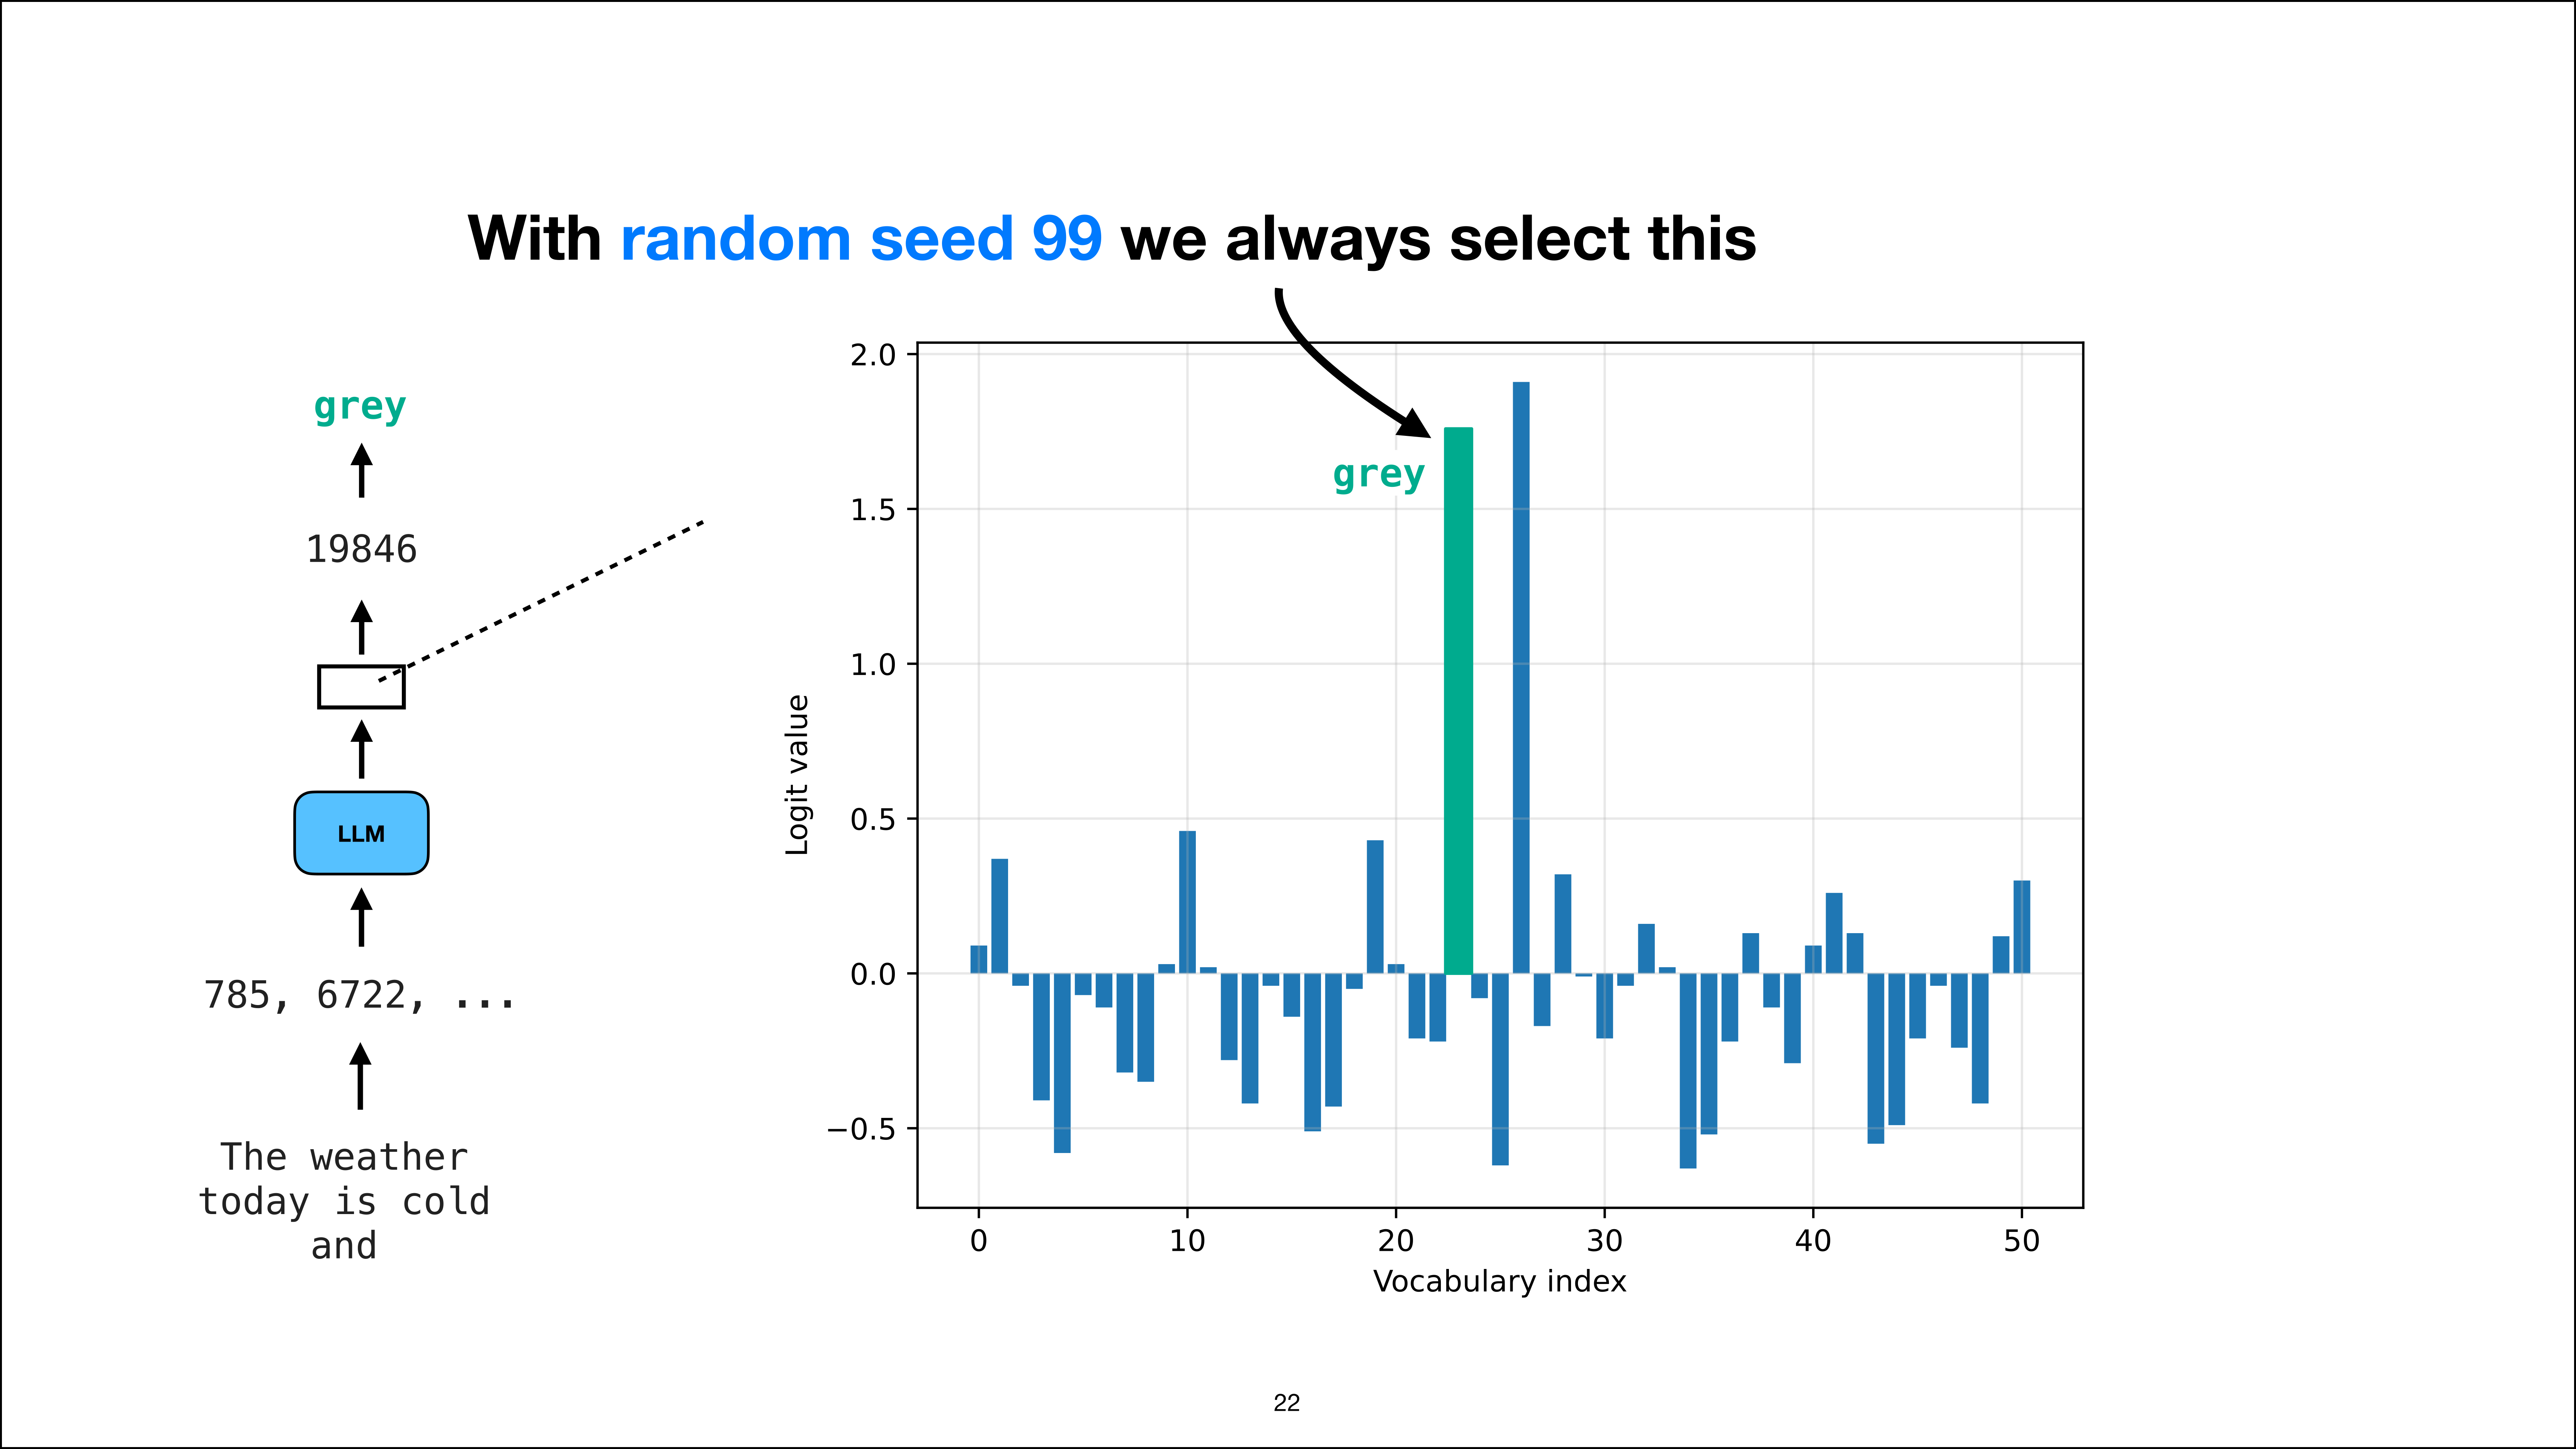
If we use a different random seed, the model might select “gray”. Every time we sample, it will always select “gray” as the next token. So it’s still random sampling, but we are making it deterministic based on the random seed.


20:03

How the Watermarking Key Works

Watermarking derives a random seed from a secret key and token context
Slide 23 of 52, time stamp 20:04

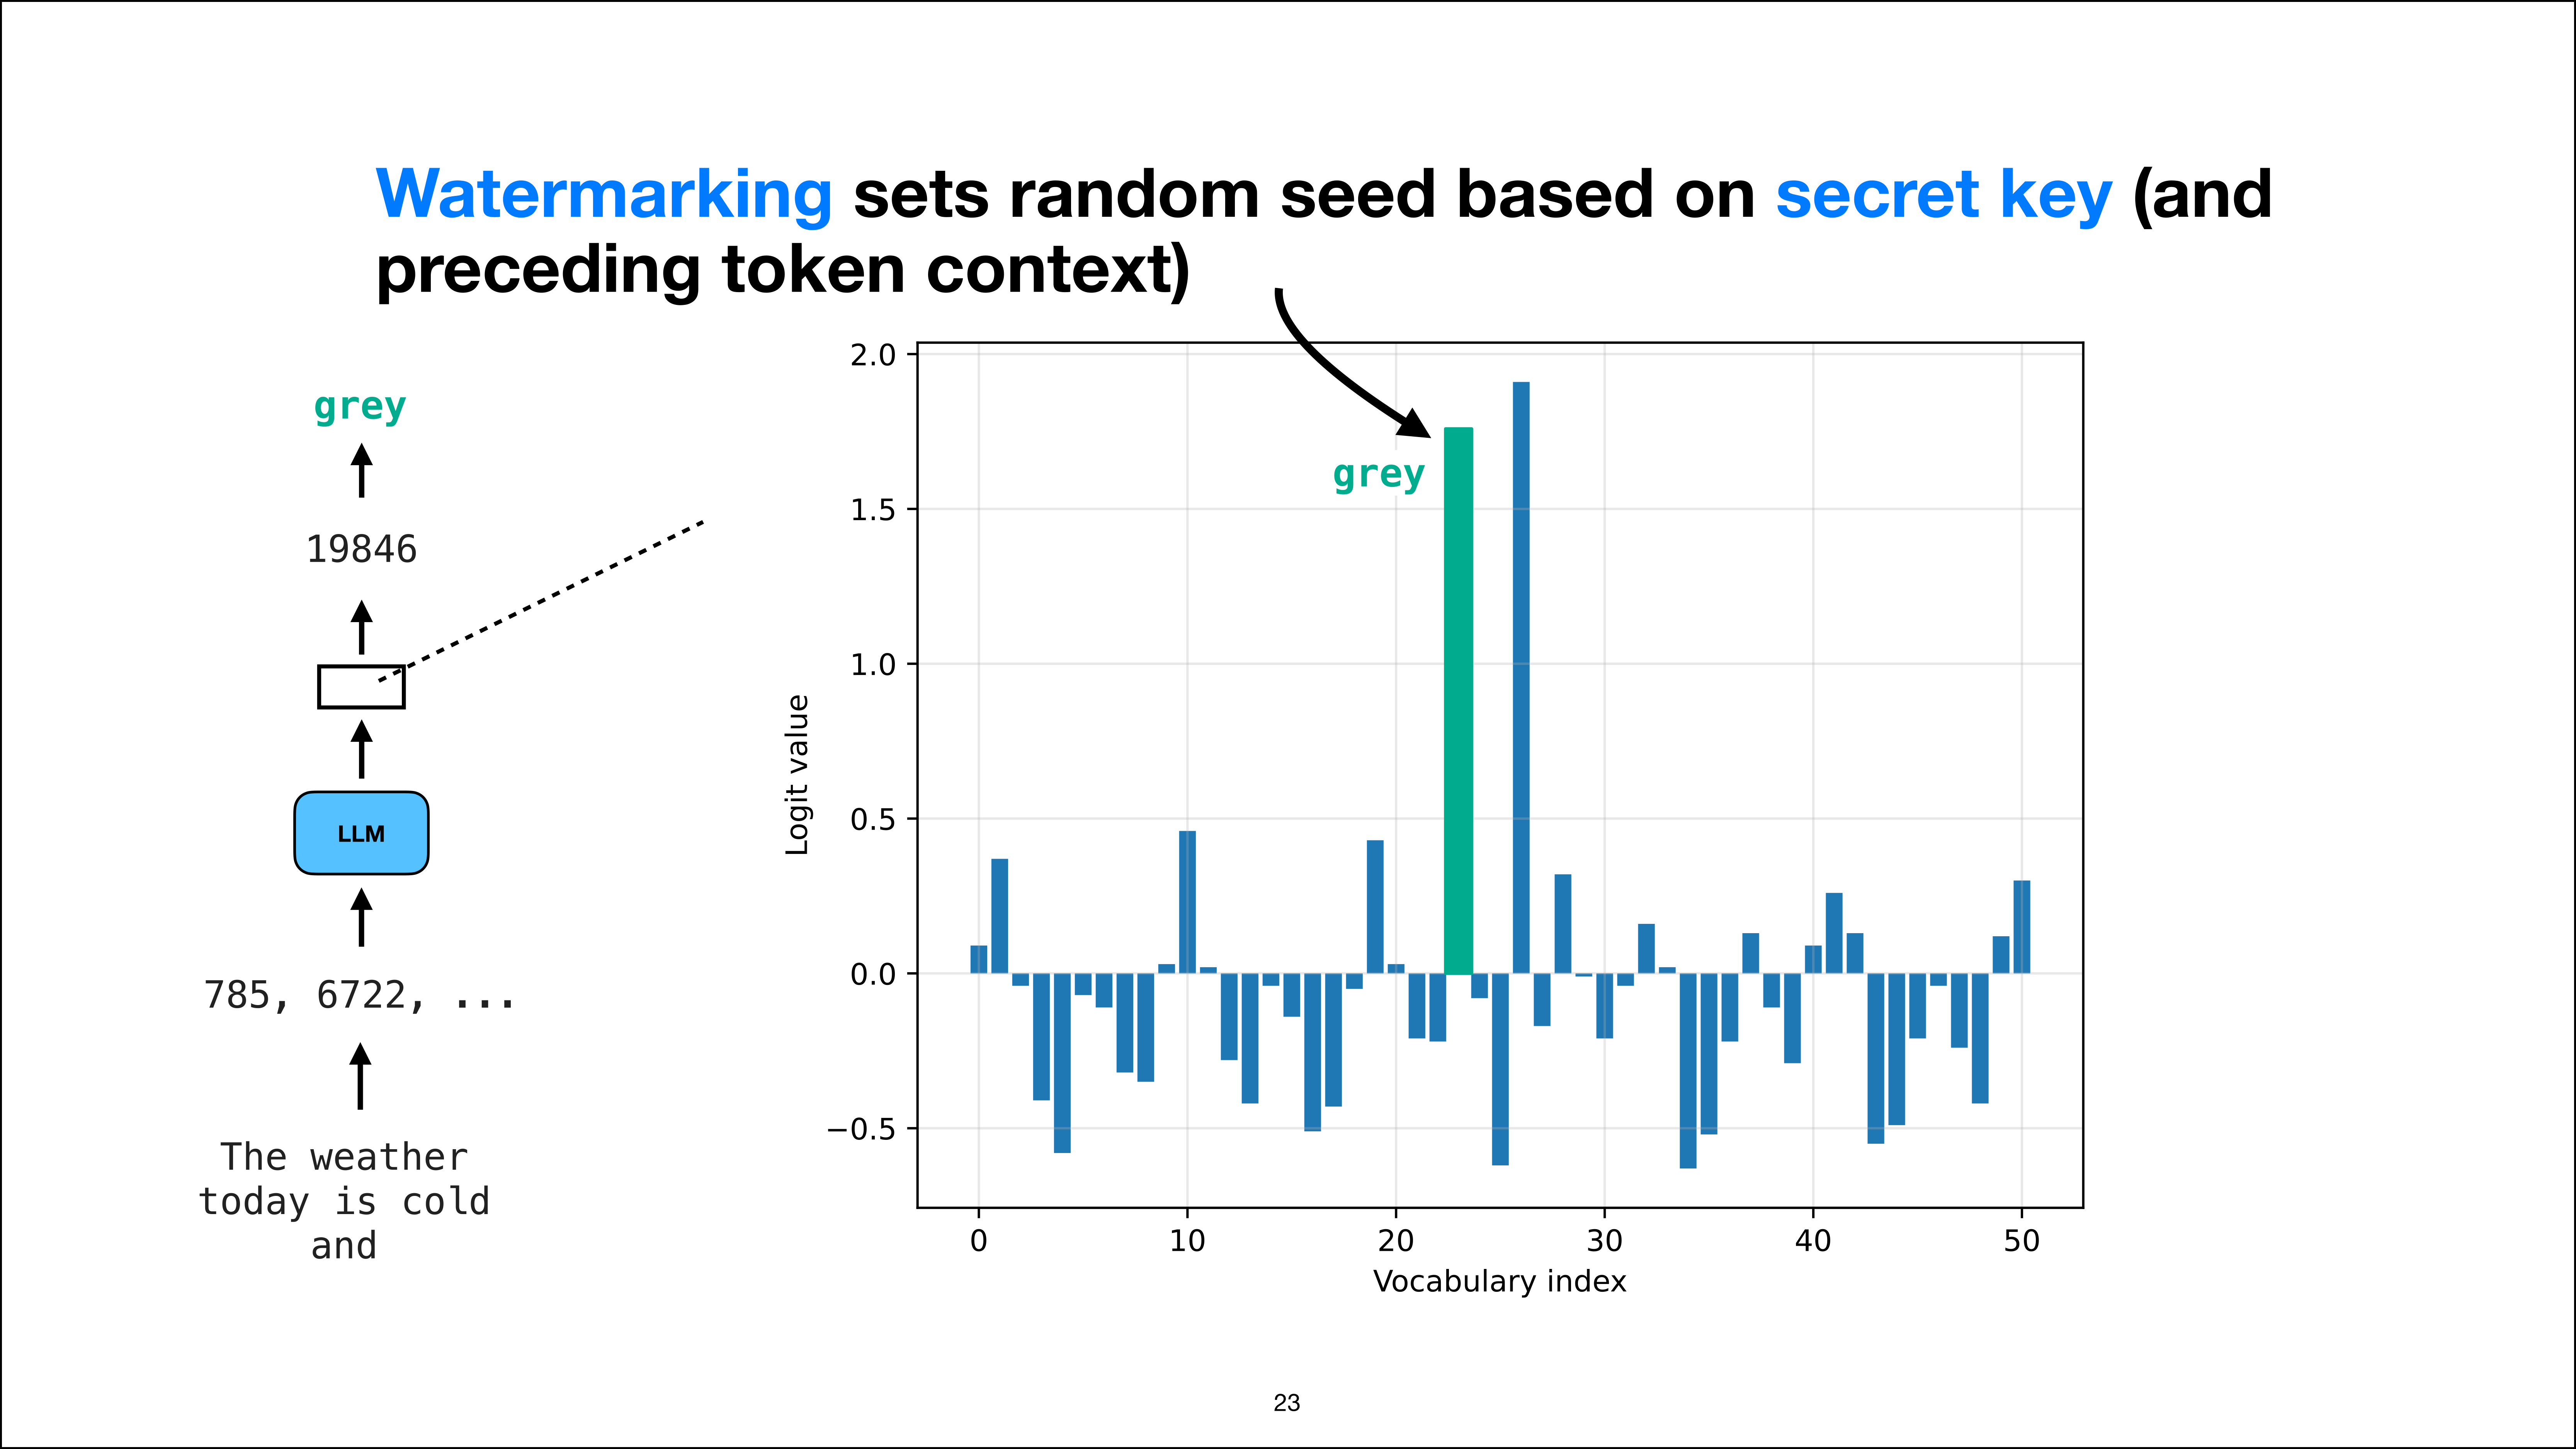
So, in watermarking, Claude watermarking is kind of like the idea that it sets a random seed. But this random seed, instead of being like a number that is fixed based on, I don’t know, someone writing down a fixed number, they’re using a secret key that is essentially like an API key, a secret key, and from that key, together with the four previous words, they derive this random seed essentially.

But the idea is that if I go back one slide, it’s the same as here: there’s essentially a fixed random seed, and that random seed always selects the same next token. Okay, so instead of using random seed 99 here, for example, they have a secret key and also use information about the previous tokens to derive this random seed. But more on that later.


Without watermarking, sampling can produce many plausible texts
Slide 24 of 52, time stamp 21:06

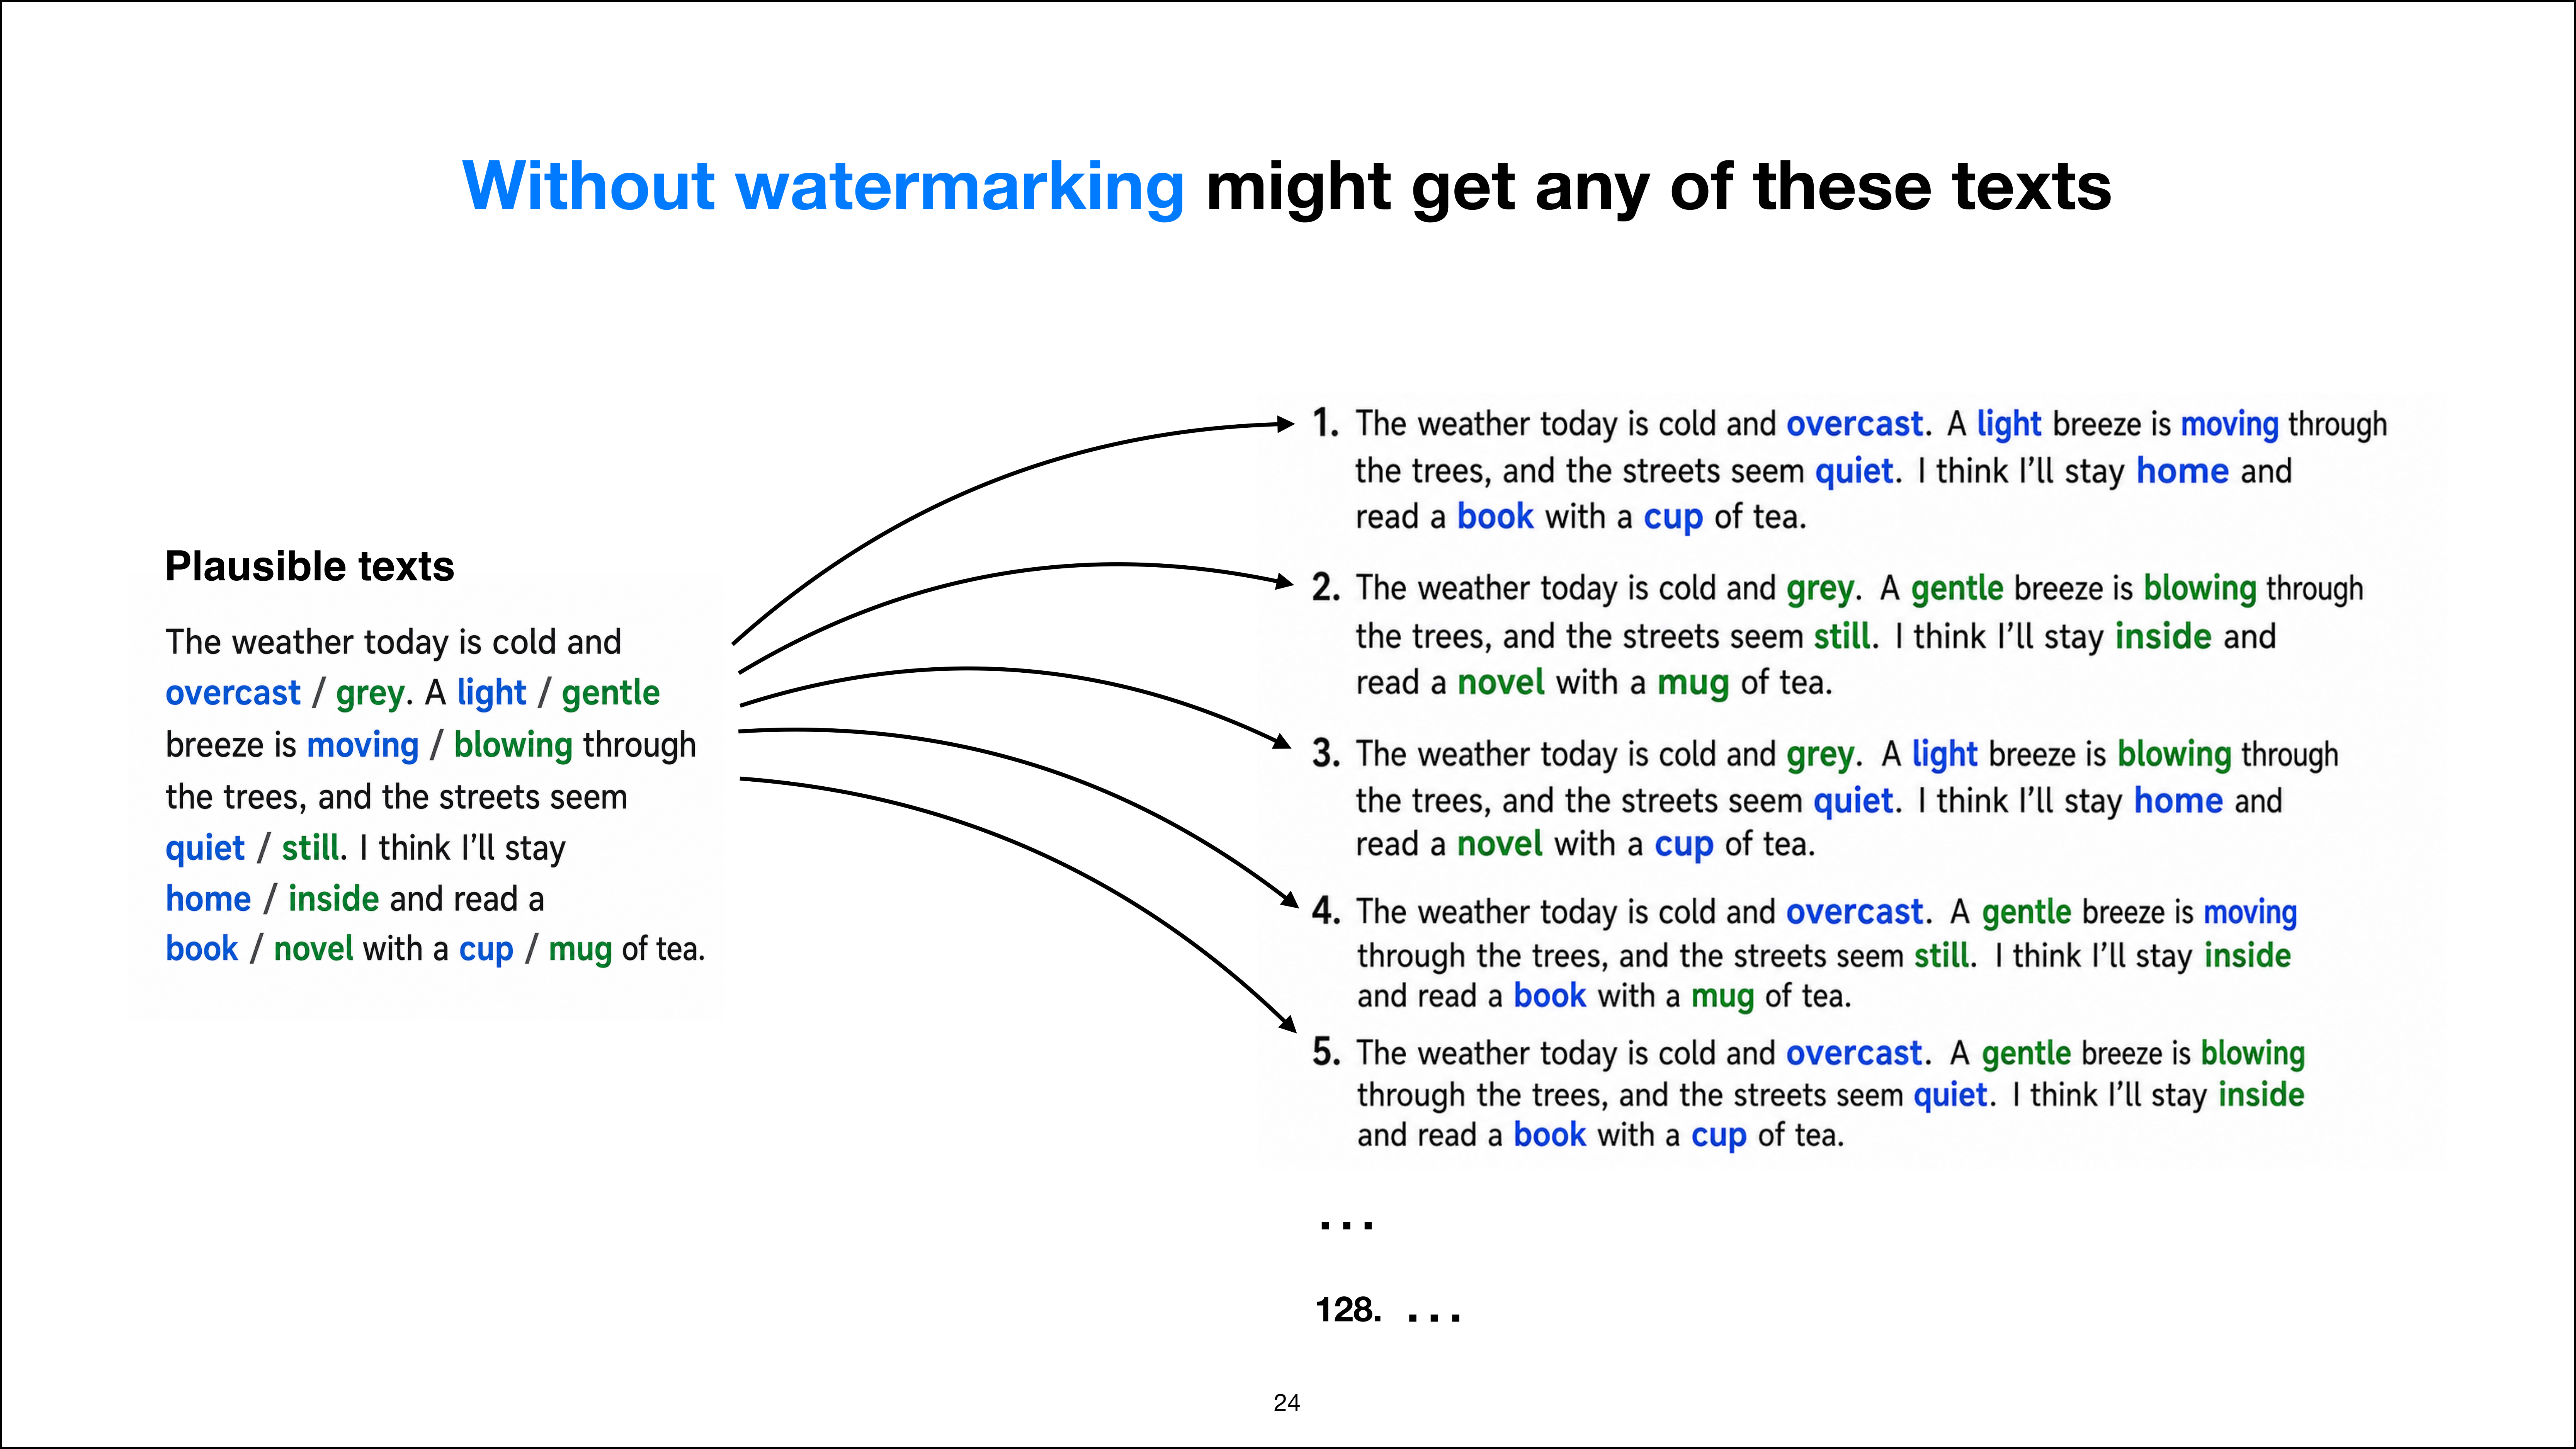
So the idea is that watermarking makes the text generation more deterministic in certain positions. So, for example, if we have these plausible texts on the left side. So if I have a text that says,

> The weather today is cold and

I may either pick “overcast” or “gray”. And the next sentence could be,

> and then “light” or “gentle”

They’re both interchangeable again.

> And then breeze is “moving” or “blowing” through the trees, and the streets seem “quiet” or “still”.

Which means basically I could say either “quiet” or “still”. So there are certain positions in the text where we have token choices where they are almost equally likely, like we have seen before. So that means if we are, this is without watermarking, if we are running the prompt, or given the prompt through the LLM, we might sometimes get this answer here, sometimes this answer, and so forth.

And based on the number of positions, we might have 128 possible answers here. And of course, the longer the text, the more positions we have where we can have terms interchangeably, the more combinations, or the more output texts, there are. So, for example, again, one possible output text could be

> The weather today is cold and overcast. A light breeze is moving through the trees, and the streets seem quiet. I think I’ll stay home and read a book with a cup of tea.

So that is one possible text. Another possible text is

> The weather today is cold and gray. A gentle breeze is blowing through the trees, and the streets seem still. I think I’ll stay inside and read a novel with a mug of tea. By the way, it’s also actually raining outside. I don’t know how good this microphone is, but it’s kind of a very fitting context here.

But yeah, the bottom line is that you can see there are two very reasonable texts here being generated, and there are more combinations. So they are all reasonable. There isn’t one that is necessarily better than the other. They’re just, you know, slight variations. And if we don’t use watermarking, we might get either one, or it’s just random, right? Because of the random sampling, we might get one or the other.


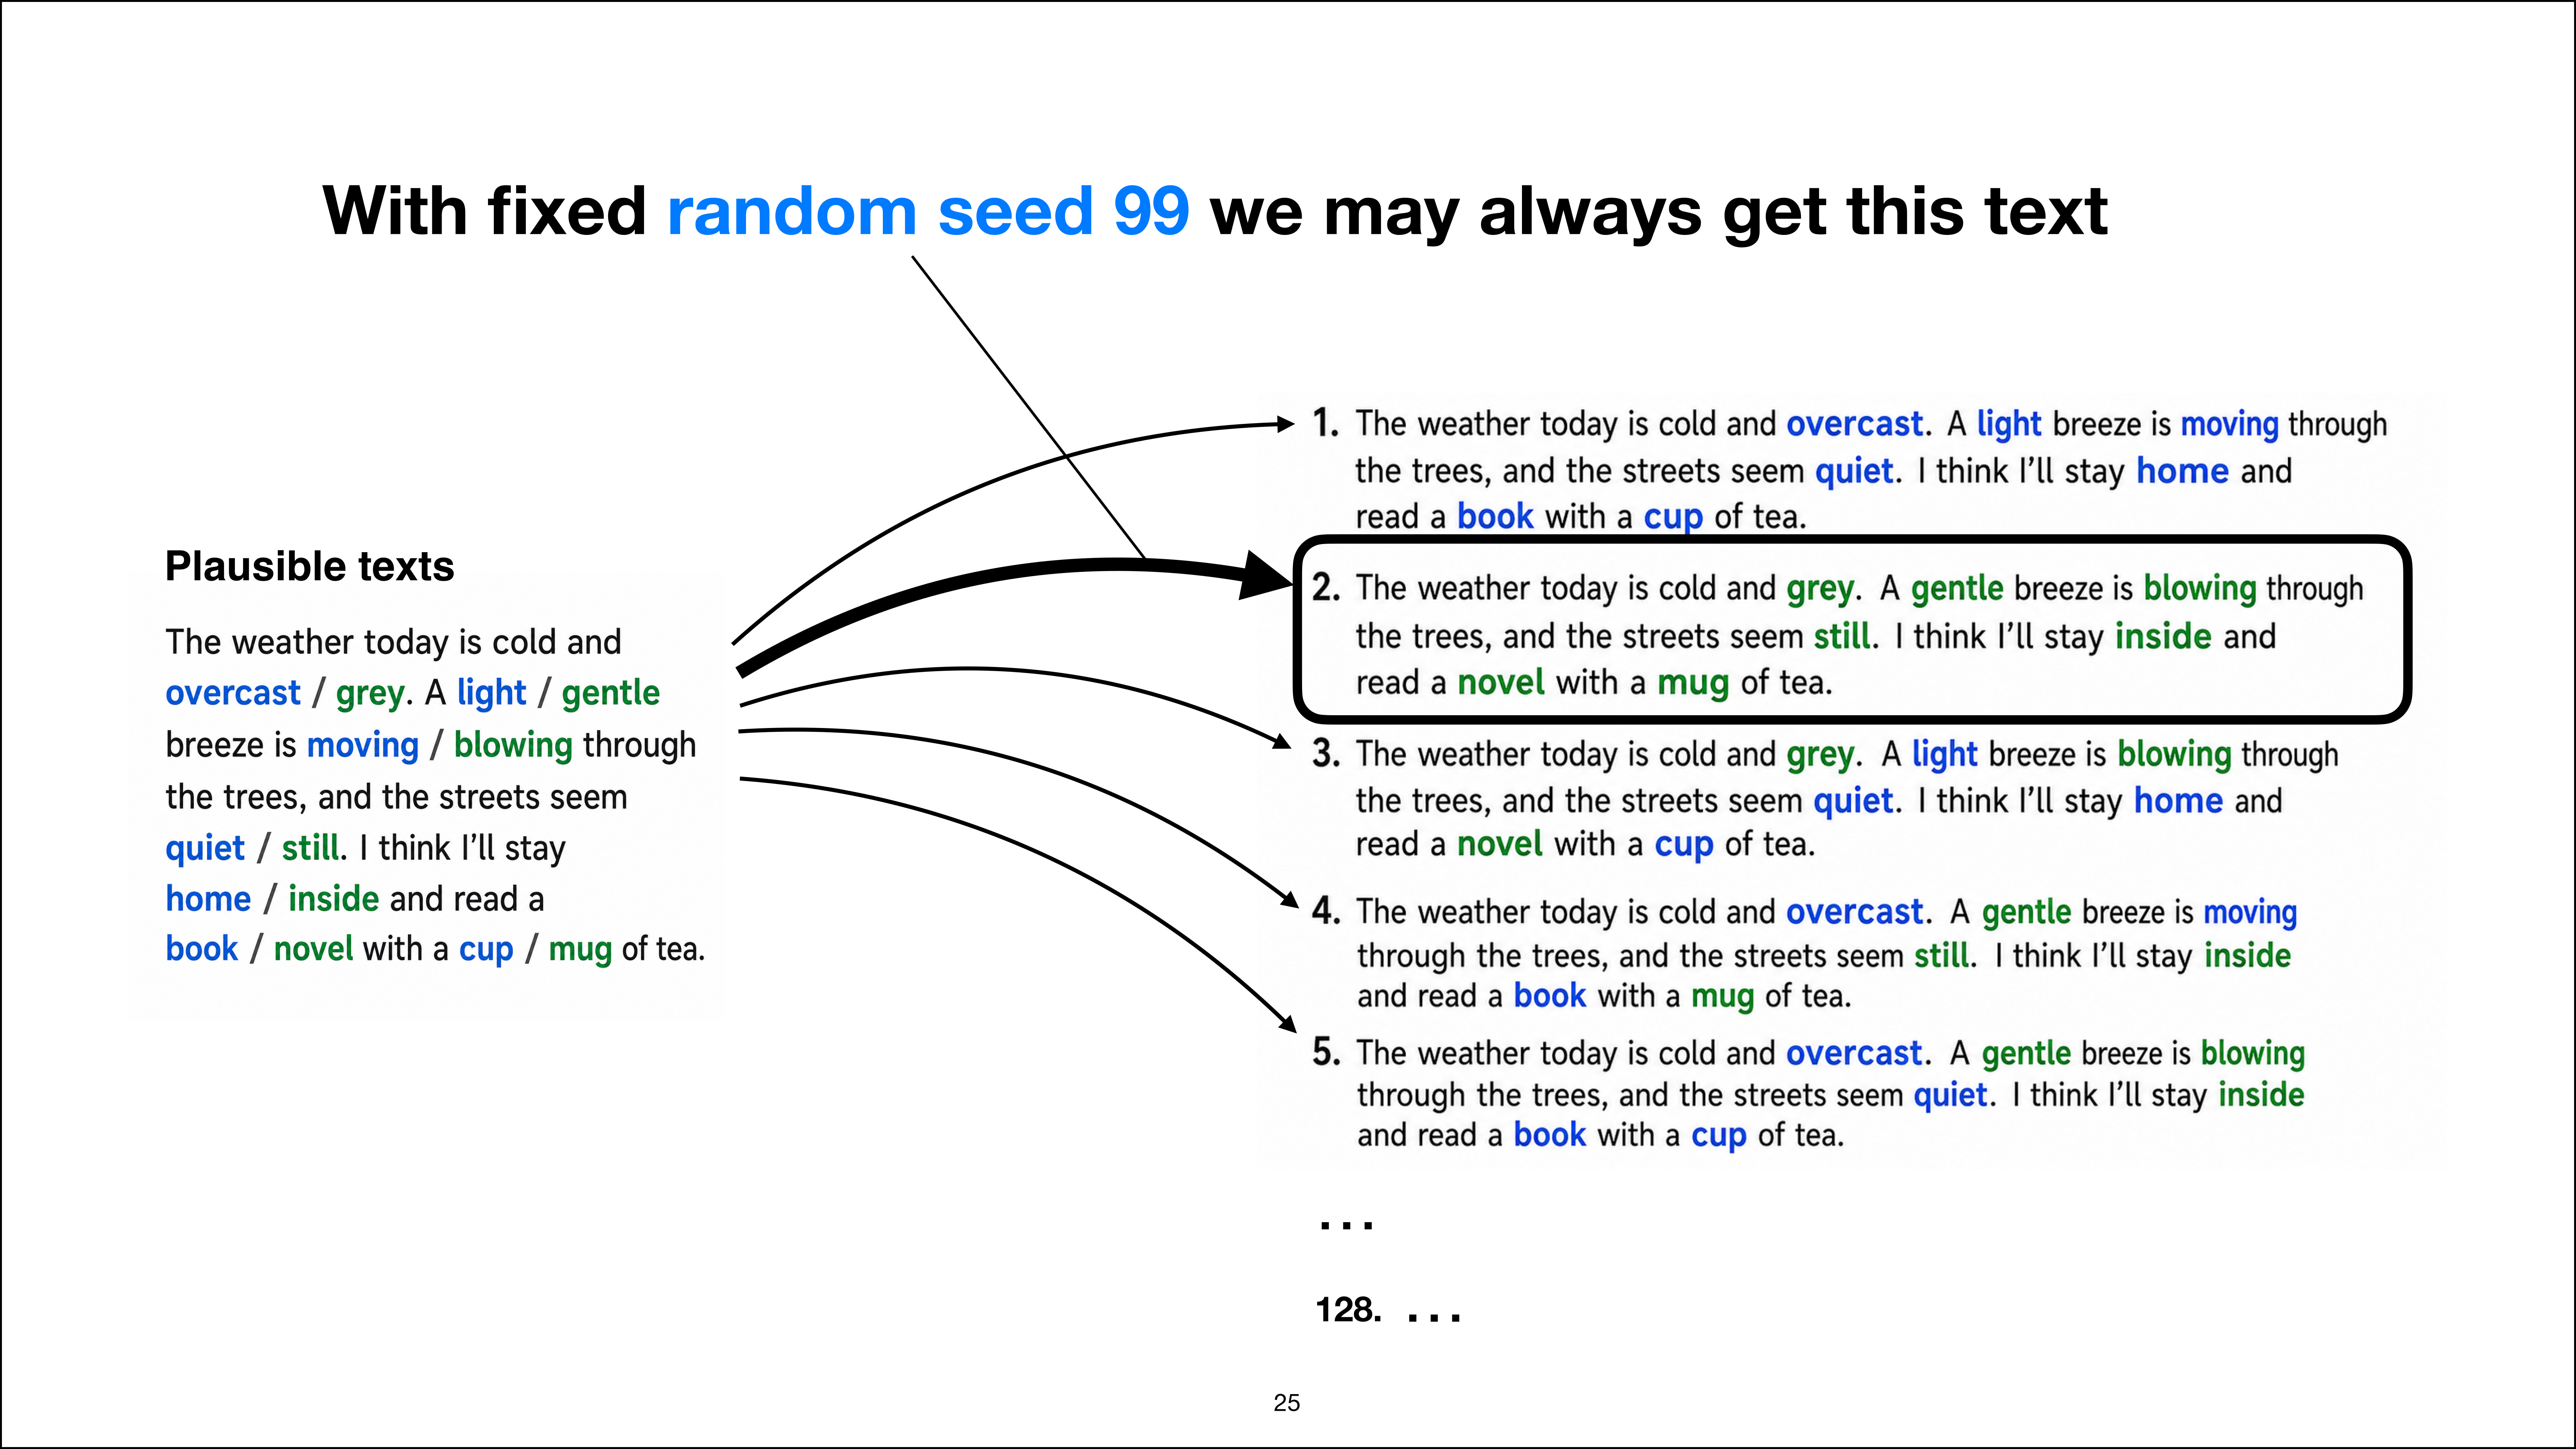
A fixed random seed reproduces one of the plausible texts
Slide 25 of 52, time stamp 23:31

Now, if we fix the random seed, as I mentioned before, for example, if the random seed is 99, we might always get this text here. So, using a random seed, we can kind of fix which answer we get, because then the random sampling is still random, but it’s deterministic in the sense that it’s reproducible. It’s always going to be the same then. Okay, so that is still without watermarking, now with a random seed.


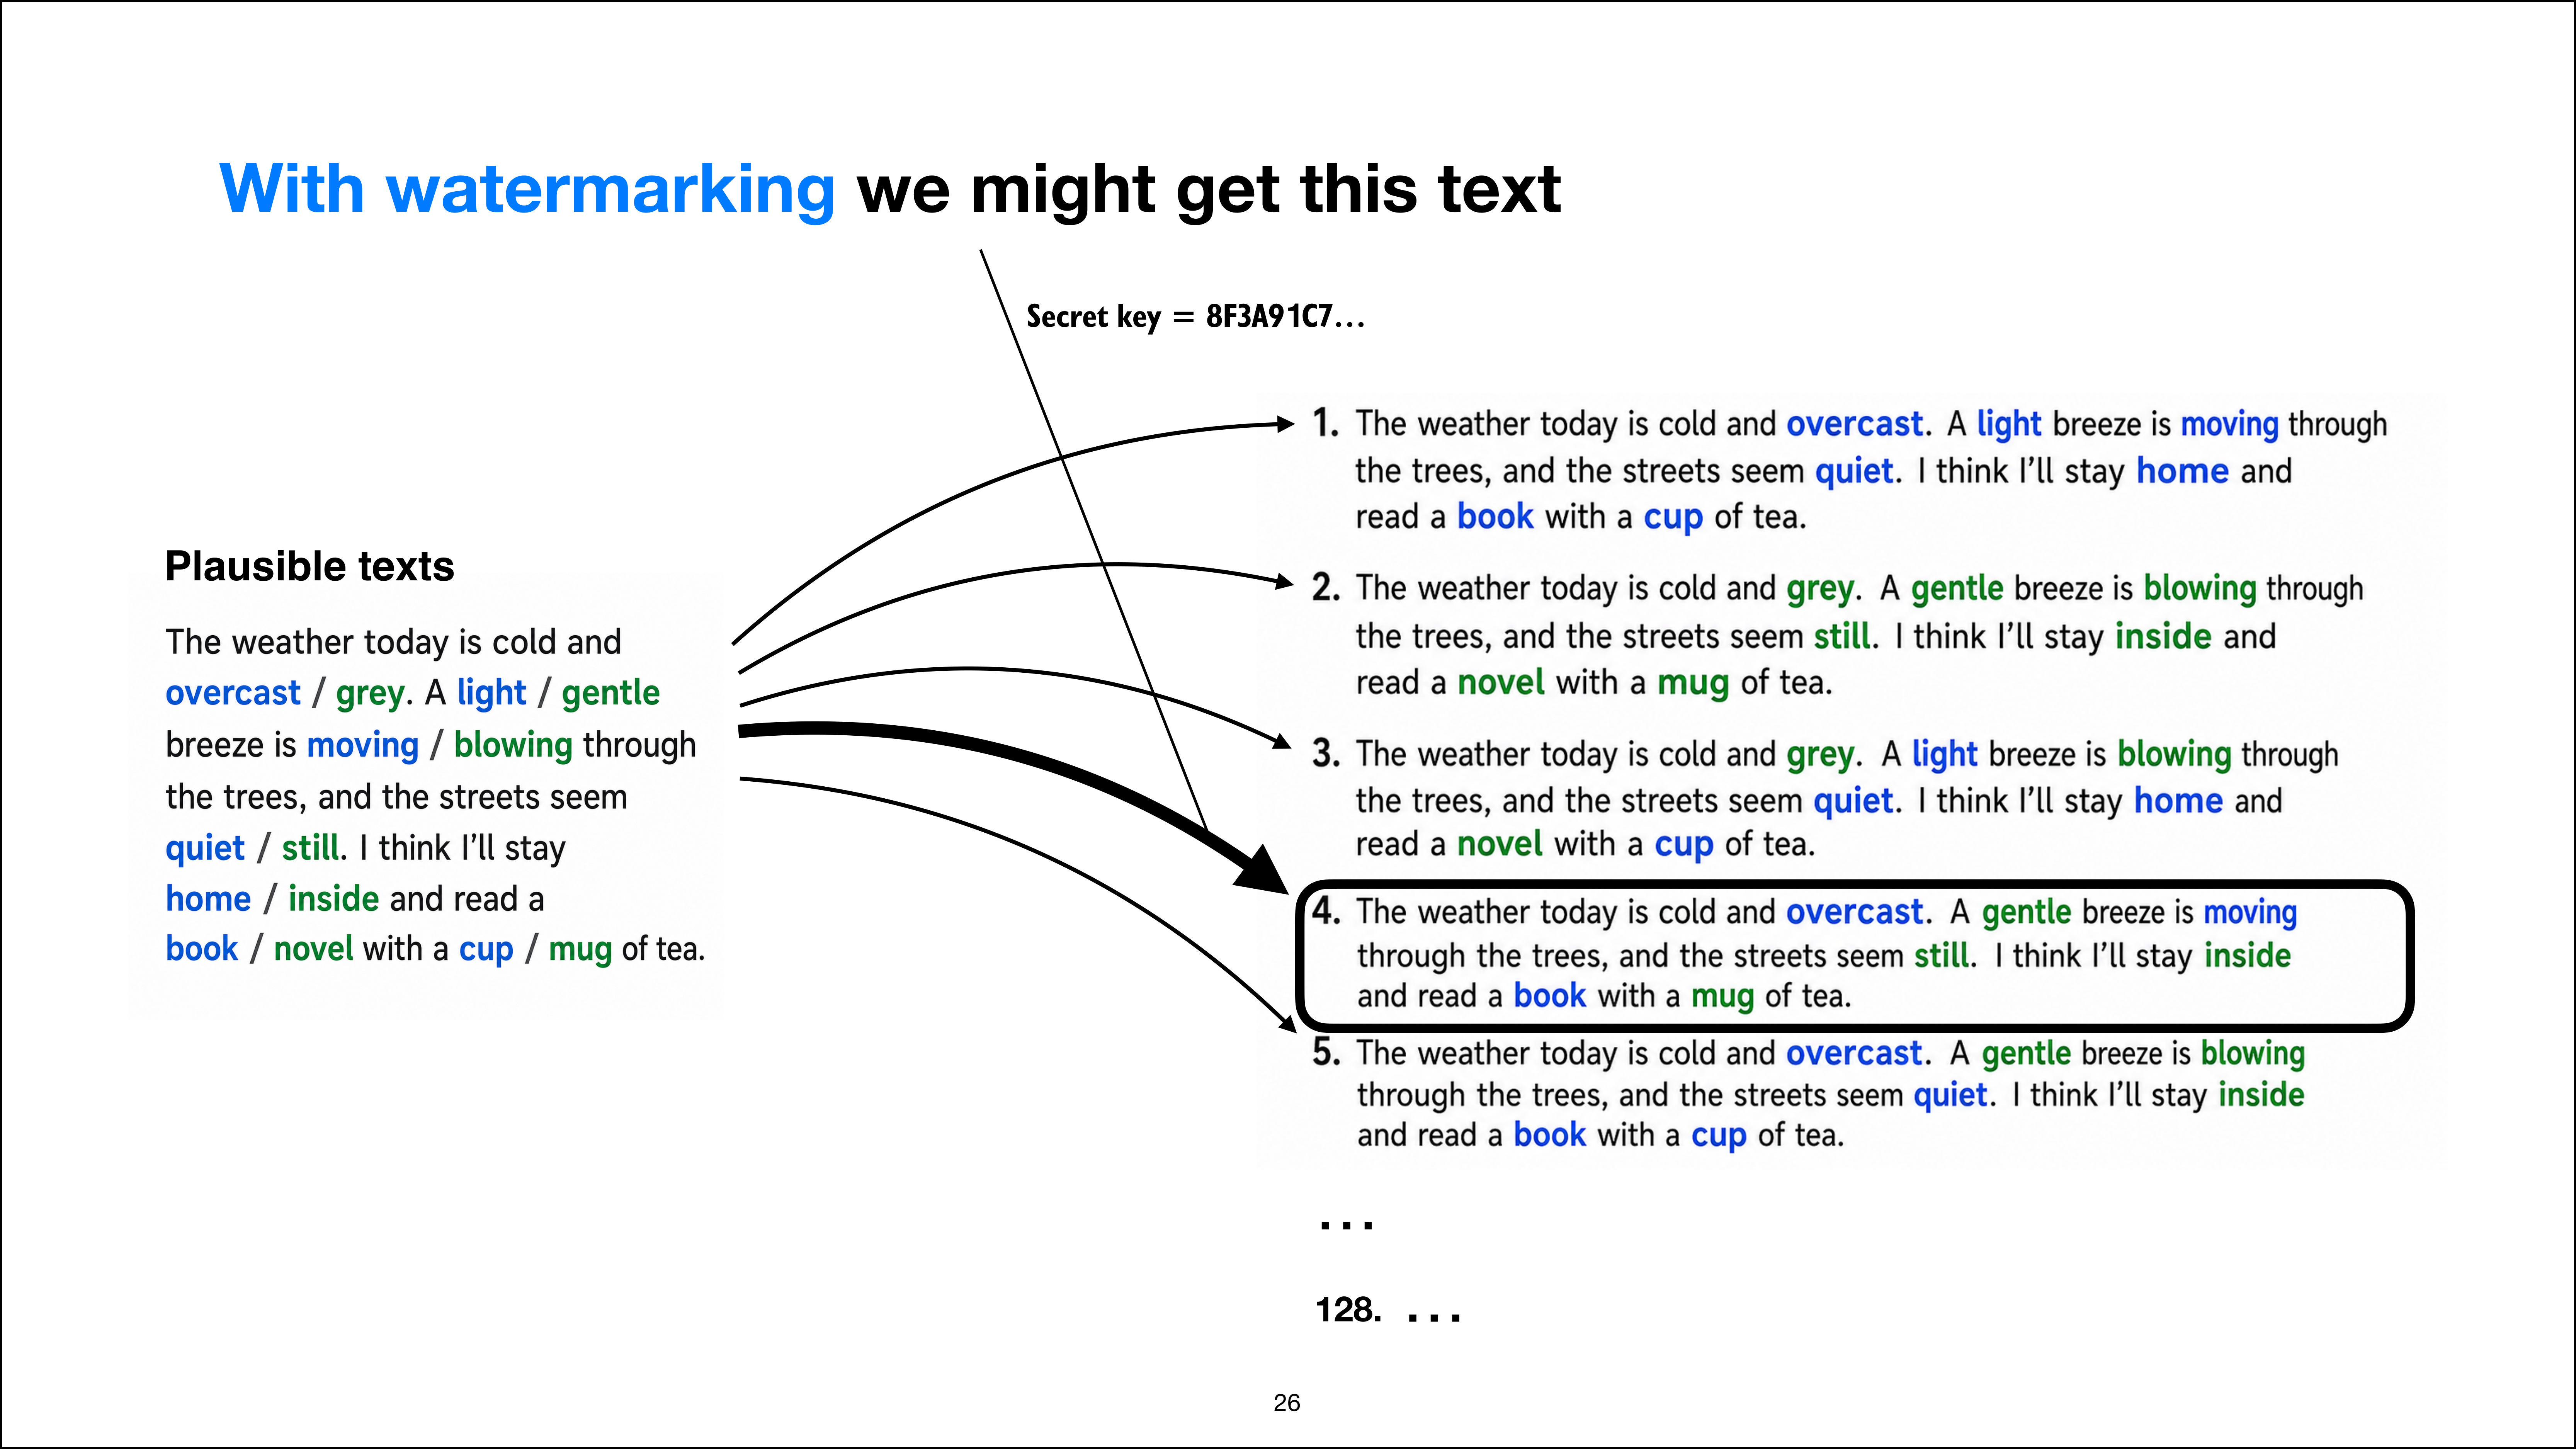
With watermarking, the key controls which plausible text is generated
Slide 26 of 52, time stamp 23:59

And the watermarking is essentially doing the same thing. Now, instead of just using a simple random seed, they have a so-called random key, where this random key is involved in selecting the text, essentially. But what we can already say is that, in the Claude blog post, they say the watermarking shouldn’t make the text worse. If we look at this mechanism, yeah, it makes sense why it would not make the text worse.

By the way, I’m not defending watermarks here. I’m just trying to explain. So please don’t kill the messenger here. But what I’m trying to say is that the watermarking is nothing else for the end user than fixing a random seed and making this sampling kind of deterministic, if that makes sense.


24:45

Where the Watermark Is Applied

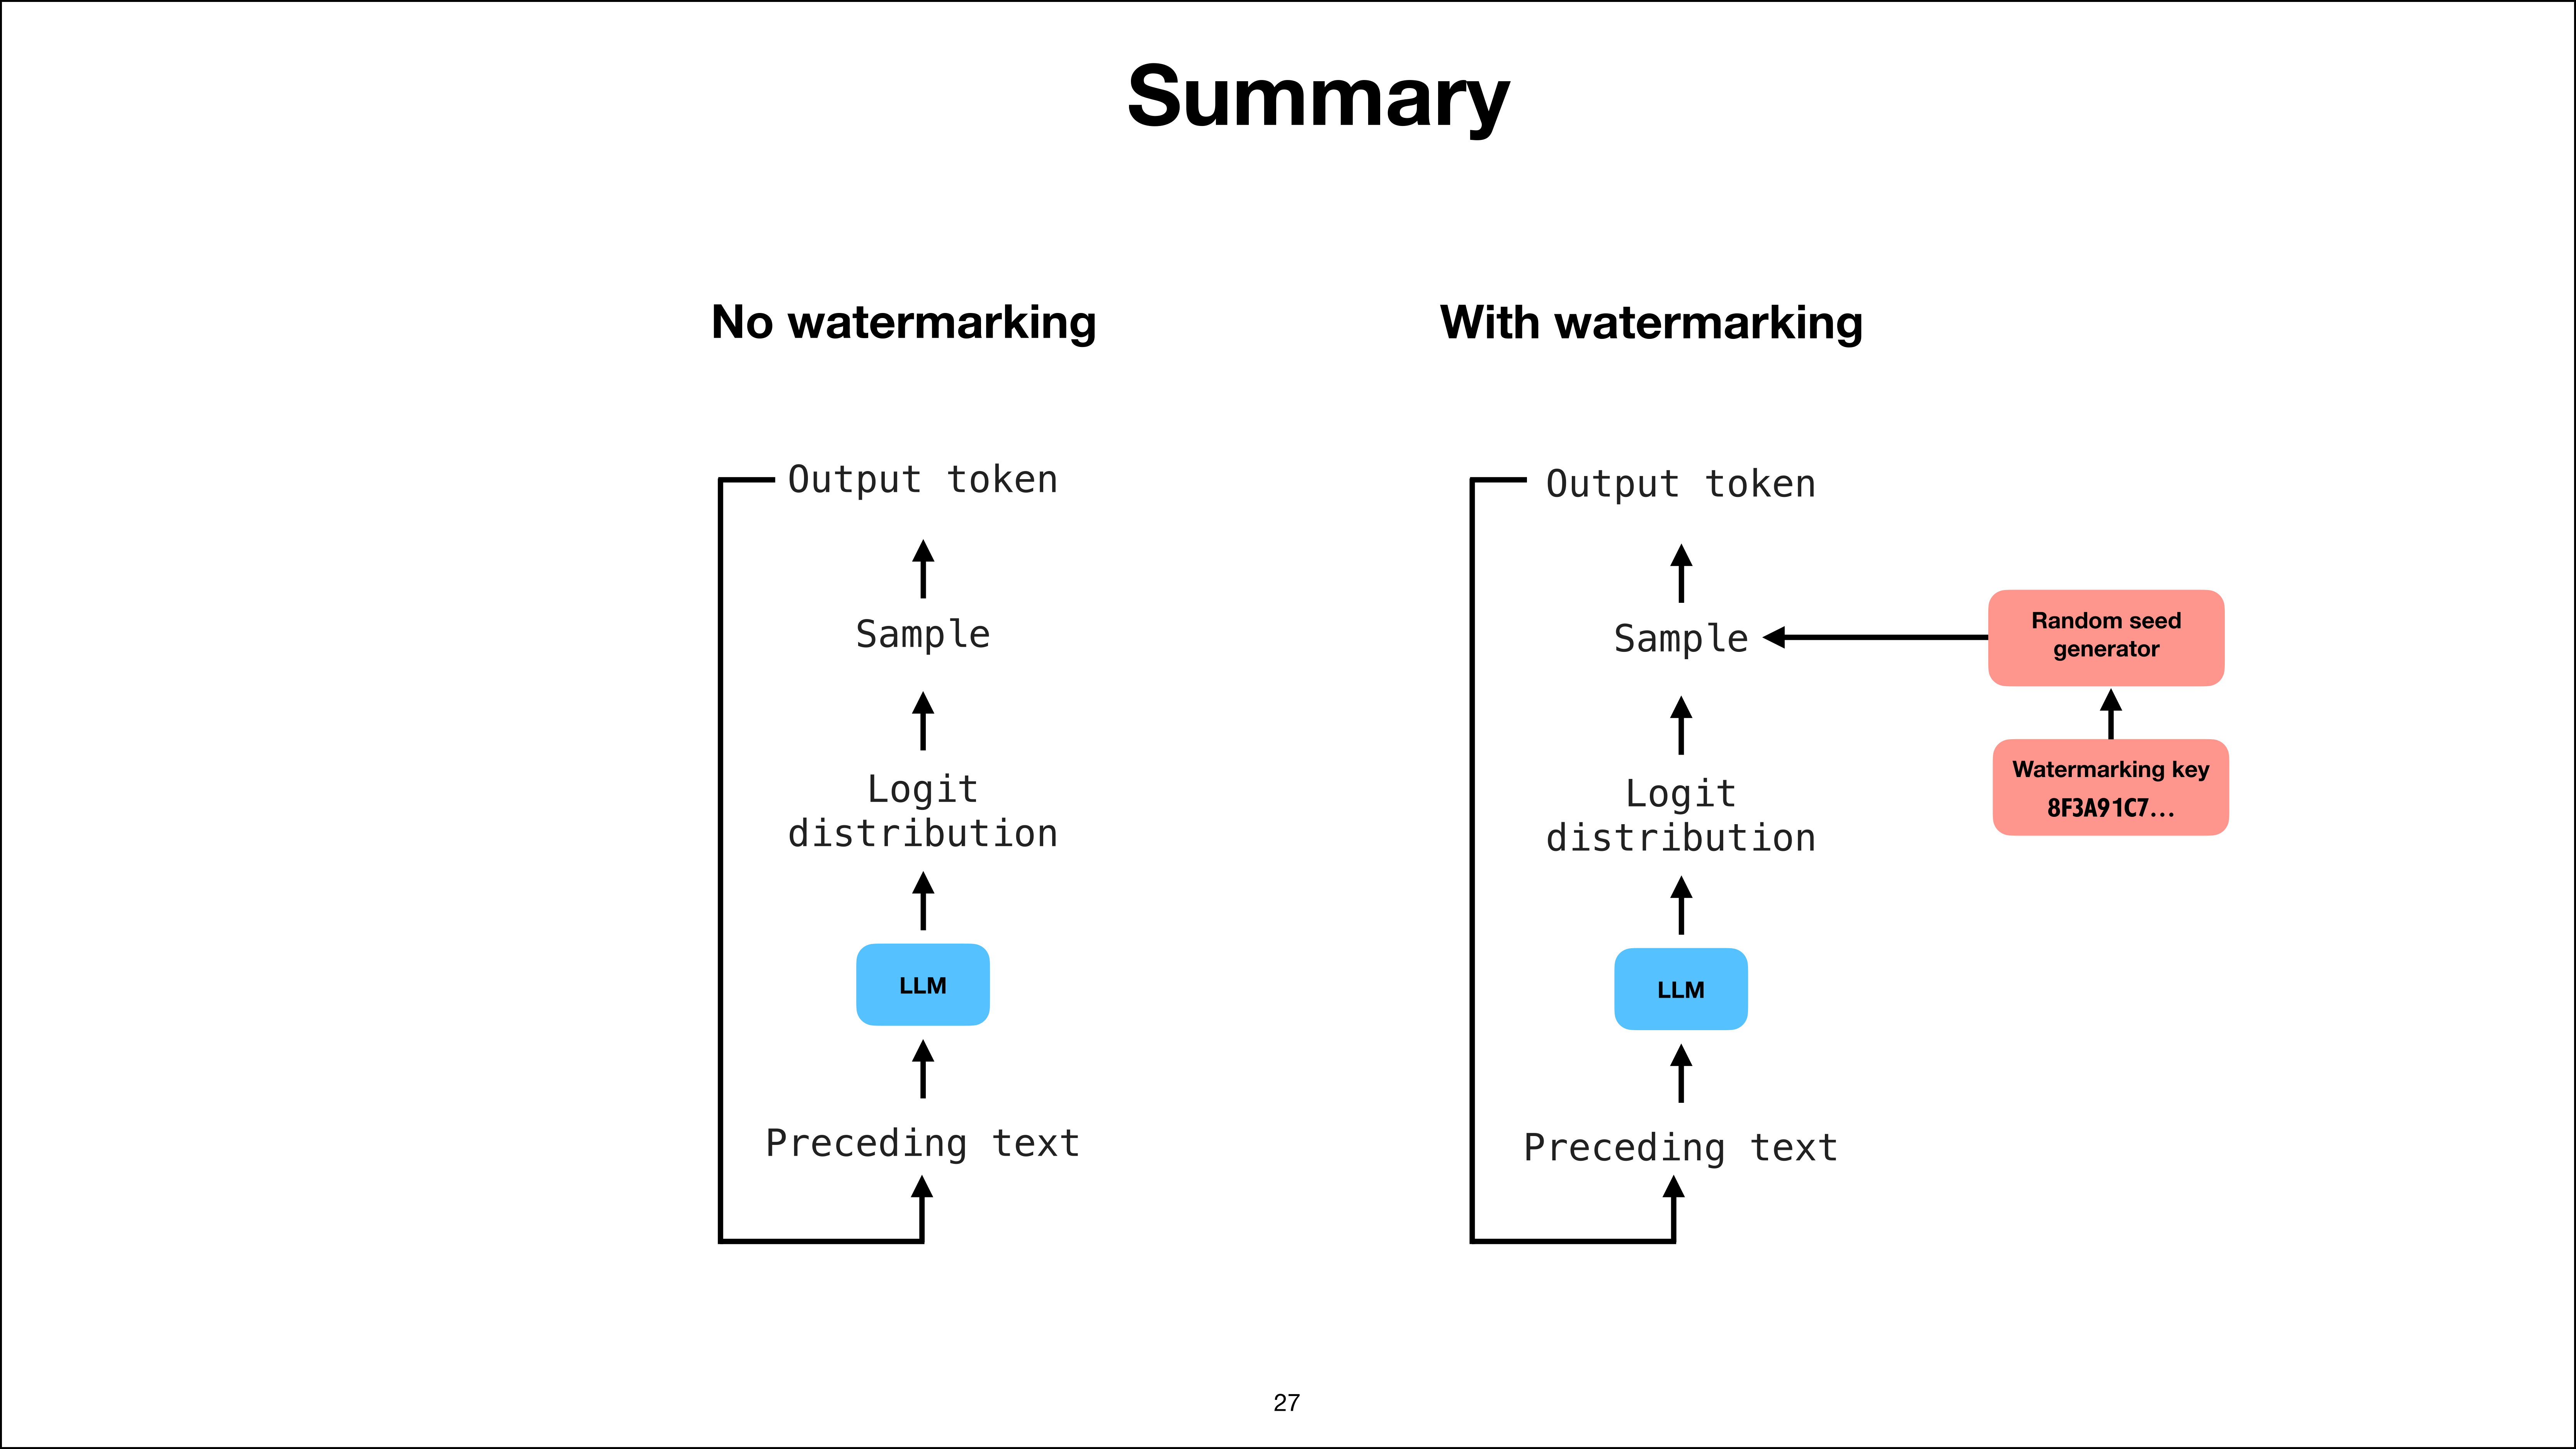
Summary of generation with and without watermarking
Slide 27 of 52, time stamp 24:47

Okay, so the summary so far is without watermarking. We often sample without a random seed because I know most people don’t even use one. I honestly don’t think you can necessarily do it with the Claude and OpenAI APIs. I know you can do it in Ollama, but I also always had some problems with that because I used Ollama in one of my books for the bonus material to generate some texts.

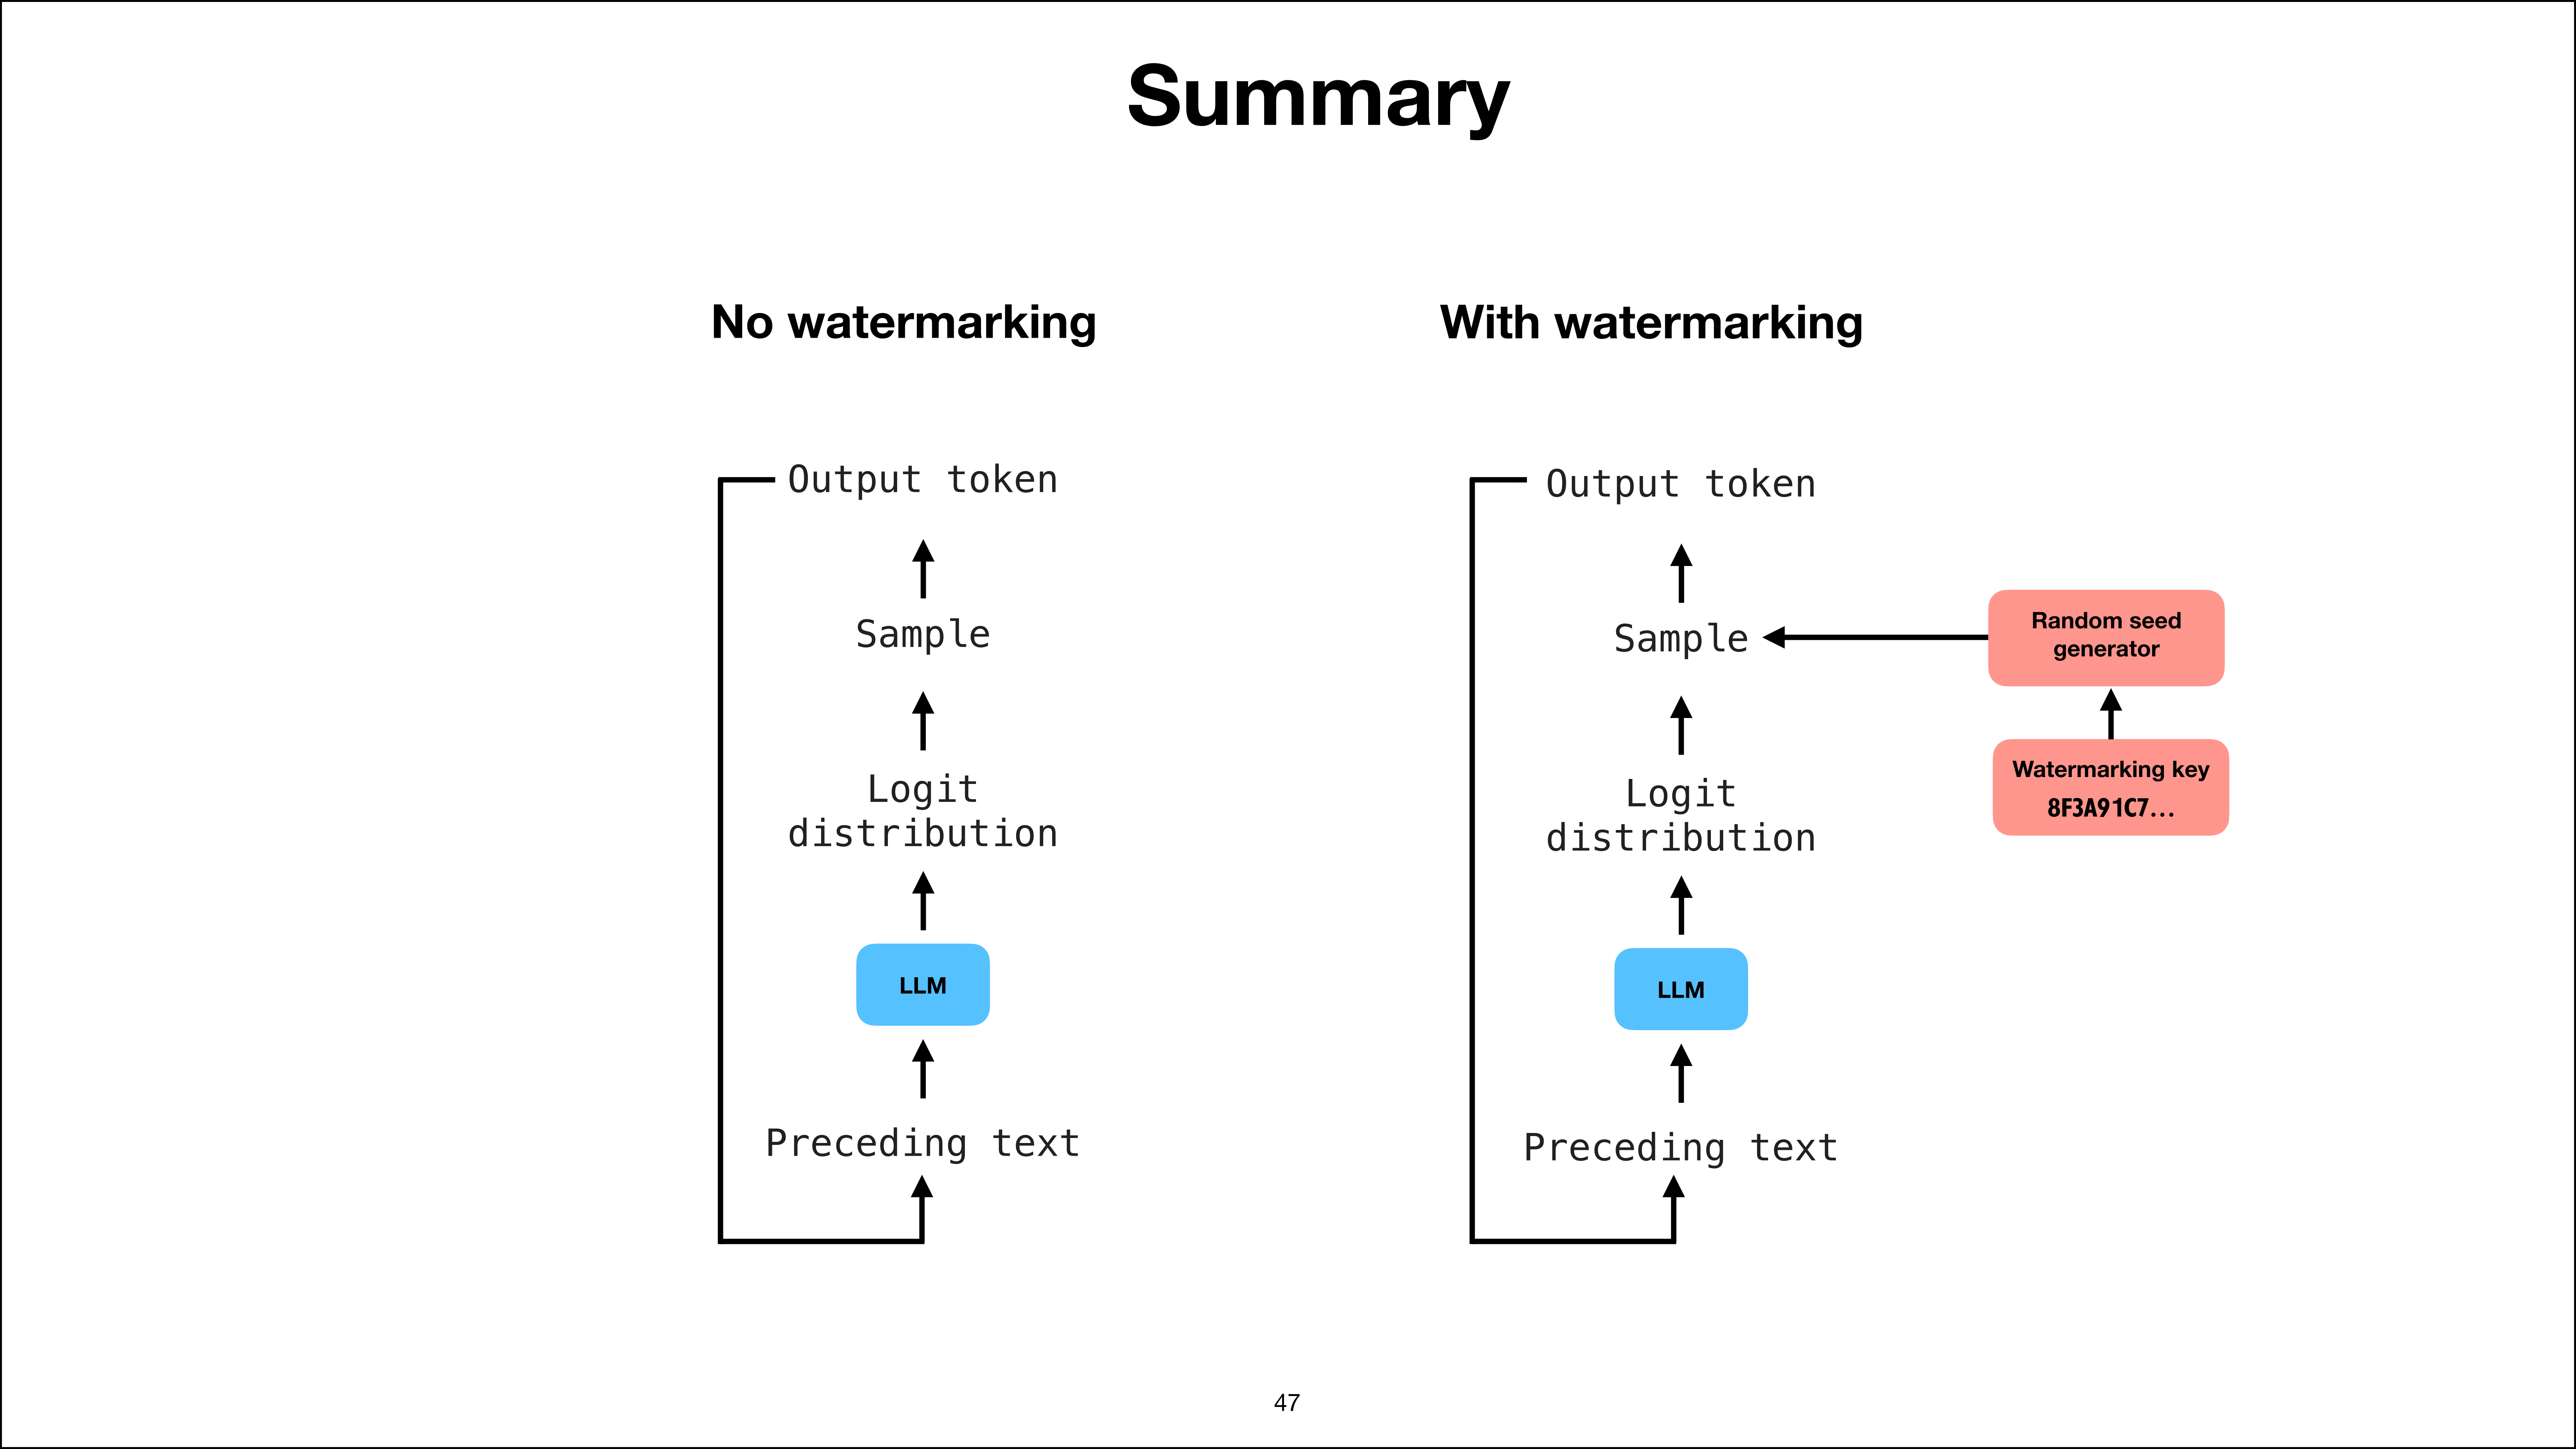
I was fixing the random seed, but it still wasn’t always deterministic, and so forth. So it’s tricky. Your mileage may also vary, depending on the software version and so forth. Anyways, so without watermarking, we have this random sampling. With watermarking on the right-hand side, we still have the random sampling. But in addition to just a random sampling being fully random, we have this watermarking key.

And this watermarking key is passed to the random seed generator to set a specific random seed, making this deterministic. But it’s essentially very similar, and like I mentioned, there’s a lot of benefit in terms of understanding things from scratch. And now we know essentially where this watermark is applied to. So this is essentially applied to the sampling. It’s not applied inside the LLM, which is actually cool knowledge.

So they don’t need to train a new LLM for that. They can just use an existing LLM, and they just apply it at this sampling stage. They don’t have to retrain anything or anything like that. So yeah, that is actually interesting, right?


26:13

How Watermark Detection Works

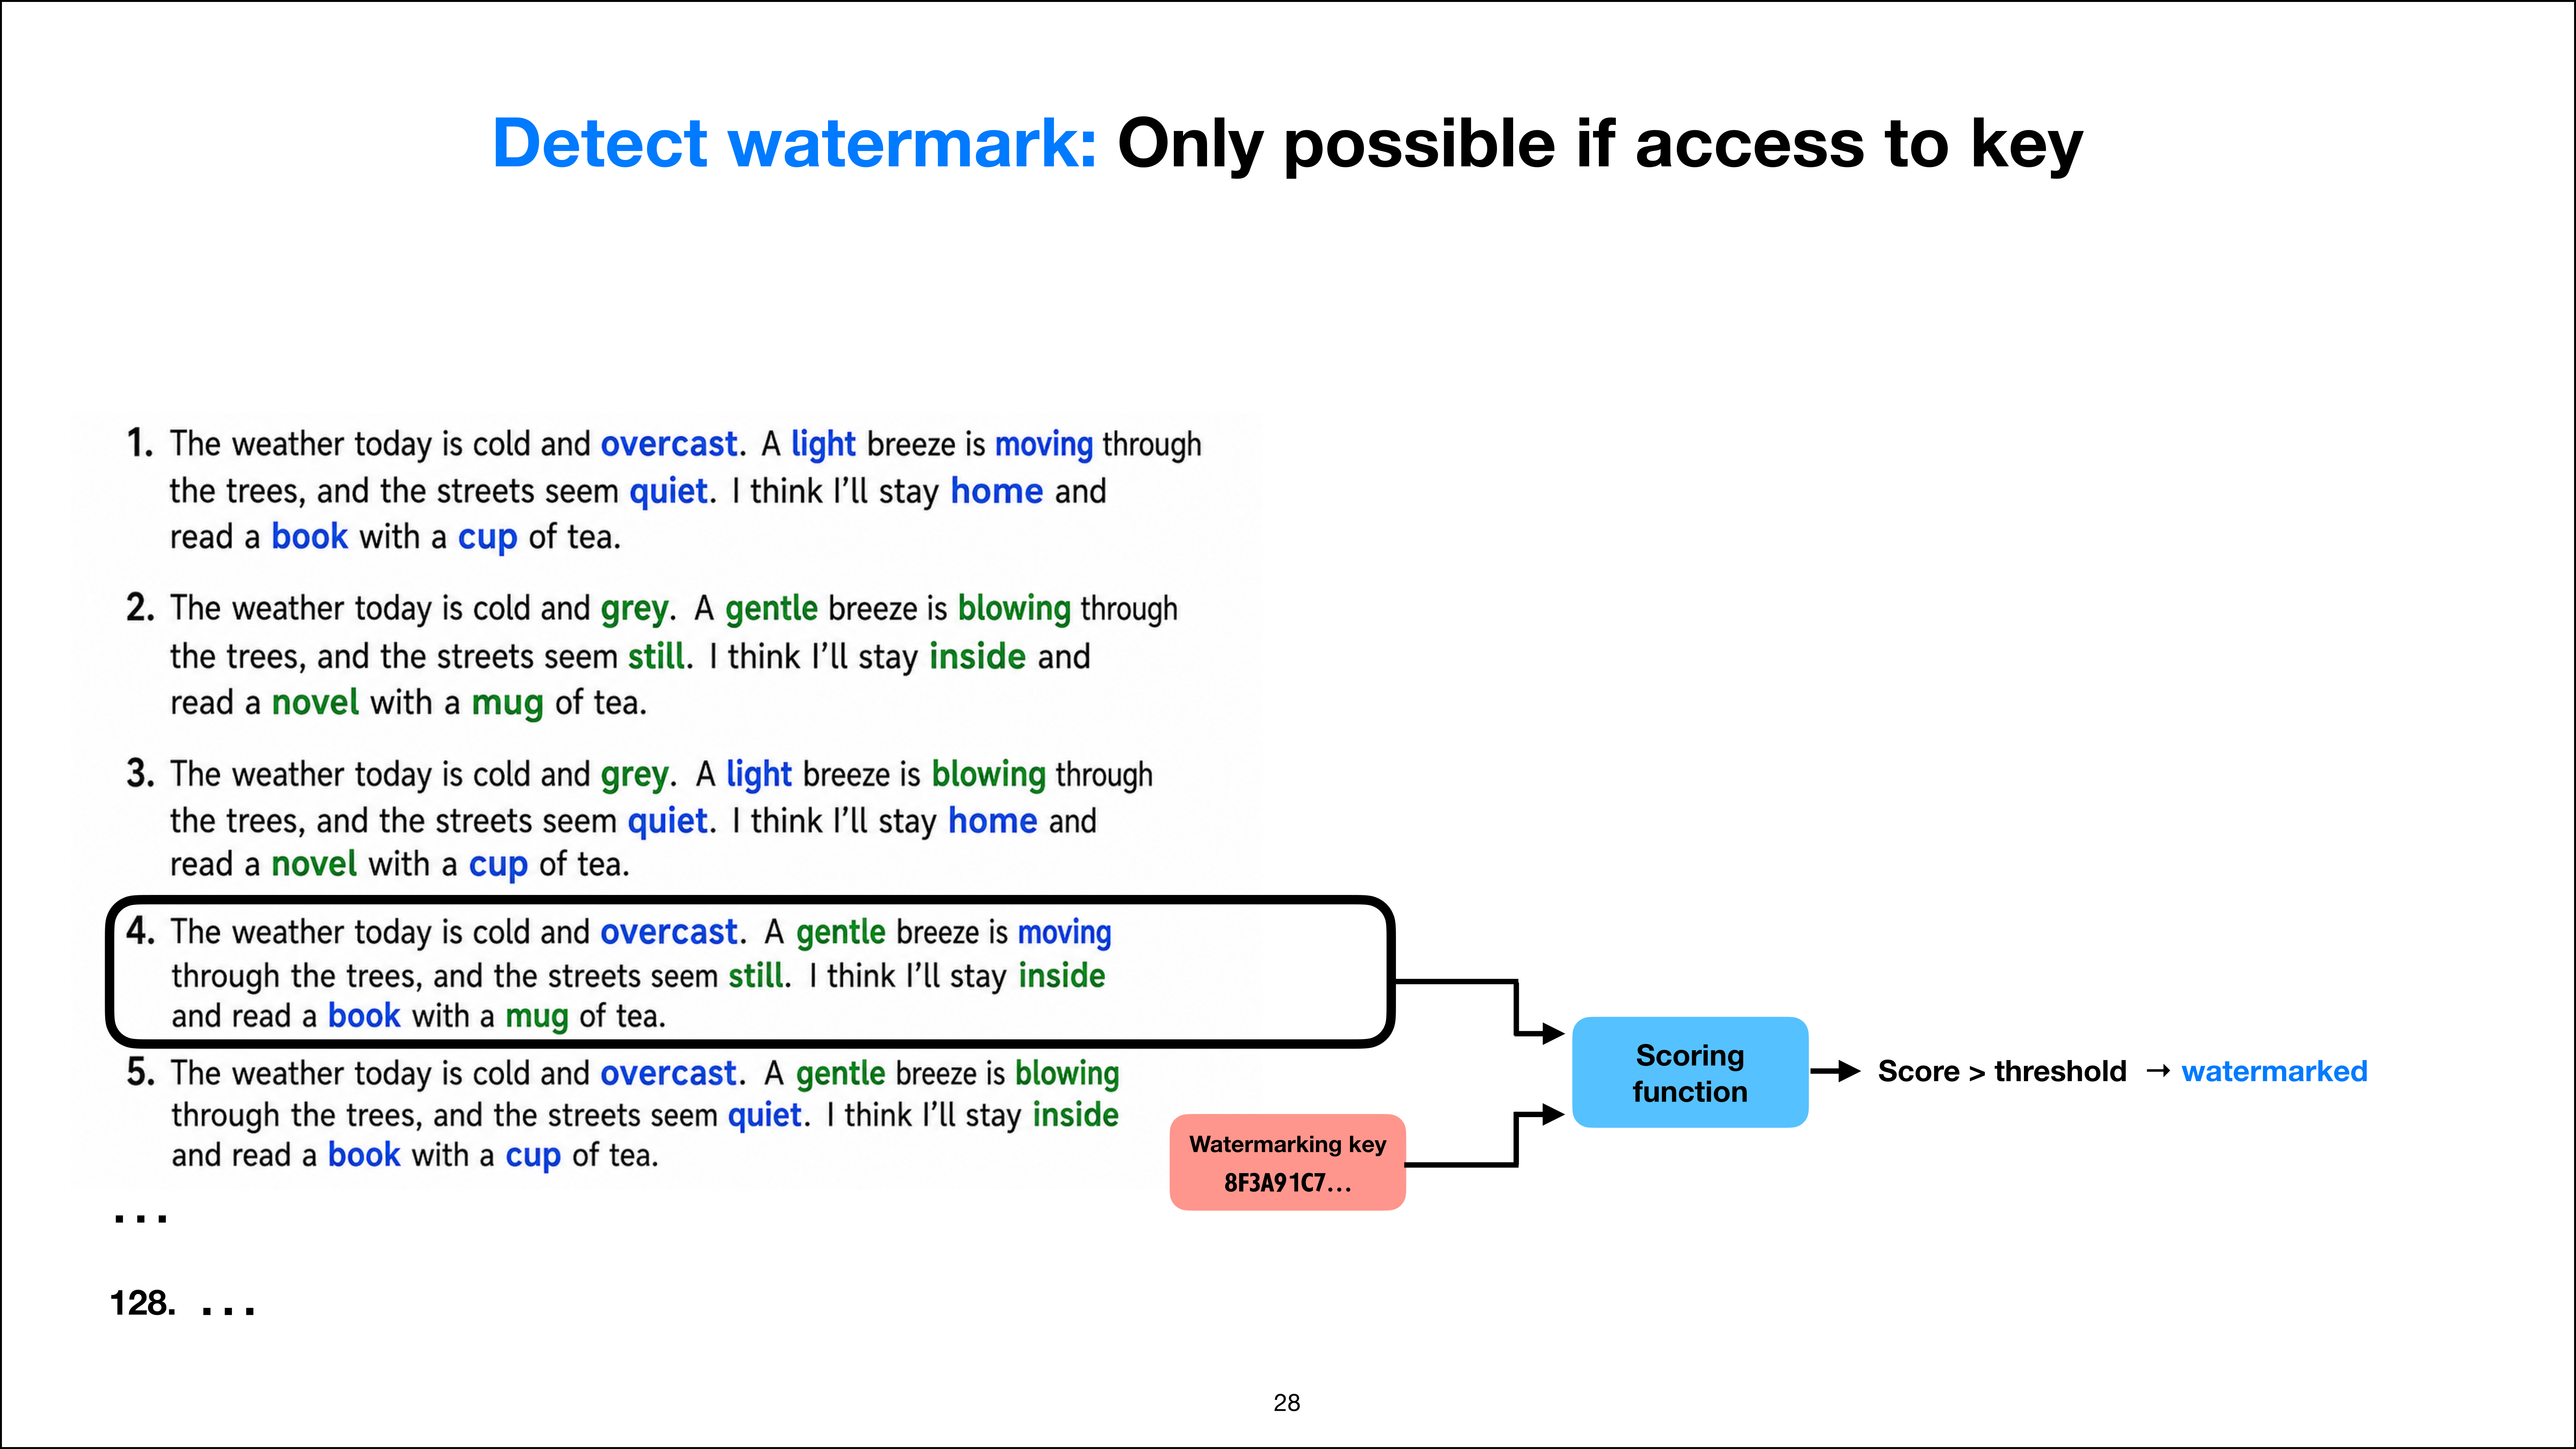
Watermark detection requires access to the key
Slide 28 of 52, time stamp 26:21

But we are not quite done yet. I would also like to talk about how we can understand or see whether text is watermarked. So detecting the watermark is only possible if we have access to the key. So, for example, if we have these different texts, and essentially, after the text was generated, you find some random text on the internet (for example, you find this text number four here on the internet somewhere), you want to know: is this watermarked?

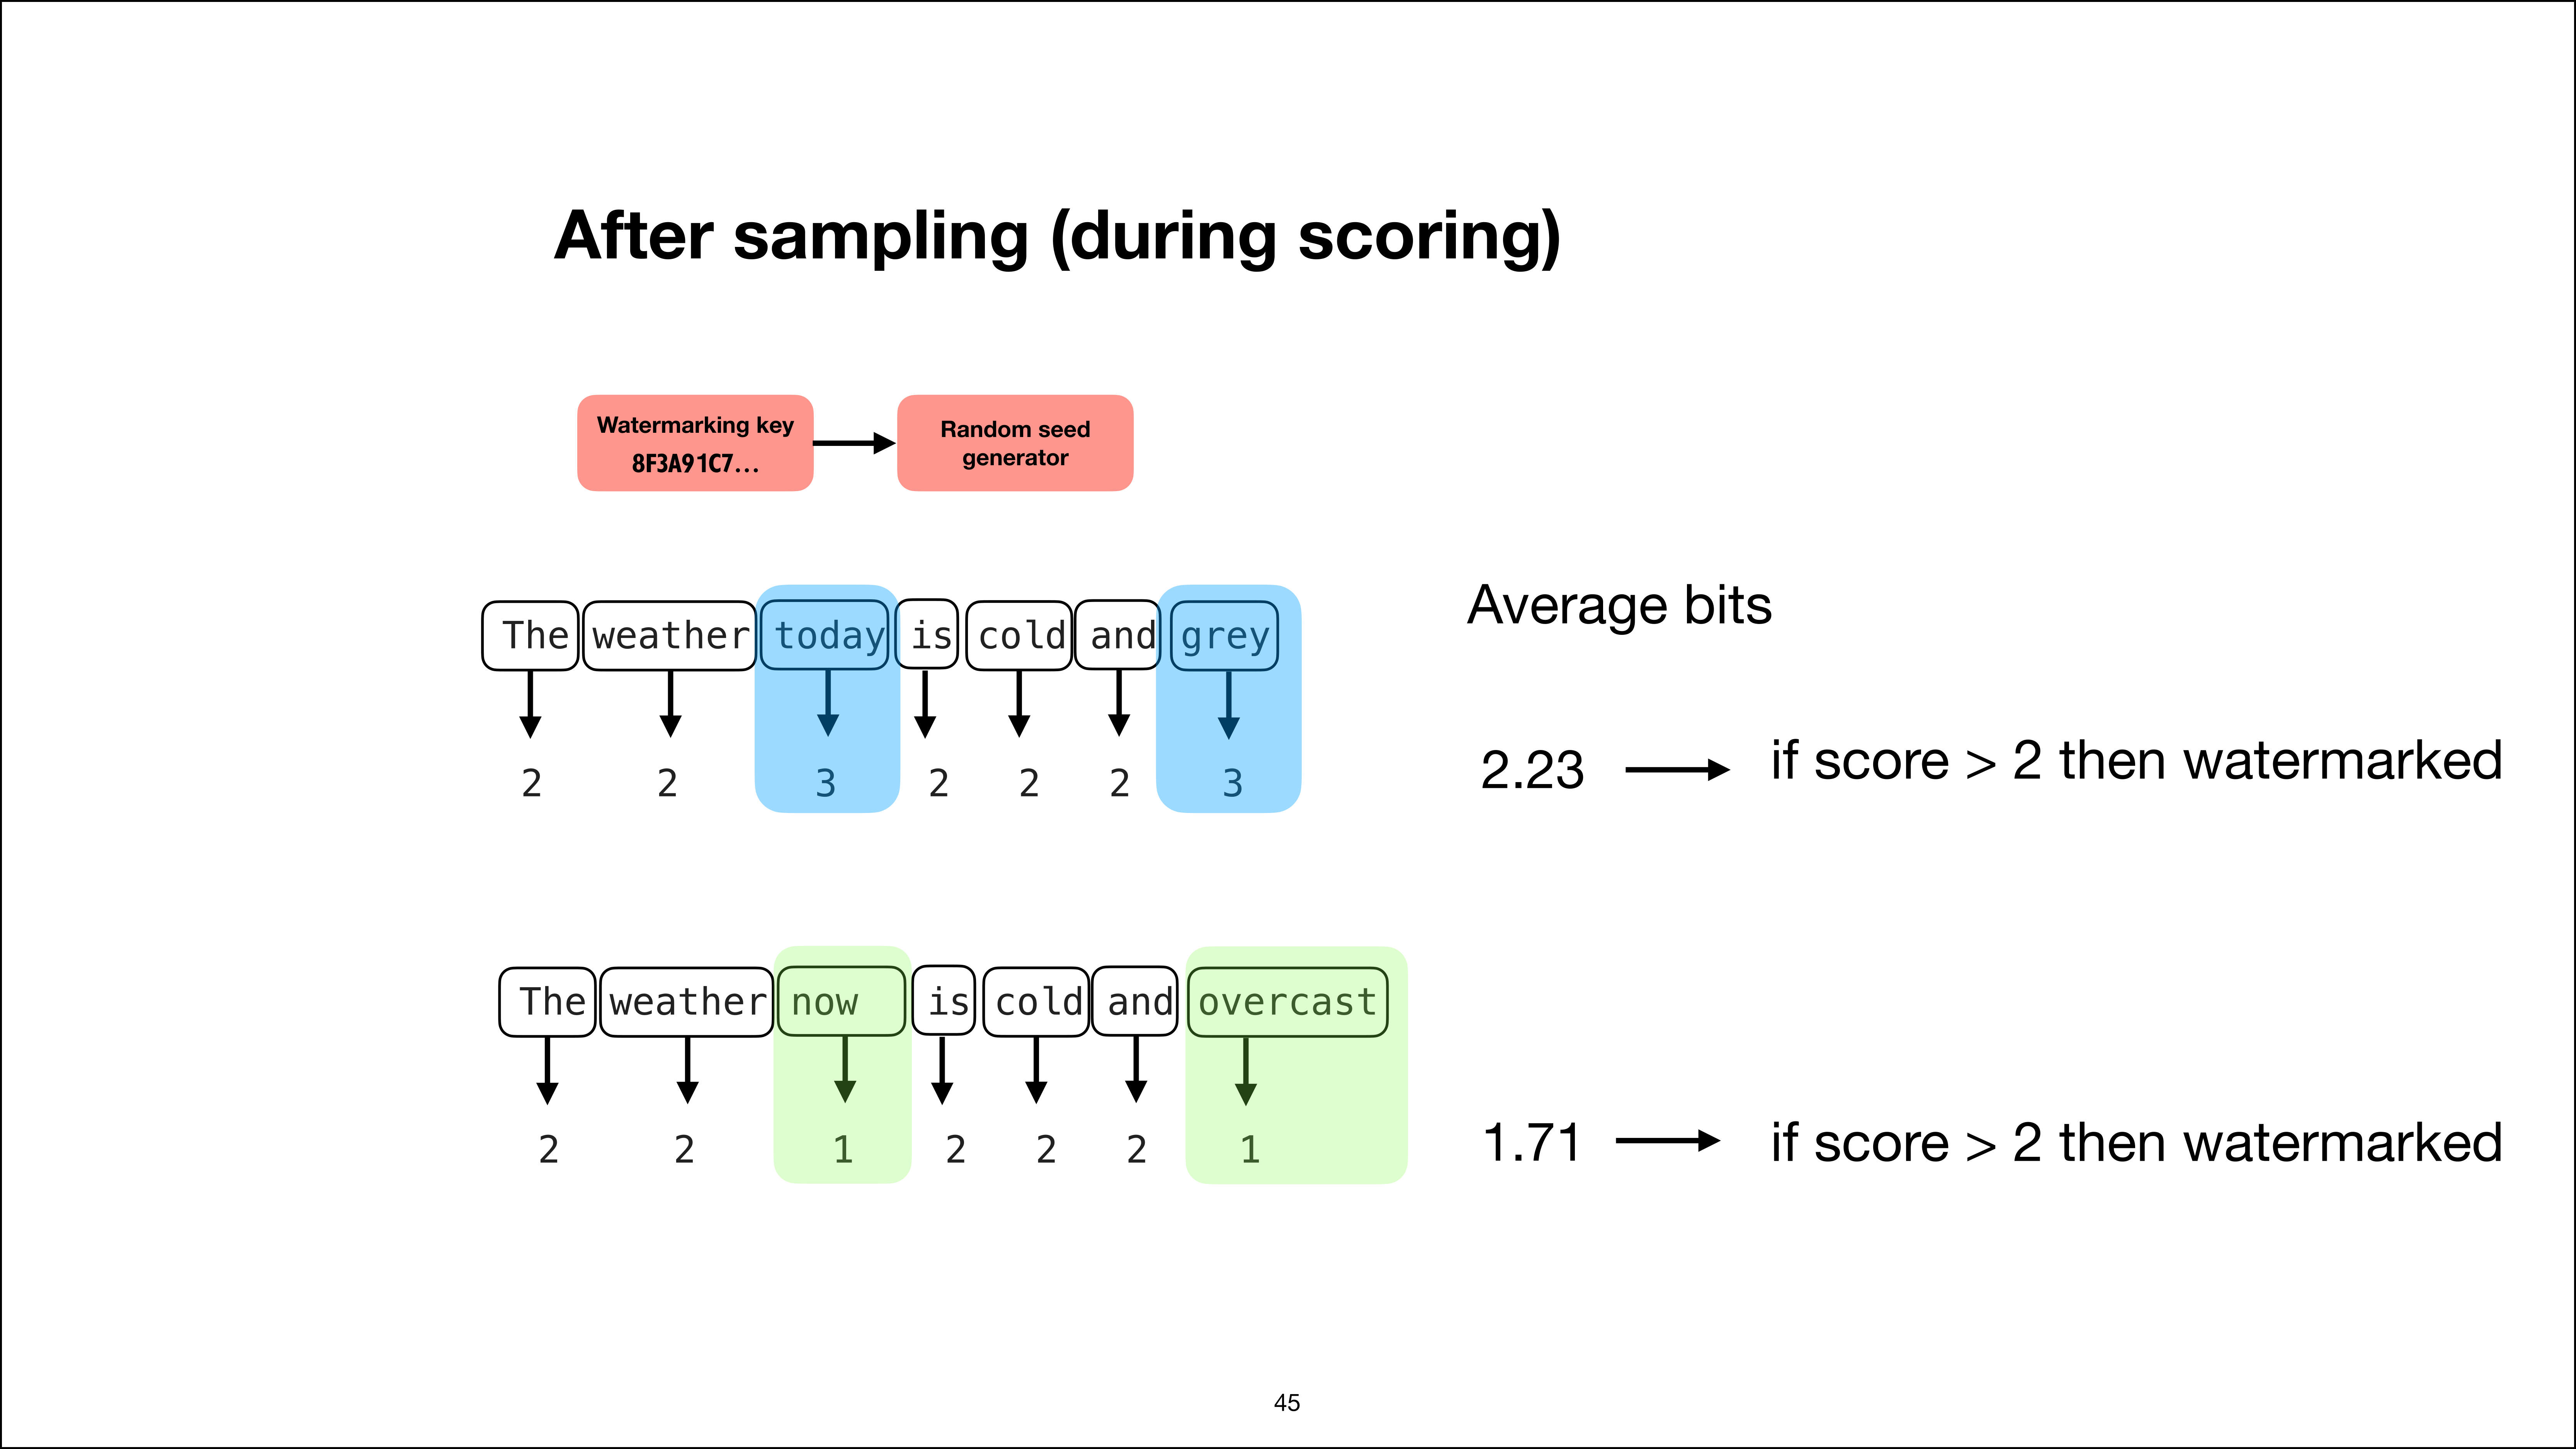
Well, it’s impossible to know because, in order to know, you would need the watermarking key. You need this scoring function, and then you have to score basically the text with a scoring function. And then the idea is that if the score is above a certain threshold, then the text is watermarked. Otherwise, it’s not watermarked. But as the end user, we can’t do this because we don’t have this key. So the key is not available to us.

Only Anthropic will have the key. However, in this blog post, they mentioned that they are providing it, of course, or they’re going to develop an API for that that they will make available. I don’t know. Honestly, I’m not affiliated. I don’t know the details. I was just reading this in this blog post. That’s all I know. So that API might as well be private for some companies, like, let’s say, X or Substack Notes, when they want to label AI-generated posts.

They may make it public for end users to use. Who knows? We will have to wait on that. But yeah, so the bottom line here is that watermark detection is only possible if we have this watermarking key or, of course, the API that they are going to develop.


28:00

How to Remove a Watermark

The watermark can be removed by editing watermarked positions
Slide 29 of 52, time stamp 28:03

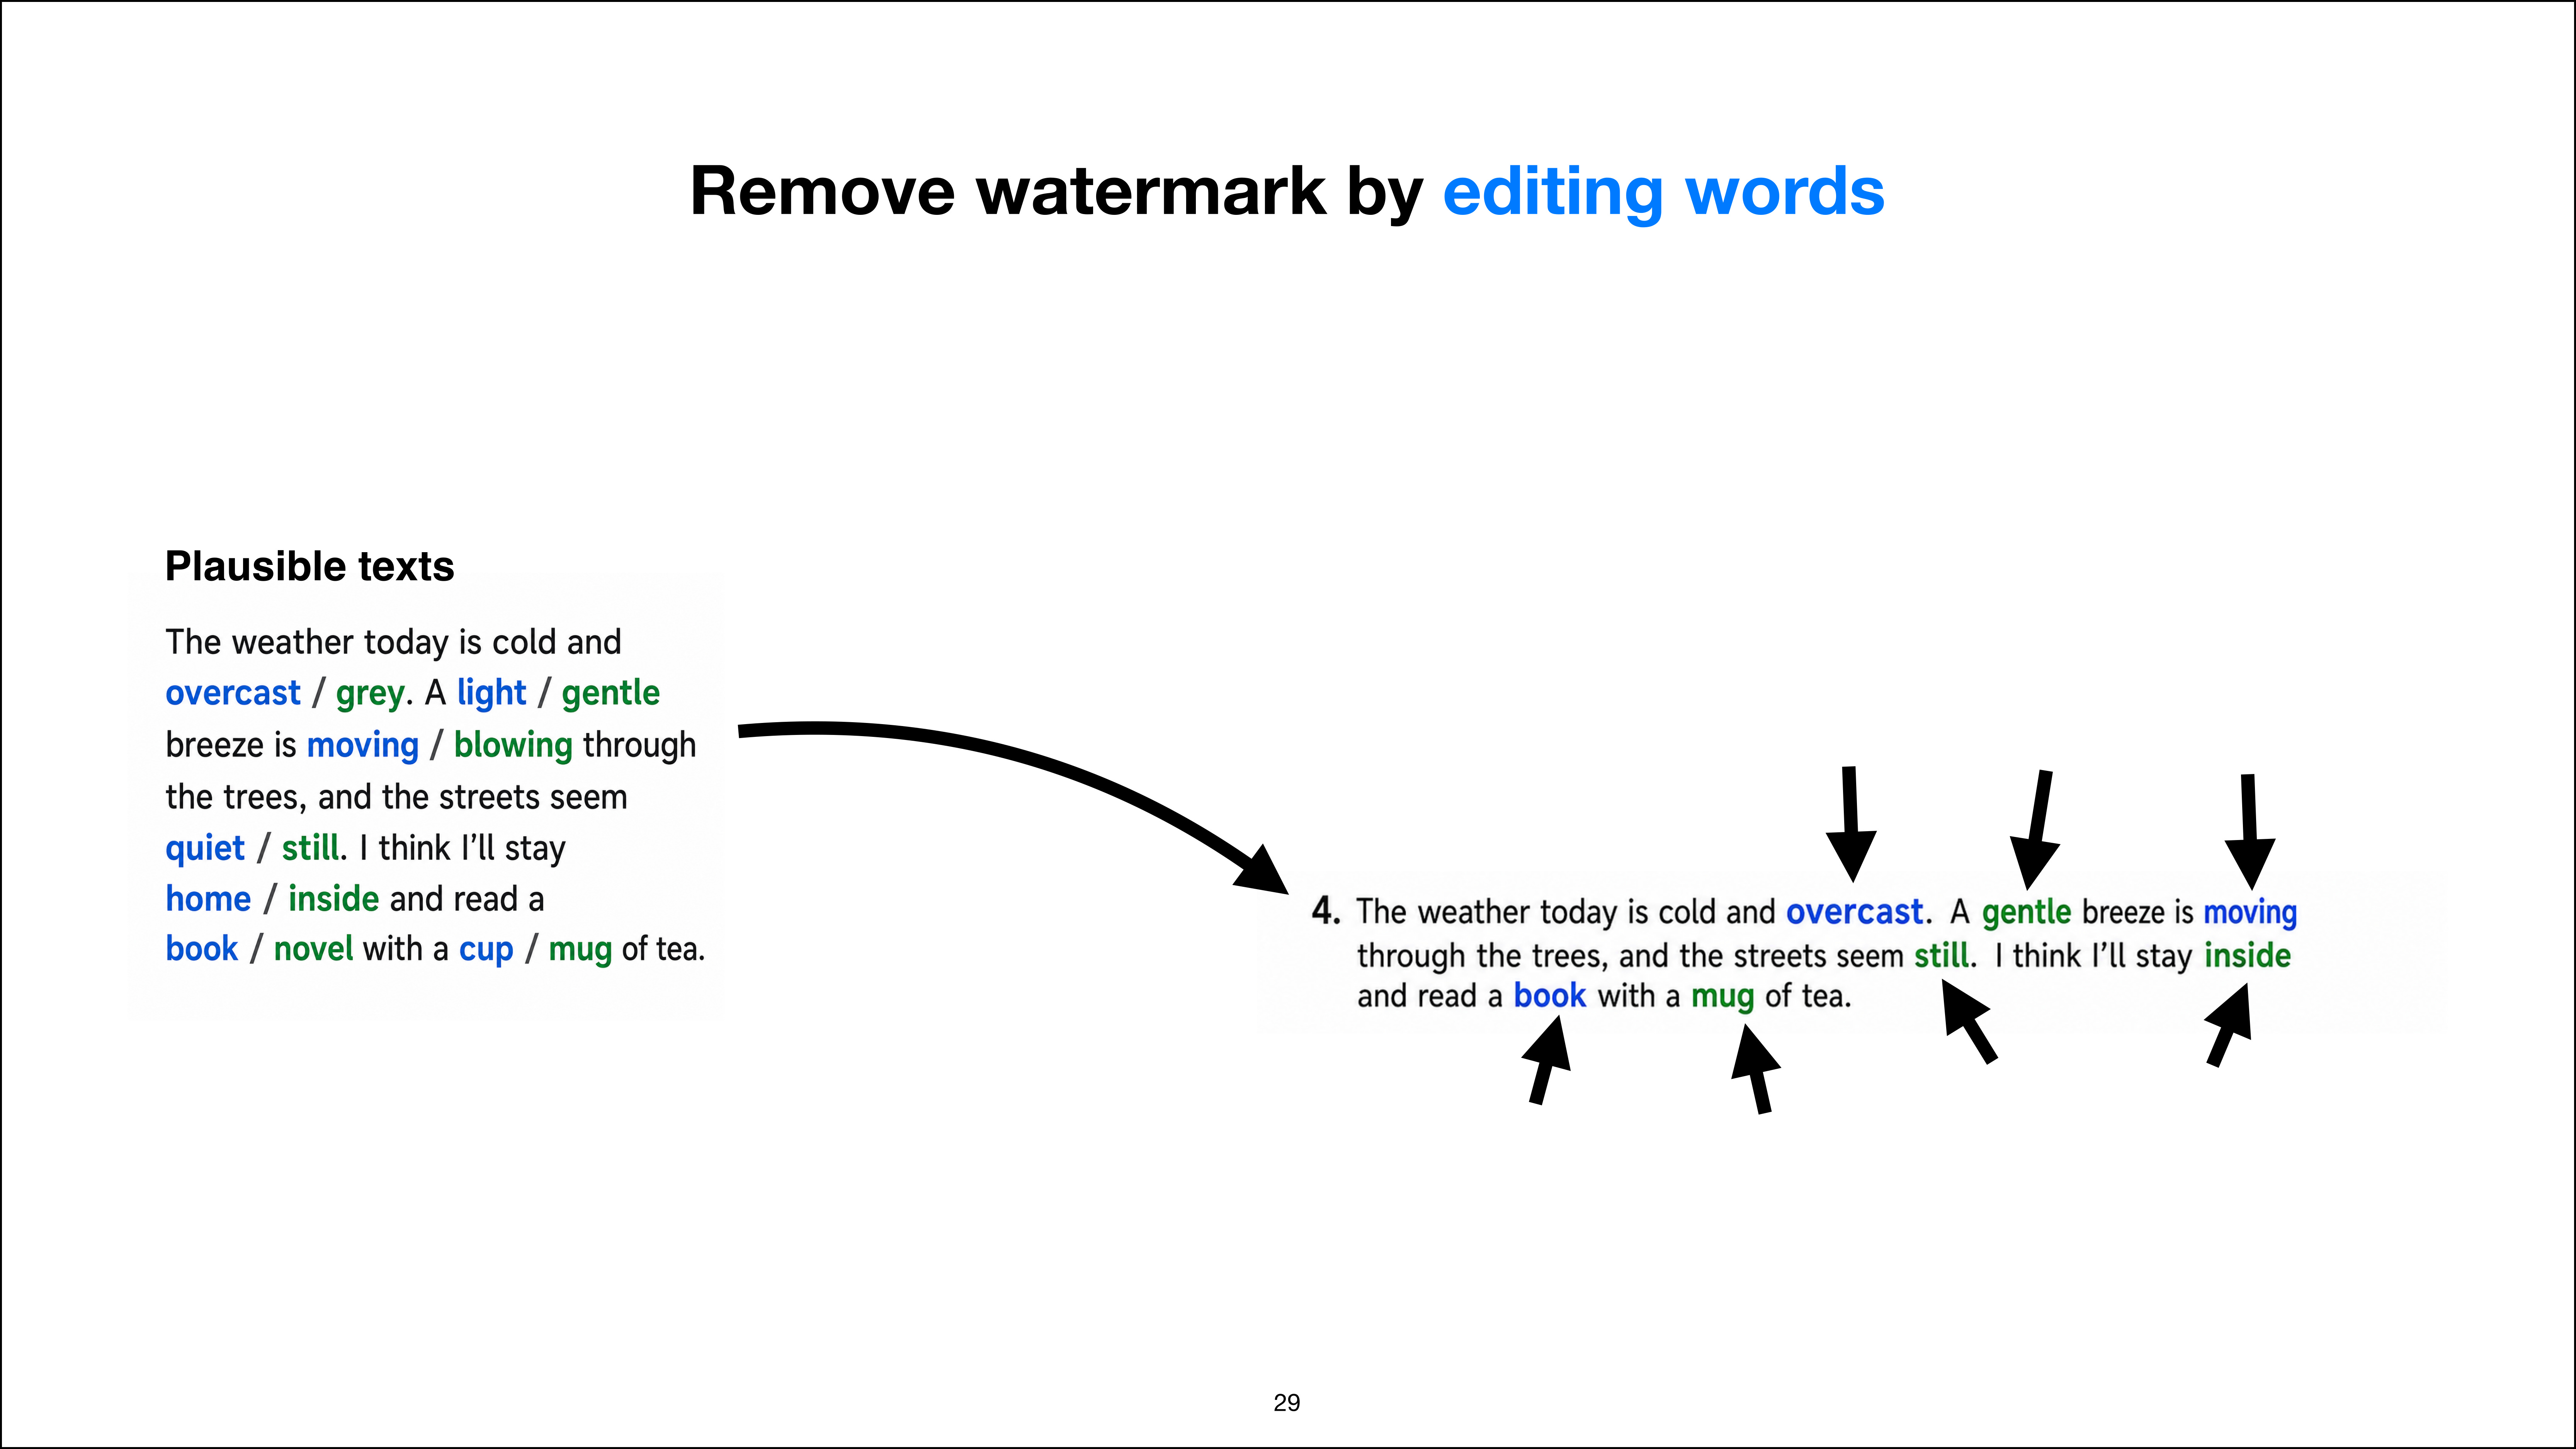
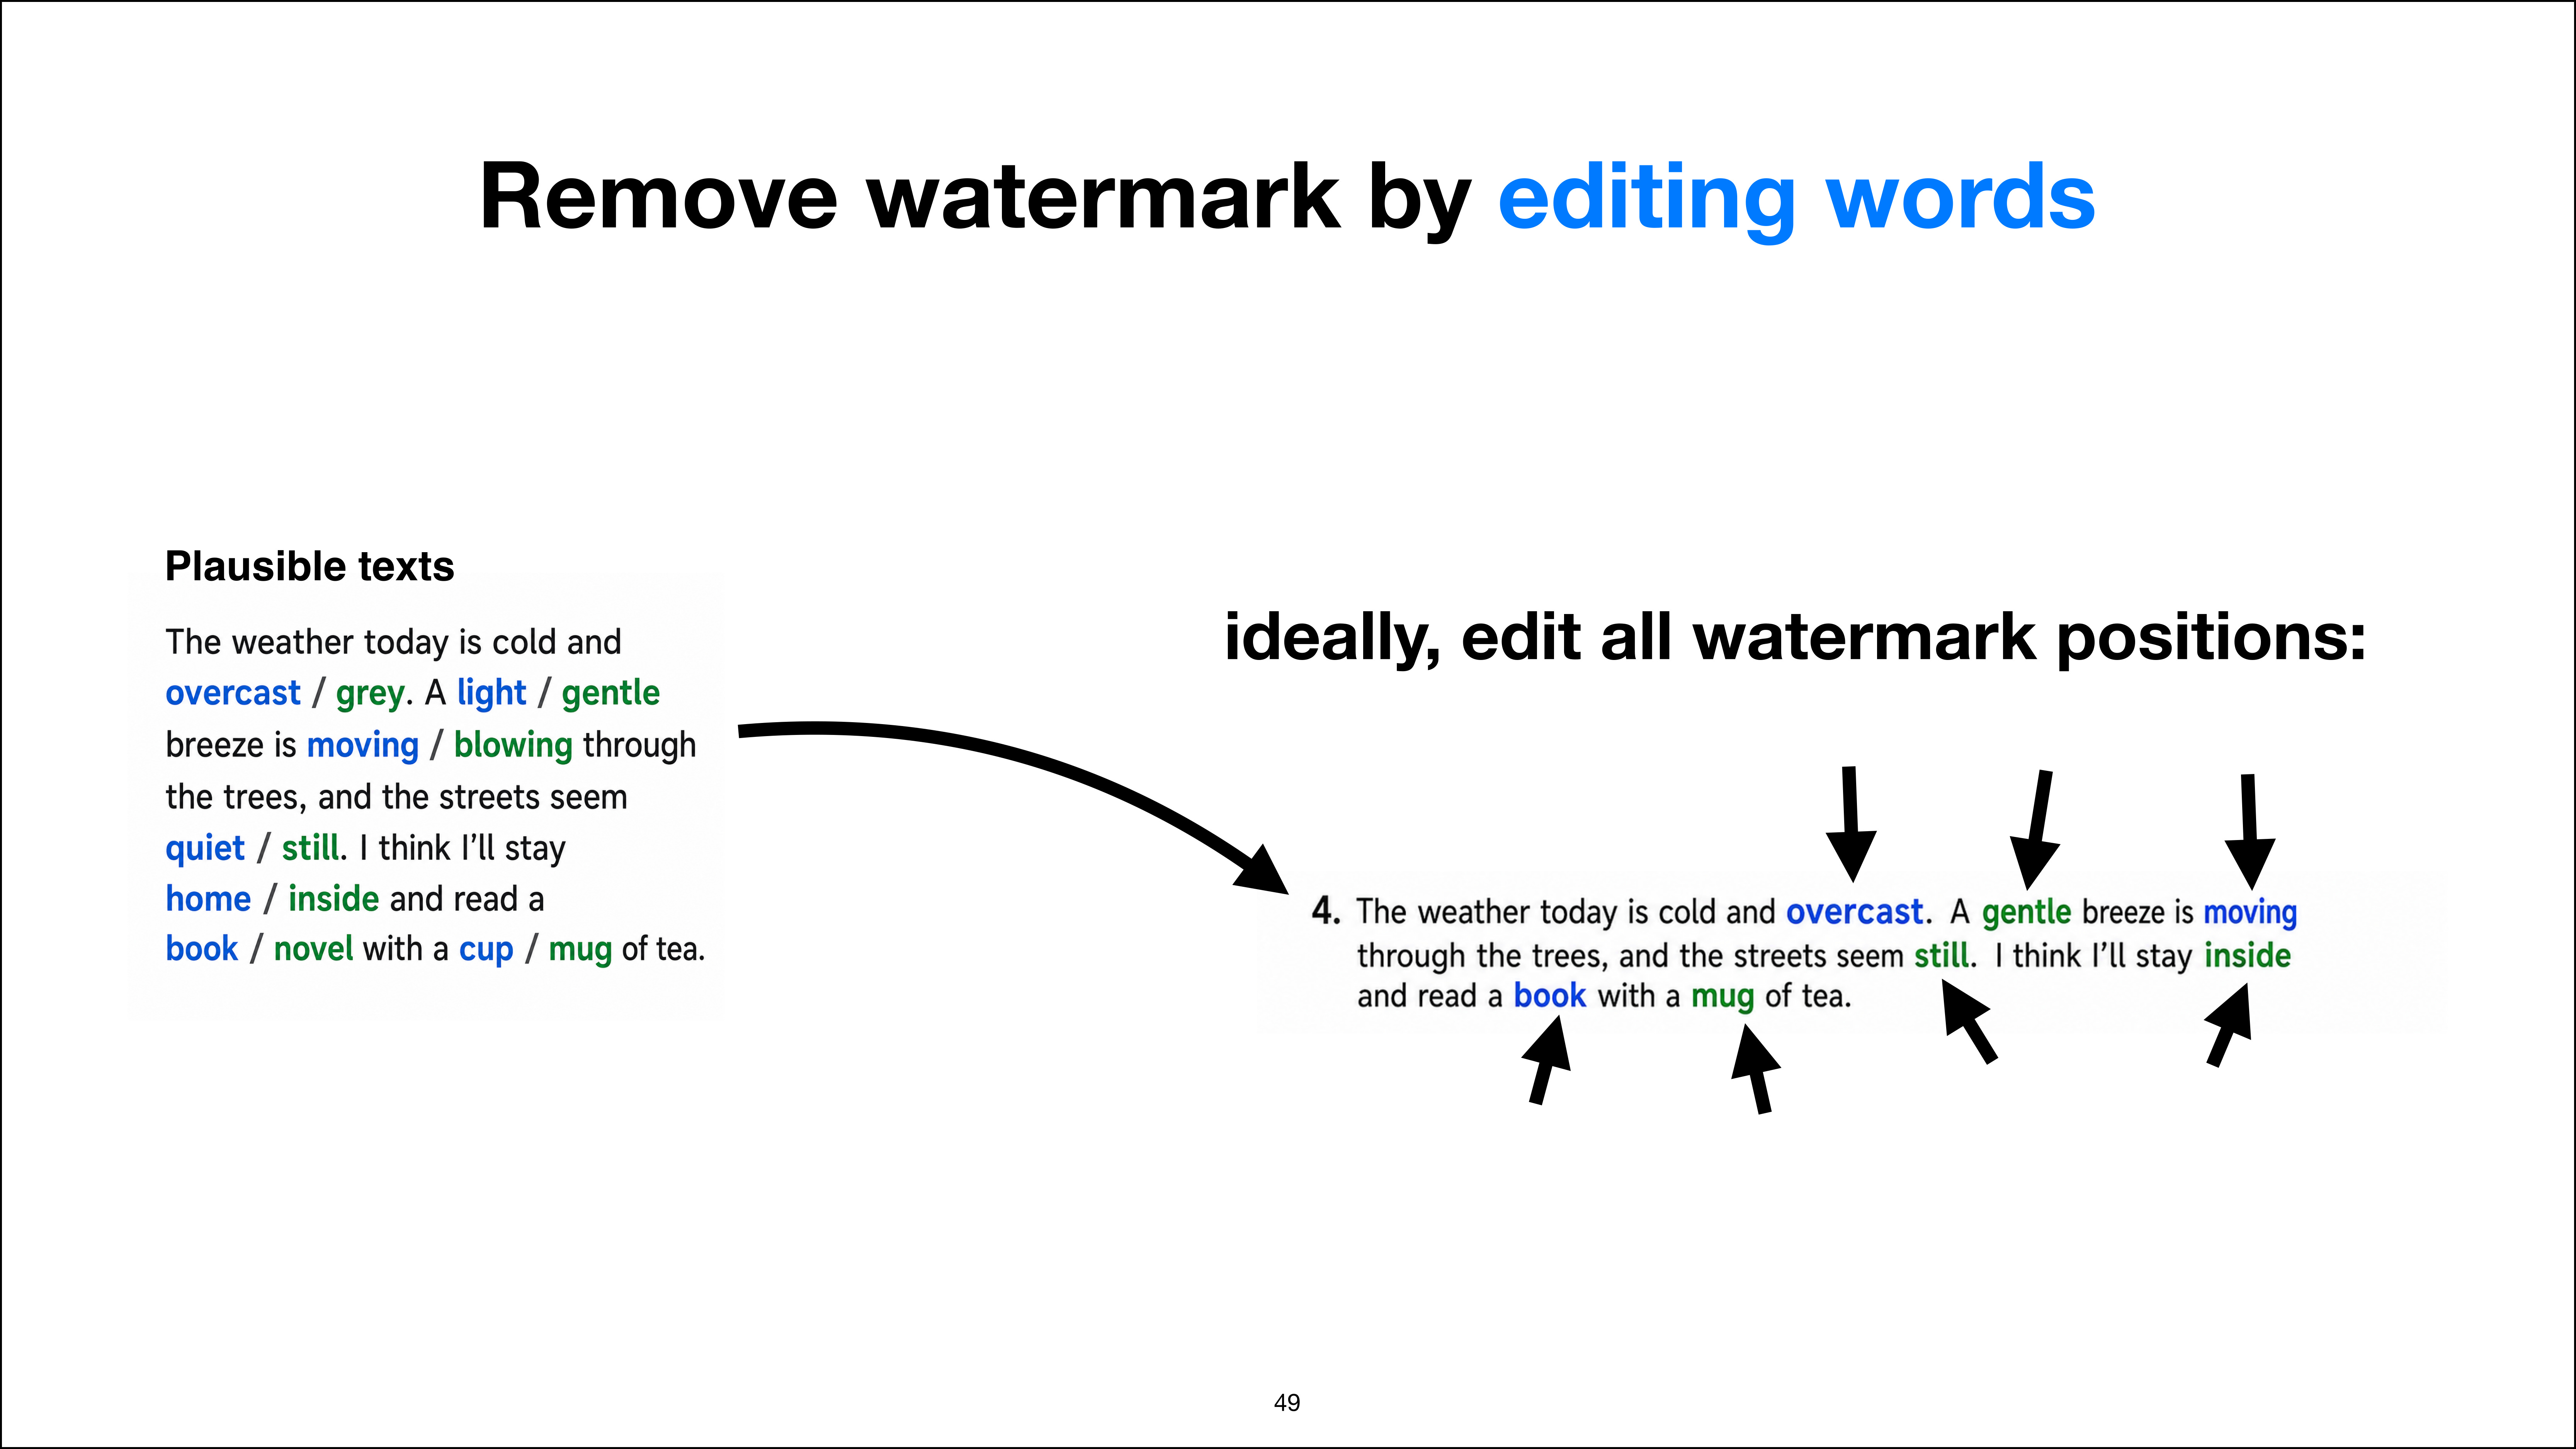
Now, removing the watermark is interesting. So now that we know how the watermarking works, we also know the shortcomings. I mean, this is really highly dependent on specific tokens in certain positions. So, for example, in this given text, if these colored words or tokens are the watermarking positions, we know that we could remove the watermark by editing this, right? If we change all the words at these positions, we would be 100% able to defeat this watermark.

Now, the problem, though, is that we don’t know, right?


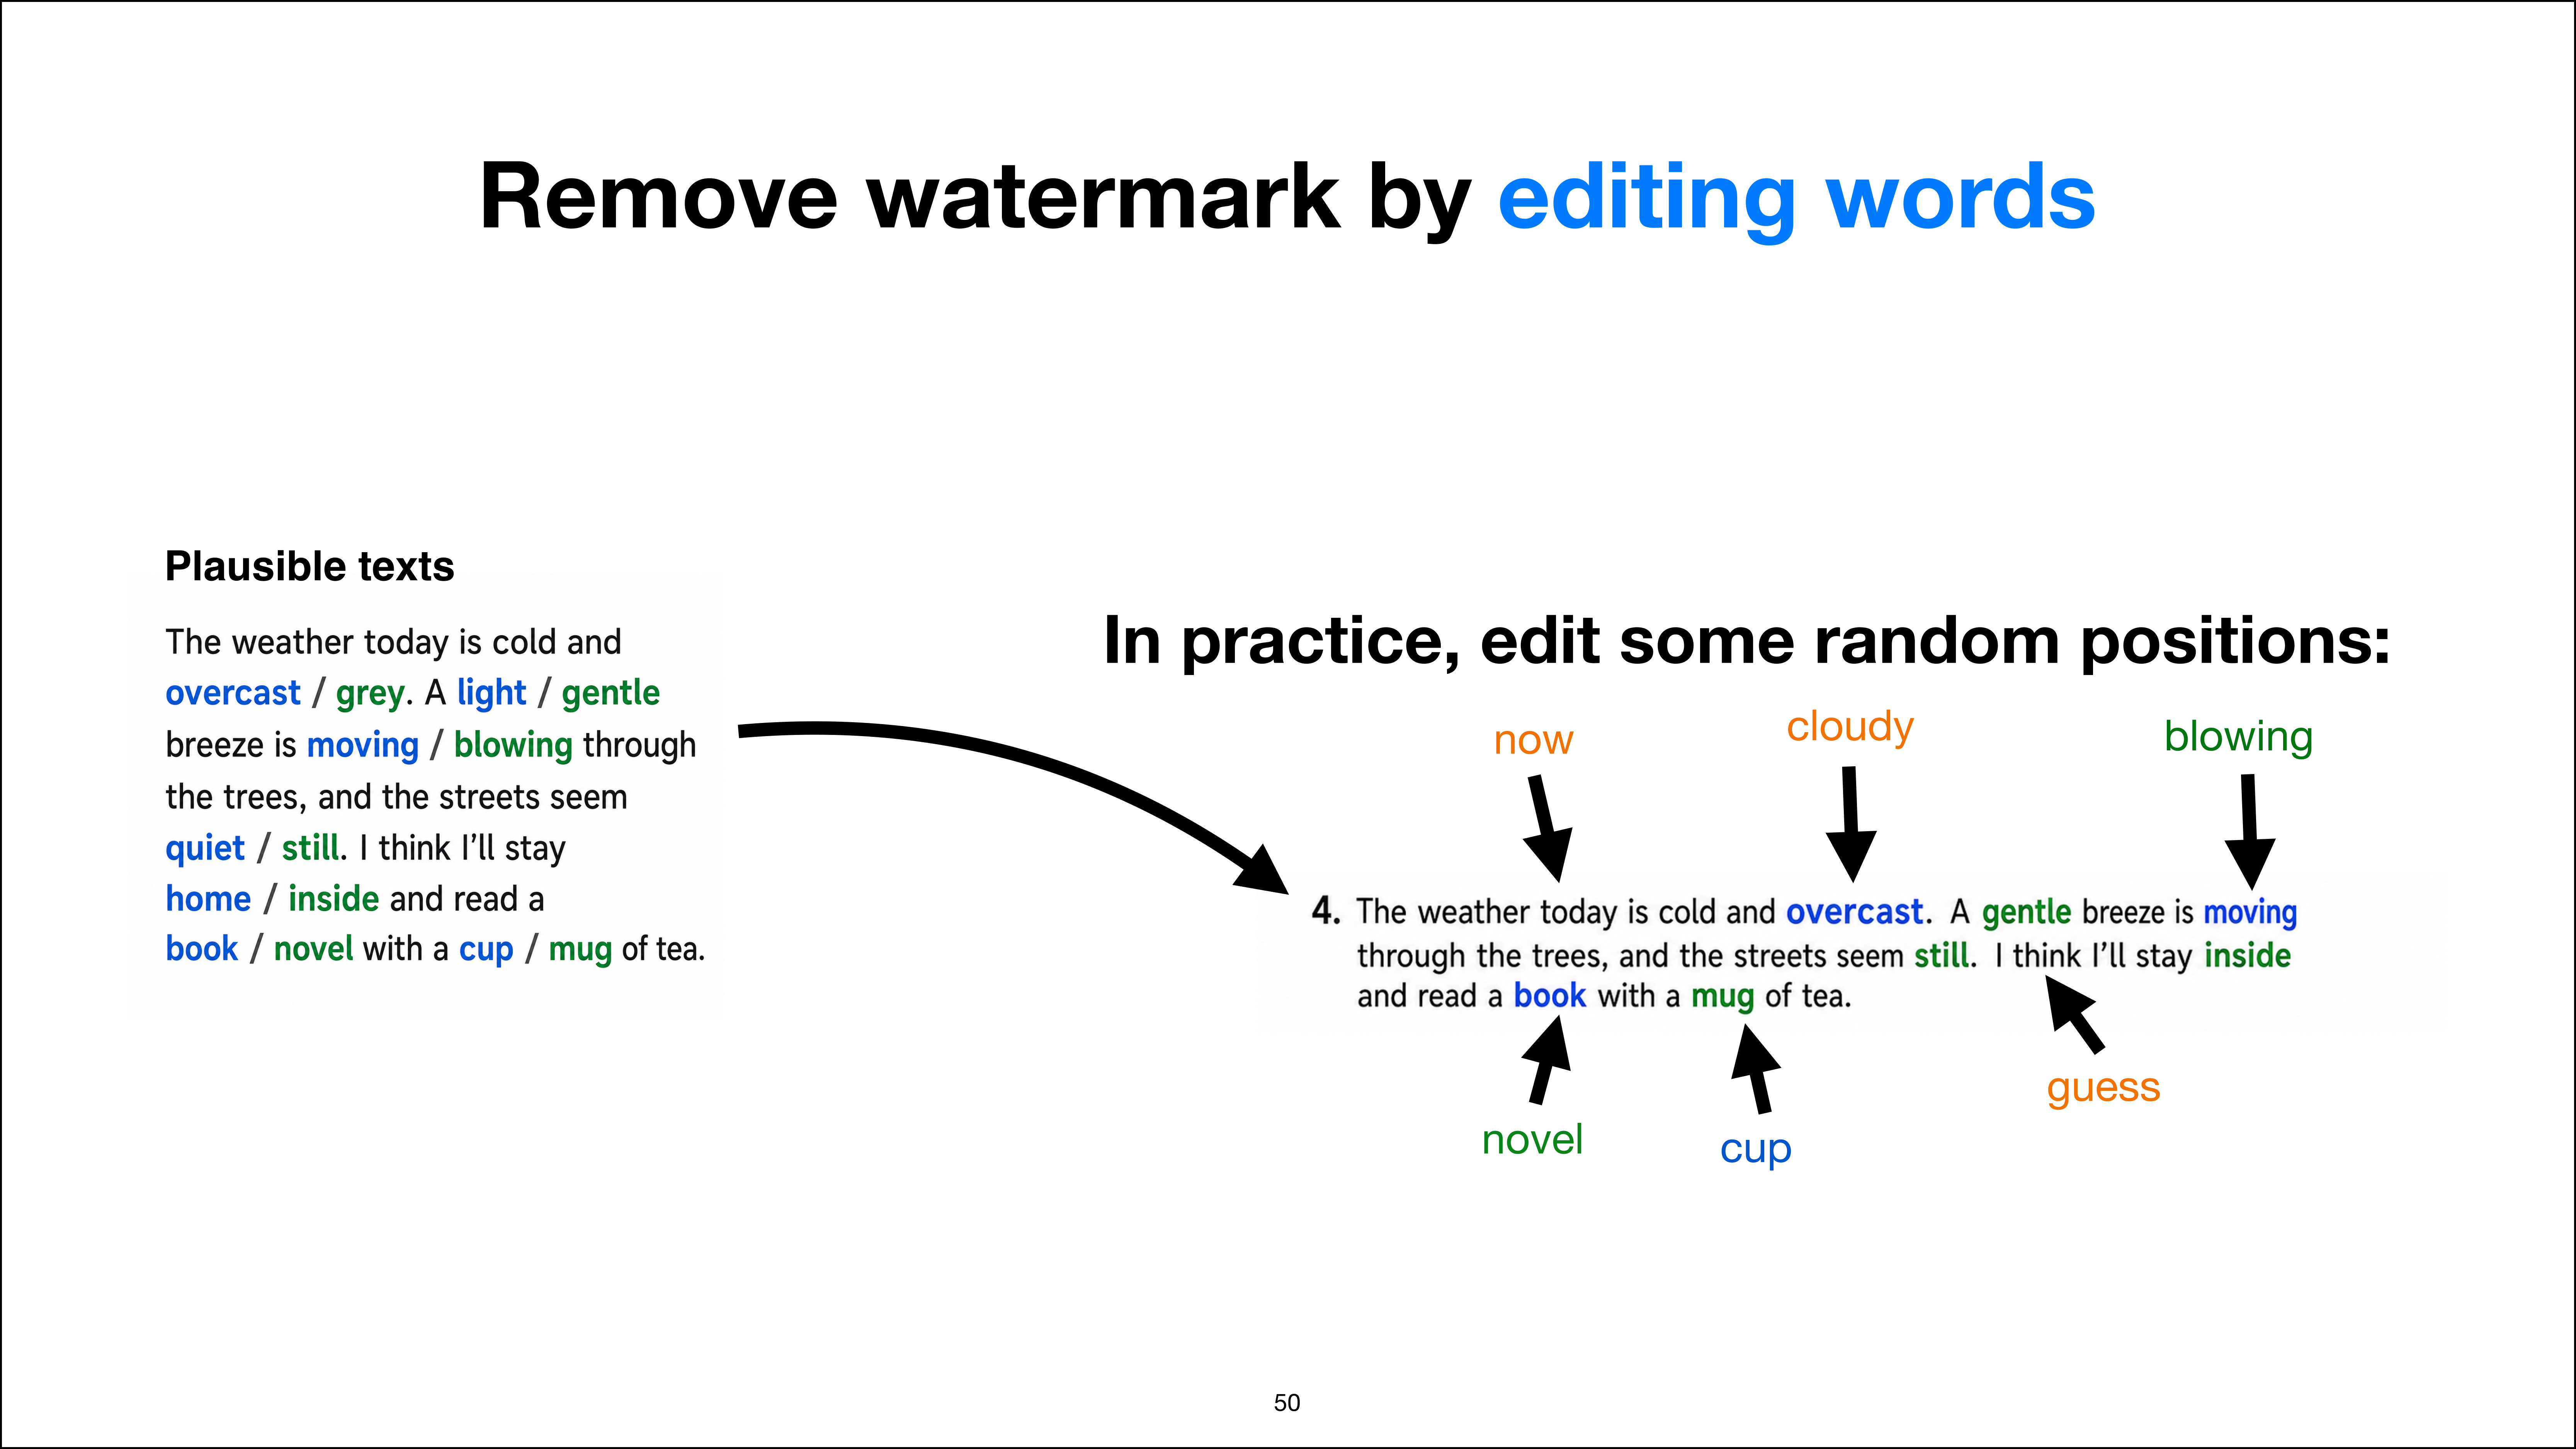
In practice, removing the watermark requires editing several positions
Slide 30 of 52, time stamp 28:41

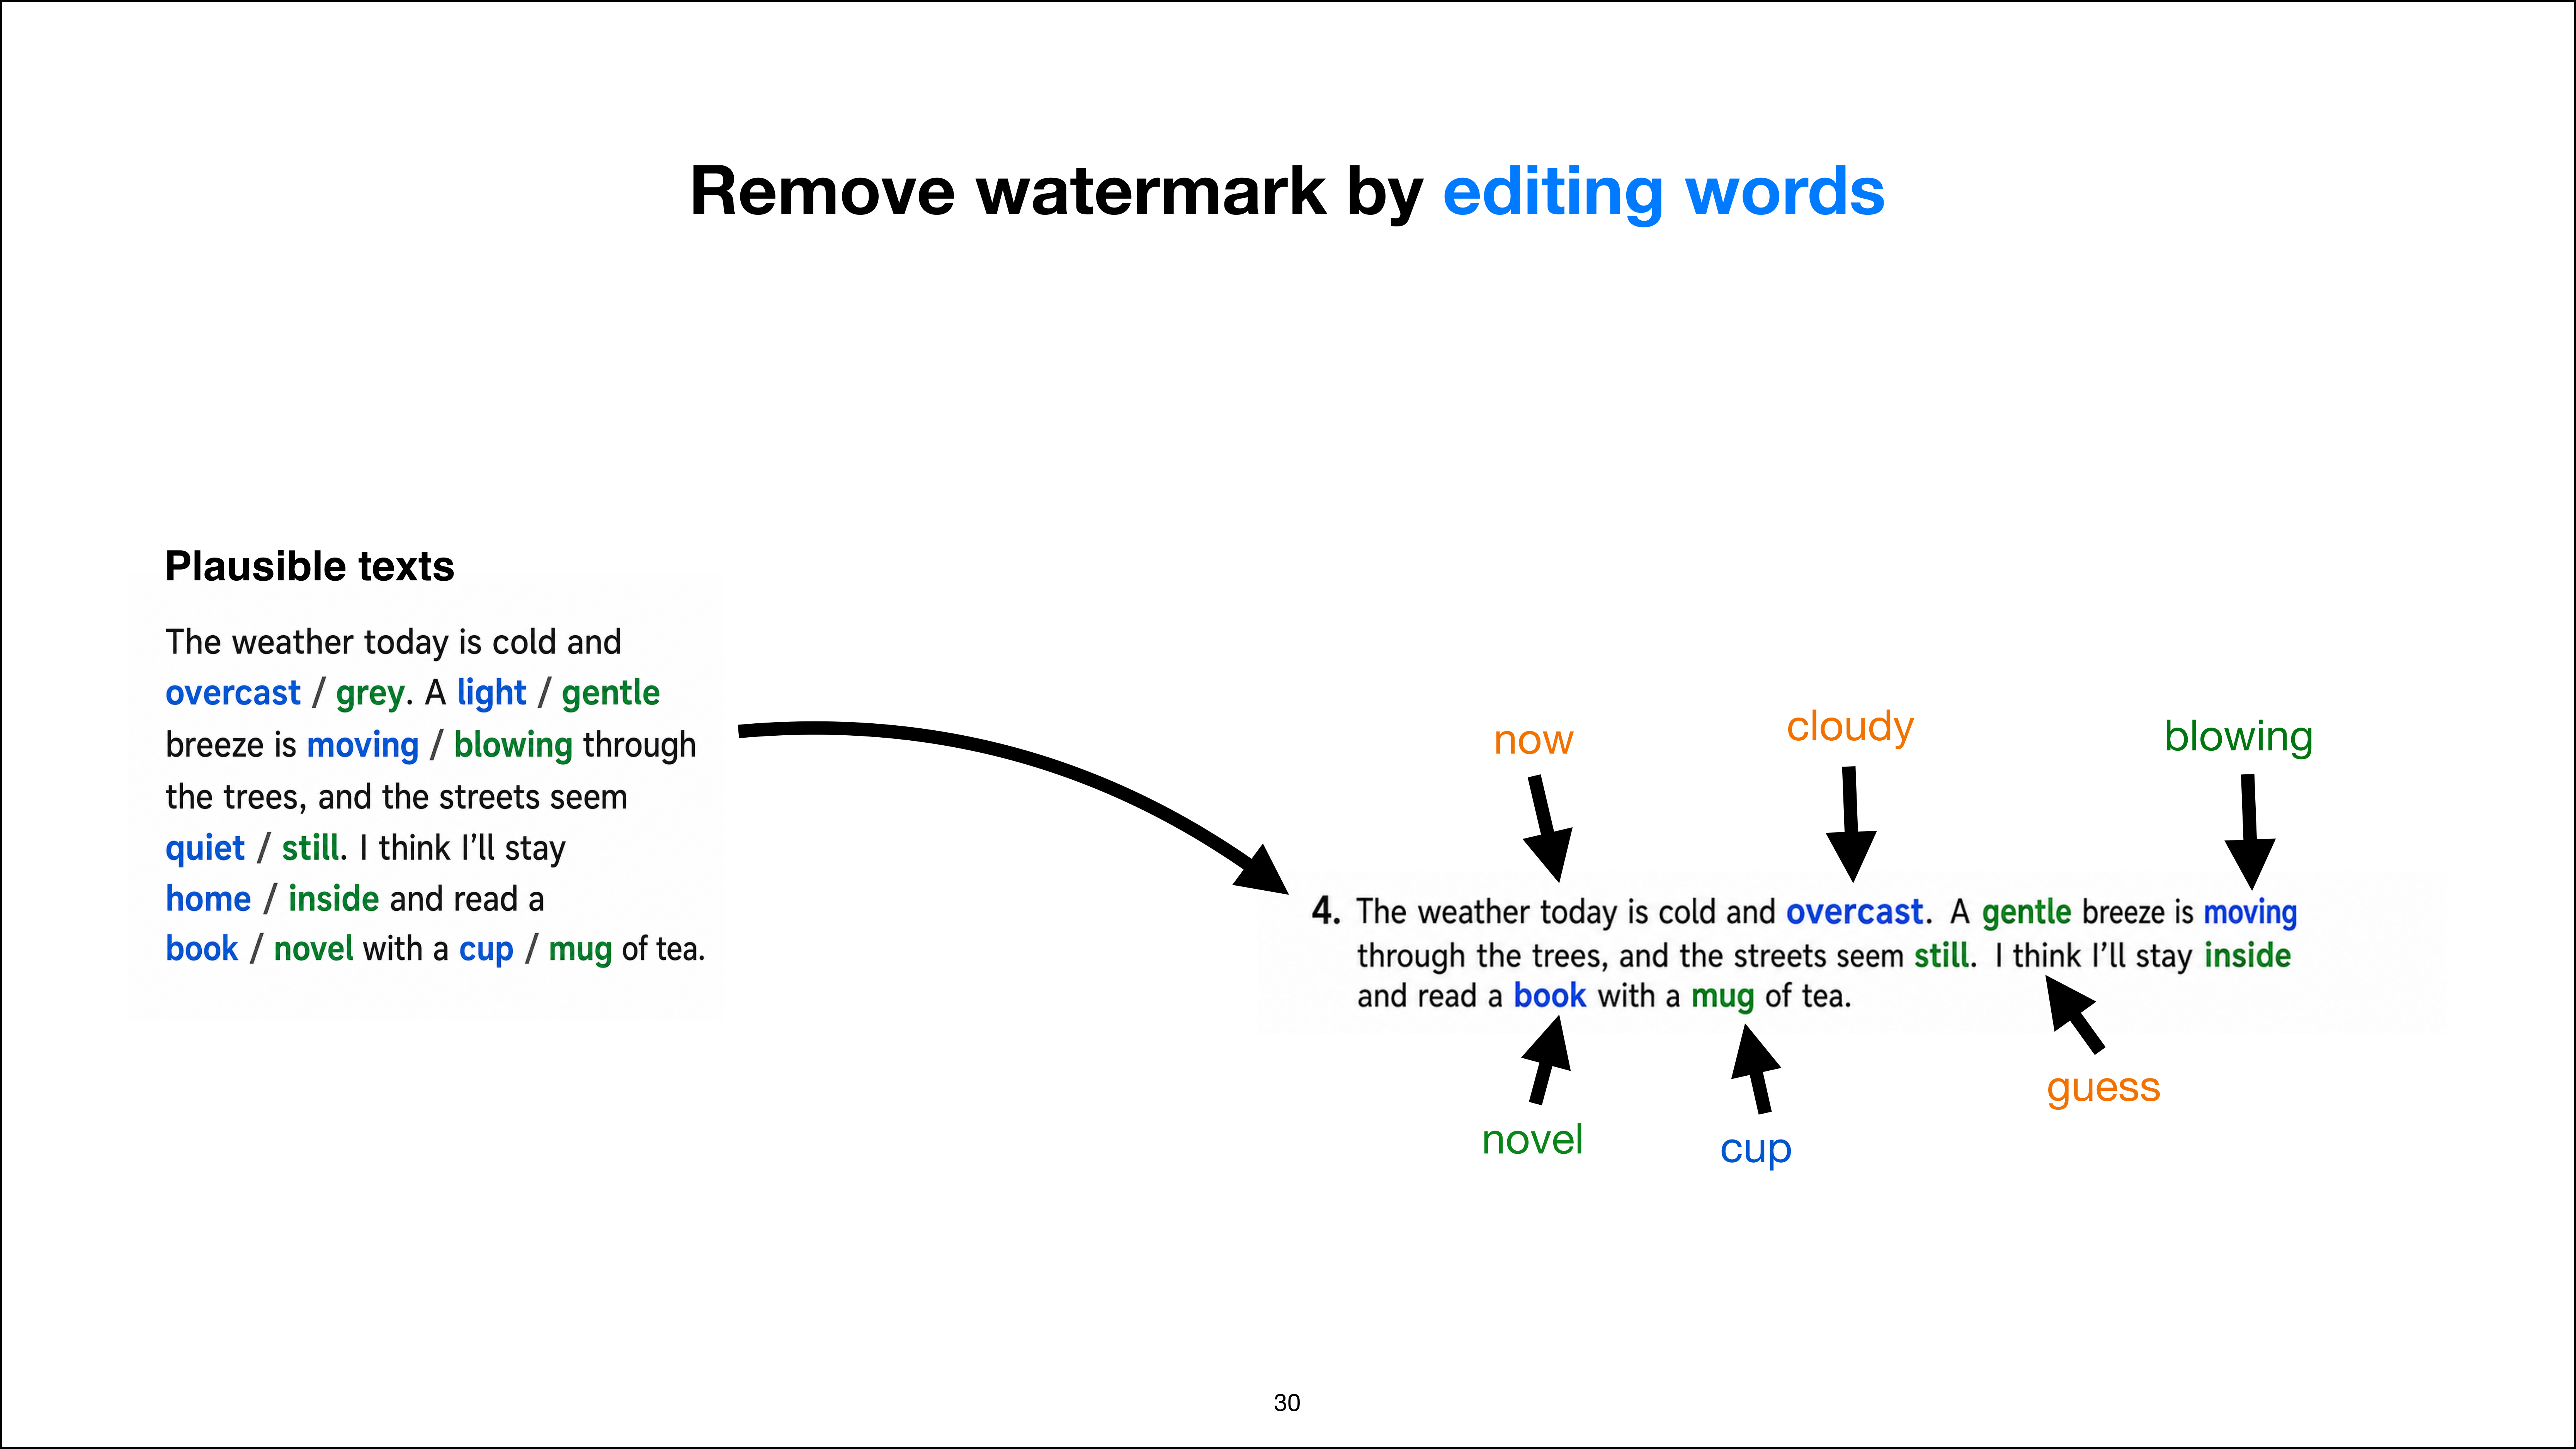
So we don’t know where these words are because we haven’t generated the watermark. So we don’t know which positions to look at. So the practical scenario here is that we could just randomly edit the text. So we would randomly change a few words and hope that we change enough positions to edit the watermark. So that would be one way to remove it. And since we also don’t know which are the highest-scoring ones, because that would require us to have access to the LLM and rerun the prompt through the LLM to find out which words are the highest-scoring, we can kind of only guess.

So for example, we might say, oh, we replace “overcast” with “cloudy” because we don’t know that “gray” was high-scoring, you know? So in this case, it might be intuitive to say “gray”, but there might be cases where it’s not so intuitive. So what I’m trying to illustrate here is just some general text editing where we are modifying positions, but we are still kind of guessing what a watermark position is.

So since we don’t know, we added just a few words here and there. And if we added enough words, that would also defeat the watermark.


30:17

How the Watermark Scoring Function Works

Bonus section on how the scoring function works
Slide 31 of 52, time stamp 29:59

So yeah, that was the watermarking in a nutshell. I mentioned that there is a scoring function to find out whether something is watermarked. And I want to do it as a bonus here. It’s already a long video, but as a bonus here, I wanted to briefly also explain how this scoring function works because that is also interesting information. It’s a bit complicated. It’s not essential to understand how the scoring function works.

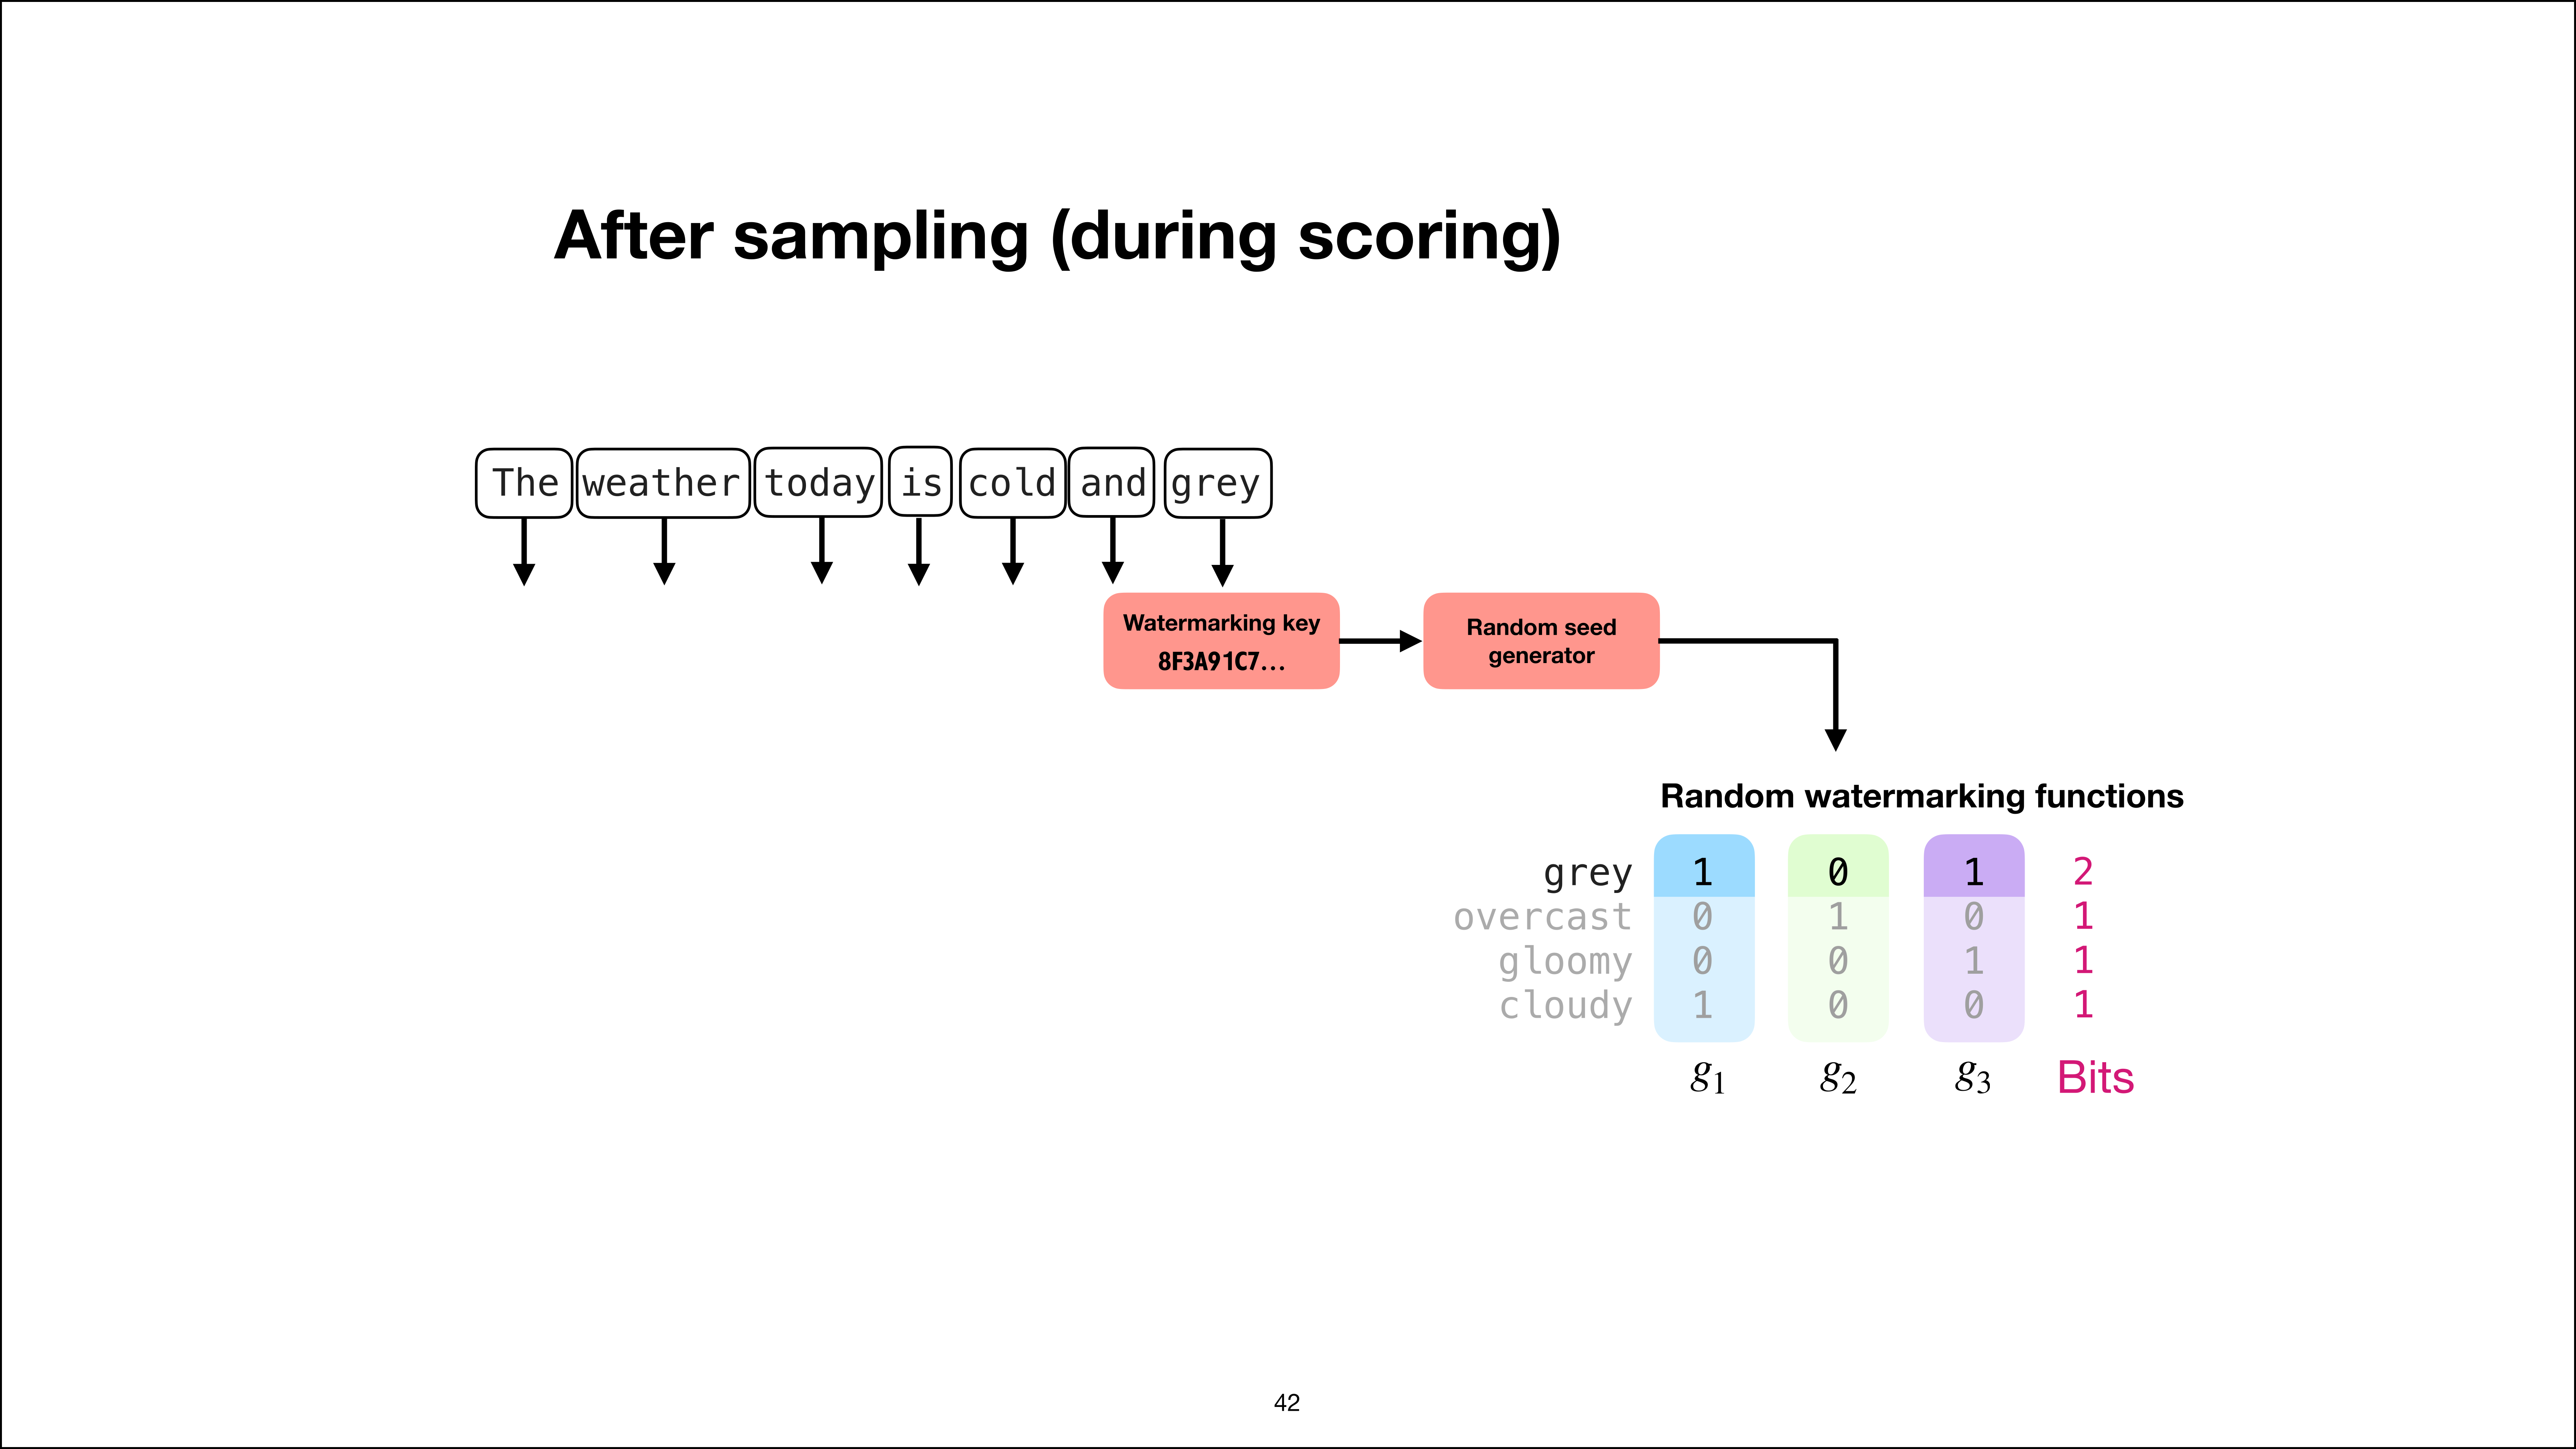
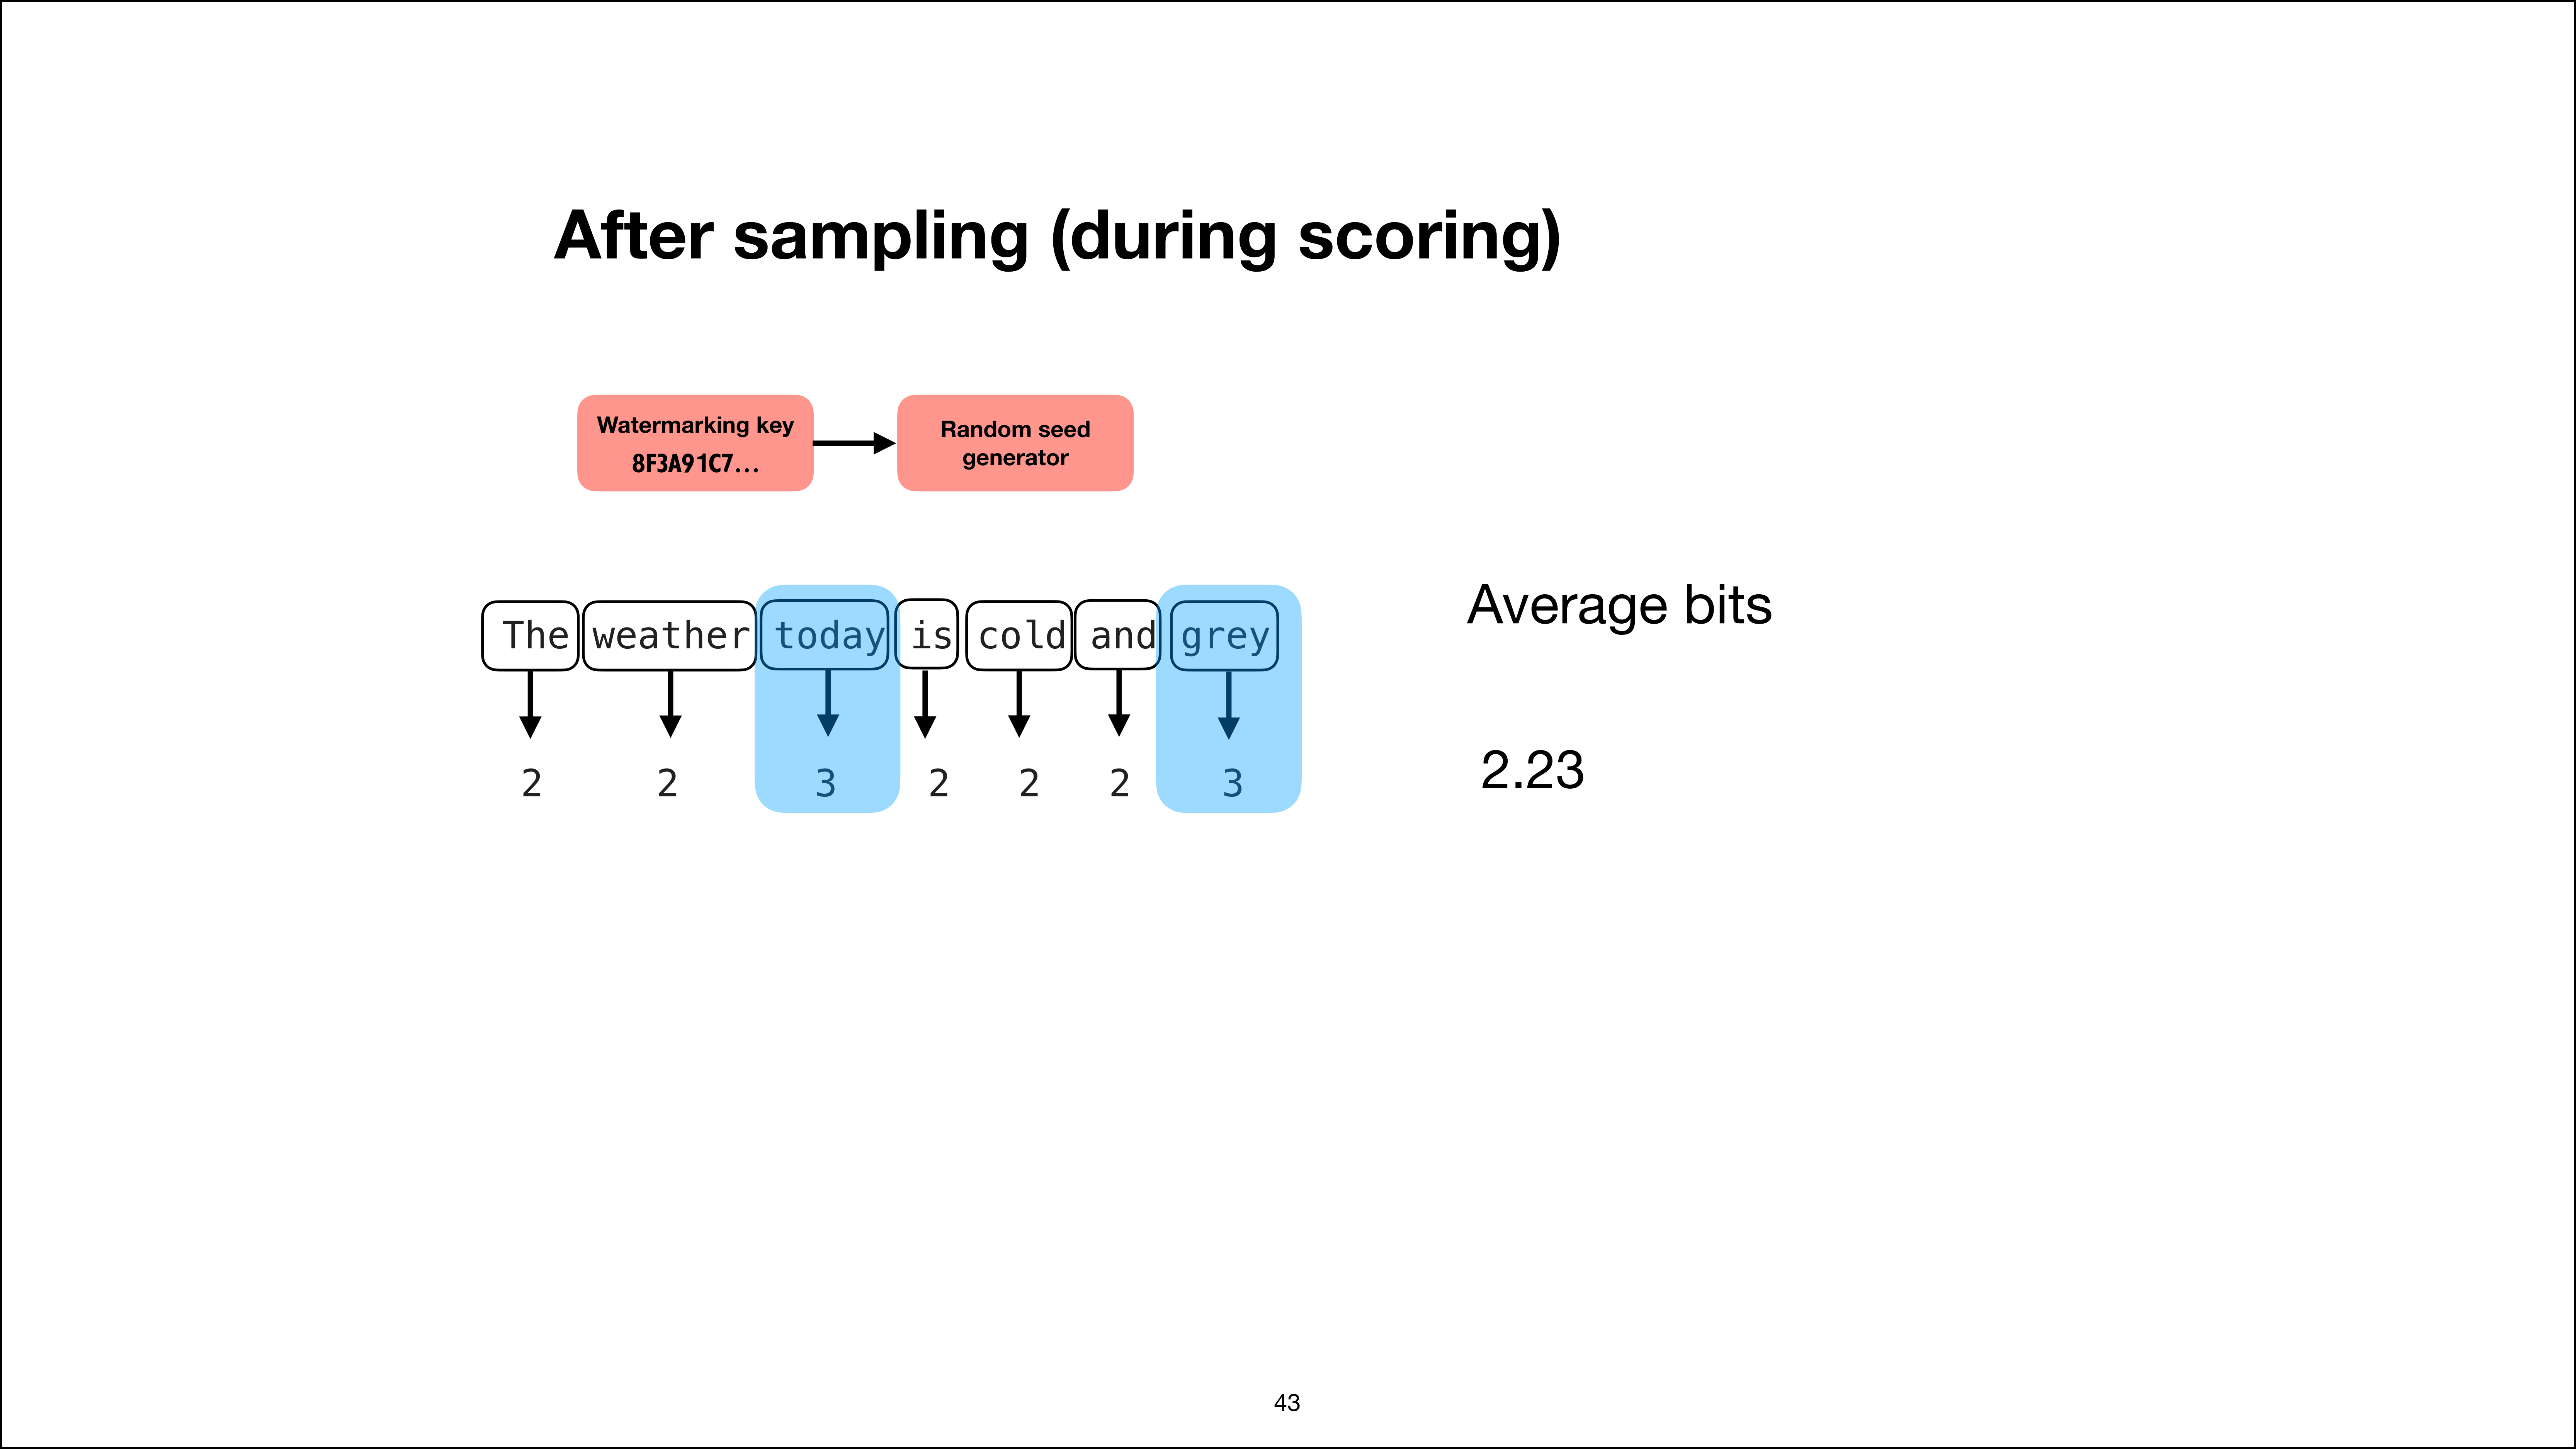
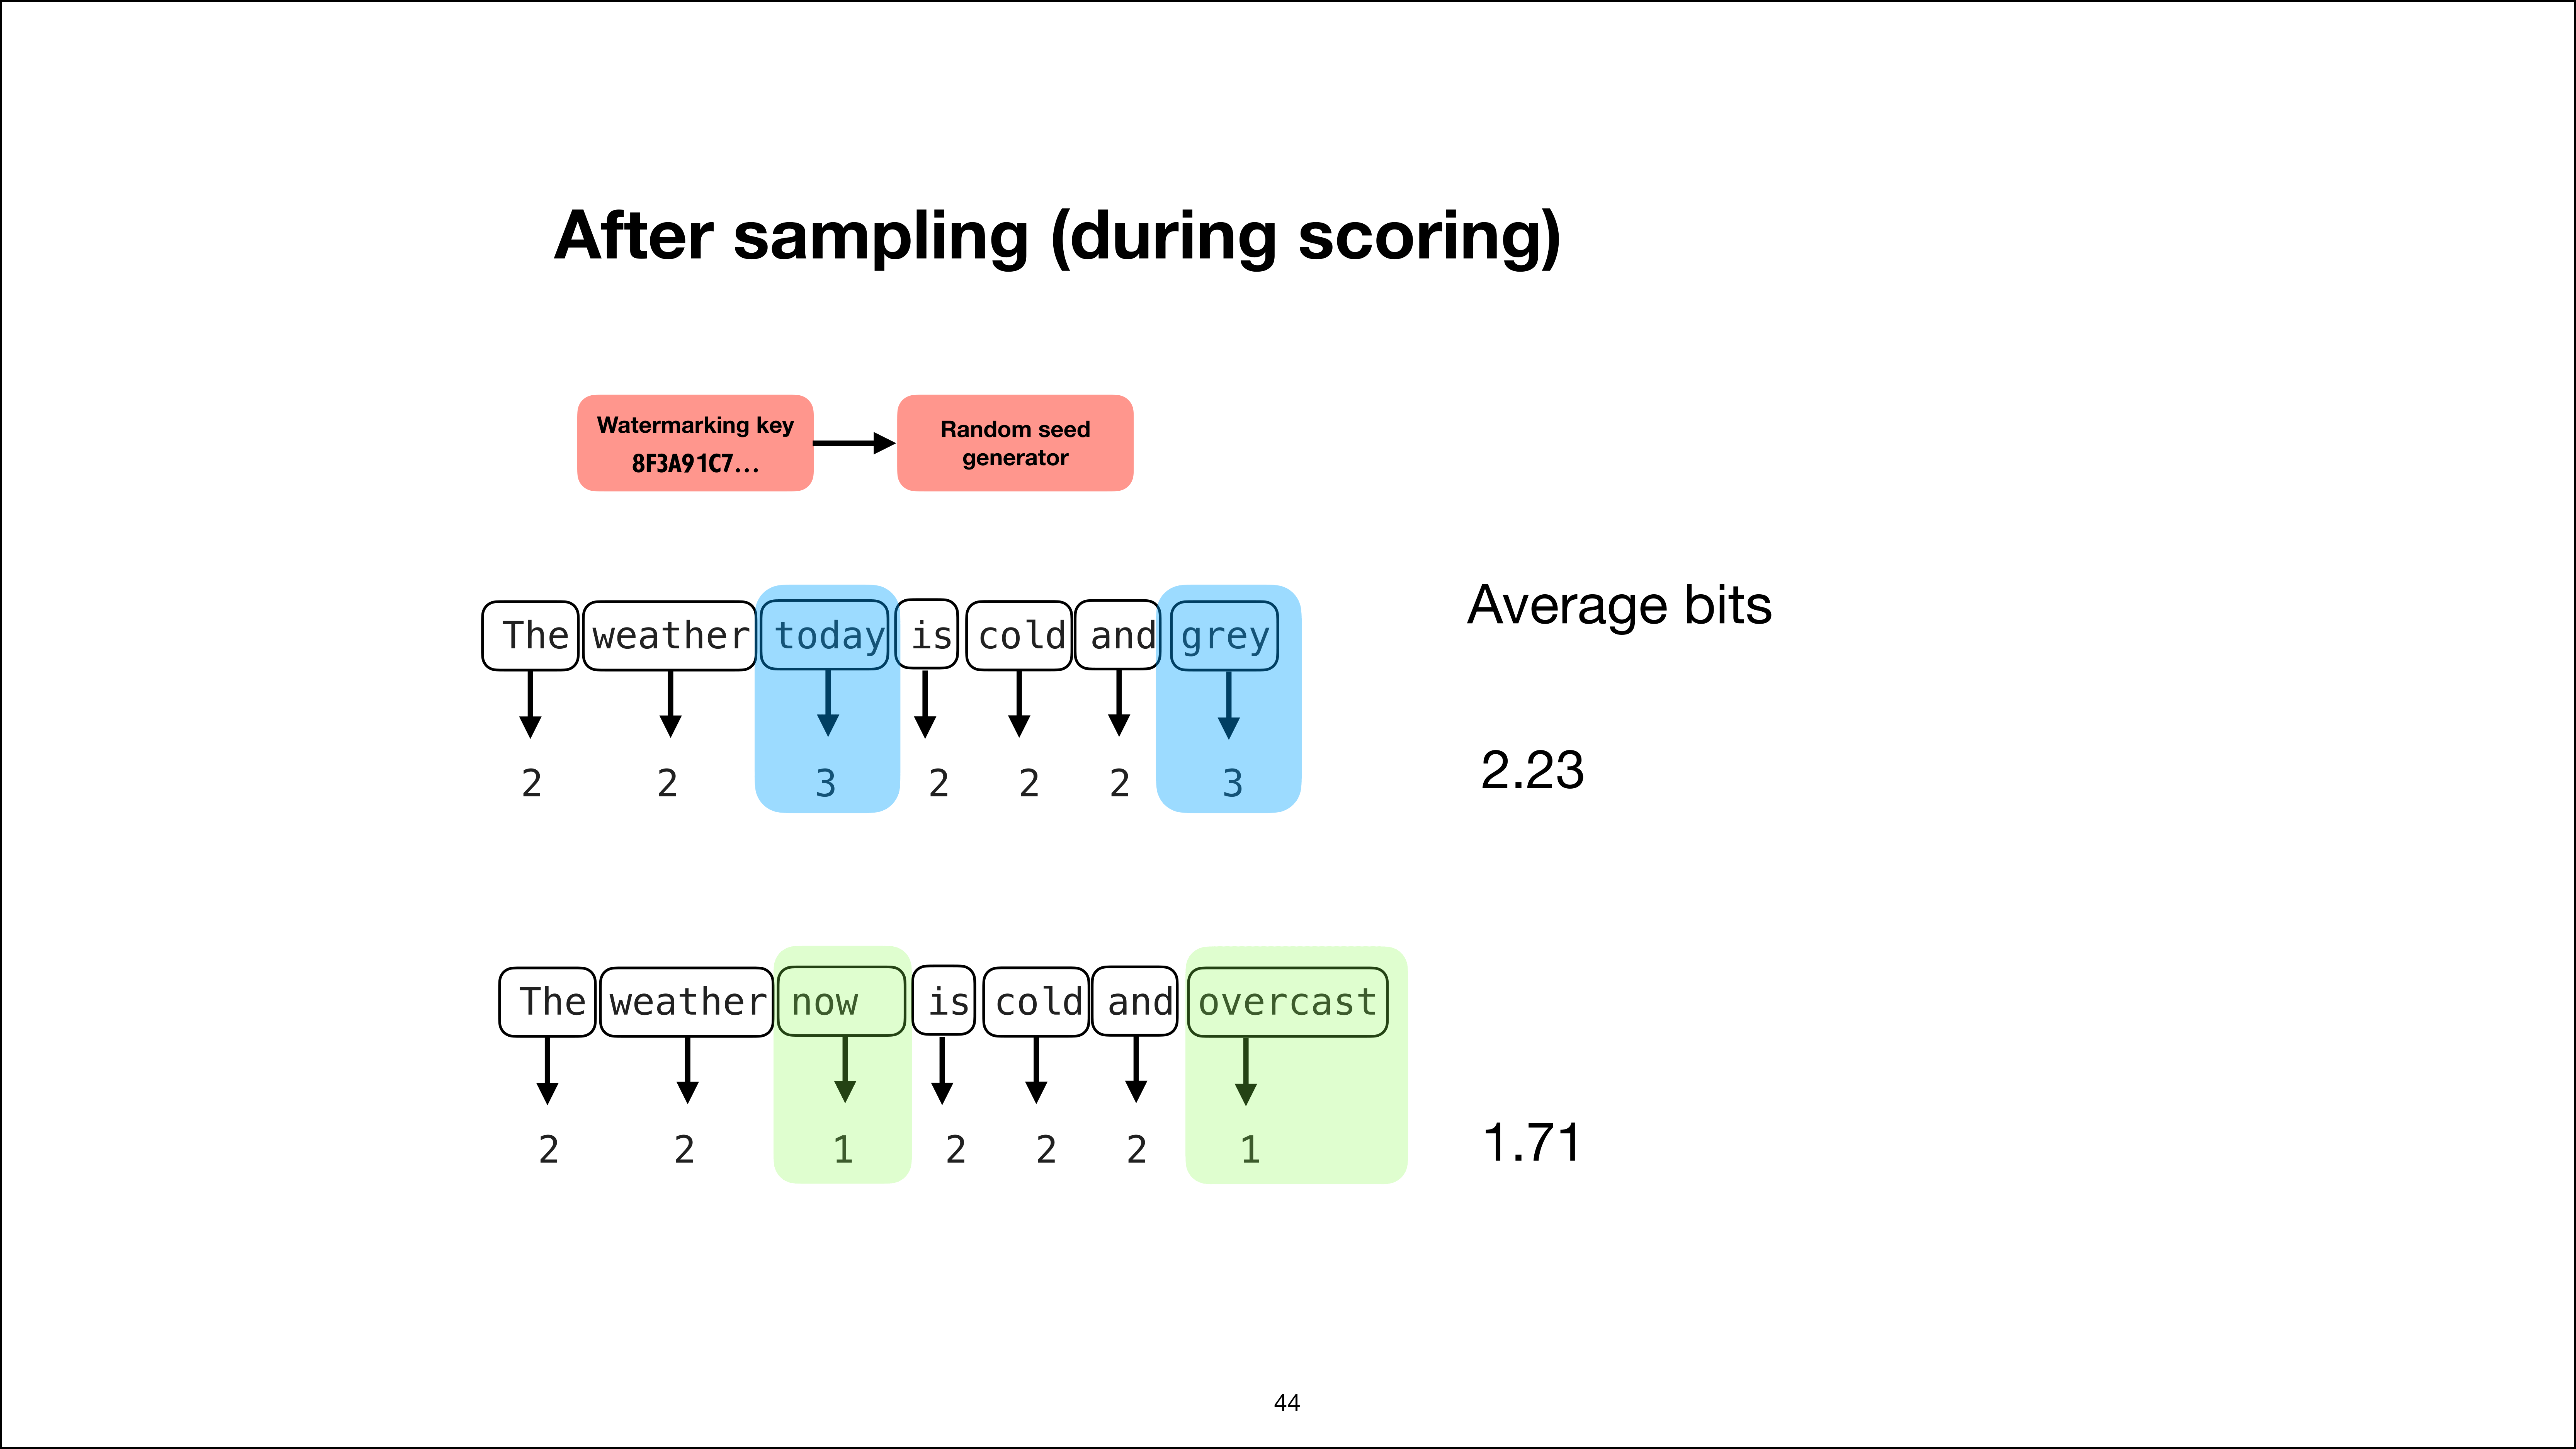
But the reason why they do it the certain way they do is to make the detection cheaper. Because otherwise, if I go back one slide or two slides, if you wanted to check if something is watermarked, if even they wanted to check, they would have to rerun the prompt to get these scores and then apply this watermarking random seed to get this text and then compare. And that would be very expensive because then essentially every text you want to compare, you would have to rerun the LLM.

You have to know which LLM, and that would be really unfeasible because you often also don’t even know the prompt, right? So yeah, so they have like a trick that they use to, yeah, I would say, modify the sampling so that you don’t use or don’t need the LLM later on for the scoring stage. And in the blog post, they mentioned that they derived this method from a paper.

It was a Nature paper, and this method is called SynthID-Text. So that was like a paper that came out maybe one or two years ago. It was by Google, and they use a similar technique they call Claude watermarking. I don’t know, sorry, I don’t know if they use exactly that technique, but that’s the one they mentioned.


31:18

SynthID Text and Tournament Sampling

The modified sampling stage used for inexpensive scoring
Slide 32 of 52, time stamp 31:39

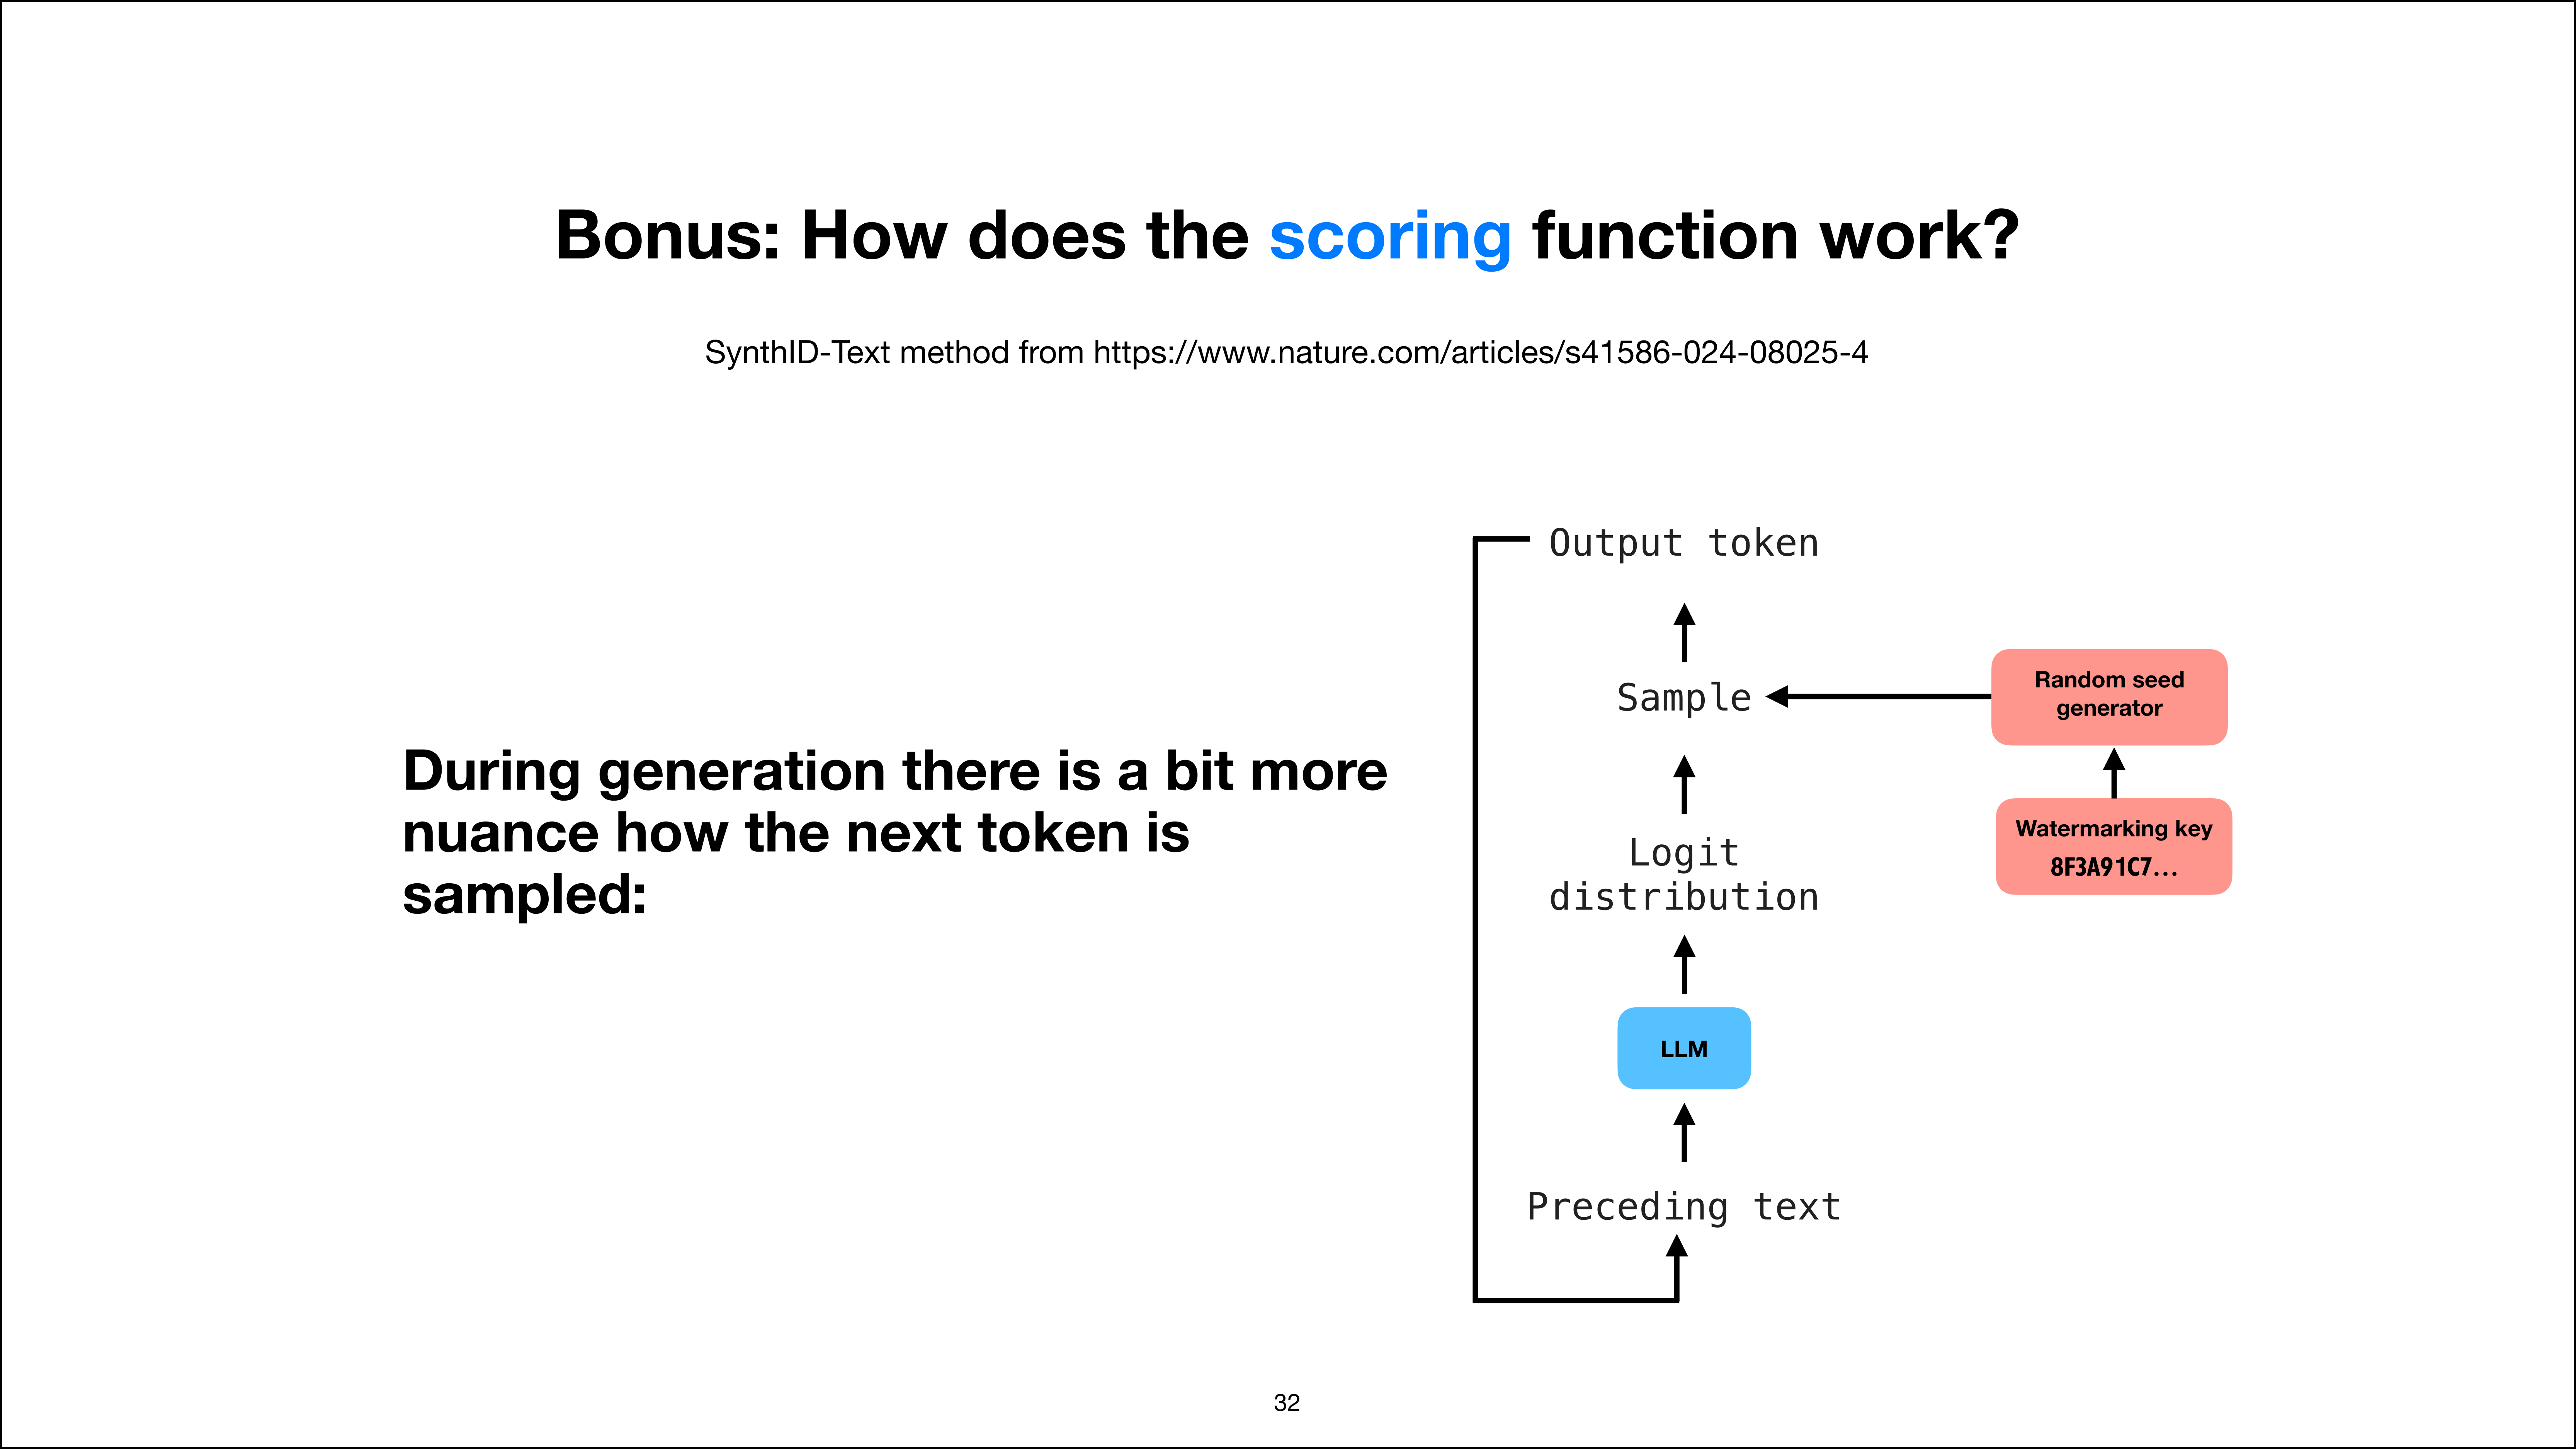
So how does it work? So before we looked at the slides, we looked at the regular, let’s say, overview here, where we have some text. We put it through the LLM. We get this logit distribution and then we sample from the distribution and get the output token. And here, during the sampling, we use the watermarking key and the random seed generator. So this is still correct. This is still what’s going on, but there is a bit more, I guess, nuance to how this token is sampled.

So they’re not just using, let’s say, NumPy’s random choice. They’re using something a bit more sophisticated here.


Plausible next tokens and their probabilities
Slide 33 of 52, time stamp 32:16

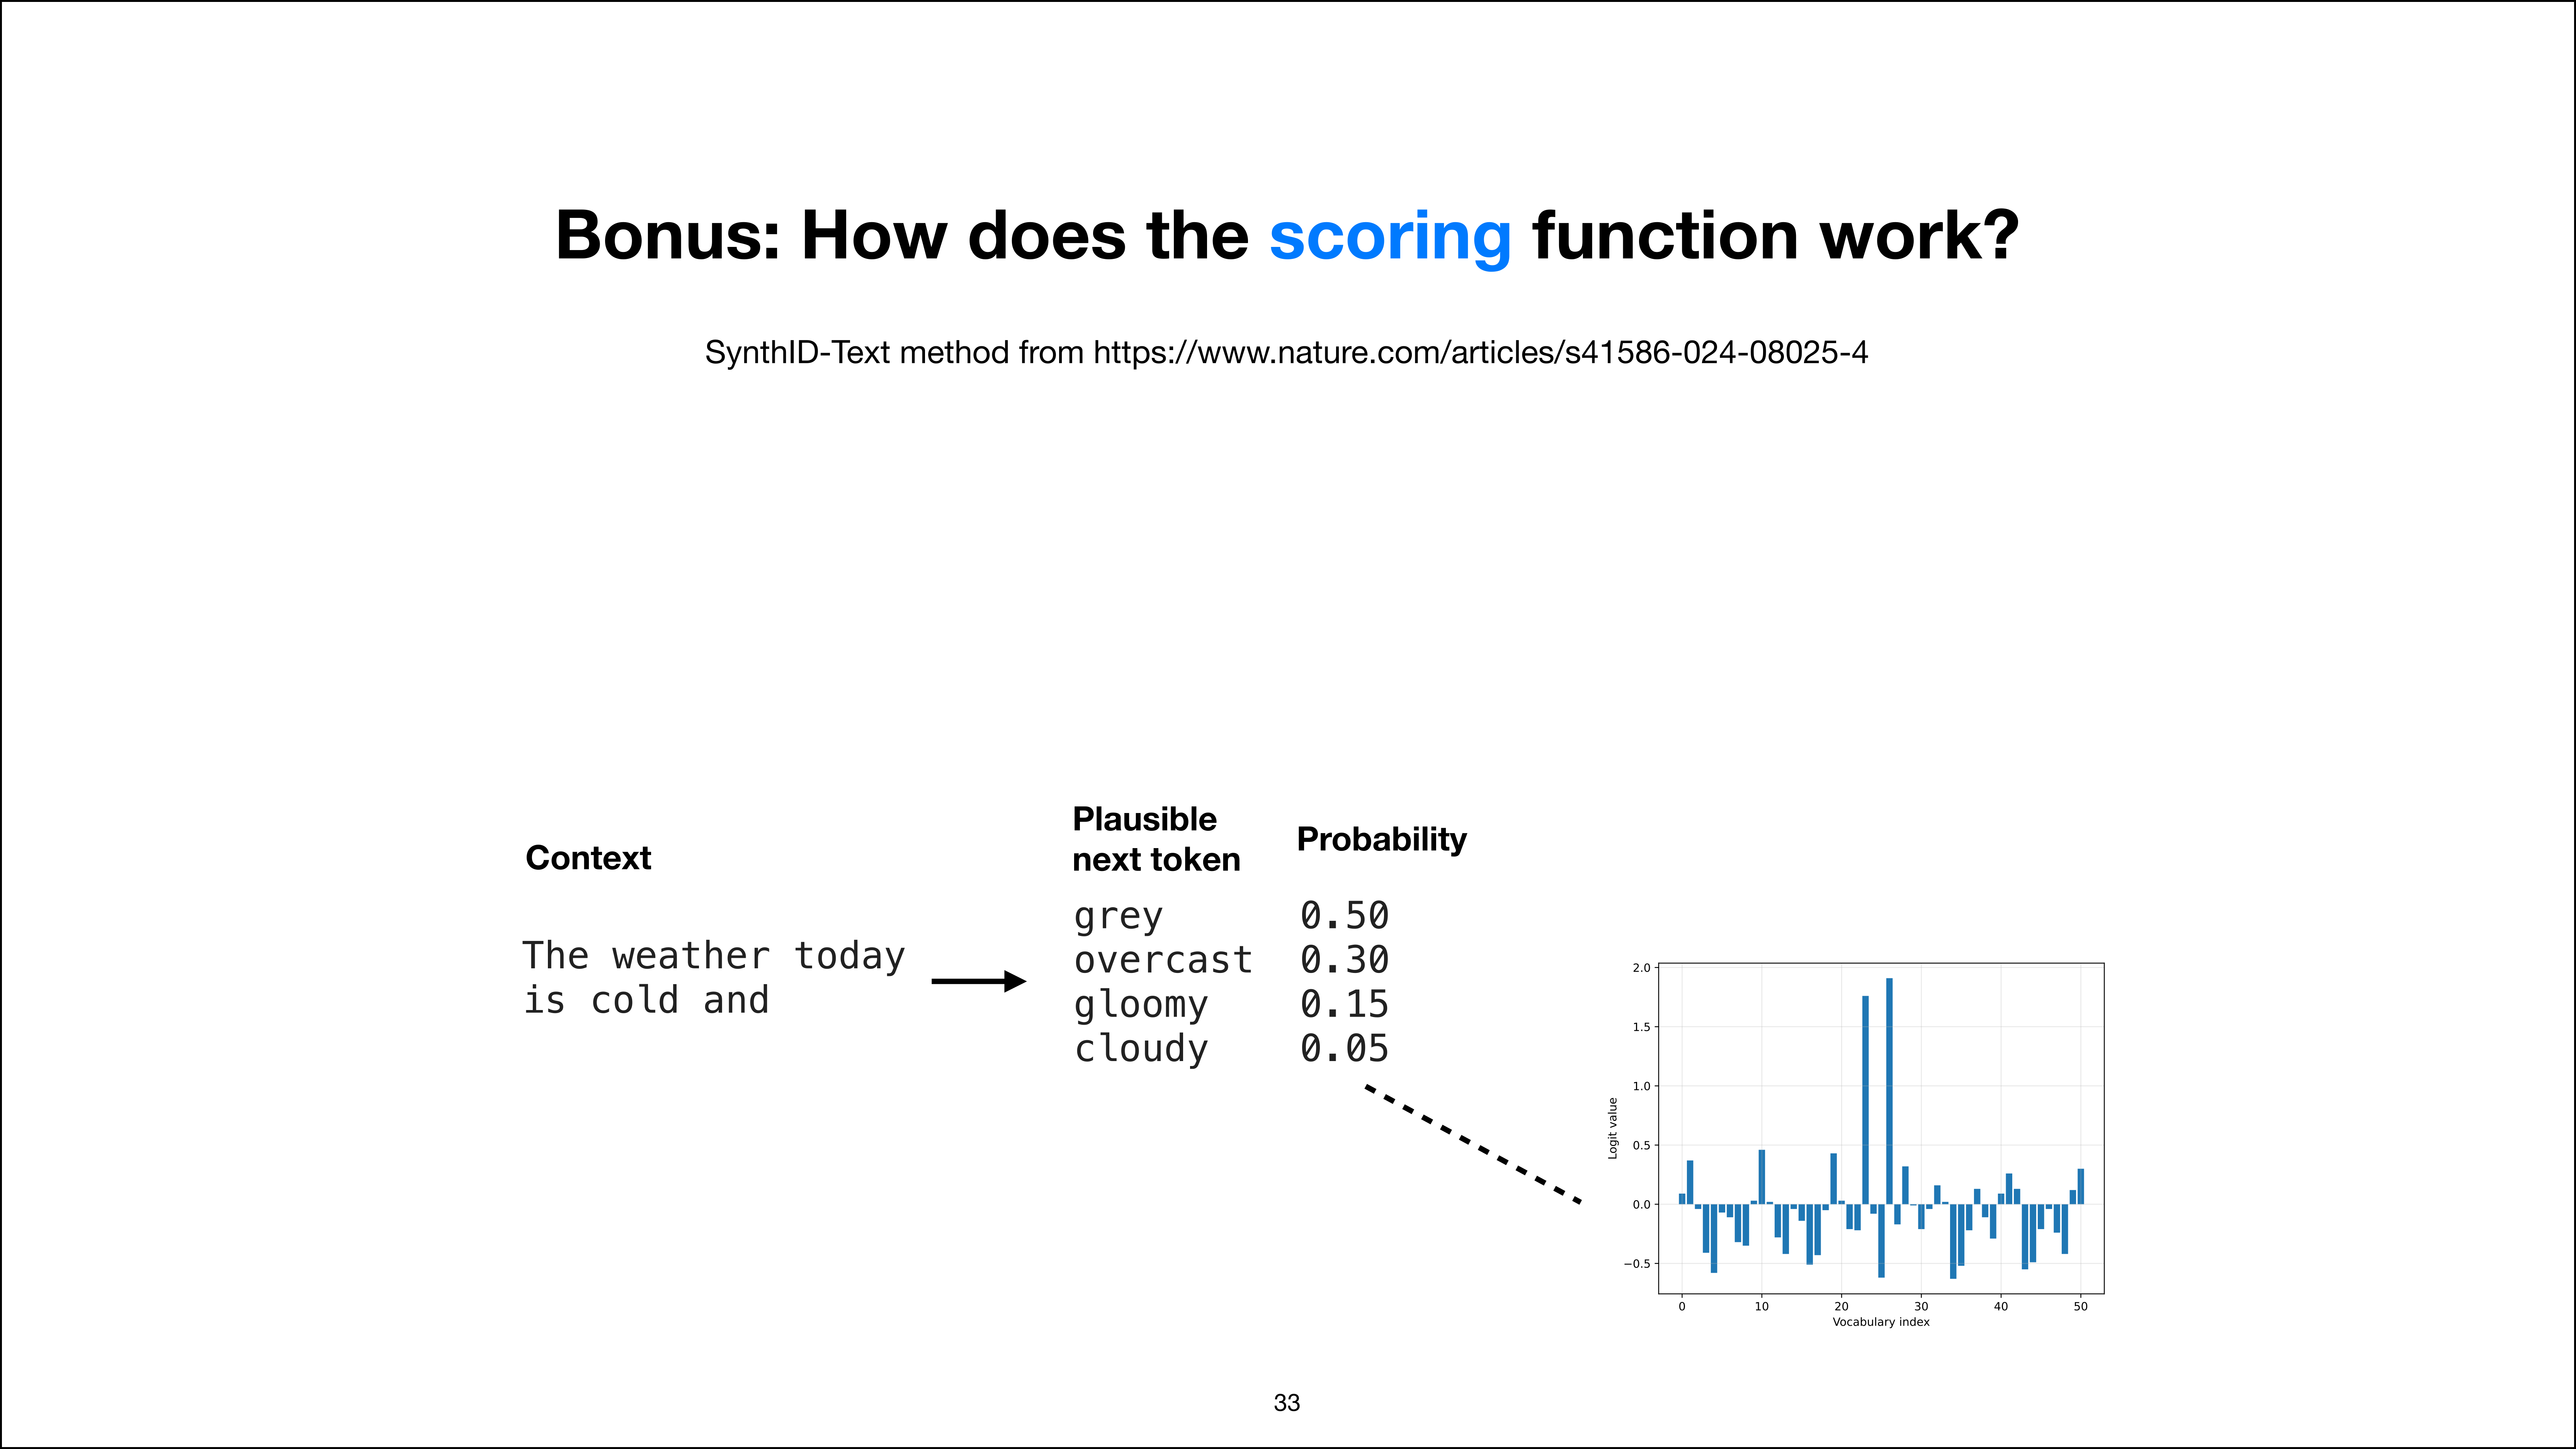
So assume, again, our context is “the weather today is cold,” and we want to generate the next token. So, for example: “gray”, “overcast”, “gloomy”, “cloudy”. “Gray” is 50% probability, “overcast” is 30, “gloomy” is 15. Let’s say “cloudy” is 0.05 and the rest is, let’s say, 0. Here it looks, of course, a bit different. Let’s say that’s “gray” and “overcast”. I’m just reusing this figure. But now imagine these are the most likely ones, like “gray” and “overcast”, and everything else is just very small, except “gloomy” and “cloudy,” maybe.

So essentially, think about just a very small vocabulary for this example of four words instead of all these 50 words here, just to make it even simpler. Now, as I mentioned before, we could use ‘sNumPy’s random choice with these probabilities to sample the next token.


Weighted random sampling could select the next token
Slide 34 of 52, time stamp 33:13

And we could use the watermarking key with this random seed generator to make it deterministic and get the certain watermark that we want. But as I mentioned before, this would be very expensive. Not the sampling itself. That doesn’t matter. This is pretty cheap. But the detection later on would be very expensive if we are trying to check random text on the internet.


Tournament sampling replaces ordinary weighted random sampling
Slide 35 of 52, time stamp 33:35

So instead, what they use, they also use it during the sampling, during the generation, so that it can be reused later during detection. What they use is called tournament sampling. So this is instead of using something like random choice, they use a concept called tournament sampling. And so how does that work? It might look a bit complicated, but it looks really more complicated than it really is, to be honest.

So you might have to, I guess, stop the video at some point and just sit with the figure a bit. But I think it is actually simpler than it looks like. It’s like once you get the hang of it, it’s pretty straightforward. But let me try to explain here. So what we have is we have still this context, and then we have these probable or plausible next tokens with these different probabilities.

Now they have something they call random watermarking functions.


34:33

Random Watermarking Functions

Random watermark functions assign a bit signature to grey
Slide 36 of 52, time stamp 34:35

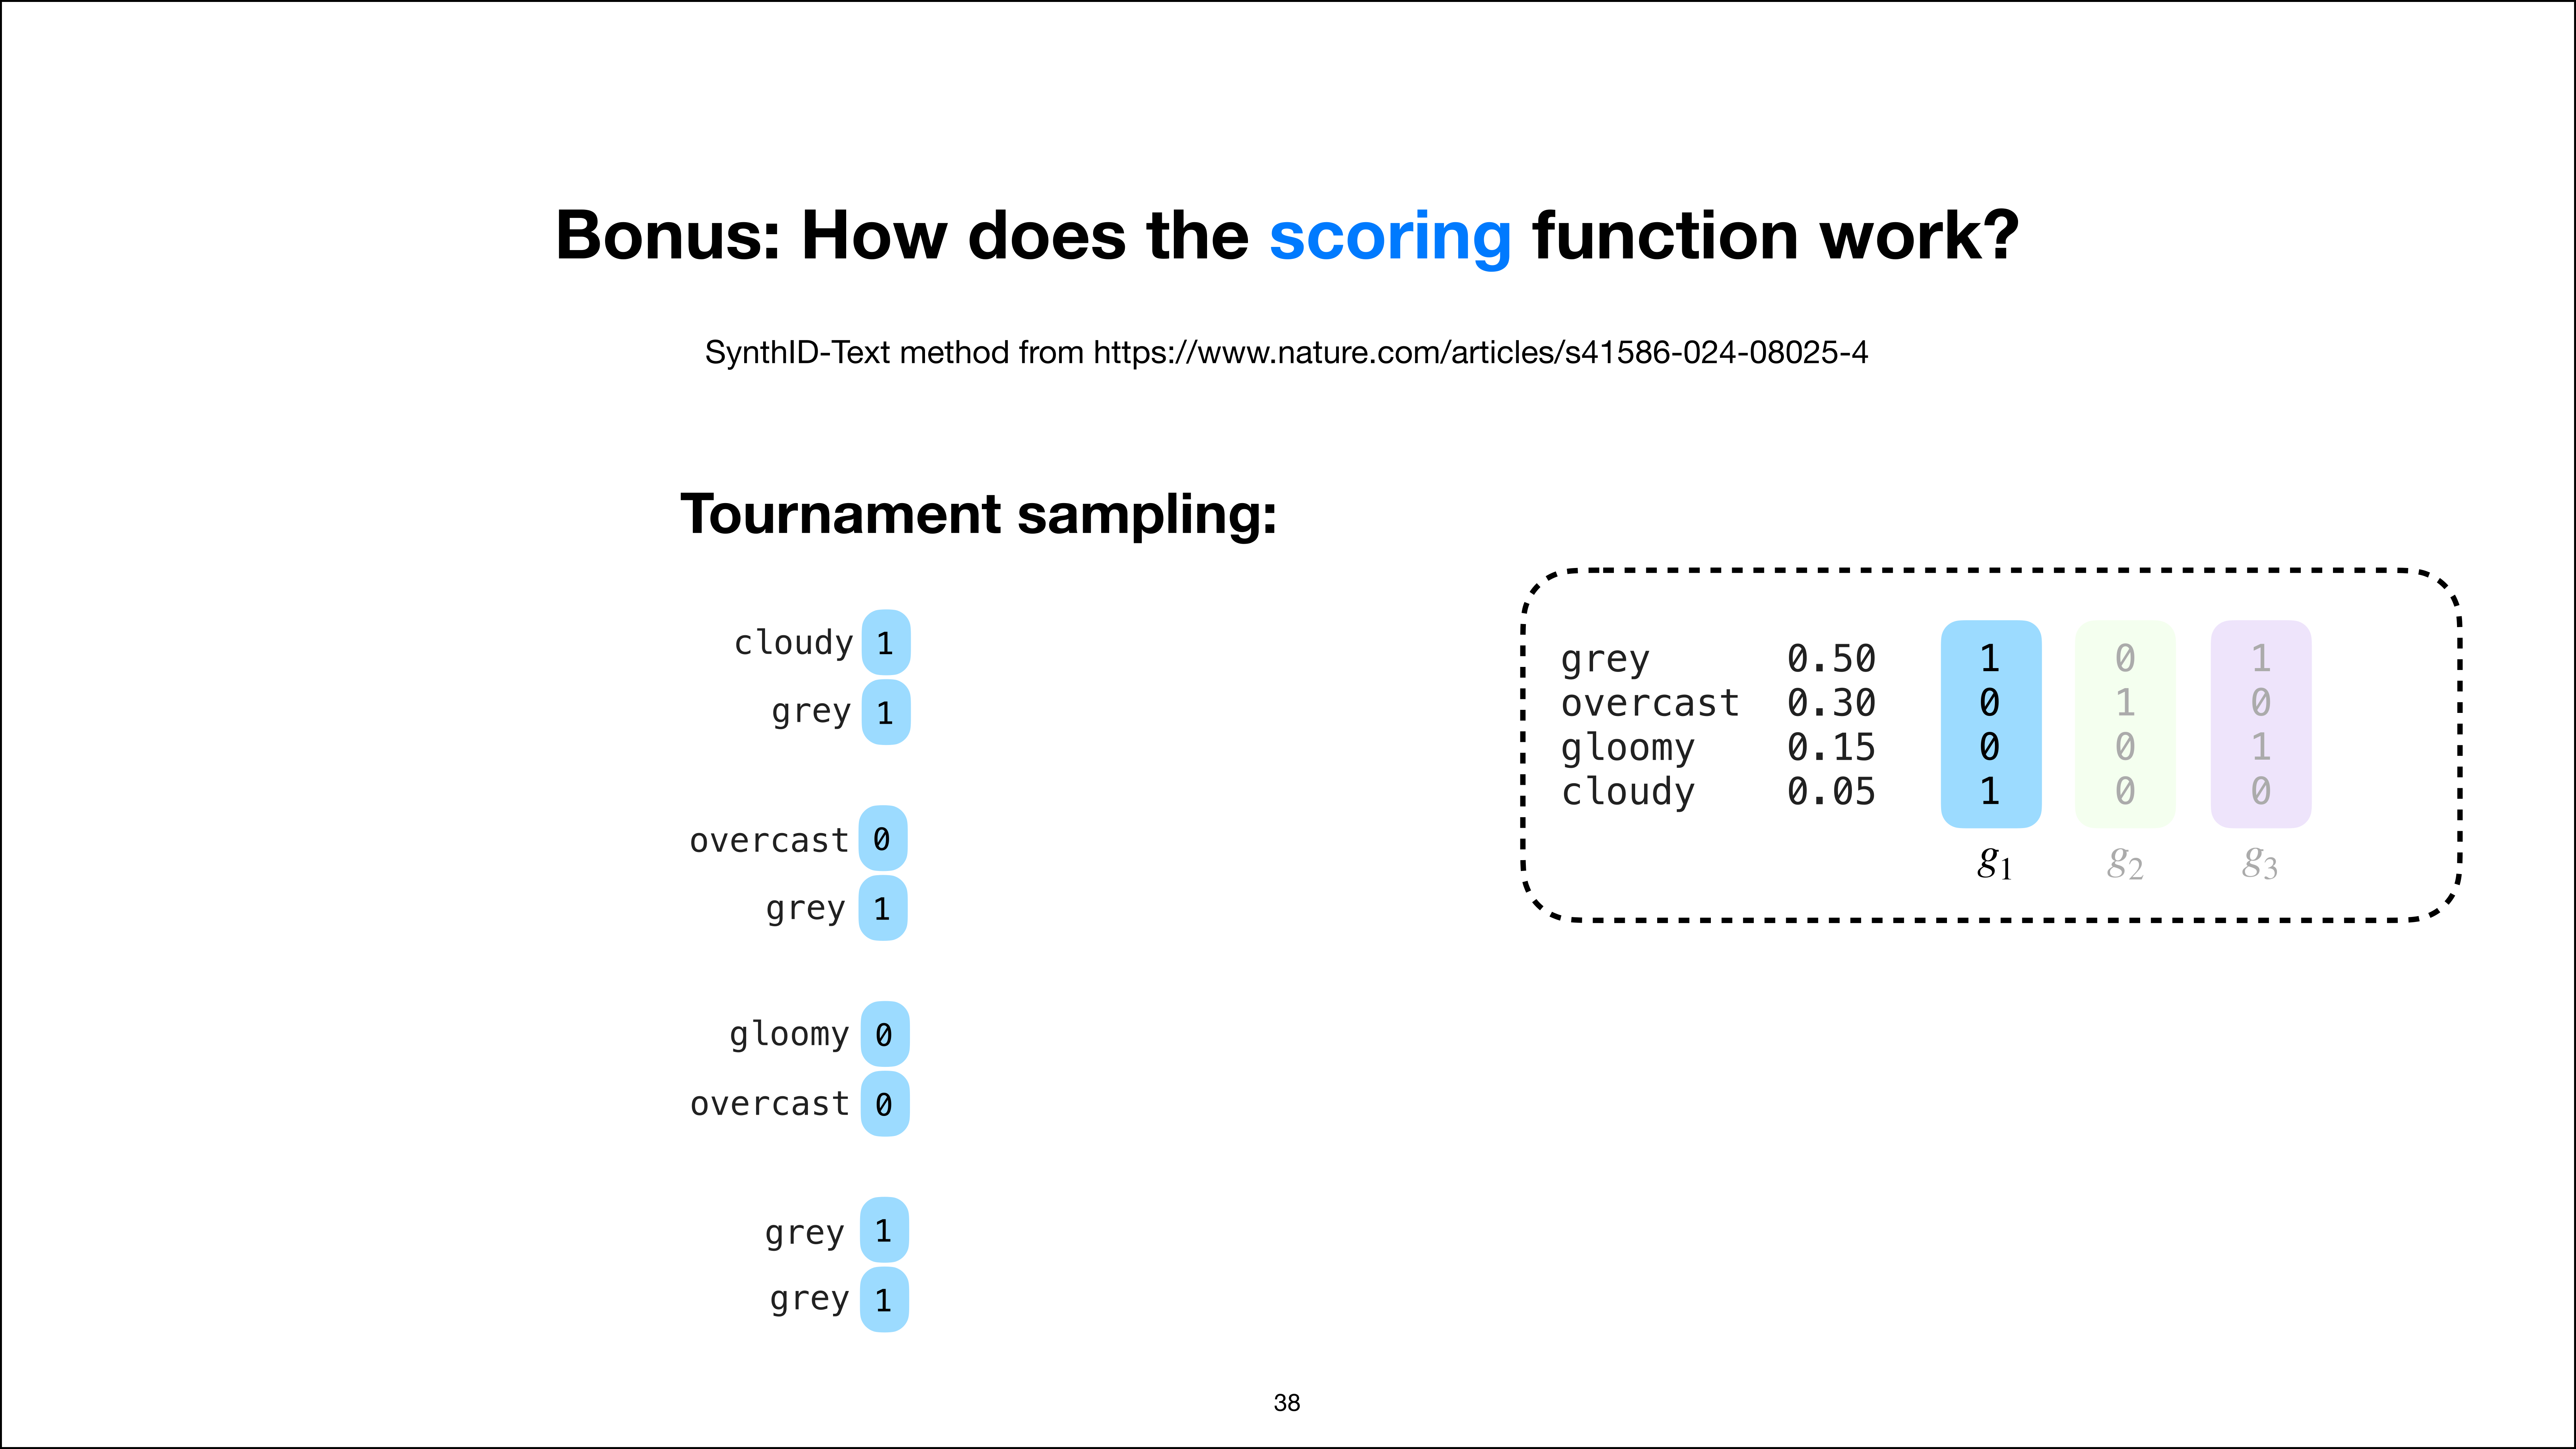
Here we have three watermarking functions, G1, G2, and G3. In reality, they might have 30, 50, or even more. Here I’m just using three because that is simpler on this slide. It’s just smaller, you know, like it fits better on the slide. Now, if we look at this word “gray”, this might give us a signature 101. With that, I mean, if we use this watermarking key to generate this random seed, and we have three functions, G1, G2, G3.

If I put the word “gray”, what I’m skipping here is that usually you put the word “gray” together with the four or three previous words from the context. So it’s “cold” and “gray”. If I put that into G1 together with this watermarking key, I get the value one. Why? Well, that’s just how this function works. It’s like a random function. The random function either returns zero or one. In this case, with this random key and this token, it returns one.

With the same key, but a different function, you get the value zero. And then here you get a one again. So if we have more functions (of course, 30 functions), this will be a very long string of ones and zeros.


Random watermark functions assign bit signatures to every candidate
Slide 37 of 52, time stamp 36:00

It’s basically like a bit string, like if you have bits of zeros and ones. Okay. So this is for “gray”. So we get the signature 101 through using these watermarking functions. Now we can do the same thing for all the other ones. So we can do it for “gray”. We can do it for “overcast”, “gloomy”, and “cloudy”. So each one has a different signature here. So, for example, “overcast” is zero, one, zero.

“Gloomy” has zero, zero, one. “Cloudy” has one, zero, zero. Okay. So we have these bits here now. The next step is a so-called tournament sampling where we just pair them.


36:36

Tournament Sampling Step by Step

Candidate-token pairings for tournament sampling
Slide 38 of 52, time stamp 36:39

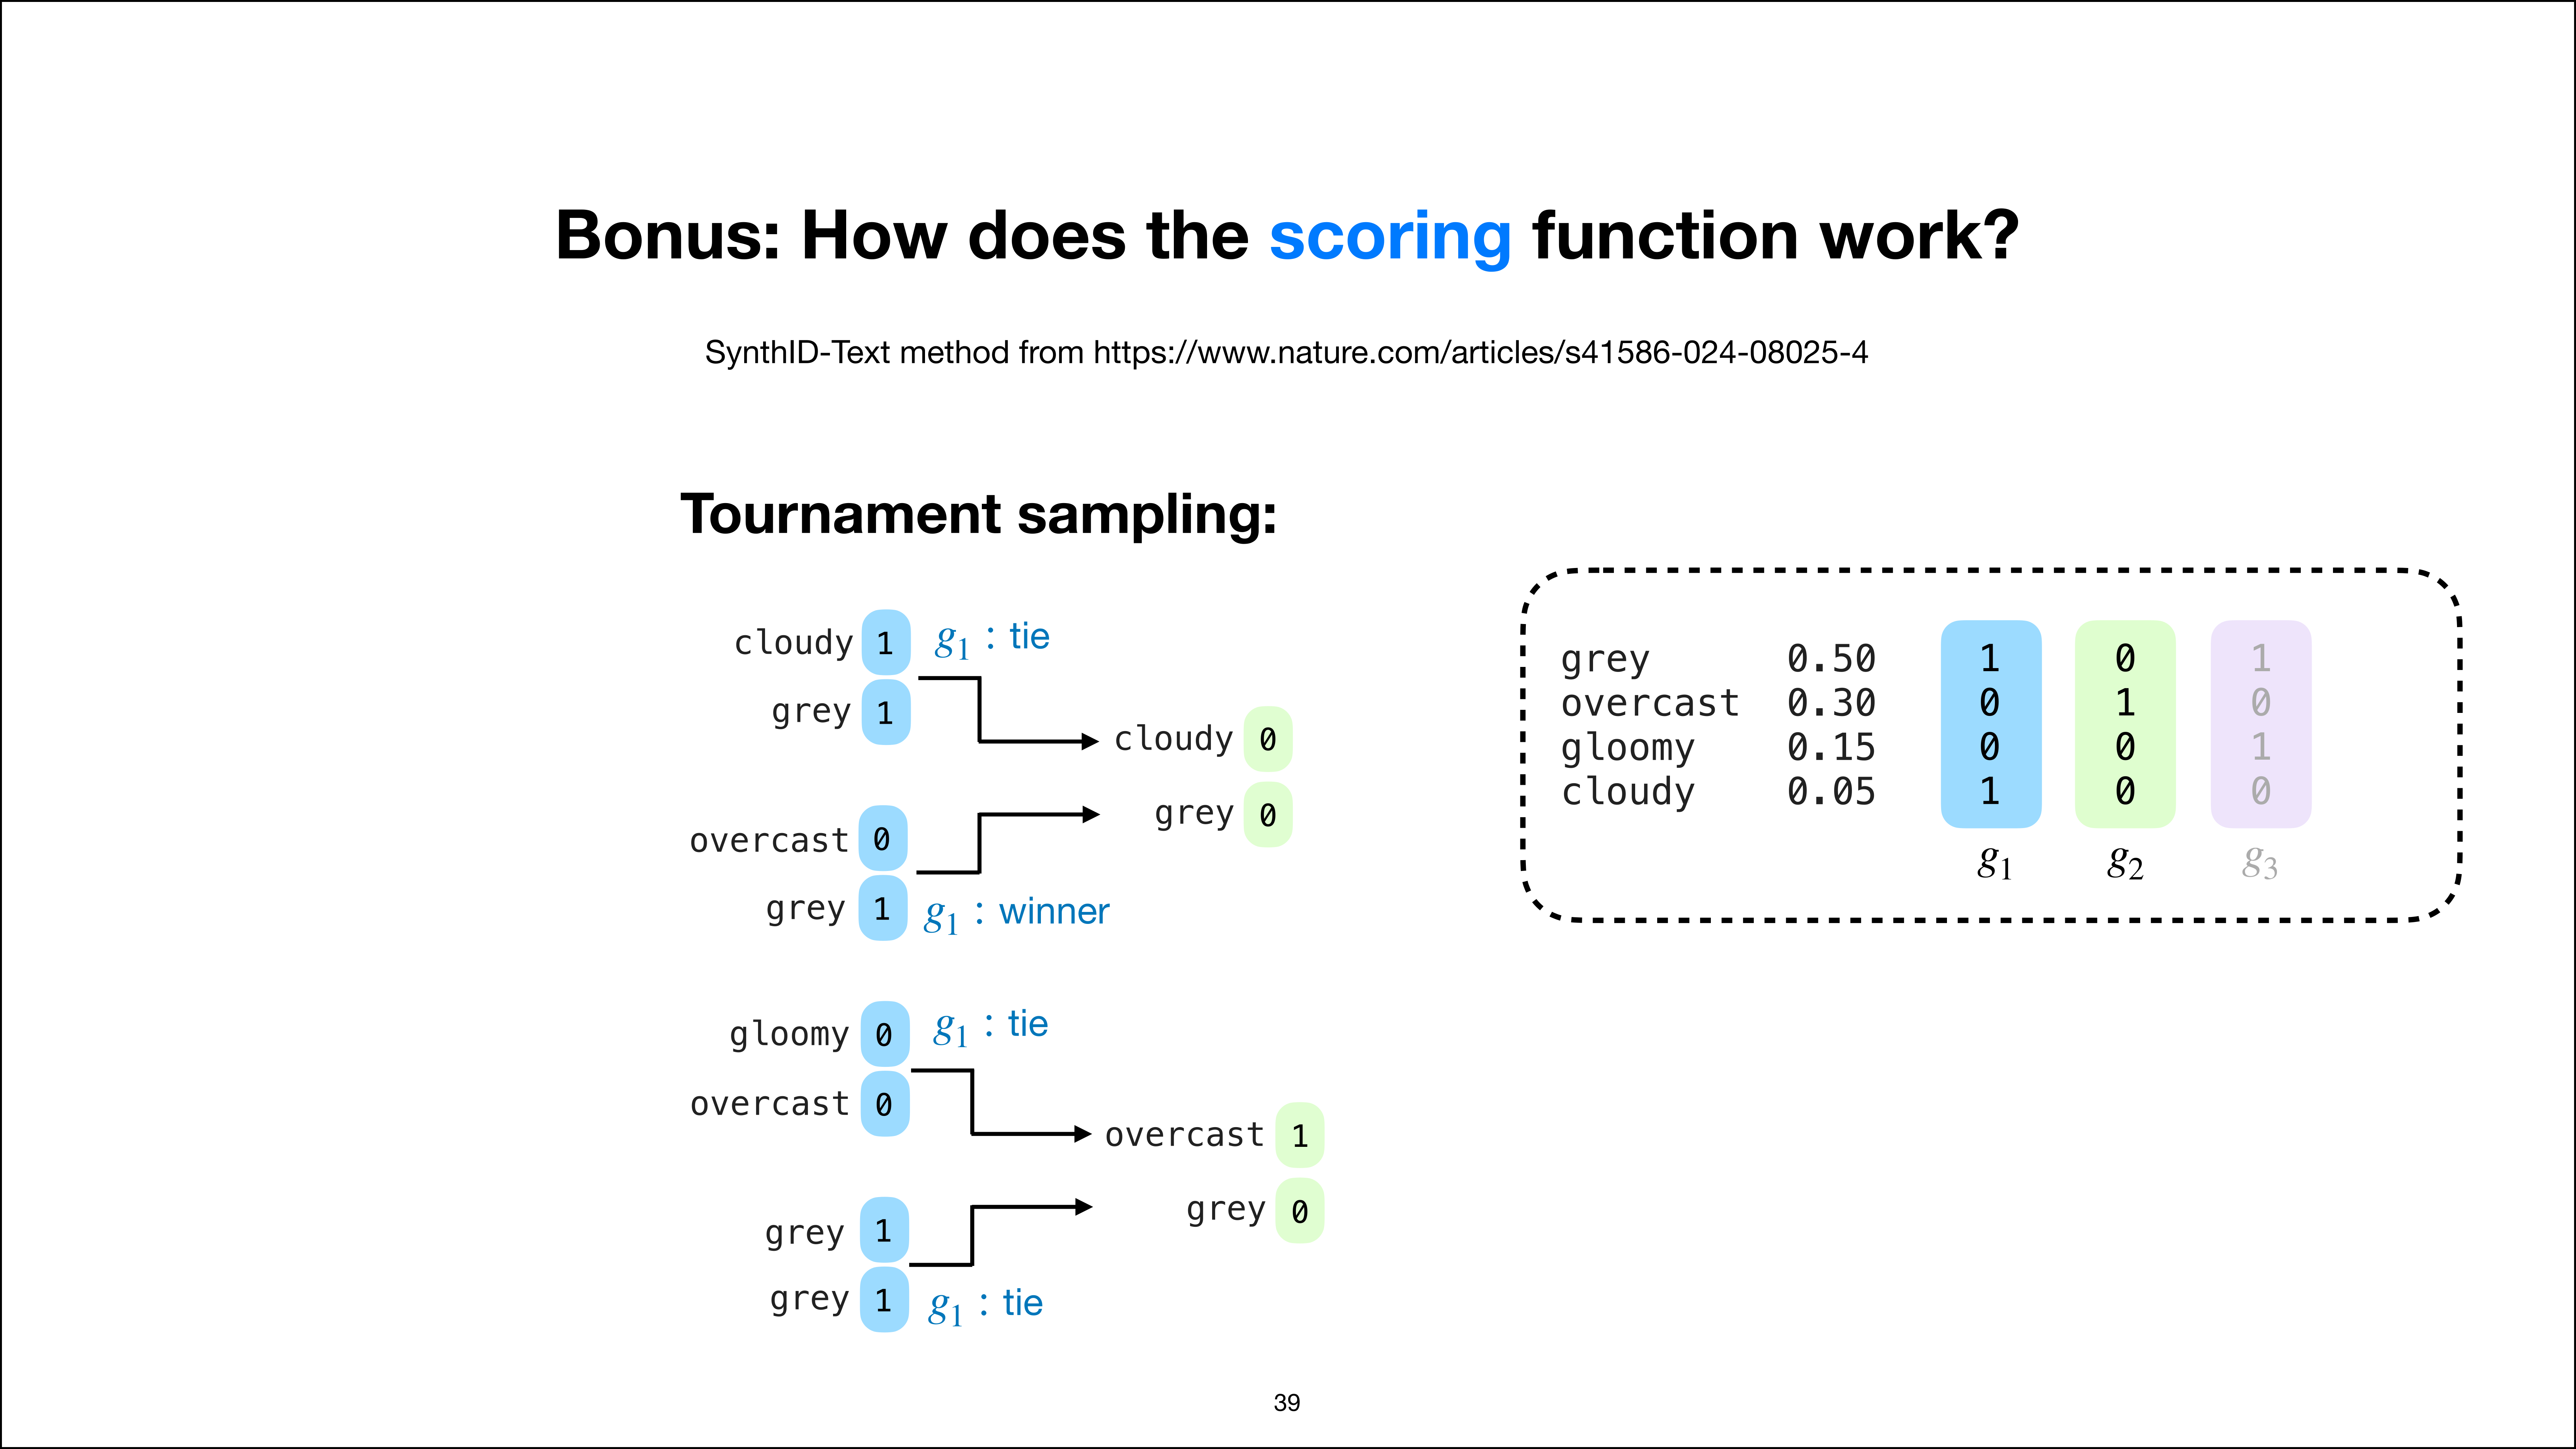
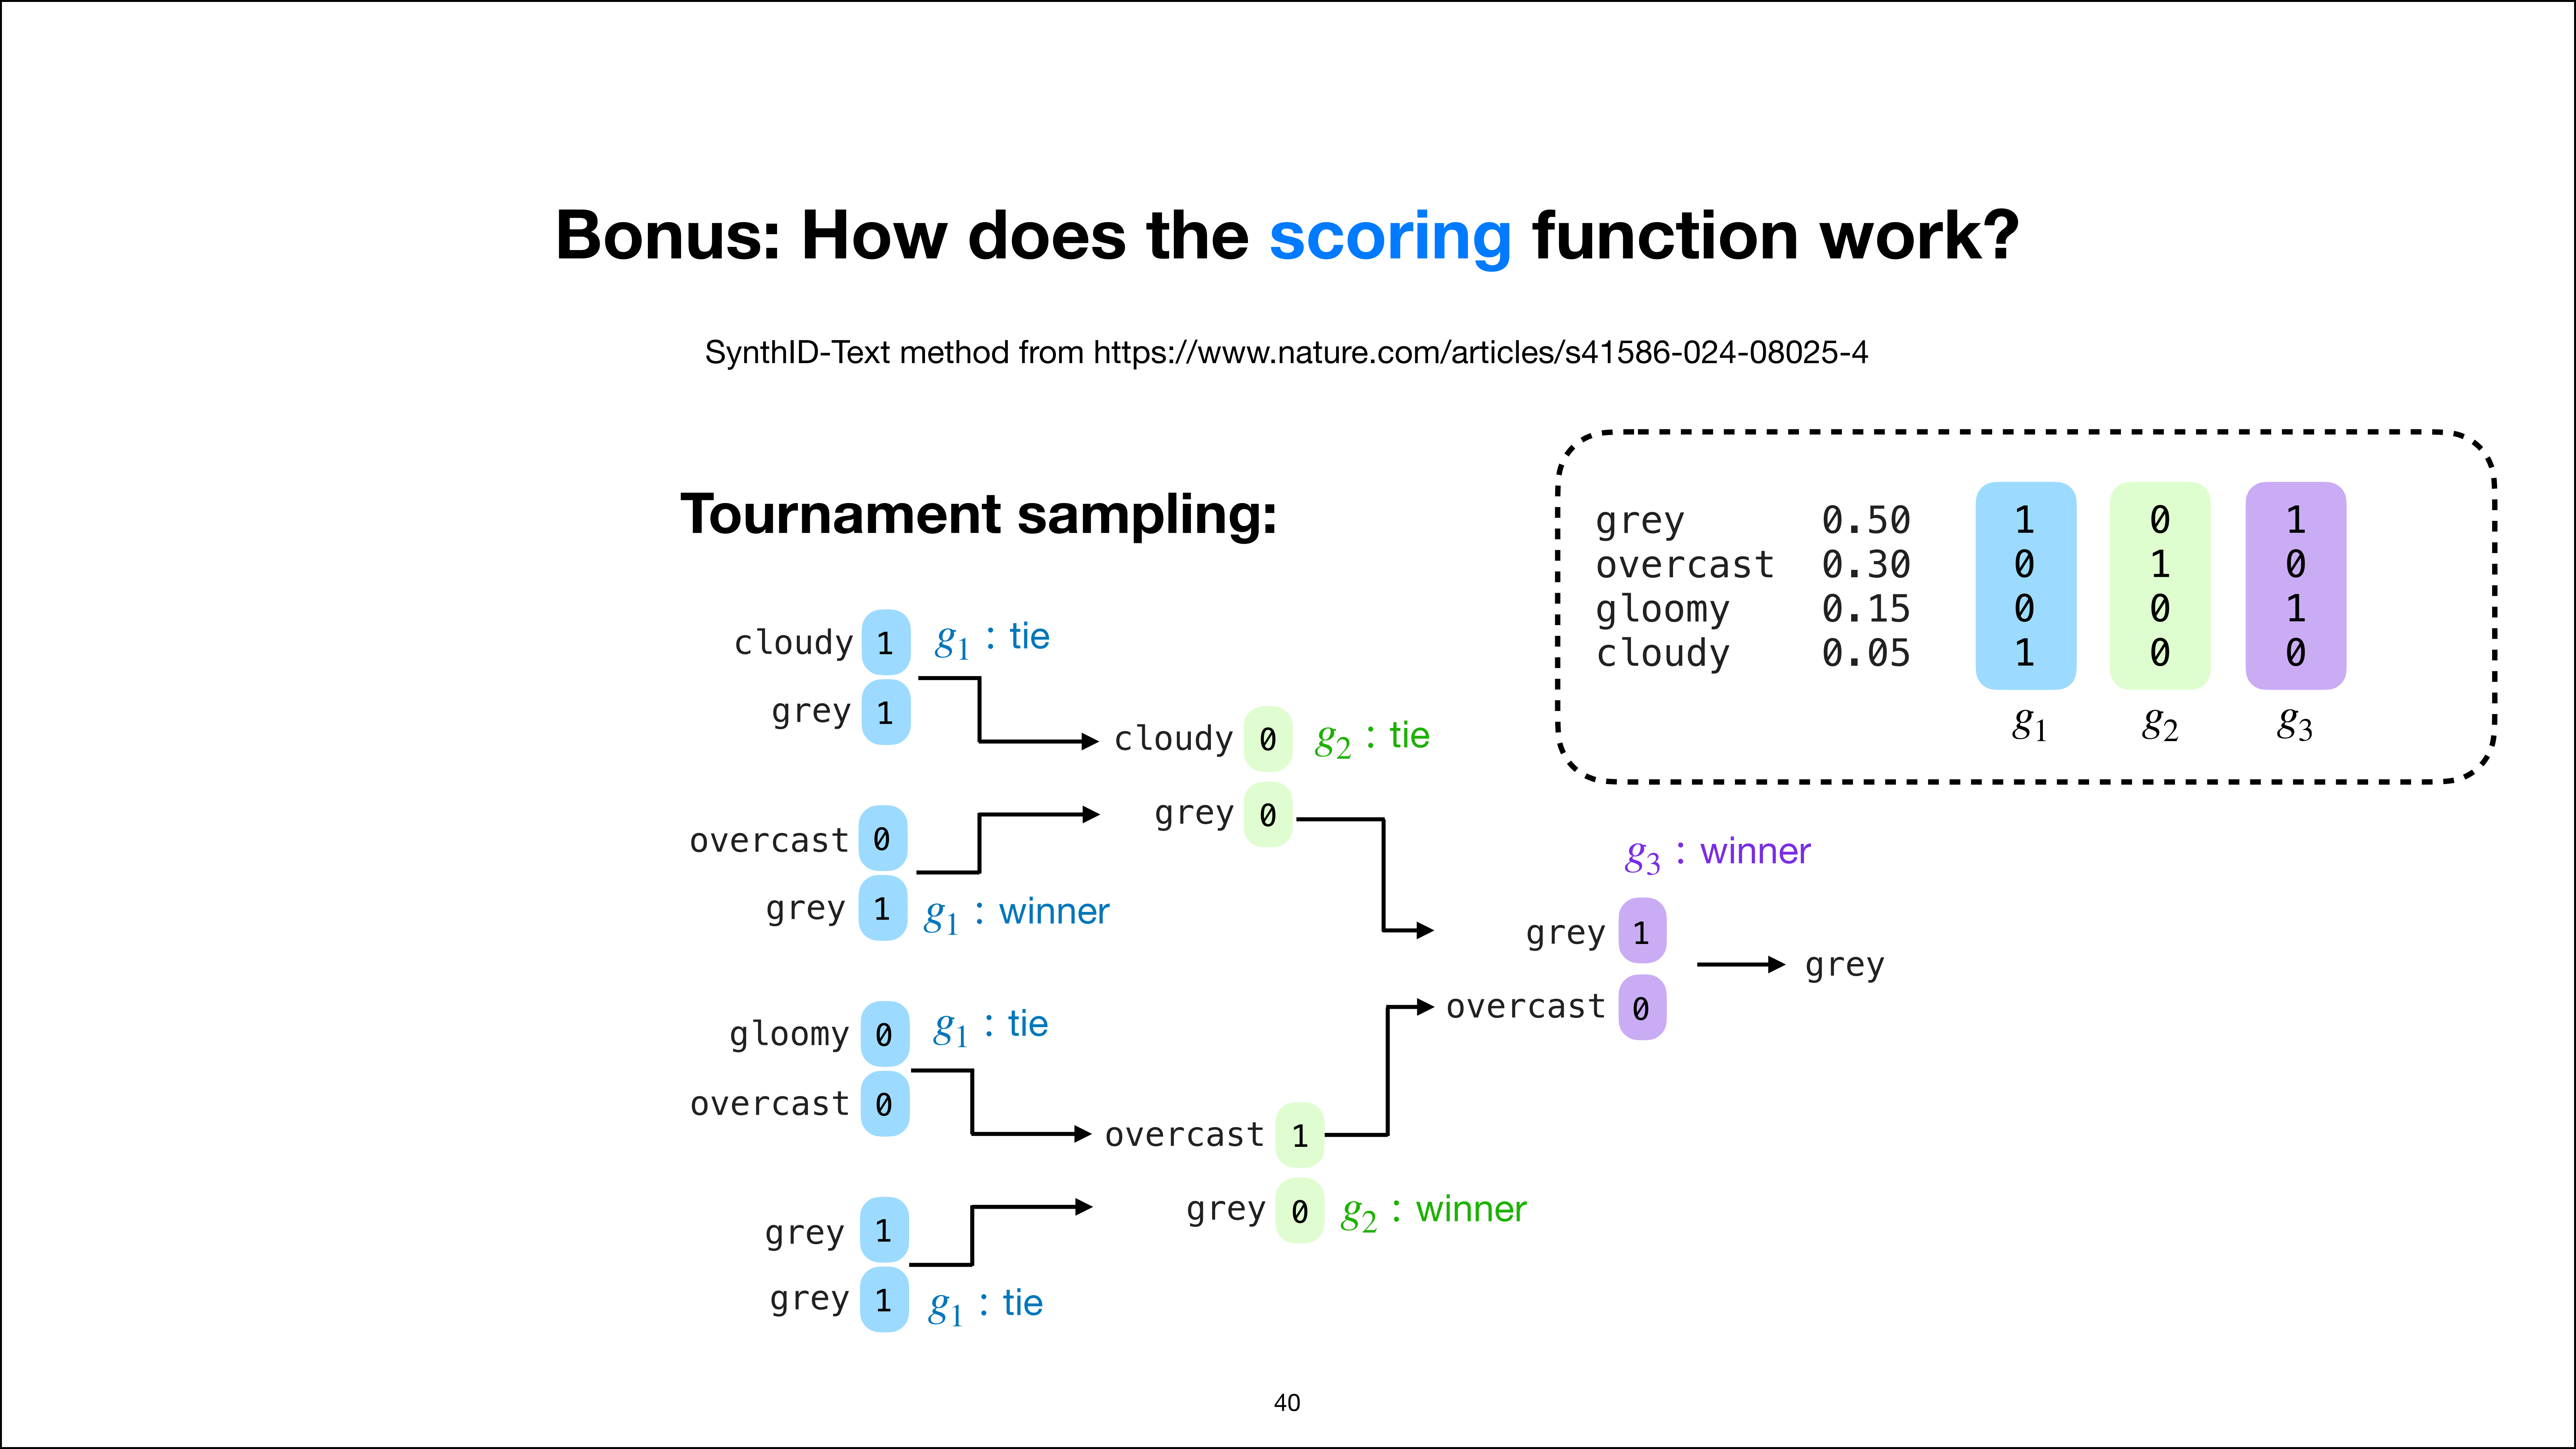
Like, you know, like a soccer tournament, the knockout (KO) stages, or like the playoffs in American football, you always have two teams playing against each other. And that’s kind of like the same idea. We have a pair of tokens, and they’re playing against each other, essentially. And the scores, they come from these functions here. So we start with the first function in the first round. So we have “cloudy” and “gray”.

So we look up here: “gray” is a one and “cloudy” is a one. Okay. So one and one. “Overcast” and “gray”. So “overcast” is zero, “gray” is one. So we have zero, one. “Gloomy” and “overcast”. So here we have “gloomy” zero, “overcast” zero. So zero, zero. And then we have “gray” and “gray” again, because we are running out. So we don’t have enough of the others. So we have one duplicate.

So this is chosen randomly. And so you have one and one here. Now we look at the results. So this is a tie. In the case of a tie, we also select randomly using, you know, the random seed and the watermarking key. So here, “cloudy” survives. And from this one, G1 is, according to G1, “gray” is the winner because it has the one. So “gray” survives. And then here, “overcast” and “ gray “ are a tie, randomly selected, and “gray” also randomly selected.

So we have now “cloudy” and “gray” and “overcast” and “gray”. And we play the next round in this tournament. So in this next round, we use G2. So according to G2, “cloudy” has a zero here. “Gray” also has zero. “Overcast” has one. And “gray” also has zero, sorry. And so, the next stage of the tournament again.


First tournament-sampling comparisons and winners
Slide 39 of 52, time stamp 38:24

So we have a tie. We randomly select “gray”. And here we have “overcast” as the winner. And so we have “gray” versus “overcast” in the final. And then we look again at the scores. So “gray” has a one. “Overcast” is a zero. So “gray” is the winner. And that’s how the token “gray” is sampled. What is the watermarking key doing here? So the watermarking key, if I go back a few slides, is selected for generating these scores using these random watermarking functions.

So the watermarking key determines essentially what values we get at these stages. So the watermarking key is still very important. Otherwise, these signatures would look different.


39:18

Detecting Watermarks Without Rerunning the LLM

Complete tournament-sampling comparisons across watermark functions
Slide 40 of 52, time stamp 39:11

So we now have sampled the next token. And that’s just how this modified sampling procedure works. We could have used NumPy’s `random.choice`. But the shortcoming of that is that if we want to score random text on the internet, we would have to rerun the LLM. With this technique, we don’t. I will show you in a moment. So this technique sounds like really weird and cumbersome, but it has the advantage that we can now score random text more easily without having to rerun the LLM.

So it’s essentially just to make the detection easier and cheaper.


Tournament sampling mainly makes detection cheaper
Slide 41 of 52, time stamp 39:43

After generation, watermark functions score the sampled text
Slide 42 of 52, time stamp 39:48

So, for example, if we have a new text. So I’m just using the same text here, but let’s assume it’s new text. So this is after the sampling, when we are scoring. And let’s say we are discovering this text on the internet. And the text is the weather today is cold and “gray”, and we want to know if this is LLM-generated or not. So we would, or Claude/Anthropic would, have the watermarking key and these functions: G1, G2, and G3.

And it would put this text through these functions. For the one position here for “gray”, we would get 101, similar to what we got during the generation process. So this is the same as before. And this has, if we add up these bits, two bits, right? One and one here. So it has two bits of information, let’s say, for simplicity. This is just a really simple illustration.

But let’s assume we get a score of two here for the “gray” in this position. If we had a different word here, “overcast,” in this position, we would get one if we get “gloomy,” like we also have one, and “cloudy” one. So I’m just summing over each row here, right? So that’s just like a score we would get at each position. And here I’m only looking at the last position.

If I would do this at other positions, I would get a different score at different positions. So, for example, let’s assume at the first position I get a two. Here I get a two. For “today”, I get a three. For “is”, I get a two. “Cold”, two. And “gray”, three. So here I’m applying these watermarking functions as I’ve shown on the previous slide.


Average watermark bits for one generated text
Slide 43 of 52, time stamp 41:33

And I’m just adding up these numbers across the three functions. And the watermarking functions are very cheap. So you can just quickly run them on the whole text and get these scores. And then based on that, I can compute the average bits. So if I just average over all these values here, let’s say I get 2.23.


Comparison of average watermark scores for two generated texts
Slide 44 of 52, time stamp 41:55

Now, if I have slightly different text, so here I swapped “today” with “now” and “gray” with “overcast”. These now get a score of one and one. And if I average over this whole string, then I get a 1.71. And so for that, I don’t need an LLM. All I need is the watermarking key, the random seed generator, and these functions, G1, G2, and G3. And that’s all I need.

I don’t need the LLM. And I can get this score here. And what they do is apply a threshold.


A threshold classifies text as watermarked or not watermarked
Slide 45 of 52, time stamp 42:27

So, for example, I mean, they don’t use this exact threshold. But for example, we can say if the score is greater than two, then the text is watermarked. If the score is smaller than two, it’s not watermarked. So here, if the score is greater than two, it’s a yes. So yes, this is watermarked. In this case, 1.71 is not greater than two. So this text is not watermarked. Okay. So that’s just the way we can then detect whether random text on the internet is watermarked or not.

It’s essentially just applying these watermarking functions and then averaging over the scores and applying a threshold. Okay.


Reminder that tournament sampling makes detection cheaper
Slide 46 of 52, time stamp 43:13

So again, the tournament sampling is mainly to make detection easier and cheaper. We could also use something like NumPy’s random choice with a random seed or to make the sampling deterministic. But then again, it would be hard to score any text on the internet.


43:26

Watermarking Summary and Limitations

Summary of generation with and without watermarking
Slide 47 of 52, time stamp 43:30

So yeah, the summary is still the same, though. The thing that is different between no watermarking and watermarking is that we are controlling this sampling here with the watermarking key. And inside that, we have this tournament sampling. And yeah, as I mentioned before, detecting the watermarks requires the secret key and the watermarking functions G1 to Gn.


Detection requires the secret key and watermarking functions
Slide 48 of 52, time stamp 43:54

And again, removing the watermark, because I think that’s maybe interesting to some people, would ideally involve editing all the positions here. But since we don’t know which positions are watermarked and internally, they choose the positions so that they have equally likely tokens at those positions. And there might be positions where that’s not true. So here, for example, for “trees”, we might not even have an alternative word that is high scoring so they don’t watermark that position.

So they only do the watermarking at certain positions essentially. Since we don’t know which positions to kind of defeat or remove the watermark, we would...


Ideally, watermark removal edits every watermarked position
Slide 49 of 52, time stamp 44:29

...have to edit several places in the text. So what I think that means for the future of AI-generated text is that this actually...


44:34

What This Means for AI-Generated Text

In practice, watermark removal edits several guessed positions
Slide 50 of 52, time stamp 44:36

…might result in worse AI-generated text. So I think if there’s a person who likes to use AI-generated text everywhere on the internet, let’s say there’s a news website that likes to use AI-generated text to write the news, I don’t think watermarking will necessarily stop them from doing that. They will probably still want to generate AI-generated text because that’s part of their workflow. So I think my guess is that they’ll use another model.


Question about whether watermarking leads to worse AI-generated text
Slide 51 of 52, time stamp 45:08

They’ll just use a second model to edit the text to get the so-called edited AI-generated text. So it’s complicating the pipeline. Instead of getting the text directly from Claude, it’s now using Claude to generate AI-generated text, passing it through a local model, and then having edited AI-generated text, which is likely not watermarked anymore. So why a local model? I just think a local model because I think all the providers- the proprietary LLMs, not only Claude, but also Google— I mean, Google wrote this paper, right?

So I’m thinking that they are also watermarking Gemini text. And I think OpenAI is probably already doing it or will do so as well. I mean, I’m just speculating, but I’m imagining everyone will probably do something like that because there’s like an EU regulation that requires that. And that’s, according to the blog post, apparently why Claude is doing it. Yeah, so I’m thinking local models may not, at least not yet, implement this watermarking.

So I think people will just use a local model and then generate edited AI-generated text. And my guess is it will be slightly worse than the original text because for the local model, you might now be using a smaller model. So, I mean, you could also technically just use the local model directly to generate text. But in my view, editing text is simpler than generating text. So for the generation of the text, you might use a very expensive high-end, I don’t know, like the highest, most expensive Claude model for complicated text.

And then you use a cheaper local model to make these surgical edits, essentially. That’s probably what’s going to happen. And why worse? So if we look back at this graphic where we just added random positions, you might be just changing words for the sake of changing them. And then it risks making the text worse. So you might still have generated text, but it’s kind of like it’s edited awkwardly.


47:13

Final Thoughts

A local model can edit Claude output to remove the watermark
Slide 52 of 52, time stamp 47:20

But anyway, so my goal here was to explain how the watermarking works and not, let’s say, the worldwide ramifications of that. But I hope this kind of behind-the-scenes, under-the-hood look is useful. The watermarking is not as complicated as it might seem, but I think it was still 52 slides, so it was also not super trivial. So I hope you found this little lecture useful. And yeah, until next time, see you then.


PS: If you like more explainers in this style, I don’t post videos to YouTube regularly, but I have accumulated over 300 videos over the years, which you can find on my YouTube channel here.

Building an AI Text Detector From Scratch

15 August 2026 at 11:54

Substack recently launched its AI detector feature in the UI, which is super interesting.

Separately, lots of people asked me about interesting local do-it-yourself LLM projects as demos to show what small language models (SLMs) are capable of.

Putting one and one together, I thought it would be interesting to show how an AI detector can be implemented. I will also use it as a verifier to train a small language model to produce text that avoids detection. This is a small educational project for studying the limitations of AI detectors and exploring a verifier-based LLM application beyond regular reasoning models trained on math and code.

substack-ai
Figure 1: Substack now features a built-in AI detector.

So, as mentioned above, the intended goal of this tutorial is to explain how AI detectors work by building (a simple) one.

In practice, such a detector can be used to filter out spammy content, but also to potentially improve your personal writing without turning it into AI-generated text. For example, if you wrote a lengthy article and want to improve spelling and grammar, it is tempting (and actually useful) to use a grammar checker to polish it and improve readability. There are different services for that, including general-purpose LLMs like ChatGPT. However, this also runs the risk that these tools turn your writing, even though it’s still your own writing, into something that is then overpolished and now sounds like AI and gets flagged as spammy content.

For example, with an AI checker, one could say, “Fix my grammar while ensuring that my text still scores 0% AI-generated.”

Anyway, while we are building a fully functional checker here, the goal is to explain 1) how AI checkers (can) work and 2) use this as a case study for a more general topic on how to build a scorer or verifier that can be used with LLMs.

Disclaimer: AI checkers are essentially a cat-and-mouse game. AI checkers may learn to detect a certain pattern that is indicative of AI-generated content. Then, the next LLM may incidentally or deliberately not exhibit that pattern and avoid detection. The AI checker then has to be updated to detect said LLM, and so forth. Plus, it’s also likely to encounter false positives (human written text flagged as AI-generated), but more on that later.

Project goals

There are several goals of this project. The overarching goal is, of course, to illustrate how AI detectors work and show an applied end-to-end LLM project including evaluation, training, and local deployment for real-world use.

The outcome of this is an AI-detector API that can be used by humans and agents, and a user-friendly UI.

user-ui-preview
Figure 2: Preview of the local browser interface developed later in this project. It returns a whole-text AI score and can also highlight the scores for individual text chunks.

Method overview

Here, we are going to develop a method similar to Pangram models, which, as far as I know, are behind Substack AI detection feature.

I wrote a short article about AI-text detection a while back in 2023: What Are the Different Approaches for Detecting Content Generated by LLMs Such As ChatGPT? And How Do They Work and Differ?

In essence, there are different ways to detect AI-written text, from supervised classifiers and perturbation-based probability tests to perplexity measures and watermarking.

In this tutorial, we will build a model that returns a 0-100 score. It’s essentially a classifier with an estimated probability score. The probability score will denote how likely a text is AI-generated according to the classifier. (Or, to be precise the score is the classifier’s estimated probability for the AI-generated class based on its training distribution. However, we shouldn’t interpreted it as a general probability that the text was written by AI.)

For this, we are going to fine-tune a DistilBERT classifier (similar to what I described in one of my early Substack articles, Finetuning Large Language Models), but more details on that later when we get to that stage.

Read more

Controlling Reasoning Effort in LLMs

18 July 2026 at 11:16

It has been almost two years since OpenAI released o1, a model that popularized the idea of LLM-based reasoning models. DeepSeek-R1 followed about four months later, together with details of a reinforcement learning with verifiable rewards (RLVR) recipe to train such reasoning models.

Last week, OpenAI released the GPT-5.6 model family. It comes in three sizes, each with roughly five or six reasoning-effort settings.

Figure 1: The GPT 5.6 Sol model with different reasoning effort settings. (Benchmark numbers for Ultra are currently not available but should be relatively similar to Max, since it uses a similar effort level but accelerates the work with four subagents.)

So yes, reasoning models are here to stay. They have become a standard part of modern model releases.

In the past, I covered the methodology of reasoning models (Understanding Reasoning LLMs) as well as relevant research papers (The State of Reinforcement Learning for LLM Reasoning and The State of LLM Reasoning Model Inference). And I even wrote a whole new 440-page book on how to develop reasoning models, Build A Reasoning Model (From Scratch).

Figure 2: My new Build A Reasoning Model (From Scratch) book. In color!

These resources have focused on turning a conventional LLM into a reasoning model. Now, in this article, I want to focus on and explain how to develop a reasoning model that has multiple effort modes, similar to what’s shown in the figure at the beginning of this article.

No worries, this article can be read as a standalone article. However, the aforementioned resources may be interesting and useful.

1. A brief definition of reasoning models

When talking about pretty much any machine learning or AI technique or subfield, the one lesson is that we usually shouldn’t take technical terms “literally”. For example, an (artificial) neural network in machine learning and AI doesn’t literally work like a biological neural network like the human brain.

Similarly, when talking about “reasoning models”, we shouldn’t expect that these models literally reason like us humans. In the context of AI and LLM research, “reasoning model” means a model that outputs an intermediate reasoning trace, which is like an intermediate response that works through a question or task step by step.

It’s probably easiest to explain this by showing an example.

Figure 3: Illustration of a conventional LLM answer (left) and an answer by a reasoning model (right).

2. A brief overview of training and inference scaling reasoning models

There are essentially two ways to improve (reasoning) task performance: training scaling and inference scaling.

Figure 4: Training and inference-scaling are two ways to improve LLM and reasoning model problem-solving capabilities. Plot based on Learning to reason with LLMs

Let’s briefly talk about training first.

2.1 Training reasoning models

In a nutshell, DeepSeek-R1 proposed training an LLM using reinforcement learning with verifiable rewards (RLVR) to turn it into a reasoning model. RLVR is a technique to provide a reward signal (0=incorrect and 1=correct) for verifiable data domains. These verifiable data domains here are math (we can use a symbolic math checker like SymPy or WolframAlpha to check results) and code (we can use a compiler or unit tests, or integrated platforms like LeetCode) to check for correctness.

Figure 5: Illustration of accuracy and format rewards during RLVR training.

Notably, the reasoning trace itself was not used for training or updating the model. Although they tried to use this intermediate response information for training, the DeepSeek-R1 paper reported that it wasn’t helpful for the model training, so it was ultimately not used. (Whether and how to incorporate intermediate reasoning traces in the training signal via process reward models is an active area of research.)

Figure 6: The intermediate reasoning trace is ignored during RLVR; only the final answer and response format determine the reward.

2.2 “Aha” moments

Anyway, just training on the output rewards alone, as Figure 7 shows, turned out to be sufficient for the model to learn how to reason through a problem, meaning that it would learn to write intermediate explanations, backtrack, and self-correct itself. These moments when the model realizes that it made a mistake and self-corrects itself are called “Aha” moments.

Figure 7: An example of an aha moment, where a reasoning model notices an error in its intermediate reasoning and corrects it before producing the final answer.

By the way, while DeepSeek-R1 is inarguably the more popular paper, and the paper that created excitement around reinforcement learning with verifiable rewards and the development of reasoning models, there is another paper, Kimi K1.5, published on exactly the same day on arXiv (22 Jan 2025). Also, the term RLVR was already coined two months earlier in Tülu 3: Pushing Frontiers in Open Language Model Post-Training.

One reason why the DeepSeek R1 is ultimately the more popular paper is that it demonstrated that reasoning behavior can be achieved with pure reinforcement learning (RL).

Figure 8: DeepSeek-R1-Zero applies RLVR directly to the pretrained base model without supervised fine-tuning.

For instance, Tülu 3 and Kimi K1.5 applied reinforcement learning on top of a supervised fine-tuned (SFT) model. The DeepSeek-R1 model was also trained from an SFT checkpoint of the DeepSeek-V3 base model, and it included a DeepSeek-R1-Zero variant trained with pure RLVR. R1 Zero is a weaker model than R1, but it showed that RLVR is sufficient for teaching the model to generate and use reasoning traces.

​While R1-Zero was more of a proof-of-concept model, note that the full DeepSeek-R1 reasoning model training pipeline is usually multi-stage and a bit more complicated, as mentioned above.

Figure 9: More detailed reasoning model training pipeline. This one depicts the various DeepSeek-R1 models. For more details, see my other article: Understanding Reasoning LLMs

By the way, most of today’s LLMs are effectively reasoning models, meaning they have been trained in a similar fashion to DeepSeek-R1 using a form of RLVR.

2.3 Inference scaling in a nutshell

Next to improving reasoning behavior through training, another lever for improving model performance is inference compute scaling. In short, this means that we are spending more compute after training the model, during usage, to get better answers.

This is a whole topic by itself, and you could read through my The State of LLM Reasoning Model Inference for a more detailed rundown:

I will try to summarize what’s most essential to mention as background info below.

First, training a model with RLVR is already implicitly leading to a form of inference scaling, since reasoning models usually output more tokens during inference compared to conventional LLMs, and that means we are spending more compute during inference.

Second, we can further adjust this output length via reasoning effort levels, but more on that later.

​Third, there are many additional inference scaling techniques. A popular one is self-consistency, which is often implemented as a form of majority voting where the model is queried multiple times, and the final answer is selected via majority vote.

Figure 10: An example of self-consistency, a popular inference scaling technique.

This can be applied to conventional LLMs as well as reasoning models. Also, this method can be used on demand and in addition to reasoning training. A good example of that is DeepSeekMath-V2, where the researchers applied extreme inference-scaling on top of a reasoning model (specialized for math) to achieve state-of-the-art performance on challenging math olympiad-type problems.

Figure 11: Two types of inference scaling (self-consistency and self-refinement) used together to improve math performance. Figure adapted from DeepSeekMath-V2: Towards Self-Verifiable Mathematical Reasoning

But again, I will refer to my other article, The State of LLM Reasoning Model Inference for an overview of other techniques:

3. Think tokens

You may have seen the <think></think> tokens in the earlier “Aha moments” figure. I also included the corresponding figure below so you don’t have to scroll all the way up.

Figure 12: Common formatting tokens in reasoning models.

These <think> and </think> tags are cosmetic with respect to reasoning ability. They do not make the model reason, and they are not required to achieve good reasoning performance. One could train the same model without these delimiters and likely reach similar benchmark performance.

The purpose of these <think> tags or tokens is mainly to mark where the reasoning trace begins and ends so that the training pipeline or user interface can separate it from the final answer and optionally hide it from the user. (UIs like ChatGPT or Codex usually do this.)

The point here is that the <think> tokens are not giving the model the ability to “think” or reason or reason better. One could train the same models without such <think> tokens and reach similar benchmark performance.

There is also nothing special about the literal strings <think> and </think>. Another pair of delimiters could serve the same purpose.

By the way, the way this is implemented is typically by adding a formatting reward during the RLVR stage. So instead of just rewarding the model based on answer correctness, one would provide additional reward for the use of <think> tokens, which in turn encourages the model to use those.

In DeepSeek-R1, for example, the overall reward was calculated as

R_total = R_accuracy + R_format

where the format reward was a simple rule-based check that encouraged the model to place its reasoning inside:

<think>

reasoning trace

</think>.

4. Reasoning mode on and off switches

The first generation of reasoning models was dedicated reasoning models. With that, I mean that there was a DeepSeek-V3 base model and a separate DeepSeek-R1 reasoning model.

No matter what the prompt is, R1 generally outputs very verbose responses using lots of tokens, even for simple prompts. It also lacks a built-in option to turn off the reasoning mode.

Figure 13: Reasoning models are very verbose, even for the simplest prompts.

Later models, like Qwen3 and others, experimented with hybrid approaches, where the same model can behave like a regular instruction fine-tuned model or a reasoning model on demand.

Note: Some model developers call this “thinking mode,” while others call it “reasoning mode.” Both terms refer to the same behavior.

In Qwen3, this is handled via the tokenizer using enable_thinking=True or enable_thinking=False. Under the hood, setting enable_thinking=False essentially adds an empty <think></think> section to the beginning of the assistant response to turn off Qwen3’s reasoning (”thinking”) mode.

Figure 14: Response of Qwen3 0.6B reasoning model with thinking=False and thinking=True. (The empty <think></think> tags are hidden in the interface on the left as they are part of the modified input prompt, not the generated answer.)

How is this implemented during training, such that the model supports this toggle during inference time, as shown in the figure above?

In short, as explained in the Qwen3 technical report, this on/off behavior is introduced primarily through supervised fine-tuning (SFT) and then reinforced during general RL in their largest flagship models.

For instance, after the initial reasoning model is trained via long-chain-of-thought SFT and reasoning RL, they add a “Thinking Mode Fusion” stage. During this additional SFT stage, the model sees both thinking and non-thinking examples:

  • /think: <think>{reasoning}</think>{answer}

  • /no_think: <think></think>{answer}

Thinking is the default behavior, so /think can also be omitted. The subsequent general RL stage further reinforces this mode and format following.

These /think and /no_think flags are a “soft” switch. However, the enable_thinking=False setting mentioned earlier, which force-adds the empty <think></think> in the False case, acts then as a “hard” switch.

Figure 15: “Thinking Mode Fusion” in Qwen3’s training pipeline to enable the reasoning mode on and off switch.

In other words, the tokenizer does not add /no_think to the query. It directly fills in the empty <think></think> section at the beginning of the assistant response. The model only sees the resulting tokens and continues directly with the answer.

Anyway, this on-and-off toggle is essentially a simplified version of the reasoning effort levels in GPT-5.6 and others, which I cover in the next section.

5. How “reasoning effort” settings work

In this section, I want to provide a brief overview of how the different reasoning effort toggles may be implemented, which have been introduced in models like GPT 5 and are present in pretty much any flagship model today.

Concretely, at the beginning of this article, I showed a figure from the Codex GPT 5.6 interface that lets users select multiple reasoning “effort” settings.

Figure 16: GPT-5.6 exposes six reasoning effort settings, ranging from Light to Ultra.

The following subsection will illustrate how these settings may be implemented. Then, in the next section, I will go over some of the more interesting research papers related to this topic.

5.1 Reasoning effort and response length and quality

Unfortunately, the implementation details of their effort settings are not shared by OpenAI, but there is some evidence out there that can be used for educated guesses.

For instance, via their open-source gpt-oss models from last year (I wrote about them in From GPT-2 to gpt-oss: Analyzing the Architectural Advances), we know that OpenAI allows us to toggle the reasoning effort setting via the system prompt (”Reasoning effort: low/medium/high”) that is prepended to each prompt.

Figure 17: The gpt-oss chat template inserts the selected reasoning effort into the system message before sending the prompt to the same model.

As expected, the reasoning effort directly affects the response length and accuracy, as shown below.

Figure 18: Response length and quality of gpt-oss models under different reasoning efforts (annotated figure from the model card)

Presumably, their GPT 5 models, including the recent GPT 5.6 models, use a similar approach.

By the way, note how different effort settings scale the response length in the figure above. The effort level seems directly correlated to token usage, which in turn seems correlated to accuracy. It might be possible to come up with effort settings beyond the “high” one, but I assume performance would saturate at some point. This saturation can be seen more clearly for the GPT 5.6 Sol model, which also shows that increasing reasoning budgets can become uneconomical at some point.

Figure 19: Reasoning effort increases both API cost and coding-agent performance, with diminishing returns at the highest GPT-5.6 settings. Figure based on the Artificial Analysis Coding Agent Index v1.1.

Another good, very recent data point that shows the relationship between reasoning effort, token usage, and benchmark performance is this week’s new open-weight Inkling release by Thinking Machine Labs.

Figure 20: Increasing the Inkling effort level generally increases generated tokens and benchmark performance, with diminishing or uneven gains at higher effort. Figure from the Inkling announcement blog.

As discussed in this section, during inference, the reasoning effort level can simply be controlled via a system prompt. (The ChatGPT UI presumably simply maps the menu choice to a system prompt.) However, this would not work for an arbitrary model and requires certain modifications to the training pipeline, which will be discussed next.

5.2 Possible effort level implementations

While the training details are not public, neither for GPT 5.6 nor the open-source gpt-oss models, typically, the reasoning effort label is included in prompts during post-training.

There are typically two ways to implement this.

First, we can implement it as part of the RLVR process and apply a different length penalty when different system prompts are used. For example, a high length penalty when “Reasoning effort: low” and a mild or no penalty when “Reasoning effort: high”.

Second, we can fine-tune the model after RLVR to follow different effort instructions via supervised fine-tuning (SFT).

For instance, after the core RLVR stage and during SFT, the prompts in the training dataset are paired with target responses that exhibit the desired amount of reasoning. (The targets may be written by humans, generated by another model, or generated and then filtered.)

Figure 21: Illustration of effort-conditioned RLVR and SFT. (This is a possible implementation, not a confirmed description of OpenAI’s training pipeline.)

During this SFT stage, the model learns the association between the effort label and the target reasoning length directly from the training examples. An RL-based implementation would instead place the effort labels and budget-aware reward inside the RLVR stage. The two approaches could also be combined, which I suspect was done for both gpt-oss and GPT 5.6 (note that effort settings in GPT 5.6 are likely just changing the system prompt for a given user query).

5.3 Inkling case study

The just-released Inkling technical report gives a small but somewhat concrete example of effort-level training.

Figure 22: Inkling sweeps a continuous effort value between 0.2 and 0.99; higher effort generally produces longer responses and higher benchmark scores.

During large-scale RL, they did two things for each sample:

  1. Specified the desired effort level in the system message.

  2. Adjusted the cost assigned to each generated token.

Conceptually, the reward likely looked something like this:

Here, e is the requested effort level and λ(e) controls the token penalty.

  • Low effort uses a larger per-token cost, encouraging shorter reasoning traces.

  • High effort uses a smaller per-token cost, allowing the model to spend more tokens.

Then, at inference time, Inkling receives a system message such as Thinking effort level: 0.8, and adjusts its token usage accordingly. The difference between Inkling and models such as gpt-oss and GPT-5.6 is that the effort label is a continuous number between 0 and 1 instead of ordinal labels such as low, medium, and high.

This places Inkling’s effort-level conditioning primarily in the Reasoning RL stage, not only in the later SFT stage.

They do not disclose the exact reward formula, token-cost coefficients, or whether effort conditioning was also included in SFT, though.

5.4 A short note about inference scaling versus training scaling

Before moving on to the reasoning effort papers, I want to briefly connect this section back to the earlier “2.3 Inference scaling in a nutshell” section.

Earlier, I separated scaling into training compute scaling and inference-time scaling. The GPT-5.6 interface provides a nice way to illustrate the difference, as shown below.

On the left, selecting Luna, Terra, or Sol changes the model itself. As a rough analogy, this corresponds to training compute scaling. These are separate trained models. At a fixed training recipe and dataset size, a larger model requires more training compute. It also generally requires more compute per generated token.

On the right, we keep the model fixed and only change the reasoning effort. This is inference-time scaling. The model weights stay the same, but the model is allowed to spend fewer or more tokens working on the answer.

Figure 23: The model selection and reasoning effort menus correspond to two different scaling axes. Selecting Luna, Terra, or Sol changes the model, whereas changing the reasoning effort adjusts the inference-time compute for a fixed model.

One small terminology caveat is that selecting a different model from the menu is not training scaling at that moment. The training has already happened. It is better to think of the model menu as selecting among models that were produced at different training scales.

The Artificial Analysis results below show how these two axes interact in practice.

Each blue curve corresponds to one model, Luna, Terra, or Sol. Moving along a curve by increasing the reasoning effort is inference scaling. Moving from one model curve to another corresponds to model scaling, which I use here as a practical proxy for training scaling.

As expected, both approaches can improve the benchmark score, but they also increase the cost. More interestingly, the curves overlap. For instance, a smaller model at a higher reasoning effort can sometimes reach a similar score as a larger model at a lower reasoning effort.

Figure 24: Training scaling and inference scaling for the GPT-5.6 model family on the Artificial Analysis Coding Agent Index. Moving along each model curve corresponds to increasing the reasoning effort. Moving across the Luna, Terra, and Sol curves corresponds to selecting a different model.

By the way, the x-axis in this figure shows API cost rather than raw compute. The API cost is a useful practical measure, but it also depends on the provider’s pricing and the number of generated tokens. Also, the exact shape of these curves is benchmark-specific.

So, the model size and reasoning effort form two separate knobs. We can use a larger model, increase the reasoning effort, or combine both. Which combination is best depends on the desired accuracy, cost, and latency.

So far, the article should give you a pretty solid understanding of how reasoning effort modes work and how they are implemented. This is a fine point to wrap the article if you are short on time. Otherwise, if you want to look into some of the nitty-gritty details of some of the recent open-weight models, please read on!

6. Bonus: Different ways to implement reasoning efforts (in flagship open-weight LLMs)

[This section is fine to skip unless you are interested in some additional details]

Section 5 described two possible ways to train reasoning-effort controls, namely effort-conditioned supervised fine-tuning and reinforcement learning with different token costs. Originally, I wanted to cover research articles on alternative ways to implement reasoning budgets. However, reading through most of these articles, they seemed more like proofs-of-concept that may or may not work well in practice.

So, instead of covering those, I decided to pivot a bit and cover those recipes used by state-of-the-art and notable open-weight (flagship) LLMs. For these models, there is at least evidence that the methods work in practice.

This leaves six examples. DeepSeek V4, Nemotron 3 Ultra, Kimi K2.5, GLM-5, Qwen3, and Inkling. They have different levels of detail in their reporting, but each contributes a useful variation. (I exclude models whose reports only show an effort setting in the user interface without explaining how that behavior was trained.)

6.1 DeepSeek V4 trains separate effort specialists

Let’s start with the DeepSeek V4 technical report, which describes the use of three modes:

  • Non-think produces a direct response without a reasoning trace.

  • Think High is the classic approach where the model places the reasoning trace between <think> and </think> tags. This is similar to what was discussed in the DeepSeek R1 section (section 2) at the beginning of this article.

  • Think Max is the same as above but adds a special system instruction. (More on that below.)

The additional system prompt instruction for Think Max starts with “Reasoning Effort: Absolute maximum with no shortcuts permitted.”

Figure 25: Reasoning effort control overview from the DeepSeek V4 documentation

At first, this sounds like a simple prompt engineering trick, but this prompt is actually backed by a different training setup. That is, each mode uses its own context window and length penalty (unfortunately, the exact length penalty implementation is not detailed in this report). Think Max receives a longer context window and a smaller length penalty than Think High, which gives it more room to continue reasoning.

So, the system instruction selects a behavior that was created during post-training. Adding the same instruction to an arbitrary model would not have the same effect.

Figure 26: DeepSeek V4 describes the three effort modes and the larger teacher pool in separate parts of the report. The teacher pool contains more than ten domain specialists. The report does not disclose how these teachers map to Non-think, Think High, and Think Max.

Unfortunately, the public, and otherwise very detailed DeepSeek V4 report does not connect the descriptions of the reasoning mode and domain specialists in enough detail to reconstruct the exact teacher assignment.

However, the report states that the final model, which supports different reasoning effort levels, was created via on-policy distillation from said teachers.

To summarize, DeepSeek V4 develops the three reasoning specialists during post-training. Starting from the base model, it applies supervised fine-tuning followed by RLVR via GRPO. The RL configuration differs for each mode. In particular, each specialist uses its own context window and length penalty, while Think Max additionally receives a special system instruction.

Then, including domain specialists, the different reasoning mode specialists are distilled into a single checkpoint that supports all three effort modes.

6.2 Nemotron 3 Ultra combines learned modes with hard budgets

The Nemotron 3 Ultra technical report describes three settings called reasoning-off, regular, and medium-effort, analogous to DeepSeek V4 in the previous section. Medium-effort is the cheaper reasoning mode compared with regular. NVIDIA introduces this mode during SFT using examples generated by GPT-OSS-120B in its medium-effort mode, and then further optimizes it during RLVR. About 2.5% of the RLVR prompts use medium-effort (this corresponds to length-based adjustments applied to their rewards).

6.2.1 Using Nemotron reasoning budgets during inference

At inference time, all three modes are selected through the chat template.

Figure 27: Nemotron 3 Ultra reasoning settings via the chat template (examples from the official model card)

1) Regular is the default and uses enable_thinking=True, which starts the assistant response with an opening <think> tag.

2) Medium-effort uses enable_thinking=True together with medium_effort=True where the latter setting also appends {reasoning effort: efficient} to the latest user message.

By the way, to further complicate things, the regular and medium-effort modes can also be combined with a separate inference-time reasoning budget. This budget acts as an external stopping mechanism. In the released implementation, the chat client asks the model to end the reasoning trace near the chosen token limit. If the model has not emitted </think>, the client closes the reasoning block and continues generation to produce the final answer. The learned effort mode determines how the model uses its reasoning tokens, while the budget constrains how long the reasoning trace can continue. This makes it possible to pair either mode with a tighter or looser budget depending on the desired cost and accuracy.

3) Reasoning-off uses enable_thinking=False, which prefills an empty <think></think> block (similar to Qwen3 discussed in section 4) so that the model proceeds directly to the final response. Thus, these are chat-template controls rather than system prompts.

6.2.2 Reasoning budget-aware training in Nemotron

The inference controls described above are backed by two related SFT components. The first introduces medium-effort behavior using GPT-OSS-120B traces, as discussed earlier. The second prepares the model for hard reasoning budgets.

To construct this training data, the authors take regular reasoning traces, truncate them at randomly selected token budgets, and keep the original final answers. The inserted </think> token is masked from the SFT loss. As a result, the model sees examples where it has to move from an incomplete reasoning trace to the answer after the reasoning block has been closed externally.

Medium-effort training then continues during RLVR. About 2.5% of the RL prompts use the medium-effort setting across math, STEM, and coding tasks. The report notes that the mode can be calibrated through reward hyperparameters where length-based reward adjustments provide additional control over the cost-quality trade-off.

Figure 28: Nemotron 3 Ultra introduces medium effort with teacher-generated SFT data, random-budget truncation, and a small medium-effort subset during RLVR.

6.3 Kimi K2.5 alternates budgeted and unconstrained RL

The Kimi K2.5 technical report discusses a training method called Token Efficient RL for lower reasoning effort. (While there was a K3 announcement this week, the reasoning-effort methodology of K3 is not publicly disclosed, but it could be similar or related to K2.5.)

6.3.1 Kimi’s Toggle method

The report mentions that a fixed token budget can make a reasoning model overfit to short solutions. That means the model becomes more concise (i.e., faster and cheaper), but it may lose the ability to benefit from additional inference-time compute and can thus perform poorly.

Figure 29: The proposed Toggle method makes Kimi K2.5 much more token-efficient while keeping the overall benchmark performance similar. Annotated figure from https://arxiv.org/abs/2602.02276

Kimi K2.5’s method, called Toggle, alternates between two RL phases every fixed number of training iterations:

1. In the budgeted phase, correct solutions are encouraged to stay within a problem-specific token budget.

2. In the unconstrained phase, the usual maximum generation length is restored so that the model can still learn from longer solutions.

For each problem, the budget is estimated from a selected percentile of response lengths among correct rollouts in RLVR. The budget constraint is then only activated once the mean accuracy on that problem exceeds a threshold. This avoids forcing the model to shorten its reasoning before it can solve the problem reliably.

Figure 30: Overview of the two phases of the Toggle method.

The report evaluates Toggle on K2 Thinking and finds that it reduces generated tokens by about 25 to 30% with little change in benchmark performance. The same behavior also transfers from math and coding RL tasks to GPQA and MMLU-Pro.

Toggle supplies a concrete flagship-model recipe for training a more token-efficient reasoning policy while preserving its ability to scale at test time.

6.3.2 What Toggle changes at inference

Toggle operates entirely during RL training. Both alternating phases update the same policy (i.e., LLM), and the final (unified) checkpoint has no budgeted-versus-unconstrained selector. At inference, the resulting model then runs in thinking mode by default.

Interestingly, though, Kimi K2.5 itself exposes a separate binary choice between thinking and instant modes in some APIs I checked (like vLLM or SGLang). Thinking mode is enabled by default. Instant mode disables the reasoning trace through thinking: {”type”: “disabled”} in the official API or chat_template_kwargs={”thinking”: False} when serving the model through vLLM or SGLang. However, these settings are separate from Toggle.

Also, the official Kimi report does not provide a separate training recipe for instant mode. However, K2.5’s SFT data were generated using both the earlier K2 model, which produces direct responses without long reasoning, and K2 Thinking, which produces extended reasoning traces. This likely exposes the unified checkpoint to both response formats similar to what’s done in Nemotron 3 above. At inference time, the chat template selects between them by prefilling either an open <think> tag for thinking mode or an empty <think></think> block for instant mode. But again, unfortunately, the report does not disclose the exact data mixture or whether additional mode-specific RL was used.

The newer Kimi K3 provides a more direct inference-time effort interface. The current Kimi Code documentation lists three settings called low, high, and max, with max as the default. These are passed through the reasoning_effort parameter. However, Moonshot has not yet explained how the three effort levels were created during training. Its launch post says that these details will appear in a future K3 technical report, so I’ll stay tuned for that.

6.3.3 Kimi K3 (Update)

Based on the new Kimi K3 technical report (released after I published this article), Kimi K3 has three reasoning modes: low-, high-, and max-effort.

For each training problem, the researchers first estimate an initial token budget. On a simple verifiable task, a correct response would normally receive a reward of +1 and an incorrect response 0. But here, if the response exceeds the selected token budget, its reward is instead set to -1. This gives the model a strong incentive to stay within the budget. (The exact reward setup is different for non-verifiable and agentic tasks, and Kimi also uses learned reward models and pairwise comparisons.)

To have Kimi K3 support the three reasoning effort modes, the training looked as follows. First, the researchers start by training a max-effort version (“specialist”) with a relatively generous budget. They then lower the budget to train high- and low-effort versions.

This process is repeated for three domains: general tasks, general agents, and coding agents. And each domain gets one specialist for each effort level. So, for example, one specialist learns low-effort coding behavior, while another learns max-effort agent behavior. This gives nine specialist models in total.

The behaviors of these nine specialist models are then combined into a single Kimi K3 model using multi-teacher on-policy distillation. At inference time, a natural-language thinking-effort instruction in the prompt can then be used to tell the model which effort level to use.

6.4 GLM-5 introduces turn-level and interleaved thinking through SFT

The GLM-5 technical report extends the binary on/off thinking switch introduced with GLM-4.5 to multi-turn and tool-using scenarios. It describes three related behaviors (rather than three effort levels):

  • Interleaved thinking: this inserts a reasoning block before each response and tool call.

  • Preserved thinking: here, the chat retains earlier reasoning blocks across turns so that the model can reuse them later.

  • Turn-level thinking: this enables or disables reasoning separately for each request in a conversation.

At inference time, turn-level thinking is the actual on-off switch. In the Z.ai API, thinking is enabled by default and can be disabled for an individual request with thinking: {”type”: “disabled”}. The hosted implementation is not disclosed but the open GLM-5 chat template shows the equivalent mechanism when self-hosting with Transformers, vLLM, or SGLang.

It starts the assistant response with <|assistant|><think> when thinking is enabled and <|assistant|></think> when it is disabled. The latter closes the reasoning block immediately, so generation proceeds directly to the final answer.

The report says that these behaviors are introduced during multi-task SFT together with an updated chat template.

After SFT, GLM-5 goes through reasoning RL, agentic RL, and general RL. And a final on-policy distillation step uses checkpoints from the preceding stages as teachers. This helps the final model recover capabilities that may have weakened during the sequential RL stages.

Figure 31: GLM-5 training pipeline.

6.5 Qwen3 uses mode fusion and inference-time truncation

Qwen3 was already covered in Section 4, so I will only summarize the parts that matter for this comparison. According to the Qwen3 technical report, its post-training pipeline has four stages. These are long-chain-of-thought SFT, reasoning RL, Thinking Mode Fusion, and general RL.

Thinking Mode Fusion is the key stage for the effort on-off switch. Here the model is trained via SFT on a mixture of thinking and non-thinking examples. The /think examples contain a reasoning trace, while /no_think examples begin with an empty <think></think> block that is accompanied by a short answer. The following general RL stage reinforces instruction and format following for both behaviors.
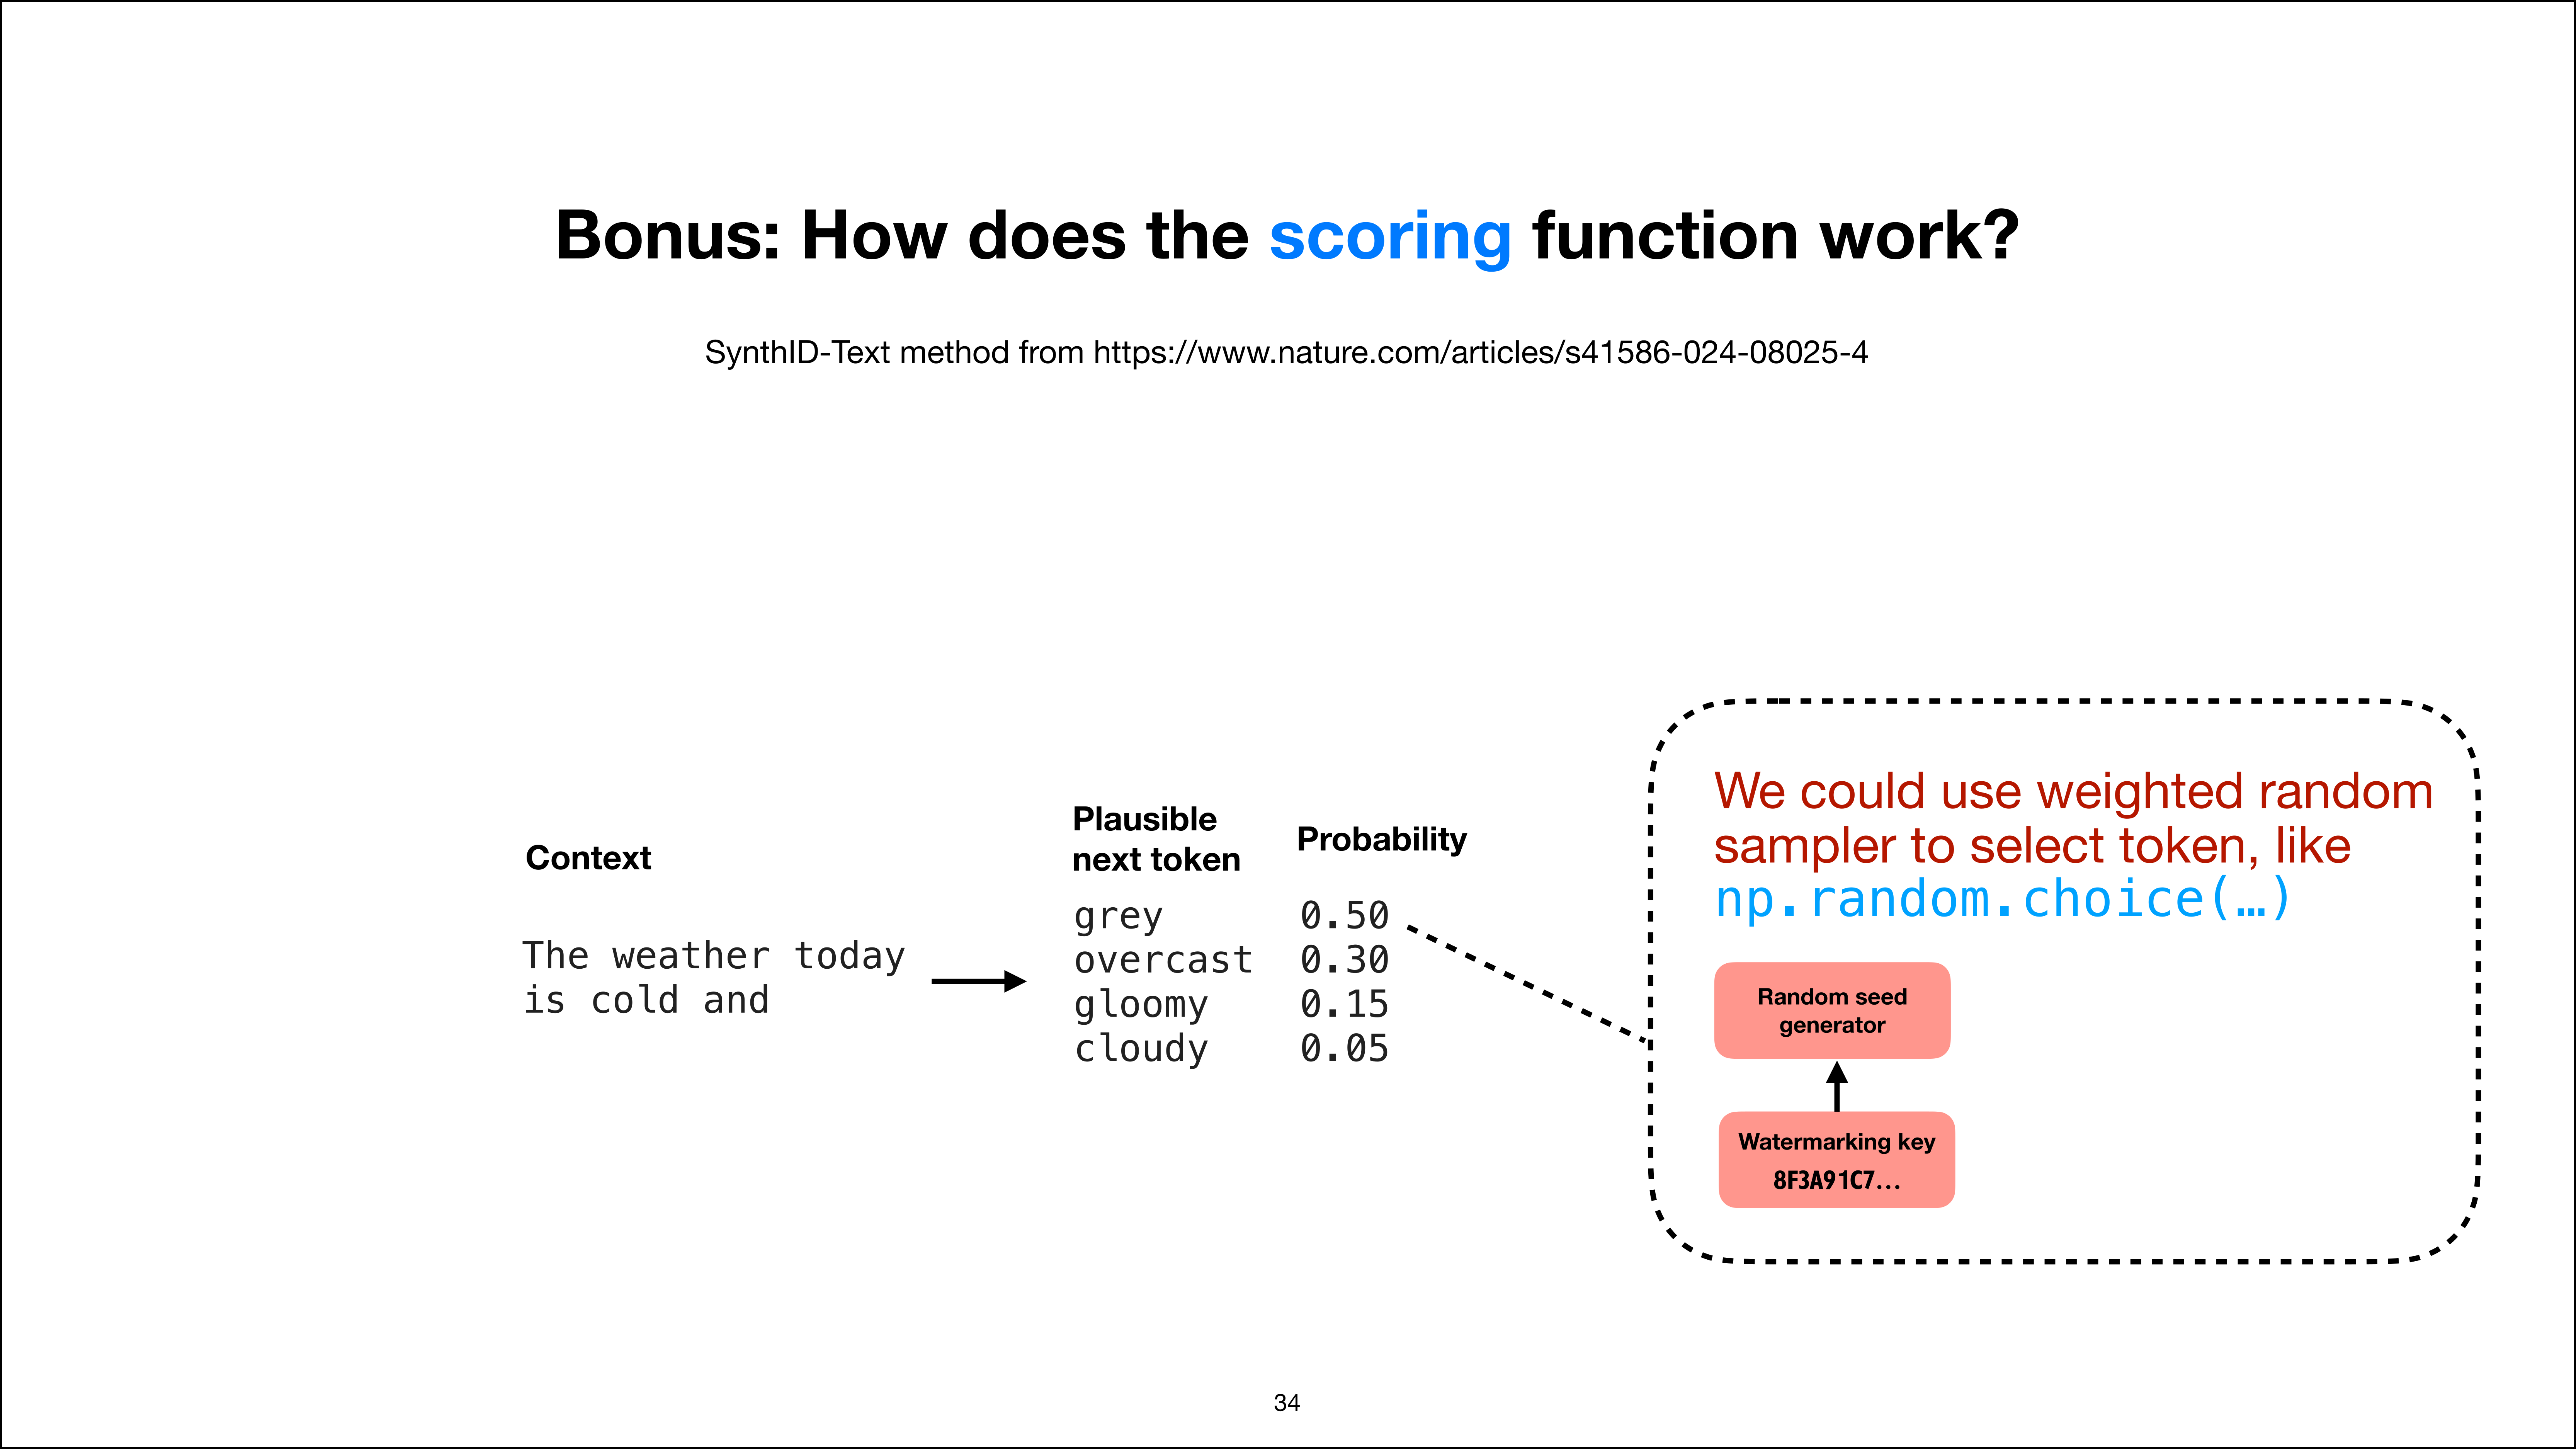
Qwen3 also supports a hard thinking budget. At the requested threshold, the reasoning span is stopped and a stop-thinking instruction is inserted before the model continues with its final answer. The report says that this partial-reasoning behavior was not trained explicitly. It emerged after Thinking Mode Fusion.

This gives Qwen3 a learned on-off switch plus an inference-time budget. It is similar but simpler than the DeepSeek V4 and Nemotron recipes.

6.6 Inkling conditions RL on a continuous effort value

Inkling was already discussed in Section 5.3. The short version is that its technical report mentions that they use continuous effort conditioning (values between 0.0 and 1.0) rather than fixed effort labels.

After a relatively small initial SFT stage, most of Inkling’s post-training comes from asynchronous RL with more than 30 million rollouts. The desired effort is included in the system message, and the token length penalty is adjusted according to that value during RL. As previously discussed, a higher token cost encourages a shorter response. A lower token cost gives the model more room to reason.

6.7 Overview of the known recipes

The table below summarizes what is actually documented in the six technical reports.

Figure 32: Comparison of the disclosed training mechanisms and inference controls for six open-weight models with reasoning-effort settings.

So, looking at the six different open-weight models, they have a shared framework. First, they introduce effort mode control through SFT and the chat template. Qwen3 explicitly mixes thinking and non-thinking examples, while GLM-5 adds interleaved, preserved, and turn-level thinking patterns.

The second shared component is a mode-conditioned RL stage, where context windows and length penalties change with the requested effort. DeepSeek V4, Nemotron 3 Ultra, and Inkling use this approach.

A third ingredient improves robustness under explicit budgets. Nemotron trains on randomly truncated traces, Qwen3 can continue from a forcibly stopped reasoning span, and Kimi alternates budgeted with unconstrained RL. These methods help preserve answer quality when the available reasoning length changes and is even cut short.

7. Conclusion

The open-weight examples in this article implement reasoning effort through several different mechanisms. Similar labels can be backed by separate specialists, mixed SFT data, mode-conditioned rewards, hard token budgets, or combinations of these methods.

It is difficult to say which approach is best. The models differ in their base checkpoints, training data, post-training compute, benchmarks, and serving goals. Their reports also omit many details needed for a controlled comparison. (Also, there may not be a one-size-fits-all, and a method that works well for an interactive assistant may be a poor fit for a long-running coding agent.)

The holy grail is of course automatic effort selection. We saw this a while back with GPT 5’s Auto mode. It’s a tricky problem to solve, and in the end, the implementation was probably more miss than hit, which is why it got removed from the UI (at least, I can’t find it anymore).

In the near future, I think reasoning effort will remain an explicit model input, which will most often be delivered through the system prompt. However agent wrapper/harness around the LLM, or an internal router may increasingly infer the appropriate mode and budget from the task state and available resources automatically (while of course still allowing a user override).

I still hope that effort selection will become more automatic. Similar to GPT 5’s auto mode, a cheap model or router could choose the mode from the request, tool state, and remaining time or token budget while still allowing a user override. The override is useful if you want to optimize for latency or cost, or maximum performance.

I realize that this was a long article, and it was perhaps not the flashiest topic. But I thought that given all the talk about LLMs, reasoning models, and agents, a look at reasoning models was something not covered before, and I hope it was a unique and somewhat useful overview!

Further resources

If you want a hands-on implementation of the core training methods behind reasoning models, my Build a Reasoning Model (From Scratch) book walks through reinforcement learning with verifiable rewards and inference-time scaling step by step, with code.

This article focused on how a trained reasoning model can support different effort modes. The book takes a step back and shows how to turn a conventional LLM into a reasoning model in the first place. It is a sequel to Build a Large Language Model (From Scratch) and starts where that book leaves off.

The print edition has now started shipping

Build a Reasoning Model (From Scratch) [Manning] [Amazon]

If you liked my previous Build a Large Language Model (From Scratch) book, this is essentially a sequel implementing inference-time scaling techniques and reinforcement learning algorithms from scratch.

And if you want to support future long-form articles like this one, consider becoming a paid subscriber. It helps me keep writing these independent deep dives and sharing the accompanying code, figures, and experiments.

Using Local Coding Agents

27 June 2026 at 11:21

Many people reached out to me in the past asking about my local agent stack as well as how I set up my local agent stack.

So, I thought it might be useful to put together a little tutorial on how to set up a local (coding) agent using open-source tools and open-weight LLMs.

Figure 1
Figure 1: Overview of the local stack, that is, a coding agent harness that uses a local model hosted through an inference engine / runtime server.

This article is a tutorial on setting up a production-ready coding agent with a fully local stack. We will use a locally served LLM together with a local coding harness that can read files, make edits, run commands, and verify changes as shown in the figure above.

Here, we can think of the LLM as the engine that provides the reasoning and code generation. And the surrounding harness provides the operating environment that allows the LLM to do meaningful coding work in our local projects.

Why local? For many coding workflows, a local setup is an interesting alternative to proprietary services such as GPT in Codex or Opus in Claude Code. The local setup is transparent, inspectable, and free to run apart from hardware and electricity costs. It also stays fully under your control, and you can modify the coding harness in any way you like. Plus, it’s a lot of fun!

By the way, in case you want a bit more background information on coding agent harnesses, I covered the core components of coding agents (and building a coding agent from scratch for learning purposes) here:

1. Intro

I have to admit that I still primarily alternate between Codex and Claude Code as my daily drivers, for now (and just to keep up with the new tooling and functions that are constantly being added). Also, the plan limits (especially for Codex) are still so generous that I haven’t had to worry about costs so far.

However, I’ve been using local solutions for a while, too, to test things and because it somehow gives me joy to have and use a fully local setup (versus proprietary services).

Either way, local solutions become more and more attractive each day. One aspect is the costs. If you have the hardware, they are practically free to run. And then there’s, of course, the privacy angle. For example, for organizing and processing my receipts, I’d be more comfortable with a local model ingesting them rather than sending the data over to OpenAI or Anthropic.

(Then, if we keep in mind that Anthropic was recently throttling their flagship model’s performance for LLM research, proprietary services may become more restrictive over time, and it’s maybe a good idea to be comfortable with open-weight alternatives as a backup.)

And there are many, many additional reasons and use cases like that.

Your motivations for using local LLMs and coding harnesses may include:

  • Predictable, fixed costs if you reach your subscription plan limits, and immunity to API price changes.

  • Reproducibility; sometimes it’s nice if a model is upgraded (e.g., GPT 5.4 -> GPT 5.5 -> GPT 5.6) and it solves all your queries more reliably. However, this can also break existing workflows.

  • Offline use in the classic airplane flight scenario with slow or no internet, or when going on a coding/writing retreat in the cabin in the woods w/o a Starlink subscription.

And there are probably several others.
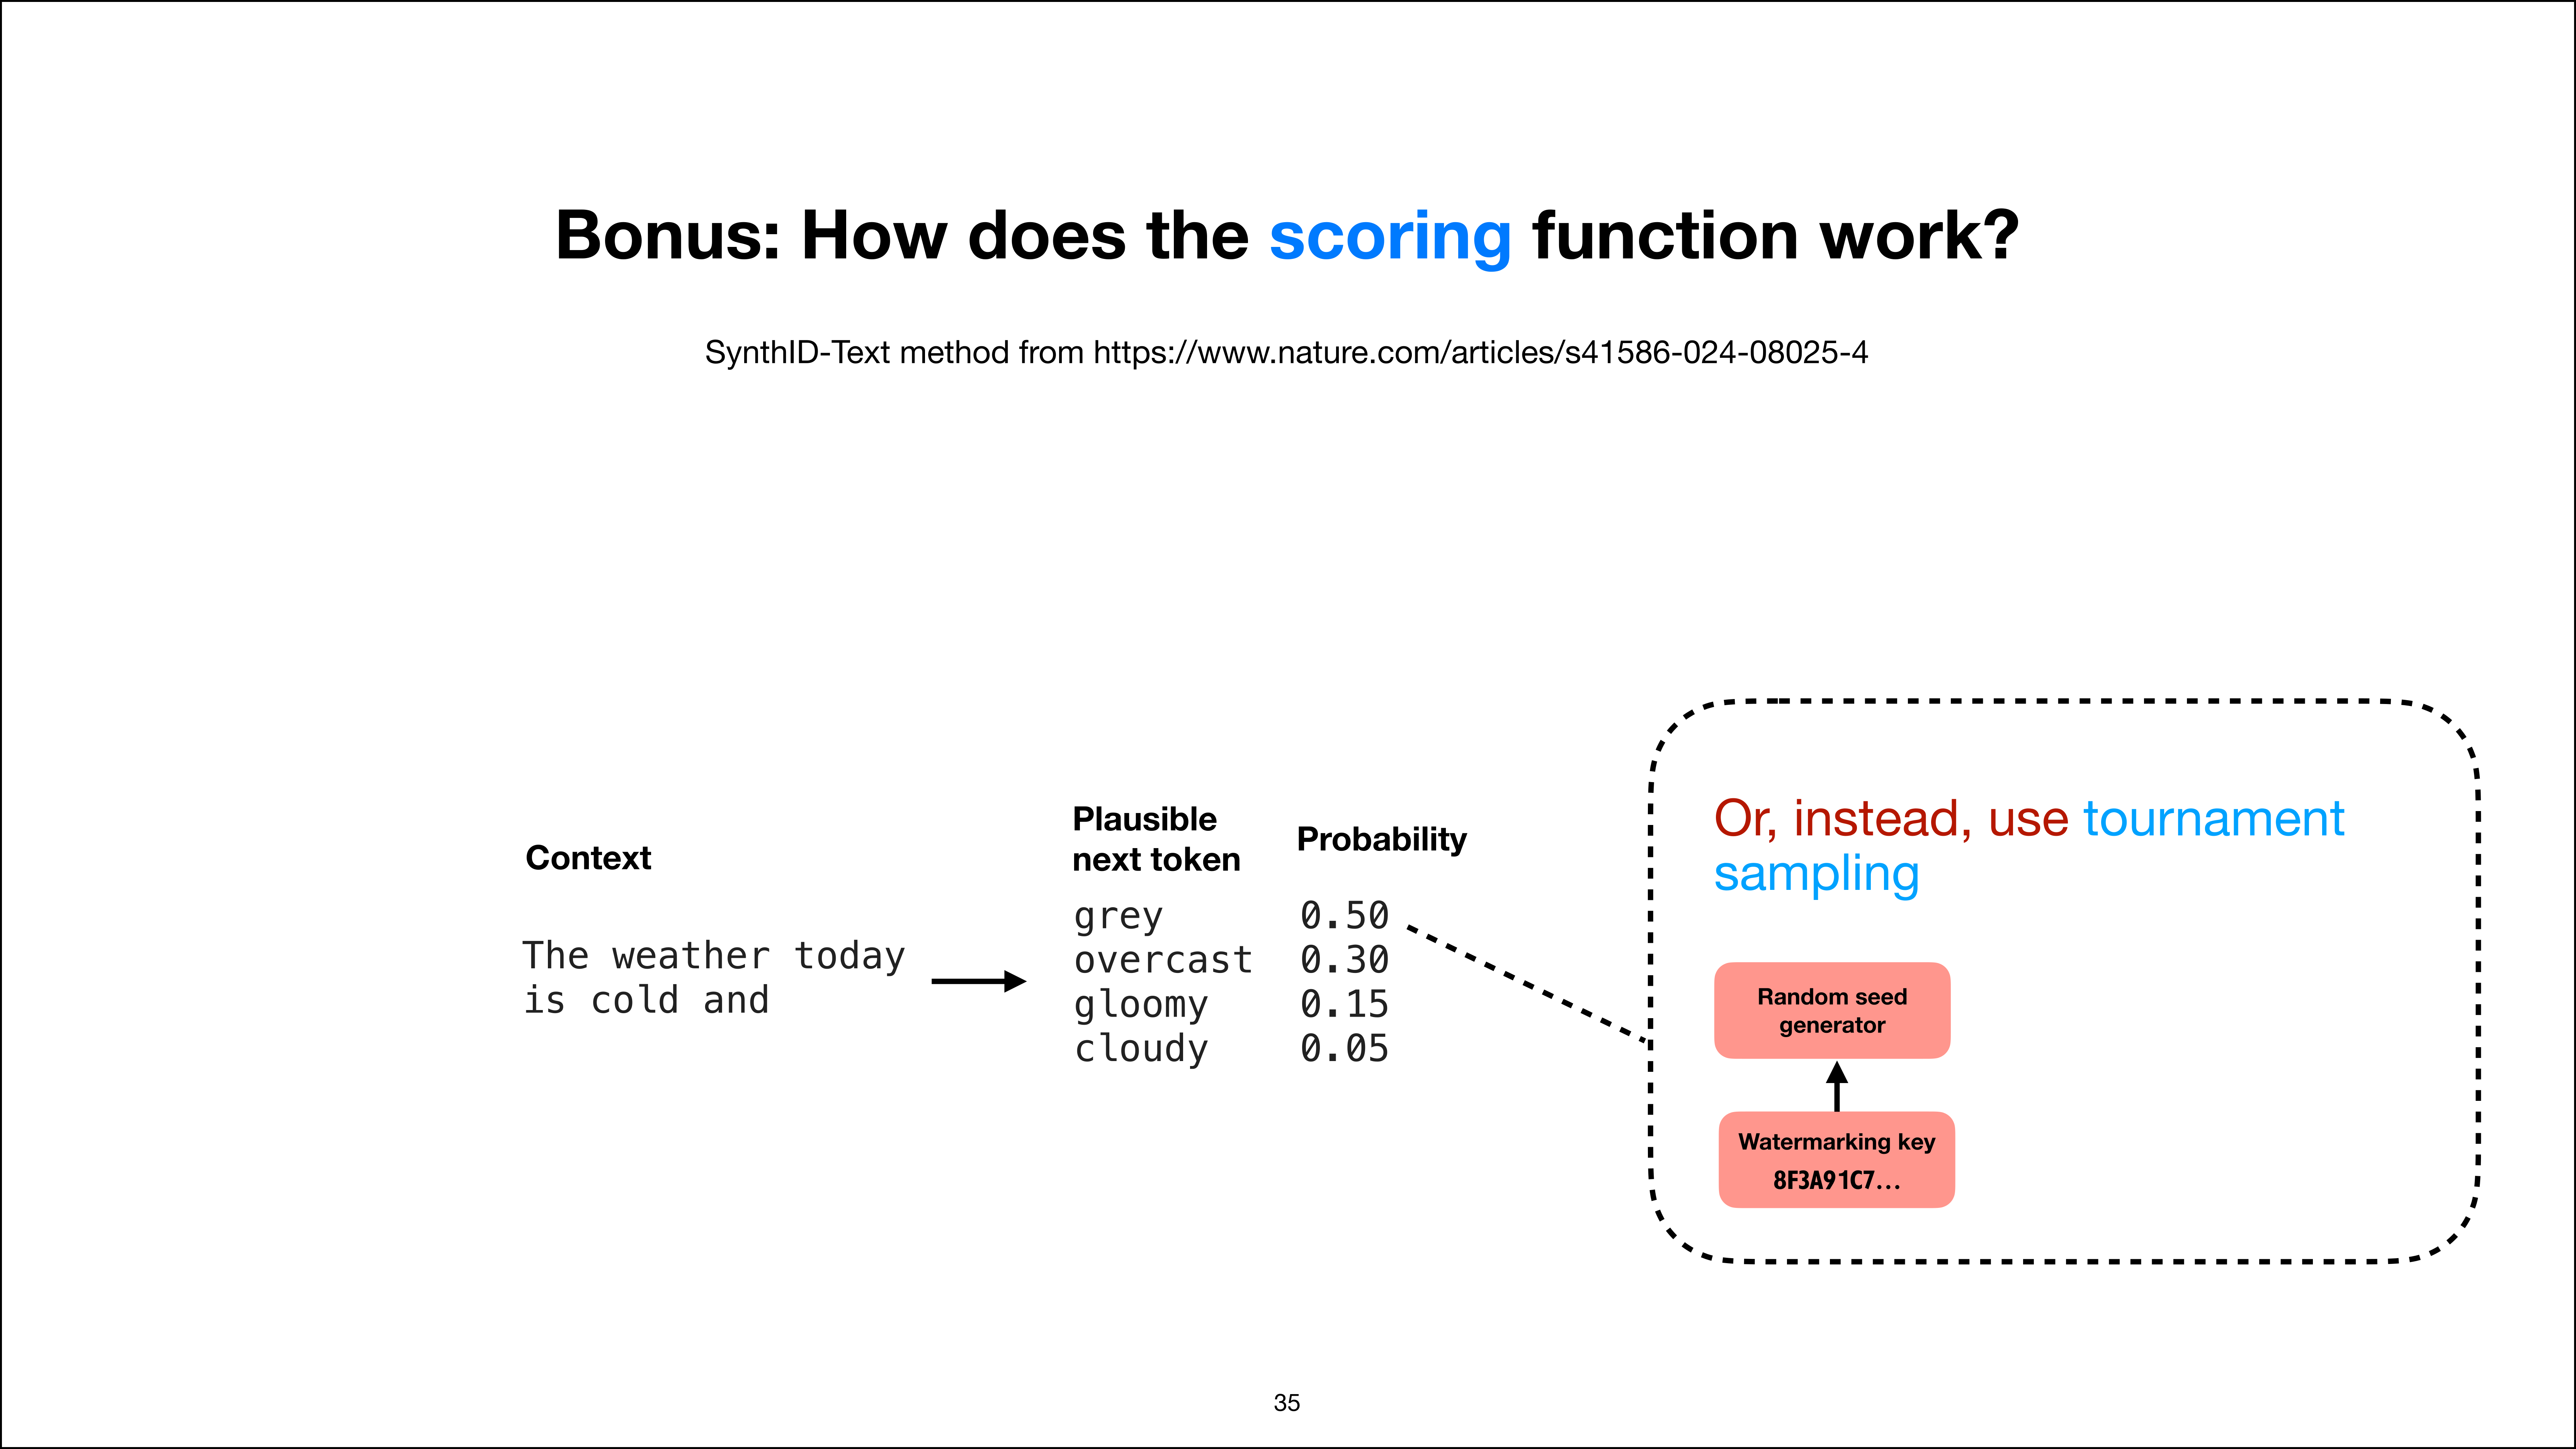
So, in this article, we will set up and use popular harnesses like Codex and Claude Code with open-weight models and investigate whether using a model-specific harness (like Qwen-Code for Qwen3.6) brings any additional benefits. (Of course, there are many more harnesses like OpenCode, Cline, Pi, and Noumena Code, but I thought that most people already have muscle memory with either Codex or Claude Code, which makes switching to open-weight models a bit smoother).
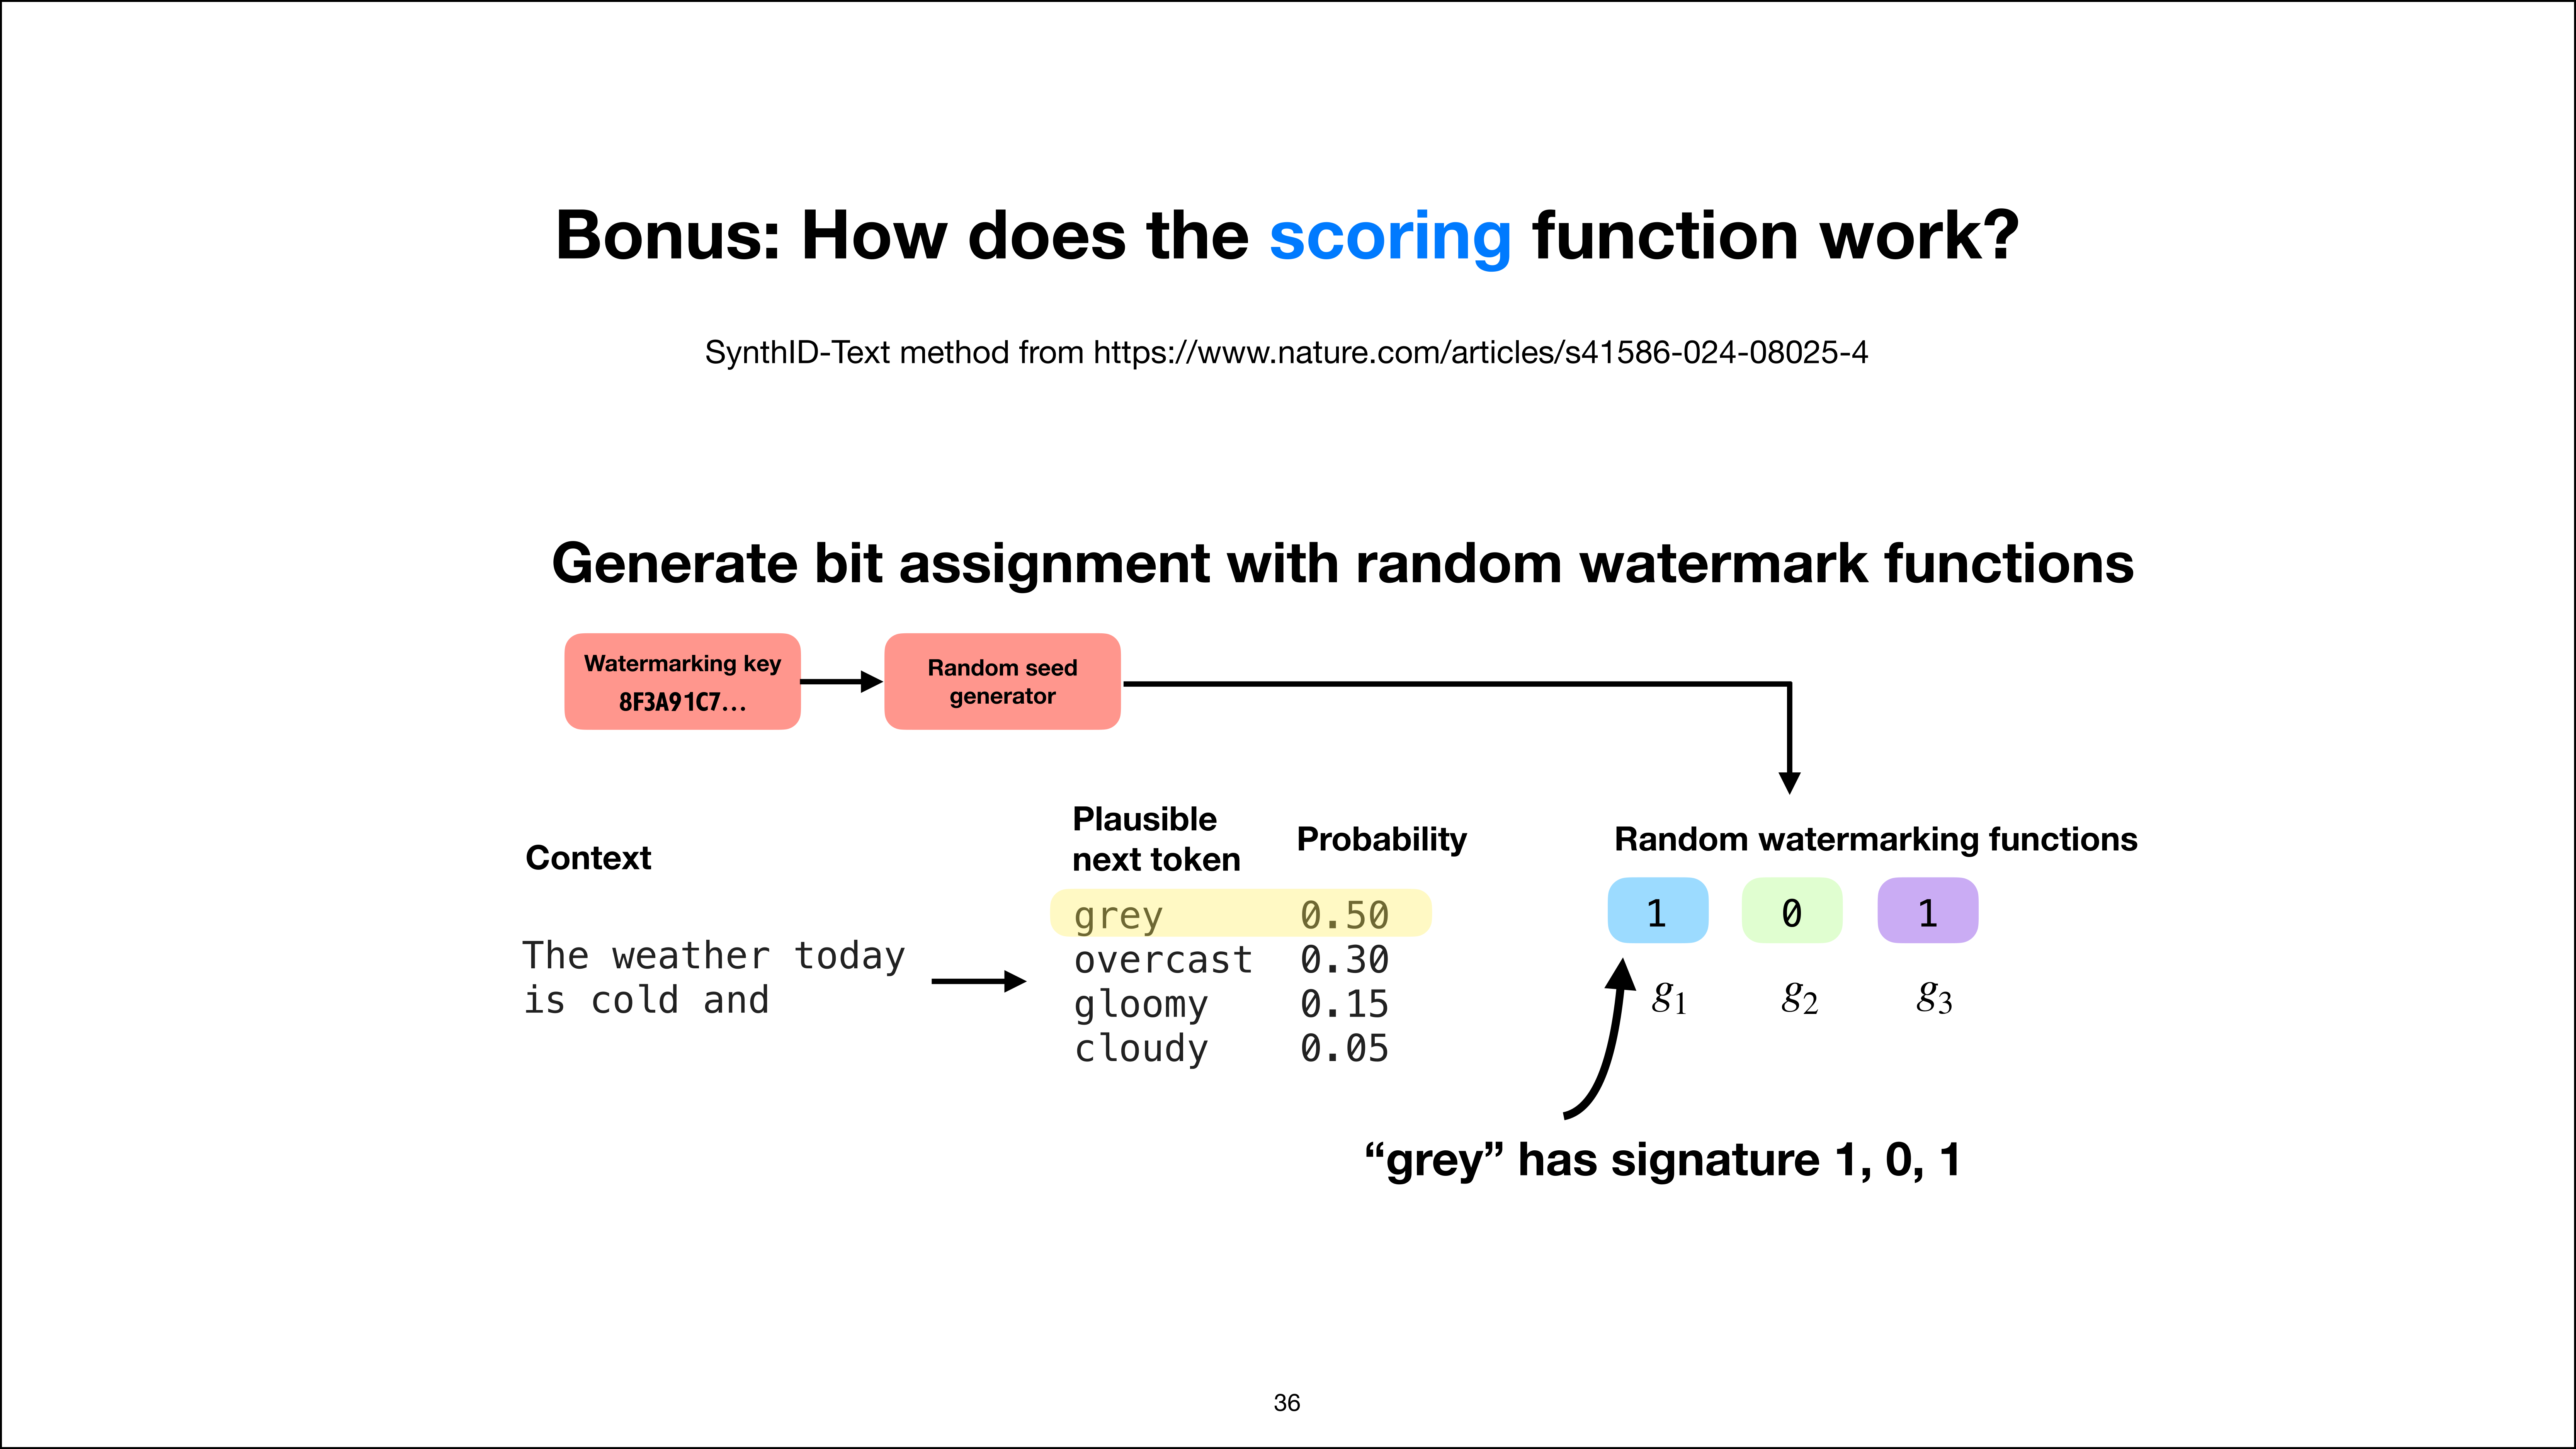
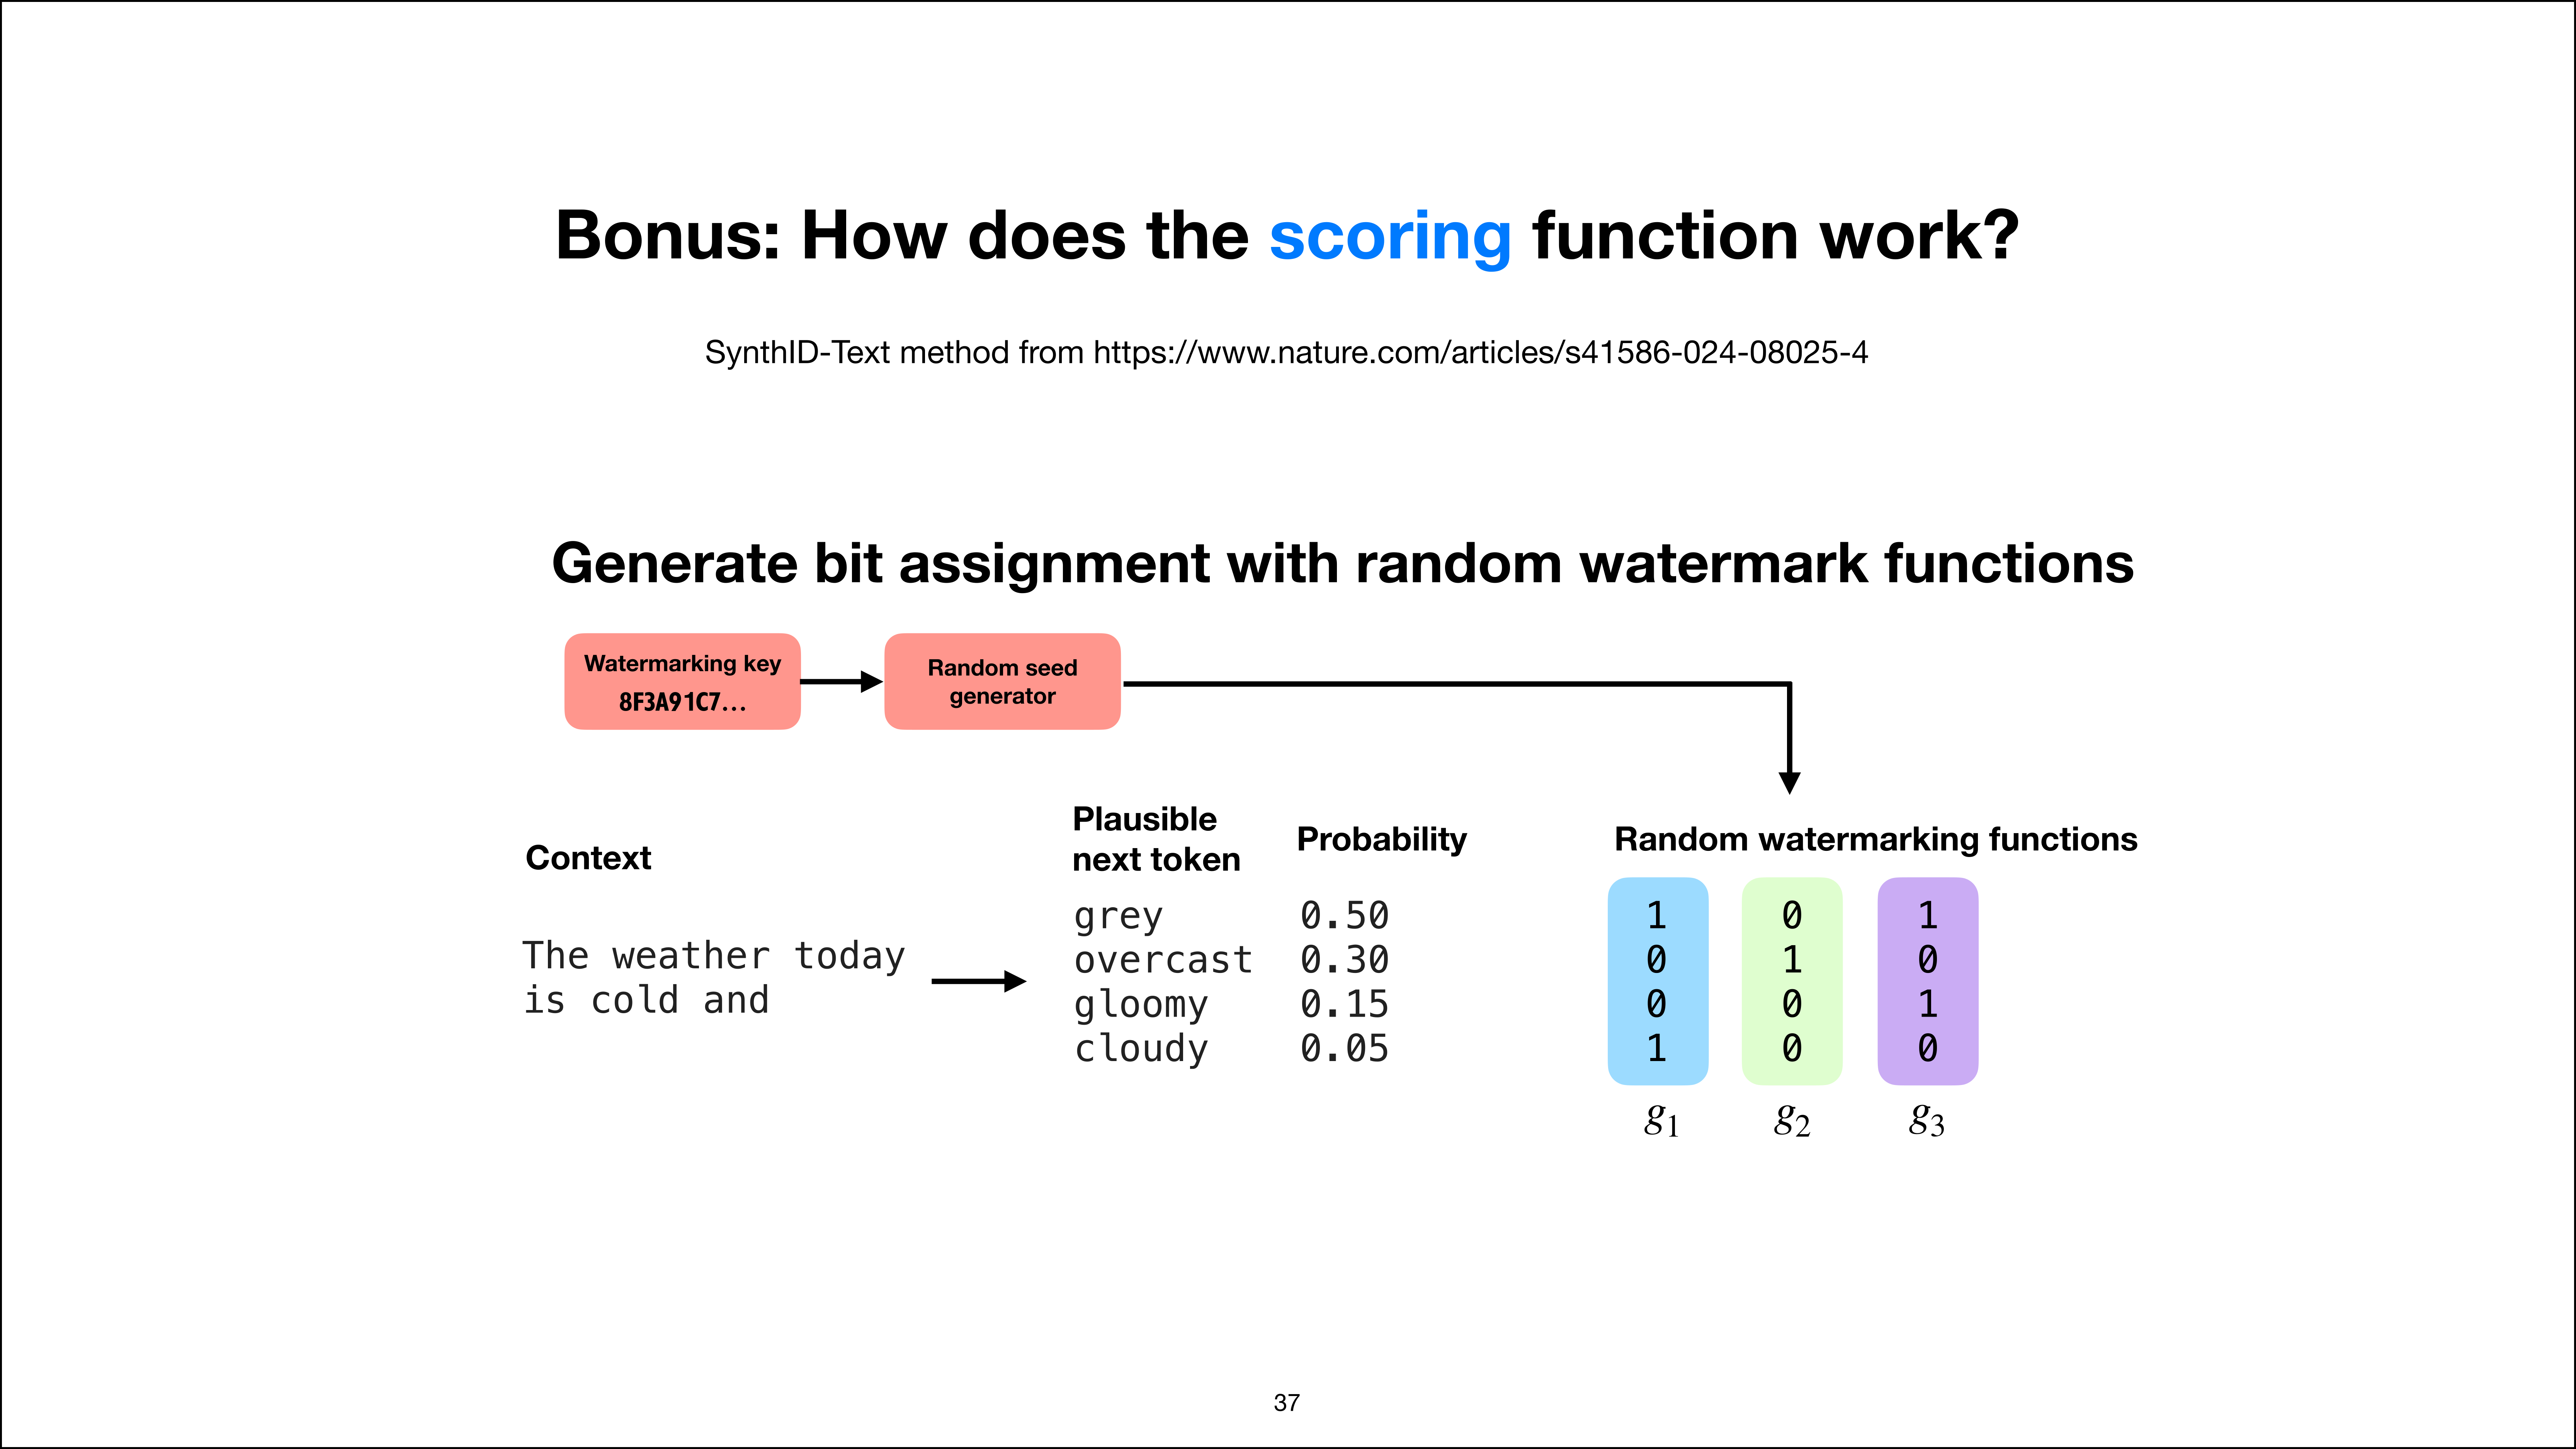
2. Coding Agent Harness Overview

Most coding agent harnesses follow similar principles and have more or less the same features and functionality. However, the implementation details may differ, and certain LLMs have usually been primarily optimized for a specific harness. Of course, many open-weight LLMs like GLM 5.2, for example, would run Claude Code, etc.

However, if an LLM developer also develops a coding harness, it is somewhat safe to assume that their model is optimized for their own harness first (while also supporting others).

Here, I am primarily going to use Qwen3.6 with the Qwen-Coder coding client. However, I will also go over other options for using a local LLM with other agent harnesses, for example, Claude Code, Codex, and the increasingly popular Cline, but more on that later.

The reason why I am primarily using Qwen-Code when working with Qwen models is that:

  1. it is open-source, like Codex (https://github.com/openai/codex) but unlike Claude Code;

  2. Qwen models have been specifically optimized for the Qwen-Code harness (more information below);

  3. I can run both Codex (with the latest GPT model) and Qwen-Code with a local Qwen model side by side on the same machine without having to switch manually back and forth between models.

Regarding the second point in the list above, that Qwen models work better in Qwen-Code, Nvidia’s Polar: Agentic RL on Any Harness at Scale paper (May 2026) has a benchmark showing that the Qwen3.5-4B base model has the best coding performance in said Qwen-Code harness (both before and after their Polar-RL training), which I included below.

Figure 2
Figure 2: Qwen model performance in different coding harnesses via Polar: Agentic RL on Any Harness at Scale (https://arxiv.org/abs/2605.24220)

The benchmark in the table above is for an older Qwen3.5 model, and I am assuming that the latest Qwen3.6 models are even further optimized to do well in Qwen-Code specifically.

However, Pi (https://github.com/earendil-works/pi) also seems to be a very interesting candidate that I need to play around with in the future.

By the way, Qwen3.6 35B-A3B is about 22 GB to download, requires roughly 30-40 GB of RAM, and runs pretty swiftly on both a Mac Mini with M4 and a DGX Spark.

Based on the recent benchmarks shared by Cohere earlier in June, it is currently the best local model in its size class.

Figure 3
Figure 3: Cohere benchmark from North Mini Code report published in June (https://huggingface.co/blog/CohereLabs/introducing-north-mini-code)

As seen above, Qwen3.6 35B-A3B dominates all but one benchmark in this size class. However, that being said, Qwen Code is a general harness and also supports other types of models. For instance, we could also connect North Mini Code or Gemma 4 in Qwen Code.

Figure 4
Figure 4: Yes, Qwen3.6 35B-A3B is a really good model! (Via x.com/pupposandro/status/2064707907489272147/)

Architecture-wise, the Qwen3.6 35B-A3B model has hybrid attention similar to Qwen3-Coder and Qwen3.5. I wrote more about it in Beyond Standard LLMs.

Figure 5
Figure 5: Qwen3.6 architecture and fact sheet from my LLM gallery.

Alternatively, if you don’t want to use Qwen3.6, Cohere’s North Mini Code is probably the most interesting, capable alternative at this size class right now. I will go over this model in the next local LLM setup section as well.

Figure 6
Figure 6: North Mini Code architecture and fact sheet from my LLM gallery.

3. Local LLM Setup

No matter what agent harness we use (Qwen-Code, Codex, or Claude Code), we have to set up a local LLM, such as Qwen3.6 35B-A3B, first.

There are several options like Ollama, LM Studio, vLLM, SGLang, MLX, etc to serve models locally. You know from my Build A Large Language Model (From Scratch) and Build A Reasoning Model (From Scratch) projects that I like to code these myself. Implementing a model from scratch has the benefits that we understand the whole stack, plus we can modify and further train and fine-tune it.

However, here, we just look for a model serving framework that has been super optimized for inference speed and resource needs since we don’t plan to do any training or fine-tuning at this point. (We could, as an extra step, convert and import our own from-scratch fine-tuned model into these efficient serving stacks, but this is out of the scope for this article.)

For this tutorial, we will use Ollama as our efficient model serving engine because it’s relatively easy to install and use from the command line across different operating systems (although LM Studio also added a non-GUI llmster client, but I am less familiar with it).

By the way, I am not affiliated with any of the tools mentioned in this article, but one nice thing about Ollama is that they also optionally support open-weight models hosted in the cloud, including the currently strongest open-weight model, GLM 5.2, which is too large to run locally on consumer hardware. (The cloud models are not free, of course, but have similar subscription plans as ChatGPT and Claude; it’s still nice though that this option exists to conveniently test the latest state-of-the-art open-weight models “locally.”)

Anyways, setting up Ollama is pretty straightforward, and you can find the official macOS/Linux/Windows download instructions on their download page.

After installing, I recommend downloading a model for a quick test run. For instance, on macOS, we can use the ollama app to download models directly via the GUI:

Figure 7
Figure 7: Using the Ollama app to find and download models

Otherwise, this can be done on the command line as well via

ollama pull qwen3.6:35b-mlx

By the way, the above-mentioned qwen3.6:35b-mlx is a model using Apple’s Metal performance shaders, i.e., optimized for Macs with Apple silicon chips. I highly recommend using *-mlx versions of models working on Macs (if available).

Figure 8
Figure 8: Prefer the MLX version when using a Mac (with an Apple Silicon chip).

On a Linux machine, use the non-MLX version:

ollama pull qwen3.6:35b

Then, to make sure that it works, you can either use the GUI again or launch Ollama from the command line.

Figure 9
Figure 9: Running Ollama in the terminal.

You can exit this session via the /bye command.

As mentioned before, the currently best alternative to this Qwen3.6 35B-A3B model is North Mini Code 1.0 of similar size.

Figure 10
Figure 10: North Mini Code 1.0 as an alternative to Qwen3.6 35B A3B.

4. Simple Speed Performance Assessment

Before deciding on whether to use an LLM as a local coding agent, it’s usually not a bad idea to run a quick speed and quality assessment. Here, for the speed assessment, I would look for tokens/sec performance. Additionally, I’d also make sure this stays stable for (very) long contexts, which is what we are usually dealing with during agentic coding workflows (as opposed to simpler chatbots).

Of course, we also don’t want the memory cost to explode either.

You could run my ollama_speed_memory_bench.py script to do a quick check. In a nutshell, it sends different prompts (ranging from 1k to 50k words) to an Ollama model and asks it to generate up to 8k tokens by default. It reports simple statistics like prefill speed from Ollama’s prompt evaluation metrics, generation speed from output-token timing, and memory use from the Ollama process plus NVIDIA GPU memory when available.

For example, to evaluate the qwen3.6:35b-mlx on macOS, if you downloaded or cloned the scripts from https://github.com/rasbt/local-coding-agent-evals, we can run the following, which takes about 5 minutes:

uv run speed-memory-benchmark/ollama_speed_memory_bench.py --model qwen3.6:35b-mlx

On Linux, we can run:

uv run speed-memory-benchmark/ollama_speed_memory_bench.py --model qwen3.6:35b

Note that this assumes that you already downloaded the respective model as explained in the previous section. Also, depending on your system, if you have less than 30 GB RAM, you may have to use a smaller model like gemma4:e2b, which uses up to about 8 GB RAM on long contexts. Of course, there are also many smaller models, but in my experience, they make pretty bad local coding agents.)

Note that for models, the RSS RAM report is not super accurate on macOS (especially for mlx model variants that utilize the Metal backend), and I suggest keeping an eye on the activity monitor’s RAM usage for Ollama during the run as well. In this case, the RAM usage fluctuated between 20 - 29 GB.

Anyways, the bottom line is that for 50k contexts, the Qwen3.6 and North Mini Code models use up to 30 GB RAM and generate output with about 40 tok/sec on a recent Mac Mini and 30 tok/sec on a DGX.

Below is a visual summary of the different runs.

Figure 11
Figure 11: Quick speed comparison of the different models on different systems. Note that the macOS RAM consumption is not super accurate there. Also, note that the Qwen 35B-A3B model is faster on Mac than on the DGX Spark (which is the other way around for the Gemma 4 E2B model) thanks to the optimized MLX version. Code to reproduce: https://github.com/rasbt/local-coding-agent-evals

Another interesting question is how Qwen 35B-A3B compares to the similarly-sized Cohere North Mini model? If we take similarly quantized models into account (above, I was using the Qwen3.6 default), they are pretty similar, although North Mini is perhaps slightly ahead overall, as shown below.

Figure 12
Figure 12: Q4-quantized Qwen3.6 35B vs North Mini Code. Code to reproduce: https://github.com/rasbt/local-coding-agent-evals

Anyway, the bottom line is that, in my opinion, anything faster than 20-30 tok/sec is pretty reasonable for local agent work. This is about the same speed as GPT 5.5 with “high” reasoning. In this case, both models clear the bar easily.

By the way, personally, I run my agents almost exclusively on my DGX Spark because I don’t want my Mac Mini to get too hot and I want to have the RAM available for other tasks.

Of course, there are always ways to optimize this more with different frameworks (other than Ollama), quantizations, MTP, and so on. However, Ollama is a good plug & play allrounder with minimal setup time that connects easily to various coding agent frameworks and where it’s super simple to swap and try out different models.

5. Simple Benchmark Performance Assessment

After checking that the model is fast enough for convenient local work, I recommend doing a quick modeling performance assessment. Sure, there are many standardized benchmarks out there we could take a look at and even run ourselves.

Usually, you can find the numbers for relevant benchmarks in the model’s technical report or model hub page. Usually, I also find it useful to look at a relative comparison with other models on https://artificialanalysis.ai/models/.

Figure 14
Figure 13: Benchmark from https://artificialanalysis.ai/models/. Average performance (top), coding performance (center), agentic performance (bottom).

Based on the figure above, we can see that Qwen3 35B-A3B is much more capable than the Gemma 4 E4B and E2B models, for example.

Note that the Artificial Intelligence Index numbers keep changing over time as they swap benchmarks and update the weighting, so there are no “absolute” numbers we could use as a reference point for deciding which model is “good enough”. Rather, I would compare a new, interesting model to a model you used before as an anchor or reference point.

Beyond standard benchmarks, I would also curate a personal set of tasks that are relevant to you to do a quick check whether this model is even suitable for any type of work that you might want it to perform.

Below are the outputs of a reasoning- and code-related set of questions that also test the tool calling capabilities of the models. Here, the model returns the tool call but doesn’t execute the code itself.

➜  uv run ollama_hard_reasoning_bench.py --model qwen3.6:35b
PASS debug_empty_tokenizer_regression: ok
PASS review_shell_command_injection: ok
FAIL choose_minimal_edit_for_cross_platform_path: argument instructions missing required content
FAIL triage_import_error_after_refactor: wrong tool: expected read_file, got ask_clarification
PASS debug_mutable_default_cache_leak: ok

Score: 3/5 passed (60.0%)
➜  uv run ollama_hard_reasoning_bench.py --model  north-mini-code-1.0
FAIL debug_empty_tokenizer_regression: wrong tool: expected final_answer, got edit_file
PASS review_shell_command_injection: ok
FAIL choose_minimal_edit_for_cross_platform_path: invalid JSON: Extra data: line 2 column 1 (char 235)
FAIL triage_import_error_after_refactor: wrong tool: expected read_file, got ask_clarification
FAIL debug_mutable_default_cache_leak: wrong tool: expected final_answer, got edit_file

Score: 1/5 passed (20.0%)
uv run ollama_hard_reasoning_bench.py --model gemma4:e2b
FAIL debug_empty_tokenizer_regression: wrong tool: expected final_answer, got edit_file
FAIL review_shell_command_injection: wrong tool: expected final_answer, got ask_clarification
FAIL choose_minimal_edit_for_cross_platform_path: wrong argument path: expected 'code/tool-reasoning-benchmark/ollama_tool_reasoning_bench.py', got 'code/tool-reasoning-benchmark/personal_tool_reasoning_tasks.jsonl'
FAIL triage_import_error_after_refactor: wrong tool: expected read_file, got ask_clarification
FAIL debug_mutable_default_cache_leak: wrong tool: expected final_answer, got edit_file

Score: 0/5 passed (0.0%)

For instance, we can say that qwen3.6:35b gets the conceptual debugging and security-review tasks right, but still struggles with agentic judgment around “what file/action first” tasks. 3/5 is usable but not fully reliable for autonomous tool use. But a harness that constrains actions, adds retries, and maybe gives stronger project context could make it pretty usable.

On the other hand, gemma4:e2b failing 0/5 is a strong signal that it is less suitable for this kind of tool-use reasoning, even if it is fast. Note that the failures are not just formatting issues. It looks like it chooses the wrong tool, asks for clarification when enough context is present, etc. I would probably not use it as a coding-agent model beyond very narrow or heavily constrained tasks.

6. Agent Code Base Audit

Now, after this lengthy preamble setting up a local LLM, let’s get back to the main topic, the coding agent harness. As mentioned at the beginning of this article, we will use the qwen-code (https://github.com/QwenLM/qwen-code) harness, as Qwen models have been optimized for it.

Figure 13
Figure 14: Next, we are trying to connect the locally served model to the coding agent harness.

If you are familiar with Claude Code, it’s basically the same thing but fully open-source. However, I will also go over how to connect the local Qwen3.6 model to Codex and Claude Code in the next sections.

Note that coding harnesses are much more capable than LLMs by themselves. This is where I recommend being more careful about what you are running and where. For instance, when trying new (coding) agents, I like to

  • Do an audit of the (open-source) agent code base first.

  • Run it on separate hardware (e.g., my DGX Spark) or a separate user account and/or virtual environment on my machine at the very least.

Regarding the audit, I recommend looking for data sharing/egress and the default blast radius when it comes to file permissions, as well as some baseline robustness to prompt injection. The figure below attempts to summarize the main points.

Figure 15
Figure 15: Practical audit checklist before running an installed coding agent harness.

Similar concerns apply to the local model serving engine (e.g., Ollama) as well. However, coding agents require even more attention as they can directly read data from your machine and manipulate files.

To do a basic audit, I recommend the following:

  1. Clone the repo:

git clone https://github.com/QwenLM/qwen-code.git
  1. Ask a trusted agent you used before (like GPT 5.5 in Codex or Opus 4.8 in Claude Code) to review it with a focused prompt. Something like the following:

You are auditing ./qwen-code before I install or run the agent on my machine.

Focus only on practical local-machine risk from the installed agent and the code paths that create it:

  • install scripts and package lifecycle hooks

  • shell command execution by the agent

  • file read/write boundaries at runtime

  • secret handling and environment-variable inheritance

  • how repo files, project instructions, and tool output can influence the agent

  • MCP, plugin, extension, or tool integrations

  • network calls and telemetry

  • update mechanisms after installation

  • terminal escape/output handling

  • data egress and data residency

Ignoring internet downloads that are strictly required for installation, check whether the installed agent can send prompts, files, telemetry, logs, identifiers, or metadata to remote servers when I use a local model through Ollama. Ignore cloud-model configurations.

Do not infer risk from the project owner alone. Identify concrete endpoints, SDKs, default providers, environment variables, config defaults, and docs that control network behavior, including any endpoints operated in foreign countries or by third-party companies.

Do not do broad style review. Do not refactor. Produce:

  1. high-risk findings with file/line references

  2. medium-risk concerns

  3. network/data-egress findings, including any foreign, third-party, or China-linked endpoints or defaults

  4. commands I should avoid running until reviewed

  5. settings or environment variables that reduce local-machine risk

  6. a short recommendation: safe to test in sandbox, safe to use, or do not run

For each item, say whether it is expected behavior for a coding agent or inherently riskier than Codex or Claude Code.

Below is a summary of the main findings (because the full report may be a bit boring and too long for this article):

  1. Local execution Qwen Code can run shell commands on our machine through its shell tool but there are strict approval controls unless permissive modes such as --yolo are enabled. This is expected for a coding agent, and it’s actually what makes it useful in practice. But of course it becomes risky if run unsandboxed or with a full environment containing secrets.

  2. Data egress Even with local Ollama, Qwen Code can send usage telemetry and metadata to Alibaba/Aliyun endpoints unless usage statistics and telemetry are disabled (more on that below). This is riskier than a local-only setup because model prompts may stay local, but session IDs, tool metadata, model info, and local base URL metadata can still leave the machine. But again, this is also common among all kinds of tools (yes, Codex and Claude do that as well).

  3. File and secret boundaries Workspace files are readable by default, while writes generally require approval and include some overwrite protections. This is good and standard agent practice.

  4. Prompt injection surfaces Repo instructions, tool output, MCP tools, extensions, and project config can influence the agent’s behavior. Prompt injection attacks can be reduced via the approval gates mentioned above. This is normal for coding agents, but untrusted repos should be treated as hostile by default because they can steer the agent toward reading files, running commands, or sending data through approved tools.

Regarding the main privacy concerns in point 2, most of it is fixable via a custom ~/.qwen/settings.json with the following contents:

{
  "privacy": {
    "usageStatisticsEnabled": false
  },
  "general": {
    "enableAutoUpdate": false
  },
  "telemetry": {
    "enabled": false,
    "logPrompts": false,
    "includeSensitiveSpanAttributes": false
  },
  "disableAllHooks": true,
  "mcpServers": {},
  "artifact": {
    "publisher": "local",
    "autoOpen": false
  }
}

The "general": { "enableAutoUpdate": false } setting is a tradeoff. Security fixes will not be installed automatically, but I prefer having explicit control over when updates happen instead of letting the tool pull and apply new code in the background.

By the way, cline (https://github.com/Cline/Cline), Codex (https://github.com/openai/codex), and Claude Code have similar telemetry data sharing defaults that would need to be disabled explicitly.

(Note that Claude Code doesn’t have an official open-source version of their codebase, which makes trusting it even trickier, and it does seem to send data to both Anthropic and Datadog.)

Either way, overall, it seems Qwen-Code follows standard practices, and as of this writing, there is no particular concern that is non-standard for coding agents.

7. Qwen-Code Setup

If we accept the reported findings and risks (personally, I didn’t see any red flags), we can now proceed with the installation and hook up our local Qwen3.6-35B-A3B model to Qwen Code (and Codex and Claude Code in the next sections).

As mentioned before, I preferably experiment with and run coding agents, which can read and edit local files, on a separate machine (in my case a DGX Spark, but it could also be a separate Mac or Linux workstation). Alternatively, I would run it in a VM or set up a separate macOS or Linux user account as a practical middle ground.

(I heard from some friends that they also rent servers for that, like Linode or Heroku, for tinkering purposes. However, instead of the monthly hosting costs for a somewhat capable machine, I would probably rather get a relatively cheap $200-500 hardware box, or even an old retired laptop, and run a local harness and then use a stronger open-weight model hosted in the cloud via Ollama cloud models, OpenRouter, etc if you are looking for alternatives to GPT or Claude.)

Anyways, let’s install Qwen-Code. The listed options include, e.g.,

curl -fsSL https://qwen-code-assets.oss-cn-hangzhou.aliyuncs.com/installation/install-qwen-standalone.sh | bash

and

npm install -g @qwen-code/qwen-code@latest

However, running the commands above assumes that the published artifacts match the code we just reviewed in the GitHub repo. If we are extra careful/paranoid, we can also build it ourselves from the GitHub repo. Be warned, this is more manual/messier though (I recommend executing them one at a time instead of copy & pasting the whole block into the terminal):

# Go to your development folder
cd ~/Developer

# Clone the Qwen Code GitHub repository
git clone https://github.com/QwenLM/qwen-code.git

# Enter the cloned repository
cd qwen-code

# Install JavaScript dependencies
npm install

# Build the CLI output in the local dist/ folder
npm run build

# Create a user-level bin directory if it does not already exist
mkdir -p ~/.local/bin

# Create a qwen wrapper that runs the CLI from this source checkout.
# Keep ~/Developer/qwen-code in place, since this wrapper points into it.
cat > ~/.local/bin/qwen <<'SH'
#!/usr/bin/env sh
exec "$HOME/Developer/qwen-code/scripts/cli-entry.js" "$@"
SH

# Make the wrapper executable.
chmod +x ~/.local/bin/qwen

# Make qwen available in the current shell session.
export PATH="$HOME/.local/bin:$PATH"

# Verify that the qwen command is found and prints a version.
qwen --version

After completing the installation, we can now launch the Qwen-Code client via the qwen command from the terminal to complete the setup and connect to the locally served LLM.

For this, after running the qwen command, we select “Custom Provider”, as shown below.

Figure 16
Figure 16: Choose “Custom Provider,” which lets us connect the Ollama LLM.

Ollama uses the OpenAI API standard. So, next, we follow the on-screen setup guide and choose the “OpenAI-compatible” option.

Figure 17
Figure 17: Since Ollama follows the OpenAI API standard, we choose “OpenAI-compatible” here.

Next, we need to provide the API endpoint of the running Ollama application that serves our local LLM. Usually that’s the local

http://127.0.0.1:11434

address by default. We enter http://127.0.0.1:11434/v1(including the /v1) since that’s the OpenAI-compatible base URL.

Figure 18
Figure 18: Configure Qwen Code to use Ollama’s local OpenAI-compatible endpoint, http://127.0.0.1:11434/v1.

Next, we enter ollama as our custom provider.

Figure 19
Figure 19: Enter ollama as the API key placeholder for the local custom provider.

Next, we can select the available models. These are the ones that we downloaded via ollama pull. You can enter only a single model or multiple ones separated by commas. You can double-check the list of downloaded models via ollama list. By the way, you can always add more models easily later (I’ll explain after completing the setup).

Figure 20
Figure 20: Select the local Ollama models that Qwen Code should make available through the custom provider.

We are almost done! In step 5/6, we of course select “Enable thinking” mode, which will result in higher token usage but the better resulting problem-solving capabilities are worth it.

Figure 21
Figure 21: Enable thinking mode for the local model provider.

And that’s basically it. Step 6 is basically a review step that we can confirm by pressing “Enter”.

Congratulations, you should now have a working fully-local LLM workflow set up. The usage is pretty much similar to Claude Code, where you can use / commands for various functionality. E.g., you can switch models via the /model command, as shown below.

Figure 22
Figure 22: Use /model to switch models.

By the way, as I mentioned before, it’s relatively easy to add new models from ollama. Once you pull a new model via ollama pull, you can add it as a new entry in ~/qwen/settings.json. Here, just copy & paste an existing entry into the file and change the “id” and “name” to that of the Ollama model name.

Figure 23
Figure 23: We can add new ollama models by editing the ~/qwen/settings.json config file. Here, "xxxxx" is the name of the ollama model name, e.g., "nemotron-3-nano:30b".

By the way, to update the qwen-code tool once in a while, if we used the git clone & local build route, we can pull a recent GitHub snapshot and update it as follows:

# Go to the local Qwen Code source checkout
cd ~/Developer/qwen-code

# Fetch the latest changes from GitHub
git pull

# Install or update dependencies if package files changed
npm install

# Rebuild the local CLI
npm run build

# Verify the updated CLI
qwen --version

8. Agent Capability Assessment

Now that we have a fully working, local coding agent, the question is: how well does it perform, and is it actually good enough for my tasks? Of course, there are benchmarks for this, but in my opinion, nothing beats trying it for yourself on some of your workflow. In other words, this basically means using it for a day or two to decide whether it meets your bar.

I also recommend compiling a small set of tasks that reflect your common coding agent usage. And if you come upon a particularly challenging one when working on a given project, it may not be a bad idea to add it to this set to evaluate future models.

As an example of what I mean, I shared a relatively small, simple, and general set of tasks we can use to test the agents here on GitHub: https://github.com/rasbt/local-coding-agent-evals/tree/main/agent-problem-pack. This is basically an extension of the tasks from the Local LLM Setup section.

The details on how to run these are in the GitHub README: https://github.com/rasbt/local-coding-agent-evals/tree/main/agent-problem-pack#quick-start-running-benchmarks-manually.

Below is the outcome for the different LLMs tested in Qwen-Code.

Figure 24
Figure 24: Small local agent capability benchmark using Qwen-Code. Code to reproduce: https://github.com/rasbt/local-coding-agent-evals

As we can see, both the Qwen3.6 and North Mini Code 35B-A3B models solve 4 out of 5 of these problems. Gemma 4 E2B fails a lot. Out of curiosity, I also added the a bit older Nemotron 3 Nano model. It has a similar size and compute performance as the aforementioned Qwen and North models, and it performs similarly well.

Figure 25
Figure 25: Nemotron 3 Nano architecture overview from my LLM Gallery

9. Codex Setup

After setting up the local coding agent (and the article exceeding 5000 words), this would probably be a reasonable place to stop. However, as a bonus, I also thought it might be interesting to add brief Codex and Claude Code notes for completeness.

Unfortunately, as far as I know, the Codex UI does not support non-OpenAI models, but we can use the Codex CLI to run our Ollama models.

If you haven’t installed the OpenAI Codex CLI yet, you can get and install it analogously to qwen-code from their open-source GitHub directory: https://github.com/openai/codex (Yes, the Codex CLI is open source!)

I will spare you the lengthy listing of the commands and recommend checking the repo’s README instead for the official instructions. (Cloning the repo and running an audit similar to qwen-code is not a bad idea here, as well.)

Then, once installed, there are multiple ways to enable local model use. In my opinion, the most convenient way is to set up a separate config ~/.codex/ollama.config.toml (inside the existing ~/.codex folder) with some default options:

model = "qwen3.6:35b"
model_provider = "ollama"
model_reasoning_effort = "high"
personality = "pragmatic"

[projects."/home/rasbt"]
trust_level = "trusted"
Figure 26
Figure 26: Set up a separate Ollama profile for Codex for convenience.

Then, we can still use codex to launch the regular “Codex with GPT 5.5” mode and use our Ollama model via codex --profile ollama.

Figure 27
Figure 27: Launch Codex using a local Ollama model.

When rerunning the test cases from the Agent Capability Assessment section, to my surprise, Qwen3.6 does actually perform better via Codex compared to its “native” Qwen-Code coding harness, as shown below.

Figure 28
Figure 28: Small local agent capability benchmark in Codex.

Even though this is just a small set of benchmarks, it suggests that using Codex as the universal coding agent harness may not be such a bad idea after all.

10. Claude Code Setup

Of course, there is also the popular Claude Code agent harness that we could use as a harness around our local LLMs. While very popular and capable, this is probably my least favorite option for local setups because the codebase is proprietary. That also means we cannot readily inspect and/or disable Anthropic’s data logging practices.

To set it up, if you don’t have Claude Code already installed on your machine, I suggest checking the official docs for recommended installation commands: https://code.claude.com/docs/en/quickstart.

Claude Code itself does not expose the same local-provider configuration path as Codex. However, Ollama provides an integration via ollama launch claude: https://docs.ollama.com/integrations/claude-code

I.e., we can execute ollama launch claude to run the Claude Code harness with an Ollama model.

By the way, this also works for codex via ollama launch codex, but I personally prefer the codex --profile ollama route we discussed earlier, as it gives me a bit more insight and control about how things works etc.

Figure 29
Figure 29: Claude Code with a local Qwen3.6 model through Ollama.

However, as a user, it feels like Claude Code takes much longer to come up with a solution. It probably has a much higher token usage. So, below, I additionally looked at the token usage of all three harnesses.

As we can see, Claude Code uses by far the most tokens on average, Codex the least.

Figure 30
Figure 30: Average token usage of the three harnesses for different LLMs. Code to reproduce: https://github.com/rasbt/local-coding-agent-evals

When it comes to the little agent capability assessment benchmark, the Qwen and North Mini Code models also get 5/5, and even the small Gemma 4 model does ok!

Interestingly, we can also see that the token usage is largely driven by the harness, not the LLM itself. I.e., among all three LLMs that are capable of solving (almost) all 5 tasks, they all use the same number of tokens (e.g., Qwen3.6 uses roughly the same number of tokens as North Mini Code and Nemotron 3 Nano when used inside Claude Code). Only Gemma 4 uses fewer tokens, but it also fails almost all tasks, likely because of insufficient tool-calling capabilities where the tasks interrupt early.

For reference, below is again the summarized task-success rate.

Figure 31
Figure 31: Summarized task success rates.

Anyway, the takeaway here is that if more tokens help the model-harness combination to solve more (and more complex) problems, great! But if we have two harnesses that both have an equal task success rate, a harness that uses 50% fewer tokens (e.g., Codex over Claude Code), then this is a huge win, because it will make tasks run twice as fast.

However, the big caveat here is that task correctness is a necessary criterion, but it doesn’t measure code quality and readability, which are hard to assess automatically.

PS: I tried to analyze why Claude Code uses more tokens, and it seems that the difference mainly comes from input tokens rather than output tokens. In other words, Claude is not writing twice as much. The logs suggest that Claude is repeatedly feeding more context back into the model across turns, including previous messages, tool calls, command outputs, and file contents. For example, one Claude run used about 578k input tokens but only about 4.5k output tokens across 25 turns. So the likely explanation is that Claude’s harness accumulates or accounts for a larger prompt-side history during multi-step agent runs.

11. Mac <-> DGX

So far, all the setups we discussed assumed that we were running the local LLM on the same machine as the coding harness.

However, what if we developed some trust in the coding agent harness and want to use it on our main Mac while the model itself is hosted on a different machine, e.g., a DGX Spark?

In my opinion, the best (or most convenient) setup is an SSH tunnel from the Mac to the DGX.

First, I suggest quitting Ollama on the Mac or changing the 11434 to something else below.

Assuming we quit the Ollama app on the Mac, check that the following returns an empty output to indicate that Ollama is not available:

curl http://127.0.0.1:11434/v1/models

Then run the following command on that Mac in a terminal window on the Mac side:

ssh -N -L 11434:127.0.0.1:11434 rasbt@DGX-Spark

That command means that we open an SSH connection to DGX-Spark as user rasbt, which you need to adjust to whatever your username and machine name are. Then, the command forwards the Mac’s local port 11434 to 127.0.0.1:11434 on the DGX because of -L 11434:127.0.0.1:11434. Note that this is the Ollama address.

The terminal running ssh -N -L ... will look like it is hanging. That is normal. Keep it open while you use Qwen Code, Codex, or Claude Code. Press Ctrl-C to stop the tunnel.

So after it is running, use this on your Mac to see if the Mac can indeed access the ollama models from the DGX:

curl http://127.0.0.1:11434/v1/models

If that returns the DGX models, your Mac tools can use the DGX Ollama server as if it were local.

Then, just use Qwen Code and Codex just like above.

For Claude via ollama launch claude, the key is that the Mac-side ollama command must see the tunneled endpoint. If needed:

OLLAMA_HOST=http://127.0.0.1:11434 \
ollama launch claude --model qwen3.6:35b

12. What about OpenClaw and Hermes?

We focused on Qwen Code, Codex, and Claude Code because they are the most direct fit for coding-agent workflows. OpenClaw and Hermes are also capable, but they are broader agent harnesses. They are better suited when you want one agent to coordinate across tools, apps, browsers, terminals, and longer-running workflows.

For coding work, I recommend starting with Qwen Code, Codex, or Claude Code first (and there are also many other interesting coding harnesses like OpenCode, Cline, Pi, and Noumena Code). And I would treat OpenClaw and Hermes as interesting follow-up options for things beyond coding rather than the first baseline for this local coding-agent setup.

13. Conclusion

This was a long article with lots of information and configuration. If there are a few main takeaways, I’d say that it’s not the mechanistic setup pipeline but rather the considerations when running coding agents locally. That is, the most important part is not getting one specific tool installed, but understanding the model-serving layer, the agent harness, the permission model, and how to evaluate whether the setup actually solves coding tasks reliably.

Of course, GPT 5.5 and Opus 4.8 are currently better than smaller open-weight models that run on a Mac or DGX Spark. But the newer Mixture-of-Experts models in the 30-35B range (such as Qwen3.6, North Mini Code, and Nemotron 3 Nano) are all very, very capable and really sufficient for a lot of tasks. And yes, they run with the same token speed as GPT 5.5 through a Pro subscription, so it should not necessarily slow down your workflows.

The main consideration when setting up local agents, besides the model itself, is also which harness we want to use. The common perception is that models are usually optimized more for a specific harness than others (e.g., Qwen3.6 may work better in Qwen Code than Claude Code, for example). Based on the small agent assessment, this may not necessarily be true, though (this is only a very small benchmark, so take it with a big grain of salt). So, if you are more comfortable with a different harness that you have a lot of muscle memory with, like Codex and Claude Code, maybe it’s not a bad idea to just stick the model into that one and give it a try!

Anyways, I hope the article was useful, and it got you interested in doing some tinkering with open-weight models. They are becoming more capable by the day, and it’s for some inexplicable reason just fun to run models locally.


Further Resources

If you want to try the benchmarks yourself, the code and small evaluation tasks used in this article are available here: https://github.com/rasbt/local-coding-agent-evals

Also, my Build a Reasoning Model (From Scratch) book has now gone to print and started shipping. I wanted to post a picture, but it will be 3 more days until it arrives.

If you liked my previous Build a Large Language Model (From Scratch) book, this is essentially a sequel implementing inference-time scaling techniques and reinforcement learning algorithms from scratch.

And if you want to support future long-form articles like this one, consider becoming a paid subscriber. It helps me keep writing these independent deep dives and sharing the accompanying code, figures, and experiments.

Recent Developments in LLM Architectures: KV Sharing, mHC, and Compressed Attention

16 May 2026 at 11:33

After a short family break, I am excited to be back and catching up on a busy few weeks of open-weight LLM releases. The thing that stood out to me is how much newer architectures are focused on long-context efficiency.

As reasoning models and agent workflows keep more tokens around (for longer), KV-cache size, memory traffic, and attention cost quickly become the main constraints, and LLM developers are adding a growing number of architecture tricks to reduce those costs.

The main examples I want to look at are KV sharing and per-layer embeddings in Gemma 4, layer-wise attention budgeting in Laguna XS.2, compressed convolutional attention in ZAYA1-8B, and mHC plus compressed attention in DeepSeek V4.

Most of these changes look like small tweaks in my architecture diagrams, but some of them are quite intricate design changes that are worth a more detailed discussion.

Figure 1. LLM architecture drawings of recent, major open-weight releases (April to May). You can find the images, and more details, in my LLM architecture gallery. Not all model sizes are shown; Qwen3.6 includes the 27B and 35B-A3B variants, and ZAYA1 is represented by the 8B model (omitting ZAYA1-base and ZAYA1-reasoning-base). The architectures in the dotted boxes are covered in more detail in this article.

Note that this article is about architecture designs, so I will mostly skip dataset mixtures, training schedules, post-training details, RL recipes, benchmark tables, and product comparisons. Even with that narrower scope, there is a lot to cover. And, like always, the article turned out longer than I expected, so I will keep the focus on what changes inside the transformer block, residual stream, KV cache, or attention computation.

Please also note that I am only covering those topics that are interesting (new) design choices and that I haven’t covered elsewhere, yet. This list includes:

  1. KV sharing and per-layer embeddings in Gemma 4

  2. Compressed convolutional attention in ZAYA1

  3. Attention budgeting in Laguna XS.2

  4. mHC and compressed attention in DeepSeek V4

Previous Topics

Before getting into the new parts, here are the two previous articles I will refer back to. The first one gives a broader architecture background on recent MoE models, routed experts, active parameters, and model-size comparisons. The second one covers the attention background that comes up repeatedly below, including MHA, MQA, GQA, MLA, sliding-window attention, sparse attention, and hybrid attention designs.

I also turned several of these explanations into short, standalone tutorial pages in the LLM Architecture Gallery. For example, readers can find compact explainers for GQA, MLA, sliding-window attention, DeepSeek Sparse Attention, MoE routing, and other concepts linked from the corresponding model cards and concept labels.

1. Reusing KV Tensors Across Layers to Shrink the Cache (Gemma 4)

For this tour of architecture advances and tweaks, we will go back to the beginning of April when Google released their new open-weight Gemma 4 suite of models. They come in 3 broad categories:

  • the Gemma 4 E2B and E4B models for mobile and small, local (embedded) devices (aka IoT),

  • the Gemma 4 26B mixture-of-experts (MoE) model, optimized for efficient local inference,

  • and the Gemma 4 31B dense model, for maximum quality and more convenient post-training (since MoEs are trickier to work with)

Figure 2: Gemma 4 architecture drawings.

The first small architecture tweak in the E2B and E4B variants is that they adopt a shared KV cache scheme, where later layers reuse key-value states from earlier layers to reduce long-context memory and compute.

This KV-sharing was not invented by Gemma 4. For instance, see Brandon et al., “Reducing Transformer Key-Value Cache Size with Cross-Layer Attention” (NeurIPS 2024). But it’s the first popular architecture where I saw this concept applied. (Cross-layer attention is not to be confused with cross-attention.)

Before explaining KV-sharing further, let’s briefly talk about the motivation. As I wrote and talked about in recent months, one of the main recent themes in LLM architecture design is KV cache size reduction. In turn, the motivation behind KV cache size reduction is to reduce the required memory, which allows us to work with longer contexts, which is especially relevant in the age of reasoning models and agents. For more background on KV caching, see my “Understanding and Coding the KV Cache in LLMs from Scratch” article:

Practically all of the popular attention variants I described in my previous A Visual Guide to Attention Variants in Modern LLMs article are designed to reduce the KV cache size:

To pick a classic example (that Gemma 4 still uses): Grouped Query Attention (GQA) already shares key-value (KV) heads across different query heads to reduce the KV cache size, as illustrated in the figure below.

Figure 3: Grouped Query Attention (GQA) shares the same key (K) and value (V) heads among multiple query (Q) heads.

As mentioned before, Gemma 4 uses GQA. However, in addition to the KV sharing among queries as part of GQA, Gemma 4 also shares KV projections across different layers instead of computing it as part of the attention module in each layer. This KV-sharing scheme, also called cross-layer attention, is illustrated in the figure below.

Figure 4: Regular transformer blocks compute separate Q, K, and V projections in each attention module (left). Cross-layer attention designs (right) share the same K and V projections across multiple layers.

As briefly hinted at in the architecture overview in Figure 2, Gemma 4 E2B uses regular GQA and sliding window attention in a 4:1 pattern. (More precisely, Gemma 4 E2B uses MQA, which is the one-KV-head special case of GQA).

In the case of GQA (or MQA), the KV-sharing works like this. Later layers no longer compute their own key and value projections but reuse the KV tensors from the most recent earlier non-shared layer of the same attention type. In other words, sliding-window layers share KV with a previous sliding-window layer. Full-attention layers share KV with a previous full-attention layer. The layers still compute their own query projections, so each layer can form its own attention pattern, but the expensive and memory-heavy KV cache is reused across several layers.

For example, Gemma 4 E2B has 35 transformer layers, but only the first 15 compute their own KV projections; the final 20 layers reuse KV tensors from the most recent earlier non-shared layer of the same attention type. Similarly, Gemma 4 E4B has 42 layers, with 24 layers computing their own KV and the final 18 layers sharing them.

How much does this actually save? Since we share roughly half of the KVs across layers, we save approximately half of the KV cache size. For the smallest E2B model, this results in a 2.7 GB saving (at bfloat16 precision) in long 128K contexts, as shown below. (For the E4B variant, this saves about 6 GB at 128K.)

Figure 5: KV cache memory savings from GQA and cross-layer KV sharing in a Gemma 4 E2B-like setup. For simplicity, additional savings from sliding window attention are not shown.

The downside of KV-sharing is, of course, that it’s an “approximation” of the real thing. Or, more precisely, it reduces model capacity. However, according to the cross-layer attention paper, the impact can be minimal (for small models that were tested).

2. Per-Layer Embeddings and “Effective” Size (Gemma 4 E2B/E4B)

The Gemma 4 E2B and E4B variants include a second efficiency-oriented design choice called per-layer embeddings (PLE). This is separate from the KV-sharing scheme above.

KV sharing reduces the KV cache. PLE is instead about parameter efficiency, where it lets the small Gemma 4 models use more token-specific information without making the main transformer stack as expensive as a dense model with the same total parameter count.

For instance, the “E” in Gemma 4 E2B and E4B stands for “effective”. Concretely, Gemma 4 E2B is listed as 2.3B effective parameters, or 5.1B parameters when the embeddings are counted. (Similarly, Gemma 4 E4B is listed as 4.5B effective parameters, or 8B parameters with embeddings).

In short, in the “E” models, the main transformer-stack compute is closer to the smaller number, while the larger number includes the additional embedding-table layers. (For an illustration of how embedding layers work, see my “Understanding the Difference Between Embedding Layers and Linear Layers” code notebook.)

Conceptually, the new PLE path looks like this:

Figure 6: Simplified Gemma 4 block with the PLE residual path. The normal block first computes the attention and feed-forward residual updates. The resulting hidden state gates the layer-specific PLE vector, and the projected PLE update is added as an extra residual update at the end of the block.

The PLE vectors themselves are prepared outside the repeated transformer blocks. In simplified form, there are two inputs to the PLE construction. First, the token IDs go through a per-layer embedding lookup. Second, the normal token embeddings go through a linear projection into the same packed PLE space. These two pieces are added, scaled, and reshaped into a tensor with one slice per layer. Note that each block then receives its own slice.

Figure 7: Simplified PLE construction. The token IDs provide a per-layer embedding lookup, while the normal token embeddings are projected into the same space. The two contributions are combined and reshaped so that each transformer block receives its own layer-specific PLE slice.

The important detail is that PLE does not give each transformer block a full independent copy of the normal token embedding layer. Instead, the per-layer embedding lookup is computed once. Then, as mentioned before, it gives each layer a small token-specific embedding slice (via “reshape / select layer l”.

So, for each input token, Gemma 4 prepares a packed PLE tensor that contains one small vector per decoder layer. Then, during the forward pass, layer l receives only its own slice (ple_l in the Gemma4WithPLEBlock in figure 6).

Inside the transformer block, the regular attention and feed-forward branches run as usual. First, the block computes the attention residual update. Then it computes the feed-forward residual update. After that second residual add, the resulting hidden state, which I denoted as z in the pseudocode in figure 6, is used to gate the layer-specific PLE vector. The gated PLE vector is projected back to the model hidden size, normalized, and added as one extra residual update.

So the useful mental model is that the transformer block still has the same main attention and feed-forward path, but Gemma 4 adds a small layer-specific token vector after the feed-forward branch. This increases representational capacity through embedding parameters and small projections. This adds computational overhead but avoids the cost of scaling the entire transformer stack to the larger parameter count.

But why PLEs? The simpler alternative would be to make the dense model smaller, using fewer layers, narrower hidden states, or smaller feed-forward networks. That would reduce memory and latency, but it also removes capacity from the parts of the model that do the main computation.

The PLE design keeps the expensive transformer blocks closer to the smaller “effective” size, while storing additional capacity in per-layer embedding tables. These are much cheaper to use than adding more attention or FFN weights, since they are mainly lookup-style parameters that can be cached.

Also, we have to take Google’s word here that this is an effective and worthwhile design choice. It would be interesting to see some comparison studies to see how this E2B design compares to a regular Gemma 4 2.3B model and a regular Gemma 4 5.1B model.

Also, in principle, PLE is not inherently limited to small models. We could attach per-layer embedding slices to larger models, too. However, larger models already have sufficient capacity where these extra embeddings may not help that much. Also, for larger models, we already use MoE designs as a trick to increase capacity while keeping the compute footprint smaller.

By the way, if you are interested in a relatively simple and readable code implementation, I implemented the Gemma 4 E2B and E4B models from scratch here.

Figure 8: Snapshot of my Gemma 4 from-scratch implementation.

3. Layer-Wise Attention Budgeting (Laguna XS.2)

Laguna is the first open-weight model by Poolside, a Europe-based company focused on training LLMs for coding applications. Several of my former colleagues joined Poolside in recent years, and they have a great team with lots of talent. It’s just nice to see more companies also releasing some of their models as open-weight variants.

Anyways, the Laguna XS.2 architecture depicted below looks very standard at first glance. However, one detail that I didn’t show (/try to cram into there) is a concept we can refer to as “Layer-wise attention budgeting”.

Figure 9: Poolside’s Laguna XS.2 architecture.

Part of the idea behind the attention budgeting here is that instead of giving every transformer layer the same full attention budget, Laguna XS.2 varies the attention cost by layer. It has 40 layers total, with 30 sliding-window attention layers and 10 global/full attention layers. As usual, the sliding-window layers only attend over a local window (here: 512 tokens), which keeps the KV cache and attention computation cheaper. The global layers are more expensive but preserve the ability to access all information in the context window.

This mixed sliding-window + global/full attention pattern is not unique to Laguna XS.2 and is used by many other architectures (including Gemma 4).

But what’s new is the use of per-layer query-head counts. For instance, the Hugging Face model hub config.json includes a num_attention_heads_per_layer setting, so layers can have different numbers of query heads while keeping the KV cache shape compatible.

Figure 10: Per-layer query-head budgeting in Laguna, where full attention layers use 6 query heads per KV head, and sliding window attention layers use 8 query heads per KV head.

So Laguna XS.2 gives more query heads to sliding-window layers and fewer query heads to global layers, while keeping the KV heads fixed at 8. That is the actual layer-wise head budgeting in the config.

Laguna XS.2 is one of the most prominent recent examples of this per-layer query-head budgeting in a production-style open model. But the broader idea of varying model capacity by layer goes back to (at least) Apple’s 2024 OpenELM.

And again, what’s the point of such a design? Similar to KV-sharing, the point is to spend attention capacity where it is most useful, instead of giving every layer the same budget. Specifically, full-attention layers are expensive because they look across the whole context, so Laguna gives them fewer query heads compared to sliding window attention modules.

(Besides, another smaller implementation detail is that Laguna also applies per-head attention-output gating; this is somewhat similar to Qwen3-Next and others, which I also omit here since I covered it in earlier articles.)

4. Compressed Convolutional Attention (ZAYA1-8B)

Similar to Laguna, ZAYA1-8B is another new player on the open-weight market. It is developed by Zyphra, and one of the interesting details around the release is that the model was trained on AMD GPUs rather than the more common NVIDIA GPU (or Google TPU) setup.

The main architecture detail, though, is Compressed Convolutional Attention (CCA), used together with grouped-query attention. Unlike MLA-style designs that mainly use a latent representation as a compact KV cache format, CCA performs the attention operation directly in the compressed latent space, but more on that later.

(Sidenote: the ZAYA1-8B config.json lists 80 alternating layer entries rather than 40 conventional transformer blocks. These entries alternate between CCA/GQA attention and MoE feed-forward layers. But for the architecture figure, it is more convenient to visualize this as 40 repeated attention + MoE pairs, which is conceptually equivalent.)

Figure 11: Zaya1 (8B) with transformer blocks featuring compressed convolutional attention.

As hinted at in the figure above, ZAYA1-8B uses Compressed Convolutional Attention (CCA) together with a 4:1 GQA layout. The key point is that its attention block is built around CCA rather than a standard sliding-window attention block.

What is Compressed Convolutional Attention?

I would say CCA is related in spirit to Multi-head Latent Attention (MLA) in DeepSeek’s models, since both introduce a compressed latent representation into the attention block. However, they use that latent space differently. MLA mainly uses the latent representation to reduce the KV cache. In MLA, the KV tensors are stored compactly and then projected into the attention-head space for the actual attention computation.

Figure 12: Regular Multi-head Attention (MHA) and Multi-head Latent (MLA) attention side by side.

CCA compresses Q, K, and V and performs the attention operation directly in the compressed latent space. This is why CCA can reduce not only KV cache size, but also attention FLOPs during prefill and training.

Figure 13: Multi-head Latent Attention (MLA) and Compressed Convolutional Attention (CCA) side by side.

As Figure 13 above illustrates, in CCA, the compressed, latent representations enter the attention mechanism directly, and the resulting compressed attention vector is then up-projected.

Note that this is called Compressed Convolutional Attention, not just Compressed Attention, since there is an additional convolutional mixing happening on the latent K and Q representations. The convolutional mixing part is not shown in Figure 12, because it would have been too crammed, but it’s relatively straightforward.

As hinted at in Figure 13, the convolutional mixing happens directly on the compressed Q and K tensors. The point is that compression makes Q, K, and V narrower, which saves compute and cache, but it can also make attention less expressive. The convolutions are a cheap way to give the compressed Q and K vectors more local context before they are used to compute attention scores. (The convolutional mixing is only applied to Q and K, not V, because Q and K determine the attention scores, while V represents the content that gets averaged via these scores).
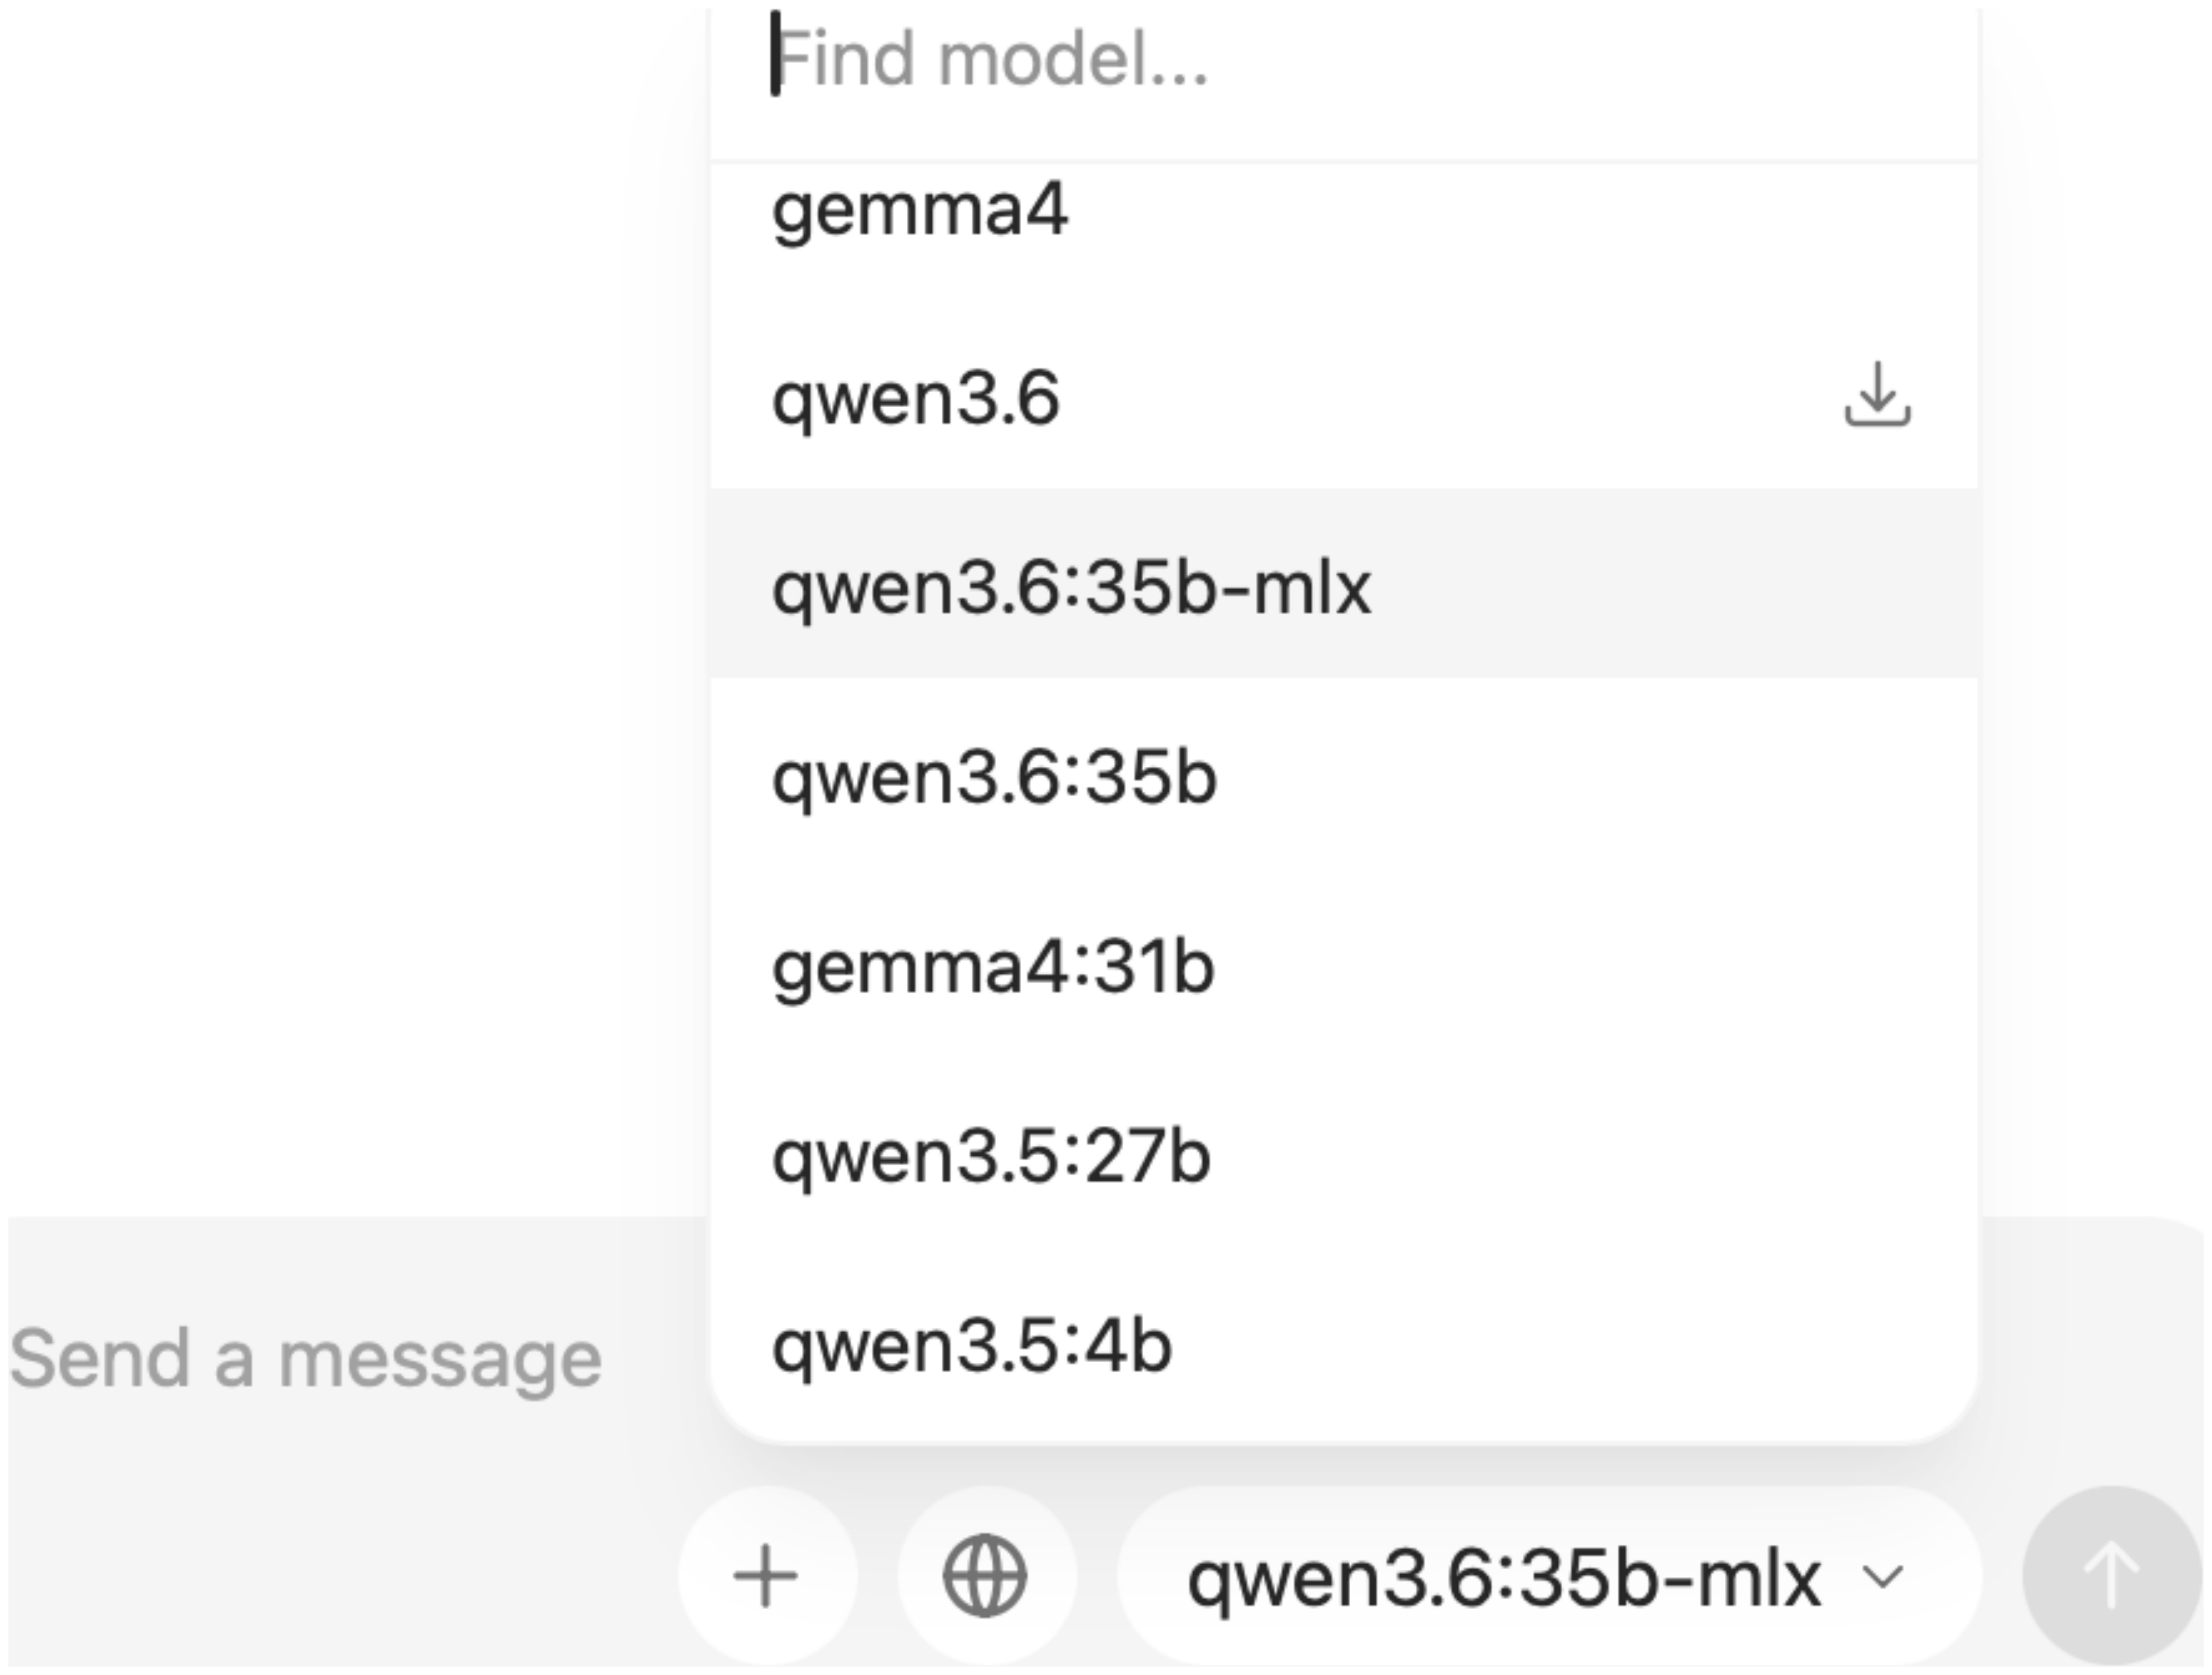
Figure 14: conceptual overview of the sequence-mixing convolution

Next to the sequence mixing shown in Figure 14, there is also a channel mixing component. It’s in principle similar though, so I am omitting the illustration.

CCA appears to be a Zyphra-introduced attention mechanism that predates the ZAYA1-8B technical report. The standalone CCA paper, Compressed Convolutional Attention: Efficient Attention in a Compressed Latent Space, was first posted in October 2025 and explicitly introduces CCA. ZAYA1-8B then uses this mechanism as one of the core pieces.

But the question is, “is it better than MLA”? According to the CCA paper’s own experiments, yes, they report CCA outperforming MLA under comparable compression settings.

Figure 15: Annotated figures from the CCA paper, https://arxiv.org/abs/2510.04476.

Overall, the interesting part here is really the new attention mechanism. The model also uses a pretty extreme (= very sparse) MoE setup, with only one routed expert active per token, but that part is more familiar. CCA is more unusual because it performs the attention operation directly in a compressed latent space, and then uses convolutional mixing on the compressed Q and K representations to make this compressed attention less limiting. So, in short, ZAYA1-8B is not only trying to save compute in the feed-forward layers, but also in the attention mechanism itself.

5. CSA/HCA, mHC, and Compressed Attention Caches (DeepSeek V4)

DeepSeek V4 was the biggest release of the year so far, both in terms of hype and model size. Interestingly, DeepSeek V4-Pro is also the most parameter-sparse MoE among the models in the table below, measured by active-parameter share, as summarized in the table below.

Figure 16: Percent active parameter plot for MoE models. You can also find an HTML version at https://sebastianraschka.com/llm-architecture-gallery/active-parameter-ratio/.

Caveat: active parameter share is only one lens. It does not capture KV cache size, attention pattern, context length, routing overhead, hardware efficiency, or training quality. But it is a helpful, quick check when comparing sparse models.

There’s a lot to say about DeepSeek V4, but since it’s been all over the news already, and to stay on topic regarding architecture tweaks, I will focus on the two most relevant parts that are new compared to previous architectures:

  1. mHC for a wider residual pathway,

  2. CSA/HCA for long-context attention compression and sparsity

Looking at the DeepSeek V4 architecture drawing below, there seems to be a lot going on. The useful way to read it is to separate the residual-path change, mHC, from the attention-path changes, CSA/HCA, and compressed attention caches.

Figure 17: DeepSeek V4-Pro architecture overview.

5.1 Manifold-Constrained Hyper-Connections (mHC)

Let’s start with the mHC component of DeepSeek V4. This goes back to a research paper that the DeepSeek team shared last year (31 Dec 2025, mHC: Manifold-Constrained Hyper-Connections). However, in this paper, the technique was only tested on an experimental 27B scale model. Now, we see it in their flagship release, which is a good sign that this idea actually works well in production.

The main idea behind mHC here is to modernize the design of the residual connections inside the transformer block, which is refreshing, because architecture tweaks are usually focused on the attention mechanism, normalization layer placement, and MoE parts.

Now, mHC is based on previous work on hyper-connections (see Hyper-connections by Zhu et al., 2024), which we should briefly discuss first. Hyper-connections essentially modify the single residual stream inside the transformer block by replacing it with several parallel residual streams and learned mappings between them.

(For those new to residual connections, I made a video on residual neural networks many years ago, where I explained the general mechanism.)

The idea behind hyper-connections is to widen the residual stream. We can think of this as keeping several parallel residual streams, with an additional Res Mapping linear transformation that mixes them across layers. Since the Attention or MoE layer itself still operates on the normal hidden size, hyper-connections also add a Pre Mapping that combines the parallel residual streams into one normal hidden vector for the layer, and a Post Mapping that distributes the layer output back across the parallel residual streams. This is visually summarized in the figure below.
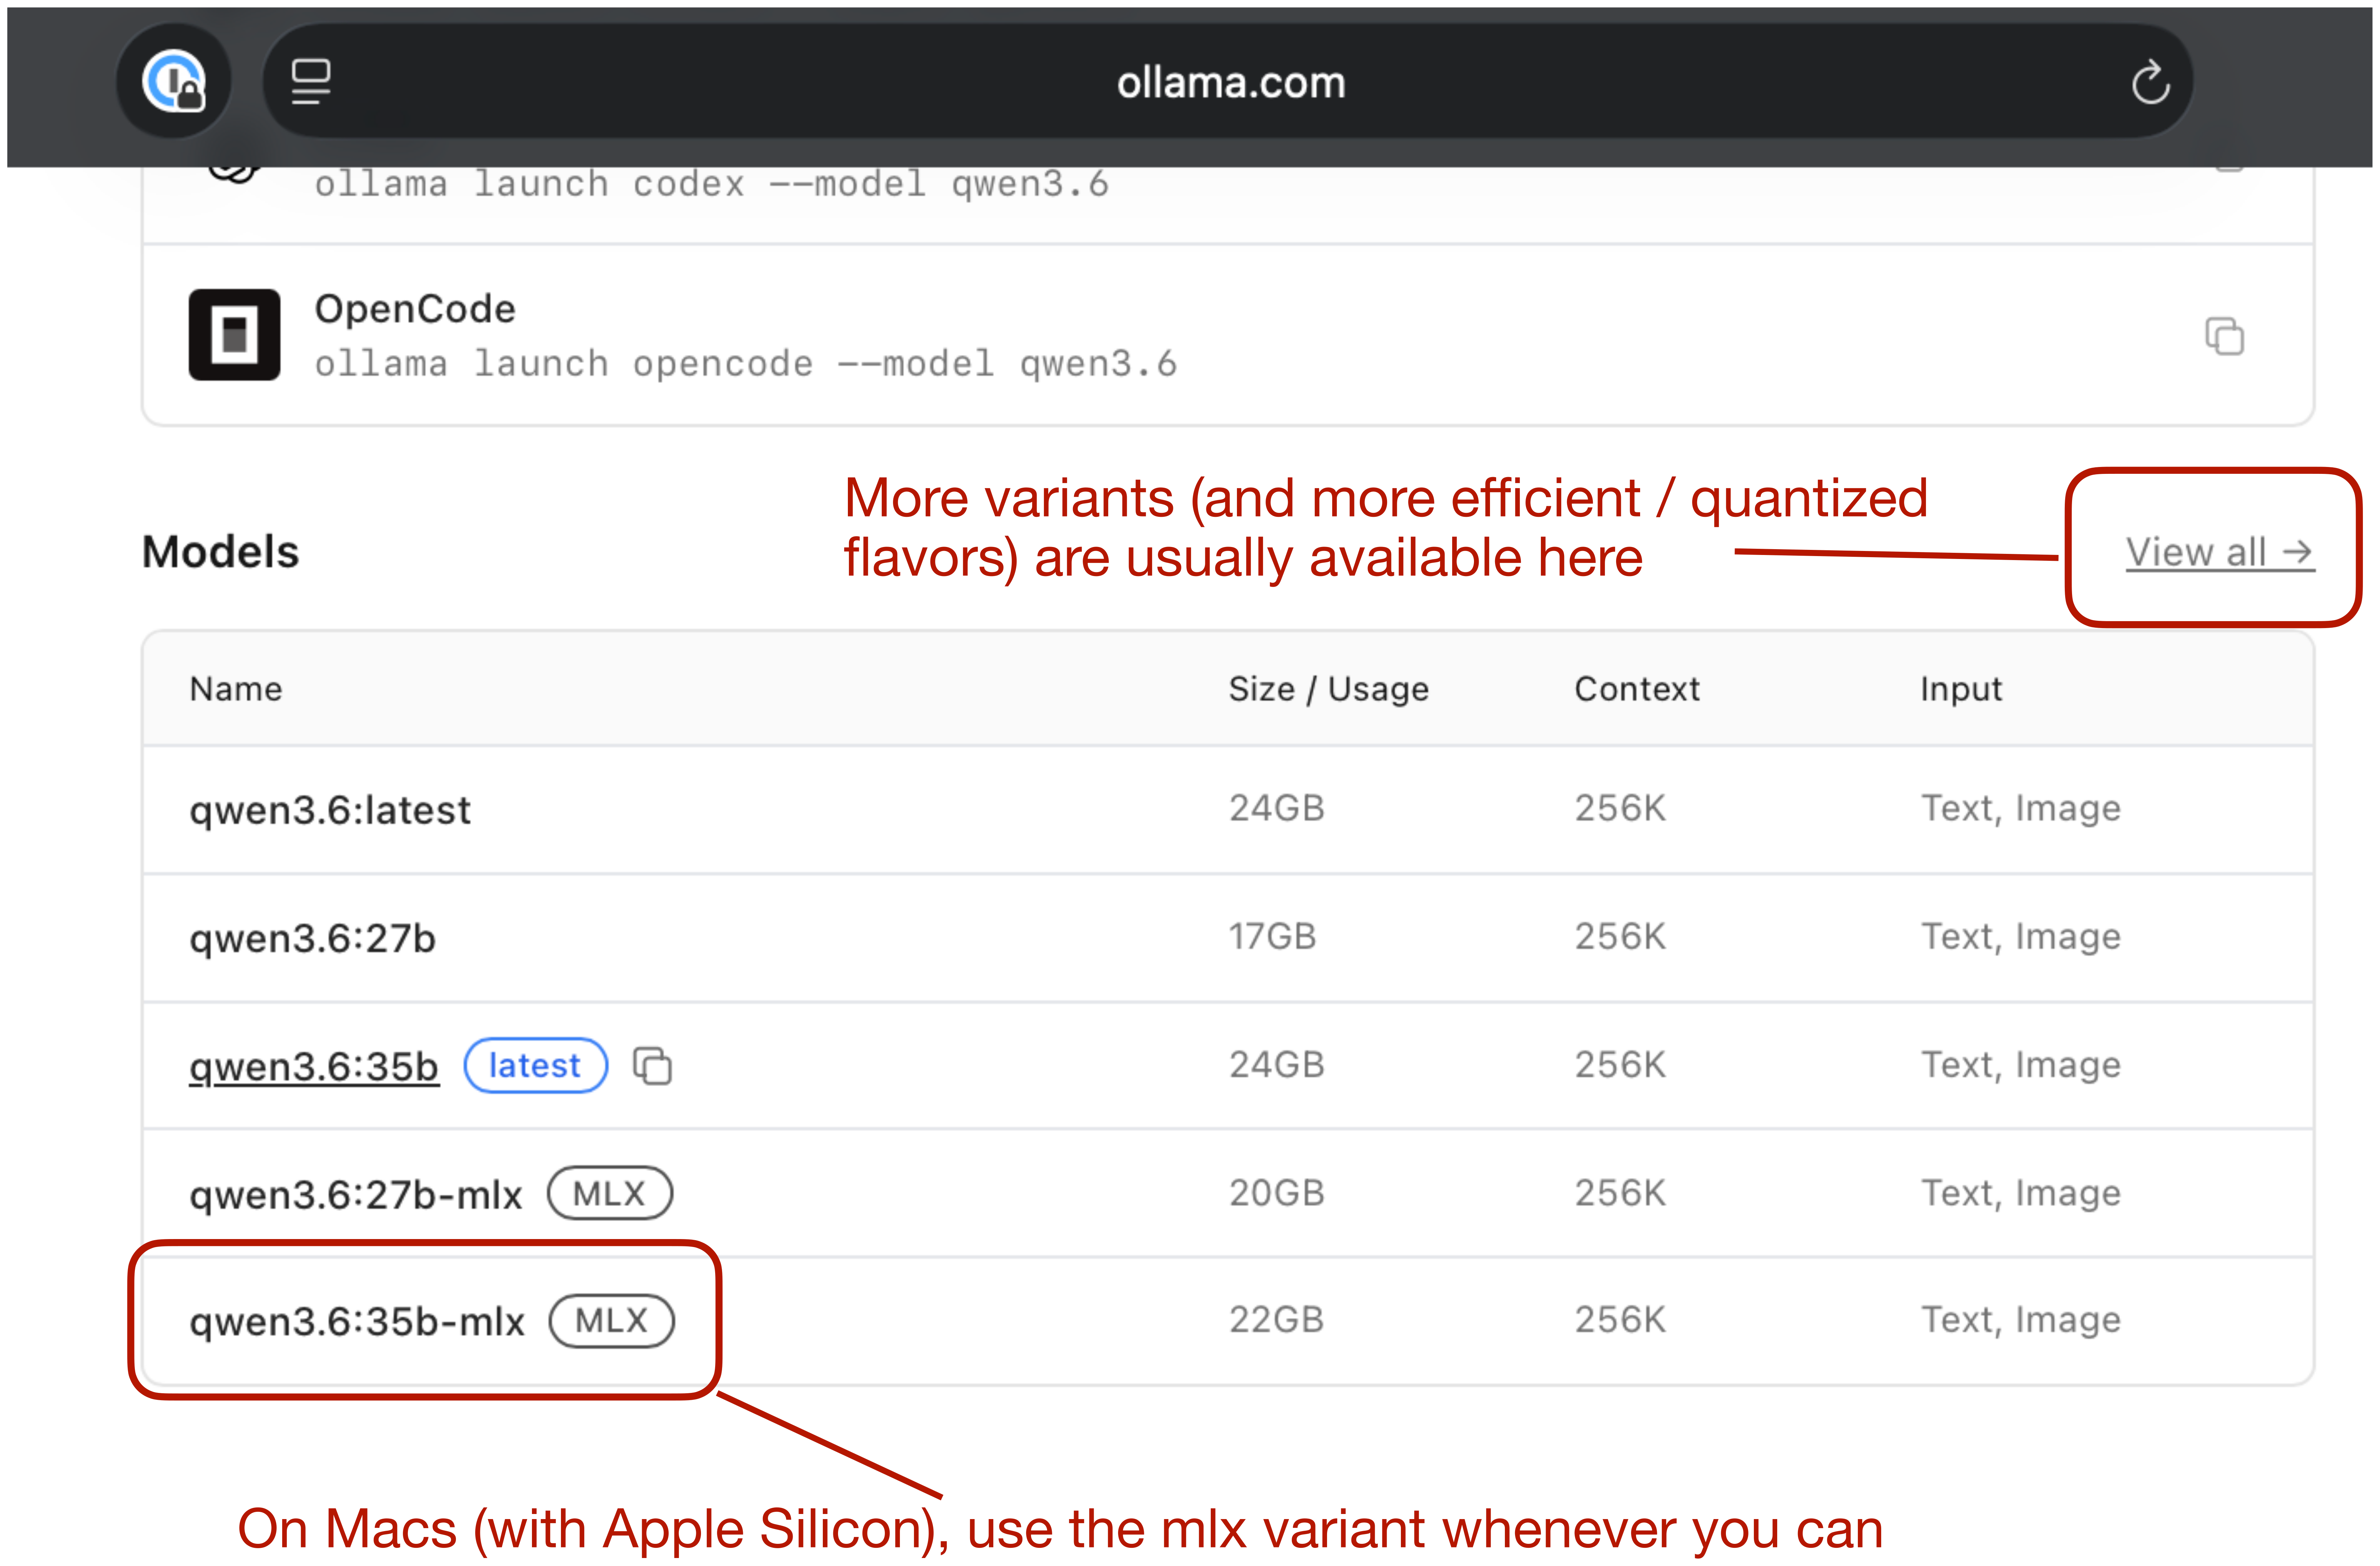
Figure 18: Regular transformer block (top) vs transformer block with hyper-connections (bottom) using annotated figures from the mHC paper, https://arxiv.org/abs/2512.24880.

The figure below focuses on the attention-layer portion of the transformer block, but the same concept applies to the second residual branch around the MoE layer.

The purpose of hyper-connections is to make the residual pathway more expressive without making the actual Attention or MoE layer wider. This is only mildly more expensive in FLOPs because the extra mappings operate over the small residual-stream axis, for example, n = 4 in DeepSeek V4, not over a huge hidden dimension.

In the original hyper-connections paper, the 7B OLMo MoE experiment goes from 13.36G to 13.38G FLOPs per token, which is basically unchanged. In terms of reported gains, there were modest (but consistent) improvements, as shown in the figure below.

(However, only looking at FLOPs is a bit simplistic. The widened residual state still has to be stored, moved through memory, mixed, etc. So the practical overhead can come more from memory traffic and implementation complexity than from arithmetic, which is not explicitly measured. However, given that DeepSeek V4 is all about efficiency, it seems to be a worthwhile addition.)

Figure 19: Hyper-connections performance versus baseline, using an annotated figure from the hyper-connections paper, https://arxiv.org/abs/2409.19606.

Also, as shown in the figure above, metrics reached the baseline’s performance using roughly half the training tokens.

The main change from regular hyper-connections (HC) to manifold-constrained hyper-connections (mHC) is that the mappings are no longer left unconstrained. In regular HC, the Res Mapping is a learned matrix that mixes the parallel residual streams, but stacking many such matrices can amplify or shrink signals unpredictably.

In mHC, this residual mapping is projected onto the manifold of doubly stochastic matrices, meaning all entries are non-negative and each row and column sums to 1. This makes the residual mixing behave more like a stable redistribution of information across streams. The Pre Mapping and Post Mapping are also constrained to be non-negative and bounded, which avoids cancellation when reading from and writing back into the widened residual state. In short, mHC keeps the richer residual mixing of HC, but adds constraints so it scales more safely, which becomes more relevant for larger (deeper) models.

Otherwise, the main idea of using parallel residual streams remains, as shown in the figure below.

Figure 20: Transformer block with hyper-connections (HC) and manifold-constrained hyper-connections (mHC) using annotated figures from the mHC paper, https://arxiv.org/abs/2512.24880.

In the mHC paper, using a 27B parameter model for the experiments, the DeepSeek team’s optimized implementation (with fusion, recomputation, and pipeline scheduling) adds only 6.7% additional training time overhead for 4 residual streams (n = 4) throughout all transformer blocks compared to the single-stream baseline.

To sum up this section, HC/mHC changes how information is carried around these layers by replacing the single residual stream with several interacting residual streams, with the additional stability constraints added in mHC, while adding minimal compute overhead. Also, it pairs well with the CSA/HCA attention changes, which modify other parts of the transformer block, which I will discuss below.

5.2 Compressed Attention via CSA and HCA

The other major DeepSeek V4 architecture change is on the attention side. Again, the motivation is that at very long context lengths, attention becomes expensive not only because of the attention score computation, but also because the KV cache grows with the sequence length. DeepSeek V4 addresses this issue with a hybrid of two compressed-attention mechanisms, Compressed Sparse Attention (CSA) and Heavily Compressed Attention (HCA).

For a refresher, I recommend checking out my previous “A Visual Guide to Attention Variants in Modern LLMs” article, which covers Multi-head Latent Attention (MLA) and DeepSeek Sparse Attention (DSA), among others.

The first thing to note is that CSA/HCA in DeepSeek V4 is a different kind of compression than the MLA-style compression used in DeepSeek V2/V3. Where MLA mainly compresses the per-token KV representation, CSA and HCA compress along the sequence dimension. So, instead of keeping one full (or compressed) KV entry for every previous token, they summarize groups of tokens into fewer compressed KV entries. Consequently, the cache gets shorter. DeepSeek V4 also uses compact compressed entries and shared-KV attention, but the main distinction from MLA is the sequence-length compression. This is illustrated in the figure below.

Figure 21: Conceptual comparison of MLA-style per-token latent caching, CSA, and HCA. MLA compresses the stored KV representation but keeps one latent entry per token. CSA shortens the sequence more mildly with m=4 and sparse top-k selection, while HCA uses much heavier sequence compression with m’=128 and dense attention over the shorter cache.


The quality tradeoff for CSA/HCA is also different from MLA. As shown in the figure above, MLA compresses the representation stored for each token, but it still keeps one latent KV entry per token. CSA and especially HCA go further by reducing the number of sequence entries themselves, so the model gives up some token-level info in exchange for much lower long-context cost.

Again, it’s all about reducing long-context cost, but this trade-off can hurt modeling quality if the compression is too strong, which is why DeepSeek V4 does not rely on one compression scheme alone but alternates between CSA and HCA. CSA uses a milder compression rate and a DeepSeek Sparse Attention (DSA)-style selector, HCA uses much heavier compression for cheaper global coverage, and both keep a local sliding-window branch for recent uncompressed tokens. This sparse selection in CSA builds on DeepSeek Sparse Attention (DSA), which I discussed in more detail in my earlier DeepSeek V3.2 write-up.

HCA is the more aggressive variant of the two. It compresses every 128 tokens into one compressed KV entry, but then uses dense attention over those heavily compressed entries. In other words, CSA keeps more details but uses sparse selection, while HCA keeps far fewer entries and can afford dense attention over them, as illustrated in the figure below. This makes the two mechanisms somewhat complementary, which is why DeepSeek V4 interleaves CSA and HCA layers rather than using only one of them.

Figure 22: CSA selects a sparse set of compressed history blocks, while HCA attends densely over more heavily compressed blocks. Both paths also include recent uncompressed KV entries through a 128-token sliding-window branch.

The DeepSeek V4 paper reports that, at a 1M-token context length, DeepSeek V4-Pro uses only 27% of the single-token inference FLOPs and 10% of the KV cache size compared with DeepSeek V3.2, which uses MLA and DeepSeek Sparse Attention (DSA). DeepSeek V4-Flash is even smaller, at 10% of the FLOPs and 7% of the KV cache size relative to DeepSeek V3.2.

Figure 23. Reported 1M-context efficiency numbers from the DeepSeek V4 paper, relative to DeepSeek V3.2.

By the way, I would not describe CSA/HCA as “better” than MLA in a general sense. CSA/HCA is a more aggressive long-context design. And it’s also more complicated for sure. Unfortunately, there is no ablation study in the paper. But overall, the paper reports strong overall modeling results, including DeepSeek V4-Flash-Base outperforming DeepSeek V3.2-Base on a majority of base-model benchmarks and strong 1M-token retrieval results, but these results are for the full DeepSeek V4 recipe, which also includes better data, Muon-based optimization, mHC, precision/storage optimizations, and training/inference-system changes.

Personally, for now, I would treat CSA/HCA as an efficiency-focused long-context design that appears to preserve modeling quality well in their large flagship model(s) but not necessarily universally better than MLA.

6. Conclusion

Overall, the interesting pattern this year is that most new open-weight models try to make long-context inference cheaper without just shrinking the model in terms of total parameters. For instance,

  • Gemma 4 reduces KV-cache memory with cross-layer KV sharing and adds capacity via per-layer embeddings.

  • Laguna XS.2 tweaks how much attention capacity each layer gets.

  • ZAYA1-8B moves attention into a compressed latent space.

  • DeepSeek V4 adds constrained residual-stream mixing and compressed long-context attention.

All of these tweaks add more complexity, which seems to be where LLM architecture is going right now.

My main takeaway is that the transformer block is still changing, but in fairly targeted ways. The basic recipe is still based on the original GPT decoder-only transformer architecture, but many parts are upgraded or replaced, and they get more specialized for longer contexts and more efficient inference, whereas the qualitative modeling performance seems largely driven by data quality (and quantity) and training recipes.

The question many of you asked me in the past is centered on when (or if) transformers are being replaced with something else. Of course, there are other designs like diffusion models, but transformers remain the status quo for state-of-the-art architecture releases.

However, with each increasing yearly release quarter, we get more and more tweaks. While it was possible to implement a basic transformer block in perhaps 50-100 lines of PyTorch code, these tweaks (esp. around the attention variants) probably 10x the code complexity. This is not an inherently bad thing as these tweaks reduce (not increase) runtime costs. However, it’s becoming increasingly difficult to gain a clear understanding of the individual components and their interactions.

Figure 24: The evolution from GPT-2 (2019) to DeepSeek V4-Pro (2026)

For instance, I am fairly certain that someone who is diving into LLM architectures for the first time will be totally overwhelmed when seeing the DeepSeek V4 source code. However, by starting with the original decoder-style LLM (GPT/GPT-2) and then gradually adding / learning about these new components one at a time, we can keep the learning effort manageable. The moral of the story, I guess, is to keep learning, one architecture at a time :).


By the way, I am very excited to share that I finished writing Build A Reasoning Model (From Scratch) and all chapters are in early access now. The publisher and I worked hard on the final layouts in the past month, and it’s going to be send to the printer this week. (Good news: the print version will be in color this time!)

This is probably my most ambitious book so far. I spent about 1.5 years writing it, and a large number of experiments went into it. It is also probably the book I worked hardest on in terms of time, effort, and polish, and I hope you’ll enjoy it.

Build a Reasoning Model (From Scratch) on Manning and Amazon.

The main topics are

  • evaluating reasoning models

  • inference-time scaling

  • self-refinement

  • reinforcement learning

  • distillation

There is a lot of discussion around “reasoning” in LLMs, and I think the best way to understand what it really means in the context of LLMs is to implement one from scratch!

  • Amazon (pre-order of Kindle ebook and print paperback)

My Workflow for Understanding LLM Architectures

18 April 2026 at 11:24

Many people asked me over the past months to share my workflow for how I come up with the LLM architecture sketches and drawings in my articles, talks, and the LLM-Gallery. So I thought it would be useful to document the process I usually follow.

The short version is that I usually start with the official technical reports, but these days, papers are often less detailed than they used to be, especially for most open-weight models from industry labs.

The good part is that if the weights are shared on the Hugging Face Model Hub and the model is supported in the Python transformers library, we can usually inspect the config file and the reference implementation directly to get more information about the architecture details. And “working” code doesn’t lie.

Figure 1: The basic motivation for this workflow is that papers are often less detailed these days, but a working reference implementation gives us something concrete to inspect.

I should also say that this is mainly a workflow for open-weight models. It doesn’t really apply to models like ChatGPT, Claude, or Gemini, where the weights and details are proprietary.

Also, this is intentionally a fairly manual process. You could automate parts of it. But if the goal is to learn how these architectures work, then doing a few of these by hand is, in my opinion, still one of the best exercises.

Figure 2: At a high level, the workflow goes from config files and code to architecture insights.

Read more

Components of A Coding Agent

4 April 2026 at 11:45

In this article, I want to cover the overall design of coding agents and agent harnesses: what they are, how they work, and how the different pieces fit together in practice. Readers of my Build a Large Language Model (From Scratch) and Build a Large Reasoning Model (From Scratch) books often ask about agents, so I thought it would be useful to write a reference I can point to.

More generally, agents have become an important topic because much of the recent progress in practical LLM systems is not just about better models, but about how we use them. In many real-world applications, the surrounding system, such as tool use, context management, and memory, plays as much of a role as the model itself. This also helps explain why systems like Claude Code or Codex can feel significantly more capable than the same models used in a plain chat interface.

In this article, I lay out six of the main building blocks of a coding agent.

Claude Code, Codex CLI, and Other Coding Agents

You are probably familiar with Claude Code or the Codex CLI, but just to set the stage, they are essentially agentic coding tools that wrap an LLM in an application layer, a so-called agentic harness, to be more convenient and better-performing for coding tasks.

Figure 1: Claude Code CLI, Codex CLI, and my Mini Coding Agent.

Coding agents are engineered for software work where the notable parts are not only the model choice but the surrounding system, including repo context, tool design, prompt-cache stability, memory, and long-session continuity.

That distinction matters because when we talk about the coding capabilities of LLMs, people often collapse the model, the reasoning behavior, and the agent product into one thing. But before getting into the coding agent specifics, let me briefly provide a bit more context on the difference between the broader concepts, the LLMs, reasoning models, and agents.

On The Relationship Between LLMs, Reasoning Models, and Agents

An LLM is the core next-token model. A reasoning model is still an LLM, but usually one that was trained and/or prompted to spend more inference-time compute on intermediate reasoning, verification, or search over candidate answers.

An agent is a layer on top, which can be understood as a control loop around the model. Typically, given a goal, the agent layer (or harness) decides what to inspect next, which tools to call, how to update its state, and when to stop, etc.

Roughly, we can think about the relationship as this: the LLM is the engine, a reasoning model is a beefed-up engine (more powerful, but more expensive to use), and an agent harness helps us the model. The analogy is not perfect, because we can also use conventional and reasoning LLMs as standalone models (in a chat UI or Python session), but I hope it conveys the main point.

Figure 2: The relationship between conventional LLM, reasoning LLM (or reasoning model), and an LLM wrapped in an agent harness.

In other words, the agent is the system that repeatedly calls the model inside an environment.

So, in short, we can summarize it like this:

  • LLM: the raw model

  • Reasoning model: an LLM optimized to output intermediate reasoning traces and to verify itself more

  • Agent: a loop that uses a model plus tools, memory, and environment feedback

  • Agent harness: the software scaffold around an agent that manages context, tool use, prompts, state, and control flow

  • Coding harness: a special case of an agent harness; i.e., a task-specific harness for software engineering that manages code context, tools, execution, and iterative feedback

As listed above, in the context of agents and coding tools, we also have the two popular terms agent harness and (agentic) coding harness. A coding harness is the software scaffold around a model that helps it write and edit code effectively. And an agent harness is a bit broader and not specific to coding (e.g., think of OpenClaw). Codex and Claude Code can be considered coding harnesses.

Anyways, A better LLM provides a better foundation for a reasoning model (which involves additional training), and a harness gets more out of this reasoning model.

Sure, LLMs and reasoning models are also capable of solving coding tasks by themselves (without a harness), but coding work is only partly about next-token generation. A lot of it is about repo navigation, search, function lookup, diff application, test execution, error inspection, and keeping all the relevant information in context. (Coders may know that this is hard mental work, which is why we don’t like to be disrupted during coding sessions :)).

Figure 3. A coding harness combines three layers: the model family, an agent loop, and runtime supports. The model provides the “engine”, the agent loop drives iterative problem solving, and the runtime supports provide the plumbing. Within the loop, “observe” collects information from the environment, “inspect” analyzes that information, “choose” selects the next step, and “act” executes it.

The takeaway here is that a good coding harness can make a reasoning and a non-reasoning model feel much stronger than it does in a plain chat box, because it helps with context management and more.

The Coding Harness

As mentioned in the previous section, when we say harness, we typically mean the software layer around the model that assembles prompts, exposes tools, tracks file state, applies edits, runs commands, manages permissions, caches stable prefixes, stores memory, and many more.

Today, when using LLMs, this layer shapes most of the user experience compared to prompting the model directly or using web chat UI (which is closer to “chat with uploaded files”).

Since, in my view, the vanilla versions of LLMs nowadays have very similar capabilities (e.g., the vanilla versions of GPT-5.4, Opus 4.6, and GLM-5 or so), the harness can often be the distinguishing factor that makes one LLM work better than another.

This is speculative, but I suspect that if we dropped one of the latest, most capable open-weight LLMs, such as GLM-5, into a similar harness, it could likely perform on par with GPT-5.4 in Codex or Claude Opus 4.6 in Claude Code. That said, some harness-specific post-training is usually beneficial. For example, OpenAI historically maintained separate GPT-5.3 and GPT-5.3-Codex variants.

In the next section, I want to go more into the specifics and discuss the core components of a coding harness using my Mini Coding Agent: https://github.com/rasbt/mini-coding-agent.

Figure 4: Main harness features of a coding agent / coding harness that will be discussed in the following sections.

By the way, in this article, I use the terms “coding agent” and “coding harness” somewhat interchangeably for simplicity. (Strictly speaking, the agent is the model-driven decision-making loop, while the harness is the surrounding software scaffold that provides context, tools, and execution support.)

Figure 5: Minimal but fully working, from-scratch Mini Coding Agent (implemented in pure Python)

Anyways, below are six main components of coding agents. You can check out the source code of my minimal but fully working, from-scratch Mini Coding Agent (implemented in pure Python), for more concrete code examples. The code annotates the six components discussed below via code comments:

##############################
#### Six Agent Components ####
##############################
# 1) Live Repo Context -> WorkspaceContext
# 2) Prompt Shape And Cache Reuse -> build_prefix, memory_text, prompt
# 3) Structured Tools, Validation, And Permissions -> build_tools, run_tool, validate_tool, approve, parse, path, tool_*
# 4) Context Reduction And Output Management -> clip, history_text
# 5) Transcripts, Memory, And Resumption -> SessionStore, record, note_tool, ask, reset
# 6) Delegation And Bounded Subagents -> tool_delegate

1. Live Repo Context

This is maybe the most obvious component, but it is also one of the most important ones.

When a user says “fix the tests” or “implement xyz,” the model should know whether it is inside a Git repo, what branch it is on, which project documents might contain instructions, and so on.

That’s because those details often change or affect what the correct action is. For example, “Fix the tests” is not a self-contained instruction. If the agent sees AGENTS.md or a project README, it may learn which test command to run, etc. If it knows the repo root and layout, it can look in the right places instead of guessing.

Also, the git branch, status, and commits can help provide more context about what changes are currently in progress and where to focus.

Figure 6: The agent harness first builds a small workspace summary that gets combined with the user request for additional project context.

The takeaway is that the coding agent collects info (”stable facts” as a workspace summary) upfront before doing any work, so that it’s is not starting from zero, without context, on every prompt.

2. Prompt Shape And Cache Reuse

Once the agent has a repo view, the next question is how to feed that information to the model. The previous figure showed a simplified view of this (“Combined prompt: prefix + request”), but in practice, it would be relatively wasteful to combine and re-process the workspace summary on every user query.

I.e., coding sessions are repetitive, and the agent rules usually stay the same. The tool descriptions usually stay the same, too. And even the workspace summary usually stays (mostly) the same. The main changes are usually the latest user request, the recent transcript, and maybe the short-term memory.

“Smart” runtimes don’t rebuild everything as one giant undifferentiated prompt on every turn, as illustrated in the figure below.

Figure 7: The agent harness builds a stable prompt prefix, adds the changing session state, and then feeds that combined prompt to the model.

The main difference from section 1 is that section 1 was about gathering repo facts. Here, we are now interested in packaging and caching those facts efficiently for repeated model calls.

The “stable” “Stable prompt prefix” means that the information contained there doesn’t change too much. It usually contains the general instructions, tool descriptions, and the workspace summary. We don’t want to waste compute on rebuilding it from scratch in each interaction if nothing important has changed.

The other components are updated more frequently (usually each turn). This includes short-term memory, the recent transcript, and the newest user request.

In short, the caching aspect for the “Stable prompt prefix” is simply that a smart runtime tries to reuse that part.

3. Tool Access and Use

Tool access and tool use are where it starts to feel less like chat and more like an agent.

A plain model can suggest commands in prose, but an LLM in a coding harness should do something narrower and more useful and be actually able to execute the command and retrieve the results (versus us calling the command manually and pasting the results back into the chat).

But instead of letting the model improvise arbitrary syntax, the harness usually provides a pre-defined list of allowed and named tools with clear inputs and clear boundaries. (But of course, something like Python subprocess.call can be part of this so that the agent could also execute an arbitrary wide list of shell commands.)

The tool-use flow is illustrated in the figure below.

Figure 8: The model emits a structured action, the harness validates it, optionally asks for approval, executes it, and feeds the bounded result back into the loop.

To illustrate this, below is an example of how this usually looks to the user using my Mini Coding Agent. (This is not as pretty as Claude Code or Codex because it is very minimal and uses plain Python without any external dependencies.)

Figure 9: Illustration of a tool call approval request in the Mini Coding Agent.

Here, the model has to choose an action that the harness recognizes, like list files, read a file, search, run a shell command, write a file, etc. It also has to provide arguments in a shape that the harness can check.

So when the model asks to do something, the runtime can stop and run programmatic checks like

  • “Is this a known tool?”,

  • “Are the arguments valid?”,

  • “Does this need user approval?”

  • “Is the requested path even inside the workspace?”

Only after those checks pass does anything actually run.

While running coding agents, of course, carries some risk, the harness checks also improve reliability because the model doesn’t execute totally arbitrary commands.

Also, besides rejecting malformed actions and approval gating, file access can be kept inside the repo by checking file paths.

In a sense, the harness is giving the model less freedom, but it also improves the usability at the same time.

4. Minimizing Context Bloat

Context bloat is not a unique problem of coding agents but an issue for LLMs in general. Sure, LLMs are supporting longer and longer contexts these days (and I recently wrote about the attention variants that make it computationally more feasible), but long contexts are still expensive and can also introduce additional noise (if there is a lot of irrelevant info).

Coding agents are even more susceptible to context bloat than regular LLMs during multi-turn chats, because of repeated file reads, lengthy tool outputs, logs, etc.

If the runtime keeps all of that at full fidelity, it will run out of available context tokens pretty quickly. So, a good coding harness is usually pretty sophisticated about handling context bloat beyond just cutting or summarizing information like regular chat UIs.

Conceptually, the context compaction in coding agents might work as summarized in the figure below. Specifically, we are zooming a bit further into the clip (step 6) part of Figure 8 in the previous section.

Figure 10: Large outputs are clipped, older reads are deduplicated, and the transcript is compressed before it goes back into the prompt.

A minimal harness uses at least two compaction strategies to manage that problem.

The first is clipping, which shortens long document snippets, large tool outputs, memory notes, and transcript entries. In other words, it prevents any one piece of text from taking over the prompt budget just because it happened to be verbose.

The second strategy is transcript reduction or summarization, which turns the full session history (more on that in the next section) into a smaller promptable summary.

A key trick here is to keep recent events richer because they are more likely to matter for the current step. And we compress older events more aggressively because they are likely less relevant.

Additionally, we also deduplicate older file reads so the model does not keep seeing the same file content over and over again just because it was read multiple times earlier in the session.

Overall, I think this is one of the underrated, boring parts of good coding-agent design. A lot of apparent “model quality” is really context quality.

5. Structured Session Memory

In practice, all these 6 core concepts covered here are highly intertwined, and the different sections and figures cover them with different focuses or zoom levels. In the previous section, we covered prompt-time use of history and how we build a compact transcript. The question there is: how much of the past should go back into the model on the next turn? So the emphasis is compression, clipping, deduplication, and recency.

Now, this section, structured session memory, is about the storage-time structure of history. The question here is: what does the agent keep over time as a permanent record? So the emphasis is that the runtime keeps a fuller transcript as a durable state, alongside a lighter memory layer that is smaller and gets modified and compacted rather than just appended to.

To summarize, a coding agent separates state into (at least) two layers:

  • working memory: the small, distilled state the agent keeps explicitly

  • a full transcript: this covers all the user requests, tool outputs, and LLM responses

Figure 11: New events get appended to a full transcript and summarized in a working memory. The session files on disk are usually stored as JSON files.

The figure above illustrates the two main session files, the full transcript and the working memory, that usually get stored as JSON files on disk. As mentioned before, the full transcript stores the whole history, and it’s resumable if we close the agent. The working memory is more of a distilled version with the currently most important info, which is somewhat related to the compact transcript.

But the compact transcript and working memory have slightly different jobs. The compact transcript is for prompt reconstruction. Its job is to give the model a compressed view of recent history so it can continue the conversation without seeing the full transcript every turn. The working memory is more meant for task continuity. Its job is to keep a small, explicitly maintained summary of what matters across turns, things like the current task, important files, and recent notes.

Following step 4 in the figure above, the latest user request, together with the LLM response and tool output, would then be recorded as a “new event” in both the full transcript and working memory, in the next round, which is not shown to reduce clutter in the figure above.

6. Delegation With (Bounded) Subagents

Once an agent has tools and state, one of the next useful capabilities is delegation.

The reason is that it allows us to parallelize certain work into subtasks via subagents and speed up the main task. For example, the main agent may be in the middle of one task and still need a side answer, for example, which file defines a symbol, what a config says, or why a test is failing. It is useful to split that off into a bounded subtask instead of forcing one loop to carry every thread of work at once.

(In my mini coding agent, the implementation is simpler, and the child still runs synchronously, but the underlying idea is the same.)

A subagent is only useful if it inherits enough context to do real work. But if we don’t restrict it, we now have multiple agents duplicating work, touching the same files, or spawning more subagents, and so on.

So the tricky design problem is not just how to spawn a subagent but also how to bind one :).

Figure 12: The subagent inherits enough context to be useful, but it runs inside tighter boundaries than the main agent.

The trick here is that the subagent inherits enough context to be useful, but also has it constrained (for example, read-only and restricted in recursion depth)

Claude Code has supported subagents for a long time, and Codex added them more recently. Codex does not generally force subagents into read-only mode. Instead, they usually inherit much of the main agent’s sandbox and approval setup. So, the boundary is more about task scoping, context, and depth.

Components Summary

The section above tried to cover the main components of coding agents. As mentioned before, they are more or less deeply intertwined in their implementation. However, I hope that covering them one by one helps with the overall mental model of how coding harnesses work, and why they can make the LLM more useful compared to simple multi-turn chats.

Figure 13: Six main features of a coding harness discussed in previous sections.

If you are interested in seeing these implemented in clean, minimalist Python code, you may like my Mini Coding Agent.

How Does This Compare To OpenClaw?

OpenClaw may be an interesting comparison, but it is not quite the same kind of system.

OpenClaw is more like a local, general agent platform that can also code, rather than being a specialized (terminal) coding assistant.

There are still several overlaps with a coding harness:

  • it uses prompt and instruction files in the workspace, such as AGENTS.md, SOUL.md, and TOOLS.md

  • it keeps JSONL session files and includes transcript compaction and session management

  • it can spawn helper sessions and subagents

  • etc.

However, as mentioned above, the emphasis is different. Coding agents are optimized for a person working in a repository and asking a coding assistant to inspect files, edit code, and run local tools efficiently. OpenClaw is more optimized for running many long-lived local agents across chats, channels, and workspaces, with coding as one important workload among several others.


I am excited to share that I finished writing Build A Reasoning Model (From Scratch) and all chapters are in early access yet. The publisher is currently working on the layouts, and it should be available this summer.

This is probably my most ambitious book so far. I spent about 1.5 years writing it, and a large number of experiments went into it. It is also probably the book I worked hardest on in terms of time, effort, and polish, and I hope you’ll enjoy it.

Build a Reasoning Model (From Scratch) on Manning and Amazon.

The main topics are

  • evaluating reasoning models

  • inference-time scaling

  • self-refinement

  • reinforcement learning

  • distillation

There is a lot of discussion around “reasoning” in LLMs, and I think the best way to understand what it really means in the context of LLMs is to implement one from scratch!

A Visual Guide to Attention Variants in Modern LLMs

22 March 2026 at 11:55

I had originally planned to write about DeepSeek V4. Since it still hasn’t been released, I used the time to work on something that had been on my list for a while, namely, collecting, organizing, and refining the different LLM architectures I have covered over the past few years.

So, over the last two weeks, I turned that effort into an LLM architecture gallery (with 45 entries at the time of this writing), which combines material from earlier articles with several important architectures I had not documented yet. Each entry comes with a visual model card, and I plan to keep the gallery updated regularly.

You can find the gallery here: https://sebastianraschka.com/llm-architecture-gallery/

Figure 1: Overview of the LLM architecture gallery and its visual model cards.

After I shared the initial version, a few readers also asked whether there would be a poster version. So, there is now a poster version via Redbubble. I ordered the Medium size (26.9 x 23.4 in) to check how it looks in print, and the result is sharp and clear. That said, some of the smallest text elements are already quite small at that size, so I would not recommend the smaller versions if you intend to have everything readable.

Figure 2: Poster version of the architecture gallery with some random objects for scale.

Alongside the gallery, I was/am also working on short explainers for a few core LLM concepts.

So, in this article, I thought it would be interesting to recap all the recent attention variants that have been developed and used in prominent open-weight architectures in recent years.

My goal is to make the collection useful both as a reference and as a lightweight learning resource. I hope you find it useful and educational!

1. Multi-Head Attention (MHA)

Self-attention lets each token look at the other visible tokens in the sequence, assign them weights, and use those weights to build a new context-aware representation of the input.

Multi-head attention (MHA) is the standard transformer version of that idea. It runs several self-attention heads in parallel with different learned projections, then combines their outputs into one richer representation.

Figure 3: Olmo 2 as an example architecture using MHA.

The sections below start with a whirlwind tour of explaining self-attention to explain MHA. It’s more meant as a quick overview to set the stage for related attention concepts like grouped-query attention, sliding window attention, and so on. If you are interested in a longer, more detailed self-attention coverage, you might like my longer Understanding and Coding Self-Attention, Multi-Head Attention, Causal-Attention, and Cross-Attention in LLMs article.

EXAMPLE ARCHITECTURES

GPT-2, OLMo 2 7B, and OLMo 3 7B

1.2 Historical Tidbits And Why Attention Was Invented

Attention predates transformers and MHA. Its immediate background is encoder-decoder RNNs for translation.

In those older systems, an encoder RNN would read the source sentence token by token and compress it into a sequence of hidden states, or in the simplest version into one final state. Then the decoder RNN had to generate the target sentence from that limited summary. This worked for short and simple cases, but it created an obvious bottleneck once the relevant information for the next output word lived somewhere else in the input sentence.

In short, the limitation is that the hidden state can’t store infinitely much information or context, and sometimes it would be useful to just refer back to the full input sequence.

The translation example below shows one of the limitations of this idea. For instance, a sentence can preserve many locally reasonable word choices and still fail as a translation when the model treats the problem too much like a word-by-word mapping. (The top panel shows an exaggerated example where we translate the sentence word by word; obviously, the grammar in the resulting sentence is wrong.) In reality, the correct next word depends on sentence-level structure and on which earlier source words matter at that step. Of course, this could still be translated fine with an RNN, but it would struggle with longer sequences or knowledge retrieval tasks because the hidden state can only store so much information as mentioned earlier.

Figure 4: Translation can fail even when many individual word choices look reasonable because sentence-level structure still matters (Original source LLMs-from-scratch).

The next figure shows that change more directly. When the decoder is producing an output token, it should not be limited to one compressed memory path. It should be able to reach back to the more relevant input tokens directly.

Figure 5: Attention breaks the RNN bottleneck by letting the current output position revisit the full input sequence instead of relying on one compressed state alone (Original source LLMs-from-scratch).

Transformers keep that core idea from the aforementioned attention-modified RNN but remove the recurrence. In the classic Attention Is All You Need paper, attention becomes the main sequence-processing mechanism itself (instead of being just part of an RNN encoder-decoder.)

In transformers, that mechanism is called self-attention, where each token in the sequence computes weights over all other tokens and uses them to mix information from those tokens into a new representation. Multi-head attention is the same mechanism run several times in parallel.

1.3 The Masked Attention Matrix

For a sequence of T tokens, attention needs one row of weights per token, so overall we get a T x T matrix.

Each row answers a simple question. When updating this token, how much should each visible token matter? In a decoder-only LLM, future positions are masked out, which is why the upper-right part of the matrix is grayed out in the figure below.

Self-attention is fundamentally about learning these token-to-token weight patterns, under a causal mask, and then using them to build context-aware token representations.

Figure 6: A concrete masked attention matrix where each row belongs to one token, each entry is an attention weight, and future-token entries are removed by the causal mask (Original source Understanding and Coding Self-Attention).

1.4 Self-Attention Internals

The next figure shows how the transformer computes the attention matrix (A) from the input embeddings X, which is then used to produce the transformed inputs (Z).

Here Q, K, and V stand for queries, keys, and values. The query for a token represents what that token is looking for, the key represents what each token makes available for matching, and the value represents the information that gets mixed into the output once the attention weights have been computed.

The steps are as follows:

  • Wq, Wk, and Wv are weight matrices that project the input embeddings into Q, K, and V

  • QK^T produces the raw token-to-token relevance scores

  • softmax converts those scores into the normalized attention matrix A that we discussed in the previous section

  • A is applied to V to produce the output matrix Z

Note that the attention matrix is not a separate hand-written object. It emerges from Q, K, and softmax.

Figure 7: The full single-head pipeline, from input embeddings X to the normalized attention matrix A and output representations Z (Original source Understanding and Coding Self-Attention).

The next figure shows the same concept as the previous figure but the attention matrix computation is hidden inside the “scaled-dot-product attention” box, and we perform the computation only for one input token instead of all input tokens. This is to show a compact form of self-attention with a single head before extending this to multi-head attention in the next section.

Figure 8: One attention head is already a complete mechanism. One set of learned projections produces one attention matrix and one context-aware output stream (Original source Understanding and Coding Self-Attention).

1.5 From One Head To Multi-Head Attention

One set of Wq/Wk/Wv matrices gives us one attention head, which means one attention matrix and one output matrix Z. (This concept was illustrated in the previous section.)

Multi-head attention simply runs several of these heads in parallel with different learned projection matrices.

This is useful because different heads can specialize in different token relationships. One head might focus on short local dependencies, another on broader semantic links, and another on positional or syntactic structure.

Figure 9: Multi-head attention keeps the same basic attention recipe, but repeats it across several heads in parallel so the model can learn several token-to-token patterns at once (Original source Understanding and Coding Self-Attention).

2. Grouped-Query Attention (GQA)

Grouped-query attention is an attention variant derived from standard MHA. It was introduced in the 2023 paper GQA: Training Generalized Multi-Query Transformer Models from Multi-Head Checkpoints by Joshua Ainslie and colleagues.

Instead of giving every query head its own keys and values, it lets several query heads share the same key-value projections, which makes KV caching much cheaper (primarily as a memory reduction) without changing the overall decoder recipe very much.

Figure 10: GQA keeps the same overall attention pattern as MHA, but collapses the number of key-value heads by sharing them across multiple query heads (Original source: The Big LLM Architecture Comparison).

EXAMPLE ARCHITECTURES

Dense: Llama 3 8B, Qwen3 4B, Gemma 3 27B, Mistral Small 3.1 24B, SmolLM3 3B, and Tiny Aya 3.35B.
Sparse (Mixture-of-Experts): Llama 4 Maverick, Qwen3 235B-A22B, Step 3.5 Flash 196B, and Sarvam 30B.

2.1 Why GQA Became Popular

In my architecture comparison article, I framed GQA as the new standard replacement for classic multi-head attention (MHA). The reason is that standard MHA gives every head its own keys and values, which is more optimal from a modeling perspective but expensive once we have to keep all of that state in the KV cache during inference.

In GQA, we keep a larger set of query heads, but we reduce the number of key-value heads and let multiple queries share them. That lowers both parameter count and KV-cache traffic without making drastic implementation changes like multi-head latent attention (MLA), which will be discussed later.

In practice, that made and keeps it a very popular choice for labs that wanted something cheaper than MHA but simpler to implement than newer compression-heavy alternatives like MLA.

2.2 GQA Memory Savings

GQA results in big savings in KV storage, since the fewer key-value heads we keep per layer, the less cached state we need per token. That is why GQA becomes more useful as sequence length grows.

GQA is also a spectrum. If we reduce all the way down to one shared K/V group, we are effectively in multi-query attention territory, which is even cheaper but can hurt modeling quality more noticeably. The sweet spot is usually somewhere in between multi-query attention (1 shared group) and MHA (where K/V groups are equal to the number of queries), where the cache savings are large but the modeling degradation relative to MHA stays modest.

Figure 11: Lower is better. Once the context window grows, KV-cache savings become more pronounced. (Original source: LLMs-from-scratch GQA materials)

2.3 Why GQA Still Matters In 2026

More advanced variants such as MLA are becoming popular because they can offer better modeling performance at the same KV efficiency levels (e.g., as discussed in the ablation studies of the DeepSeek-V2 paper), but they also involve a more complicated implementation and a more complicated attention stack.

GQA remains appealing because it is robust, easier to implement, and also easier to train (since there are fewer hyperparameter tunings necessary, based on my experience).

That is why some of the newer releases still stay deliberately classic here. E.g., in my Spring Architectures article, I mentioned that MiniMax M2.5 and Nanbeige 4.1 as models that remained very classic, using only grouped-query attention without piling on other efficiency tricks. Sarvam is a particularly useful comparison point as well: the 30B model keeps classic GQA, while the 105B version switches to MLA.

Figure 12: Total KV cache sizes for 105B Sarvam (using MLA) versus 30B Sarvam (using GQA), versus using plain MHA.

3. Multi-Head Latent Attention (MLA)

The motivation behind Multi-head Latent Attention (MLA) is similar to Grouped-Query Attention (GQA). Both are solutions for reducing KV-cache memory requirements. The difference between GQA and MLA is that MLA shrinks the cache by compressing what gets stored rather than by reducing how many K/Vs are stored by sharing heads.

Figure 13: Unlike GQA, MLA does not reduce KV cost by grouping heads. It reduces it by caching a compressed latent representation. Note that it is also applied to the query, which is not shown for simplicity (Original source:The Big LLM Architecture Comparison).

MLA, originally proposed in the DeepSeek-V2 paper, became such a defining DeepSeek-era idea (especially after DeepSeek-V3 and R1). It is more complicated to implement than GQA, more complicated to serve, but nowadays also often more compelling once model size and context length get large enough that cache traffic starts to dominate, because at the same rate of memory reduction, it could maintain better modeling performance (more on that later).

EXAMPLE ARCHITECTURES

DeepSeek V3, Kimi K2, GLM-5, Ling 2.5, Mistral Large 3, and Sarvam 105B

3.1 Compression, Not Sharing

Instead of caching full-resolution key and value tensors as in MHA and GQA, MLA stores a latent representation and reconstructs the usable state when needed. Essentially, it is a cache compression strategy embedded inside attention, as illustrated in the previous figure.

The figure below shows the savings compared to regular MHA.

Figure 14: Once context length grows, the savings from caching a latent representation instead of full K/V tensors become very visible (Original source: LLMs-from-scratch MLA section).

3.2 MLA Ablation Studies

The DeepSeek-V2 paper provided some ablations where GQA looked worse than MHA in terms of modeling performance, while MLA held up much better and could even outperform MHA when tuned carefully. That is a much stronger justification than “it (also) saves memory.”

In other words, MLA is a preferable attention mechanism for DeepSeek not just because it was efficient, but because it looked like a quality-preserving efficiency move at large scale. (But colleagues also told me that MLA only works well at a certain size. For smaller models, let’s say <100B, GQA seems to work better, or, is at least easier to tune and get right.)

Figure 15: GQA drops below MHA here, while MLA remains competitive and can even slightly outperform it. Underlying paper: DeepSeek-V2.

Below is again the comparison between GQA in 30B Sarvam versus MLA in 105B Sarvam.

Figure 16: GQA and MLA are solving the same bottleneck from different directions. The tradeoff is simplicity versus better modeling performance for larger models.

3.3 How MLA Spread After DeepSeek

Once DeepSeek V3/R1, V3.1 etc. normalized the design after its introduction in V2, it started showing up in a second wave of architectures. Kimi K2 kept the DeepSeek recipe and scaled it up. GLM-5 adopted MLA together with DeepSeek Sparse Attention (from DeepSeek V3.2). Ling 2.5 paired MLA with a linear-attention hybrid. Sarvam released two models where the 30B model stayed with classic GQA and the 105B model switched to MLA.

That last pair is particularly useful as it puts the technical-complexity discussion aside. I.e., the Sarvam team implemented both variants and deliberately chose to then use GQA for one variant and MLA for the other. So, in a sense, that makes MLA feel less like a theoretical alternative and more like a concrete architectural upgrade path once a family scales up.

4. Sliding Window Attention (SWA)

Sliding window attention reduces the memory and compute cost of long-context inference by limiting how many previous tokens each position can attend to. Instead of attending to the entire prefix, each token only attends to a fixed window of recent tokens around its position. Because attention is restricted to a local token neighborhood, this mechanism is often referred to as local attention.

Some architectures combine these local layers with occasional global attention layers so that information can still propagate across the entire sequence.

Figure 17: The conceptual shift is simple. Regular attention is global attention, while sliding-window attention is local attention. Global attention lets every token see the full prefix; SWA turns many of those layers into local attention layers (Original source: The Big LLM Architecture Comparison).

EXAMPLE ARCHITECTURES

Gemma 3 27B, OLMo 3 32B, Xiaomi MiMo-V2-Flash, Arcee Trinity, Step 3.5 Flash, and Tiny Aya

4.1 Gemma 3 As A Reference Point

Gemma 3 is still one of the clearest recent SWA examples because it is easy to compare against Gemma 2. Gemma 2 already used a hybrid attention setup with a 1:1 ratio between local and global layers and a 4096-token window. Gemma 3 pushed this further to a 5:1 ratio and reduced the window size to 1024.

The key finding was not that local attention is cheaper, because that was already known. Here, the more interesting takeaway from the Gemma 3 ablation study was that using this more aggressively seemed to hurt modeling performance only slightly.

The Gemma ablation study suggests that the smaller window and more aggressive local:global ratio have little effect on perplexity. Underlying paper: Gemma 3 article (Original source: The Big LLM Architecture Comparison).

4.2 The Ratio And Window Size

In practice, saying that a model “uses SWA” does not mean it relies on SWA alone. What usually matters are the local-to-global layer pattern and the attention window size. For example:

  • Gemma 3 and Xiaomi use a 5:1 local-to-global pattern.

  • OLMo 3 and Arcee Trinity use a 3:1 pattern.

  • Xiaomi also uses a window size of 128, which is much smaller, and therefore more aggressive, than Gemma’s 1024.

SWA is essentially a knob that can be tuned more or less aggressively.

Figure 18: The long-context savings come from turning many full-attention layers into local ones, which reduces how much cached context those layers need to consider (Original source: LLMs-from-scratch SWA materials).

4.3 Combining SWA with GQA

SWA often appears together with GQA because the two ideas address different parts of the same inference problem. SWA reduces how much context a local layer has to consider. GQA reduces how much key-value state each token contributes to the cache.

That is why many recent dense models use both rather than treating them as alternatives. Gemma 3 is again a good reference point here, since it combines sliding window attention with grouped-query attention in the same architecture.

5. DeepSeek Sparse Attention (DSA)

DeepSeek Sparse Attention is one of the architectural changes that appeared in the DeepSeek V3.2 line and later showed up again in GLM-5.

Specifically, DeepSeek V3.2 combines it with Multi-head Latent Attention (MLA), and GLM-5 adopts the same pair for the same general reason, namely, reducing inference cost when context lengths get large.

EXAMPLE ARCHITECTURES

DeepSeek V3.2 and GLM-5

5.1 Changes Relative To Sliding-Window Attention

In sliding-window attention, the current token does not attend to the full prefix but only to a fixed local window. This is the same broad idea behind DeepSeek Sparse Attention, where each token also only attends to a subset of previous tokens.

However, the selected tokens are not determined by a fixed-width local window. Instead, DeepSeek Sparse Attention uses a learned sparse pattern. In short, it uses an indexer-plus-selector setup, where a lightning indexer computes relevance scores, and a token selector keeps only a smaller set of high-scoring past positions.

The way the subset of tokens is selected is the main difference from sliding-window attention. Sliding-window attention hard-codes locality. DeepSeek Sparse Attention still limits attention to a subset, but it lets the model decide which prior tokens are worth revisiting.

Figure 19: Similar to sliding-window attention, DeepSeek Sparse Attention also restricts each token to a subset of prior tokens, but does not do so with a fixed local window (Original source: From DeepSeek V3 to V3.2: Architecture, Sparse Attention, and RL Updates).

5.2 DeepSeek Sparse Attention and MLA

DeepSeek V3.2 uses both Multi-head Latent Attention (MLA) and DeepSeek Sparse Attention. MLA reduces KV-cache cost by compressing what gets stored. DeepSeek Sparse Attention reduces how much of the prior context the model has to revisit. Put differently, one optimizes the cache representation, the other optimizes the attention pattern on top of it.

Figure 20: DeepSeek V3.2 is the obvious reference point, because this is the model family most closely associated with the sparse-attention idea.

The sparse pattern is not random. The first stage is a lightning indexer that scores previous tokens for each new query token. It uses MLA’s compressed token representations and computes a learned similarity score over the prior context, so the model can rank which earlier positions are worth revisiting.

The second stage is a token selector. It keeps only a smaller high-scoring subset, for example, a top-k set of past positions, and turns that subset into the sparse attention mask. So the main point is that DeepSeek Sparse Attention does not hard-code the sparsity pattern. It learns which past tokens to keep.

Figure 21: The mechanism consists of a lightning indexer that scores prior tokens and a selector that keeps only a smaller subset for attention (Original source: From DeepSeek V3 to V3.2: Architecture, Sparse Attention, and RL Updates).

DeepSeek Sparse Attention is relatively new and relatively complicated to implement, which is why it has not been so widely adopted as Grouped-Query Attention (GQA) yet.

6. Gated Attention

Gated attention is best understood as a modified full-attention block rather than as a separate attention family.

It usually appears inside hybrid stacks that still keep an occasional full-attention layer for exact content retrieval, but add a few stability-oriented changes on top of an otherwise familiar scaled dot-product attention block.

Figure 22: Trinity Large is a useful comparison because gated attention is not only a Qwen idea (more on that later). Here the gate appears after the scaled dot-product attention output and before the output projection in a different long-context architecture (Original source: A Dream of Spring for Open-Weight LLMs).

6.1 Where Gated Attention Appears

The Qwen3-Next and Qwen3.5 architectures show that recent hybrids (covered in the next section) do not replace attention everywhere. Instead, they replace most attention layers with a cheaper alternative and keep a smaller number of full-attention layers in the stack.

Those remaining full-attention layers are where gated attention typically appears. Qwen3-Next and Qwen3.5 use it together with Gated DeltaNet in a 3:1 pattern.

But hybrid architectures aside, Trinity uses a related gating idea in a more conventional attention stack, as shown in the previous figure above.

6.2 Gated Attention Relative To Standard Attention

The gated attention block in Qwen-style hybrids or Trinity (not a hybrid) is essentially standard scaled-dot-product attention with a few changes on top. In the original Gated Attention paper, those changes are presented as a way to make the retained full-attention layers behave more predictably inside a hybrid stack.

The block still looks like standard (full) attention, but it adds:

  1. an output gate that scales the attention result before it is added back to the residual,

  2. a zero-centered QK-Norm variant instead of standard RMSNorm for q and k,

  3. partial RoPE.

These are not changes on the scale of MLA or linear attention but merely stability and control changes applied to an otherwise familiar attention block.

Figure 23: In Qwen3-Next and Qwen3.5, gated attention appears as the full-attention layer that periodically breaks up runs of Gated DeltaNet blocks.

Note that the figure above also includes Gated DeltaNet, which we will cover in the next section below.

7. Hybrid Attention

Hybrid attention is a broader design pattern rather than a specific, single mechanism. The overall idea is to keep a transformer-like stack, but replace most of the expensive full-attention layers with cheaper linear or state-space sequence modules.

The motivation is long-context efficiency. Full attention grows quadratically with sequence length, so once models move to contexts like 128k, 256k, or 1M tokens, attention memory and compute become expensive enough that using cheaper sequence modules in most layers while keeping only a smaller number of heavier retrieval layers starts making more sense. (Note that this comes with a bit of a modeling performance trade-off, though.)

In Qwen3-Next, this pattern appears as a 3:1 mix of Gated DeltaNet and Gated Attention blocks. Gated DeltaNet is also closely related to Mamba-2 (see the Gated Delta Networks: Improving Mamba2 with Delta Rule paper, for instance), and the mechanism can be read as a DeltaNet-style fast-weight update combined with Mamba-style gating. Later architectures keep the same overall idea but swap in other lightweight sequence mixers, such as Kimi Delta Attention, Lightning Attention, or standard Mamba-2.

Figure 24: The basic hybrid pattern, where most blocks are cheaper sequence mixers and every fourth block restores a heavier attention layer (Original source The Big LLM Architecture Comparison).

7.1 Gated DeltaNet in Qwen3-Next

To my knowledge, the first prominent example of a close-to-flagship LLM with hybrid attention was Qwen3-Next in 2025, which does not remove attention completely but mixes three Gated DeltaNet blocks with one Gated Attention block.

Here, lightweight Gated DeltaNet blocks do most of the long-context work and keep memory growth much flatter than full attention. The heavier gated-attention layer remains because DeltaNet is less exact at content-based retrieval.

Inside a Gated DeltaNet block, the model computes query, key, and value vectors together with two learned gates (α, β). Rather than forming the usual token-to-token attention matrix, it writes to a small fast-weight memory using a delta-rule update. In rough terms, the memory stores a compressed running summary of past information, while the gates control how much new information is added and how much previous state is retained.

That makes Gated DeltaNet a linear-attention or recurrent-style mechanism rather than just another tweak to MHA. Relative to Mamba-2, the close connection is that both belong to the linear-time gated sequence-model family, but Gated DeltaNet uses a DeltaNet-style fast-weight memory update instead of the Mamba state-space update.

Figure 25: The practical motivation behind the hybrids is shown here in the memory curve. Hybrid stacks with Gated DeltaNet grow much more slowly with context length than ordinary full attention (Original source LLMs-from-scratch DeltaNet materials).

Qwen3.5 moves the former Qwen3-Next hybrid into Qwen’s main flagship series, which is an interesting move. This basically signals that the hybrid strategy is a success and that we may see more models with this architecture in the future.

Figure 26: Qwen3.5 shows the Qwen team promoting the former Qwen3-Next side-branch into the main model line rather than leaving it as a one-off efficiency variant (Original source A Dream of Spring for Open-Weight LLMs).

7.2 Kimi Linear And Modified Delta Attention

Kimi Linear keeps the same broad transformer skeleton and the same 3:1 pattern, but it changes both halves of the recipe.

On the lightweight side, Kimi Delta Attention is a refinement of Gated DeltaNet. Where Qwen3-Next uses a scalar gate per head to control memory decay, Kimi uses channel-wise gating, which gives finer control over the memory update. On the heavier side, Kimi replaces Qwen3-Next’s gated-attention layers with gated MLA layers.

So, it’s still the same broader pattern as in Qwen3-Next and Qwen3.5, but both ingredients (slightly) change. I.e., most layers are still handled by a cheaper linear-style mechanism, and periodic heavier layers still remain for stronger retrieval.

Figure 27: Kimi Linear keeps the same overall hybrid pattern while changing both the lightweight side and the heavier attention side of the stack (Original source The Big LLM Architecture Comparison).

7.3 Ling 2.5 And Lightning Attention

Ling 2.5 shows another swap on the lightweight side. Instead of Gated DeltaNet, Ling uses a slightly simpler recurrent linear attention variant called Lightning Attention. On the heavier side, it keeps MLA from DeepSeek.

Most sequence mixing happens in the cheaper linear-attention blocks, while a smaller number of heavier layers remain to preserve stronger retrieval. The difference is that the specific lightweight mechanism is now Lightning Attention rather than DeltaNet or Kimi Delta Attention.

Figure 28: Ling 2.5 and Qwen3.5 are both linear-attention hybrids, even though Ling swaps in Lightning Attention and MLA instead of the Qwen recipe (Original source A Dream of Spring for Open-Weight LLMs).

Ling 2.5 is aimed more at long-context efficiency than at absolute benchmark leadership. According to the Ling team, it was reported as substantially faster than Kimi K2 at 32k tokens, which is the practical payoff these hybrids are aiming for.

Figure 29: Ling 2.5 was presented as a strong efficiency upgrade, with much higher 32k-token throughput than Kimi K2 at the same 1-trillion-parameter scale (Original source Ling 2.5 model hub page).

Nemotron And Mamba-2

Nemotron pushes the pattern further away from the transformer baseline. Nemotron 3 Nano is a Mamba-Transformer hybrid that interleaves Mamba-2 sequence-modeling blocks with sparse MoE layers and uses self-attention only in a small subset of layers.

This is a more extreme version of the same basic tradeoff discussed above. Here, the lightweight sequence module is a Mamba-2 state-space block rather than a DeltaNet-style fast-weight update, but the basic tradeoff is similar.

Figure 30: Nemotron 3 Nano uses Mamba-2 for most of the sequence modeling work, with self-attention only appearing in a small subset of layers (Original source The Big LLM Architecture Comparison).

The larger Nemotron 3 Super keeps the Mamba-2 hybrid attention approach and adds other efficiency-oriented changes such as latent MoE and shared-weight multi-token prediction (MTP) for speculative decoding.

Figure 31: Nemotron 3 Super keeps the Mamba-2 hybrid attention pattern while adding latent MoE and shared-weight MTP on top (Original source The Big LLM Architecture Comparison).

Conclusion

Of course, there are many more (mostly niche) attention variants throughout the literature that I haven’t covered here. The focus of this article was on those that are currently used in state-of-the-art (open-weight) models.

In particular, I am looking forward to (1) seeing the brand new Mamba-3 layers getting integrated into the aforementioned hybrid architectures (replacing Gated DeltaNet) and (2) attention residuals being used in general.

In practice, you may also wonder what the “best” architecture is at the moment. This is hard to answer, as there are no public experiments that train different architectures on the same training data etc.

Hence, we can currently only answer what the best (trained) model choice is for a given problem. In my opinion, hybrid architectures are still a novelty, and the main selling point is mainly (long-context) efficiency versus just modeling performance. Hence, I think they are a great candidate for agent contexts (like OpenClaw).

Personally, I think the problem with hybrid architectures is also that the inference stacks are not quite as optimized, yet, and I find that I get better tok/sec throughput when running LLMs locally using more classic setups like GPT-OSS with grouped-query attention.

Anyways, I am curious to see what DeepSeek V4 has in store, since DeepSeek has been quite the reliable trend-setter in the recent 2 years.

A Dream of Spring for Open-Weight LLMs: 10 Architectures from Jan-Feb 2026

25 February 2026 at 13:26

If you have struggled a bit to keep up with open-weight model releases this month, this article should catch you up on the main themes.

In this article, I will walk you through the ten main releases in chronological order, with a focus on the architecture similarities and differences:

  1. Arcee AI’s Trinity Large (Jan 27, 2026)

  2. Moonshot AI’s Kimi K2.5 (Jan 27, 2026)

  3. StepFun Step 3.5 Flash (Feb 1, 2026)

  4. Qwen3-Coder-Next (Feb 3, 2026)

  5. z.AI’s GLM-5 (Feb 12, 2026)

  6. MiniMax M2.5 (Feb 12, 2026)

  7. Nanbeige 4.1 3B (Feb 13, 2026)

  8. Qwen 3.5 (Feb 15, 2026)

  9. Ant Group’s Ling 2.5 1T & Ring 2.5 1T (Feb 16, 2026)

  10. Cohere’s Tiny Aya (Feb 17, 2026)

  11. Update 1: Sarvam 30B and 105B (Mar 6, 2026)

(PS: DeepSeek V4 will be added once released.)

Since there’s a lot of ground to cover, I will be referencing my previous The Big LLM Architecture Comparison article for certain technical topics (like Mixture-of-Experts, QK-Norm, Multi-head Latent Attention, etc.) throughout this article for background information to avoid redundancy in this article.

1. Arcee AI’s Trinity Large: A New US-Based Start-Up Sharing Open-Weight Models

On January 27, Arcee AI (a company I hadn’t had on my radar up to then) began releasing versions of their open-weight 400B Trinity Large LLMs on the model hub, along with two smaller variants:

  • Their flagship large model is a 400B param Mixture-of-Experts (MoE) with 13B active parameters.

  • The two smaller variants are Trinity Mini (26B with 3B active parameters) and Trinity Nano (6B with 1B active parameters).

Figure 1: Overview of the Trinity Large architecture (based on the model hub config file).

Along with the model weights, Arcee AI also released a nice technical report on GitHub (as of Feb 18 also on arxiv) with lots of details.

So, let’s take a closer look at the 400B flagship model. Figure 2 below compares it to z.AI’s GLM-4.5, which is perhaps the most similar model due to its size with 355B parameters.

Figure 2: Arcee AI Trinity Large next to GLM-4.5 of a relatively similar size (400B vs 355B).

As we can see in the Trinity and GLM-4.5 comparison, there are several interesting architectural components added to the Trinity model.

First, there are the alternating local:global (sliding window) attention layers (SWA) like in Gemma 3, Olmo 3, Xiaomi MiMo, etc. In short, SWA is a type of sparse (local) attention pattern where each token attends only to a fixed-size window of t recent tokens (for example, 4096) instead of attending to the entire input (which could be up to n=256,000 tokens). This reduces the per-layer regular attention cost from O(n²) to roughly O(n·t) for sequence length n, which is why it is attractive for long-context models.

Figure 3: A comparison between regular attention (global attention) and sliding window attention (local attention).

But instead of using the common 5:1 local:global ratio that Gemma 3 and Xiaomi used, the Arcee team opted for a 3:1 ratio similar to Olmo 3, and a relatively large sliding window size of 4096 (also similar to Olmo 3).

The architecture also uses QK-Norm, which is a technique that applies RMSNorm to the keys and queries to stabilize training (as shown in Figure 4 below), as well as no positional embeddings (NoPE) in the global attention layers similar to SmolLM3.

Trinity also has a form of gated attention. It’s not a full-blown Gated DeltaNet but it uses a similar gating as in the attention mechanism in Qwen3-Next.

I.e., the Trinity team modified the standard attention by adding elementwise gating to the scaled dot-product before the output linear projection (as shown in the figure below), which reduces attention sinks and improves long-sequence generalization. Additionally, it also helped with training stability.

Figure 4: Illustration of the gating mechanism that Trinity Large uses in the attention mechanism.

Also, the Trinity technical report showed that the modeling performance of the Trinity Large and GLM-4.5 base models are practically identical (I assume they didn’t compare it to more recent base models because many companies only share their fine-tuned models these days.)

You may have noticed the use of four (instead of two) RMSNorm layers in the previous Trinity Large architecture figure which looks similar to Gemma 3 at first glance.

Figure 5: Arcee Trinity and Gemma 3 RMSNorm placement side by side.

Overall, the RMSNorm placement looks like a Gemma 3-like RMSNorm placement, but the twist here is that the gain of the second RMSNorm (in each block) is depth-scaled, meaning it’s initialized to about 1 / sqrt(L) (with L the total number of layers). So, early in training, the residual update starts small and grows as the model learns the right scale.

Figure 6: Arcee Trinity and DeepSeek V3/R1 MoE side by side.

The MoE is a DeepSeek-like MoE with lots of small experts, but made it coarser as that helps with inference throughput (something we have also seen in Mistral 3 Large when they adopted the DeepSeek V3 architecture).

Lastly, there are some interesting details on the training improvements (a new MoE load-balancing strategy and another using the MuOpt optimizer), but since this is a mainly an architecture article (and there are many more open-weight LLMs to cover), these details are out of scope.

2. Moonshot AI’s Kimi K2.5: A DeepSeek-Like Model at a 1-Trillion-Parameter Scale

While Arcee Trinity essentially matched the modeling performance of the older GLM-4.5 model, Kimi K2.5 is an open-weight model that set a new open-weight performance ceiling at the time of its release on Jan 27.

​Impressively, according to their own benchmarks in their detailed technical report, it was on par with the leading proprietary models at the time of its release.

Figure 7: Kimi K2.5 performance benchmark from the official K2.5 technical report.

The good modeling performance is no surprise when compared to, e.g., Arcee Trinity or GLM-4.5 covered earlier, since (similar to its K2 predecessor), Kimi K2.5 is a 1-trillion-parameter model and thus 2.5x larger than Trinity and 2.8x larger than GLM-4.5.

Overall, the Kimi K2.5 architecture is similar to Kimi K2, which, in turn, is a scaled-up version of the DeepSeek V3 architecture.

Figure 8: Kimi K2 is a larger version of the DeepSeek V3 architecture.

However, K2 was a pure text model, and Kimi K2.5 is now a multimodal model with vision support. To quote from the technical report:

​> Kimi K2.5 is a native multimodal model built upon Kimi K2 through large-scale joint pre-training on approximately 15 trillion mixed visual and text tokens.

During the training, they adopted an early fusion approach and passed in the vision tokens early on alongside the text tokens, as I discussed in my older Understanding Multimodal LLMs article.

Figure 9: Like most other contemporary multimodal LLMs, Kimi K2.5 uses method A, passing the vision tokens alongside the text tokens during training.

Side note: In multimodal papers, “early fusion” is unfortunately overloaded. It can mean either

1. When the model sees vision tokens during pre-training. I.e., vision tokens are mixed in from the start (or very early) of pre-training as opposed to later stages.

2. How the image tokens are combined in the model. I.e., they are fed as embedded tokens alongside the text tokens.

In this case, while the term “early fusion” in the report specifically refers to point 1 (when the vision tokens are provided during pre-training), point 2 is also true here.

Furthermore, regarding point 1, the researchers included an interesting ablation study showing that the model benefits from seeing vision tokens early in pre-training, as shown in the annotated table below.

Figure 10: Given a fixed number of vision tokens during training, the model performance benefits if the model is shown a smaller number of vision tokens early on during pre-training (as opposed to adding a higher number of vision tokens later on). Annotated table from the Kimi K2.5 technical report.

3. StepFun’s Step 3.5 Flash: Good Performance at Great Tokens/Sec Throughput

I have to admit that I haven’t had the Step models on my radar yet. This one caught my attention due to its interesting size, detailed technical report, and fast tokens/sec performance.

Step 3.5 Flash is a 196B parameter model that is more than 3x smaller than the recent DeepSeek V3.2 model (671B) while being slightly ahead in modeling performance benchmarks. According to the Step team, Step 3.5 Flash has a 100 tokens/sec throughput at a 128k context length, whereas DeepSeek V3.2 has only a 33 tokens/sec throughput on Hopper GPUs, according to the data on the Step model hub page.

Figure 11: Step 3.5 Flash benchmark from the Step technical report.

One reason for this higher performance is the model’s smaller size (196B-parameter MoE with 11B parameters active per token versus 671B-parameter MoE with 37B parameters active), as shown in the figure below.

Figure 12: Step 3.5 Flash and DeepSeek V3.2 side by side.

The other reason along with gated attention (which we previously discussed in the context of Trinity) is Multi-Token Prediction (MTP). DeepSeek has been an early adopter of multi-token prediction, a technique that trains the LLM to predict multiple future tokens at each step, rather than a single one. Here, at each position t, small extra heads (linear layers) output logits for t+1...t+k, and we sum cross-entropy losses for these offsets (in the MTP paper, the researchers recommended k=4).

This additional signal speeds up training, and inference may remain at generating one token at a time, as illustrated in the figure below.

Figure 13: Multi-Token Prediction versus regular next token prediction. (Left subfigure inspired by the MTP paper.) Originally, MTP was only used during training, not inference; hence, the inference time steps (bottom) show a single next-token prediction.

DeepSeek V3 reported using MTP-1, that is, MTP with 1 extra token (instead of 3) during training, and then making MTP optional during inference.

Step 3.5 Flash uses MTP with 3 additional tokens (MTP-3) during both training and inference (note that MTP is usually not used during inference, and this is an exception).

​Note that the previously discussed Arcee Trinity and Kimi K2.5 do not use MTP, but other architectures already use an MTP-3 setup similar to Step 3.5 Flash, for example, GLM-4.7 and MiniMax M2.1.

4. Qwen3-Coder-Next: An Attention-Hybrid for Coding

In early February 2026, the Qwen3 team shared the 80B Qwen3-Coder-Next model (3B parameters active), which made big headlines for outperforming much larger models like DeepSeek V3.2 (37B active) and Kimi K2.5 and GLM-4.7 (both 32B active) on coding tasks.

Figure 14: Qwen3-Coder-Next performance on a coding benchmark next to other popular coding models; this figure appeared in the official technical report.

Moreover, as shown in the benchmark figure above, the Qwen3-Coder-Next SWE-Bench Pro performance is roughly on par with Claude Sonnet 4.5 (and only slightly below Claude Opus 4.5), which is impressive for a relatively small open-weight model!

Using the ollama version of Qwen3-Coder-Next locally, the model takes about 48.2 GB of storage space and 51 GB of RAM.

Figure 15: Running Qwen3-Coder-Next locally.

Note that the architecture behind Qwen3-Coder-Next is exactly the same as Qwen3-Next 80B (in fact, the pre-trained Qwen3-Next 80B is used as a base model for further mid- and post-training). Figure 16 below shows the Qwen3-Next architecture next to a regular Qwen3 235B model for reference.

Figure 16: Qwen3-Coder-Next 80B (3B parameters active per token) and the 3x larger Qwen3 235B-A22B architecture.

The new Qwen3 Next architecture stands out because, despite being 3x smaller than the previous 235B-A22B model, it introduces four times as many experts and even adds a shared expert. Both of these design choices (a high expert count and the inclusion of a shared expert).

​The other highlight is that they replace the regular attention mechanism with a Gated DeltaNet + Gated Attention hybrid, which helps enable the native 262k token context length in terms of memory usage (the 235B-A22B model supported 32k natively and 131k with YaRN scaling).

​So how does this new attention hybrid work? Compared to grouped‑query attention (GQA), which is still standard scaled dot‑product attention (sharing K/V across query‑head groups to cut KV‑cache size and memory bandwidth as discussed earlier, but whose decode cost and cache still grow with sequence length), their hybrid mechanism mixes Gated DeltaNet blocks with Gated Attention blocks in a 3:1 ratio as shown in Figure 17.

Figure 17: The Qwen3-Coder-Next attention hybrid setup.

We can think of the gated attention block as standard scaled-dot-product attention used in GQA, with a few tweaks on top. The main differences between gated attention and plain GQA block are:

  1. an output gate (sigmoid-controlled, usually per-channel) that scales the attention result before it is added back to the residual;

  2. zero-centered RMSNorm for QKNorm, rather than a standard RMSNorm;

  3. partial RoPE (on a subset of dimensions).

Note that these are essentially just stability changes to GQA.

The Gated DeltaNet is a more significant change. In the DeltaNet block, q, k, v, and two gates (α, β) are produced by linear and lightweight convolutional layers with normalization, and the layer replaces attention with a fast‑weight delta rule update.

However, the tradeoff is that DeltaNet offers less precise content‑based retrieval than full attention, which is why one gated attention layer remains.

Given that attention grows quadratically, the DeltaNet component was added to help with memory efficiency. In the “linear-time, cache-free” family, the DeltaNet block is essentially an alternative to Mamba. Mamba keeps a state with a learned state-space filter (essentially a dynamic convolution over time). DeltaNet keeps a tiny, fast-weight memory updated with α and β, and reads it with q, using small convolutions only to help form q, k, v, α, β.

For more details on the attention hybrid and Qwen3-Next architecture, please see my previous article Beyond Standard LLMs.

​Since this article is primarily focused on LLM architectures, the training details are outside its scope. However, interested readers can find more information in their detailed technical report on GitHub.

5. z.AI’s GLM-5: A New Flagship Open-Weight Model

The GLM-5 release on February 12th was a big deal, because at the time of its release it appeared to be on par with the major flagship LLM offerings, including GPT-5.2 extra-high, Gemini Pro 3, and Claude 4.6 Opus. (That said, benchmark performance does not necessarily translate to real-world performance.)

Figure 18: GLM-5 architecture next to its GLM-4.7 predecessor. Benchmarks at the bottom taken from the official GLM-5 technical report.

Not too long ago, GLM-4.7 (December 2025) was one of the strongest open-weight models. GLM-5 shows a major modeling performance improvement based on the benchmark shown in Figure 18 above. That jump is likely partly due to improvements to the training pipeline, but likely largely attributed to its 2x larger parameter count from 355B parameters in GLM-4.7 to 744B parameters in GLM-5. This size increase now places GLM-5 between DeepSeek V3.2 (671B) and Kimi K2.5 (1T) in terms of scale.

Comparing the benchmark numbers of the previously discussed Kimi K2.5 (1T), the smaller GLM-5 (744B) model seems slightly ahead, as shown in the table below.

Figure 19: GLM-5 (744B) and Kimi K2.5 (1T) benchmark performance side by side (larger is better).

Like GLM-4.7, all the other models discussed so far, GLM-5 is a Mixture-of-Experts model. The number of active parameters per token increases only slightly, from 32B in GLM-4.7 to 40B in GLM-5.

As shown in Figure 20 below, GLM-5 now adopts DeepSeek’s multi-head latent attention as well as DeepSeek Sparse Attention. (I described DeepSeek Sparse Attention in more detail in From DeepSeek V3 to V3.2: Architecture, Sparse Attention, and RL Updates.)

These modifications are likely intended to reduce inference costs when working with long contexts. Otherwise, the overall architecture remains relatively similar.

Figure 20: GLM-5 and DeepSeek V3.2 side by side (two similar architectures at a similar size).

The increase in total size over GLM-4.7 mainly comes from expanding the number of experts, from 160 (GLM-4.7) to 256 (GLM-5), and slightly increasing layer dimensions (while keeping the number of experts the same at 8 regular + 1 shared expert per token). For example, the embedding dimension and expert size increase from 5,120 to 6,144, and the intermediate projection size rises from 1,536 to 2,048.

Interestingly, the number of transformer layers is reduced from 92 in GLM-4.7 to 78 in GLM-5. I assume this change is also intended to reduce inference costs and improve latency, since layer depth cannot be parallelized in the same way as width.

Additionally, I also checked an independent benchmark (here, the hallucination leaderboard), and it indeed looks like GLM-5 is on par with Opus 4.5 and GPT-5.2 (while using fewer tokens).

Figure 21: Next to the overall benchmark performance, this table adds hallucination rates from the hallucination leaderboard.

Furthermore, looking at the most recent Artificial Intelligence Index, which aggregates various benchmarks, GLM-5 is indeed slightly ahead of Kimi K2.5 and only one point behind GPT-5.2 (xhigh) and the recent Claude Sonnet 4.6.

Figure 22: Artificial Intelligence Index snapshot from Feb 21, 2026.

6. MiniMax M2.5: A Strong Coder with “Only” 230B Parameters

The aforementioned GLM-5 and Kimi K2.5 are popular open-weight models, but according to OpenRouter statistics, they pale in comparison to MiniMax M2.5, which was released on February 12 as well.

Figure 23: OpenRouter usage snapshot from Feb 21, 2026.

OpenRouter is a platform and API that lets developers access and route requests across many different LLMs from various providers. Note that while its usage statistics are a good indicator of open-weight model popularity, it’s heavily biased towards open-weight models (versus proprietary models), since most users use proprietary models through the official platform directly. There is also usage bias across open-weight models, since many people also use open-weight models through the official developers’ APIs. Anyways, it can still be an interesting place to guesstimate the relative popularity of open-weight models that are too large to run locally for most users.

Now, back to MiniMax M2.5. Pulling together the GLM-5 data from the SWE-Bench Verified coding benchmark and combining it with the reported MiniMax M2.5, the latter appears to be a slightly stronger model (at least when it comes to coding).

Figure 24: MiniMax M2.5 coding performance on SWE-Bench Verified​

Side note: It’s interesting to see Opus 4.5 and Opus 4.6 practically scoring identically on SWE-Bench Verified. This can be an indicator that LLM progress has stalled. I don’t think that’s true, though, given that users of Opus 4.6 can confirm that this model does seem to perform better in real-world usage. So, the more likely issue here is that the SWE-Bench Verified benchmark has saturated, and it may no longer be a meaningful benchmark to report from now on (in favor of other benchmarks like SWE-Bench Pro, for example). With saturated, I mean that it potentially contains unsolvable problems due to design issues (as discussed in a recent Reddit thread and the new “Why SWE-bench Verified no longer measures frontier coding capabilities“ article by OpenAI).

Anyways, back to the topic of MiniMax M2.5 performance. Looking across a broader selection of benchmarks, according to the Artificial Intelligence Index aggregation, GLM-5 remains ahead. This is perhaps no surprise because GLM-5 is still a 4x larger model than M2.5, even though the tokens/sec throughput is quite similar.

Figure 25: GLM-5 vs MiniMax M2.5 comparison based on the Artificial Intelligence Index (Feb 21, 2026)

I think MiniMax M2.5’s popularity is partly owed to the fact that it is a smaller, cheaper model with roughly similar modeling performance (i.e., a good bang for the buck).

Architecture-wise, MiniMax M2.5 is a 230B model with a fairly classic design: just plain Grouped Query Attention, no sliding window attention or other efficiency improvements.

Figure 26: MiniMax M2.5 next to GLM-5.

So far, this is also the first architecture in this report that doesn’t come with a detailed technical report, but you can find additional information on the model hub page.

7. Nanbeige 4.1 3B: A Strong Llama 3 Successor

In this section, we are switching gears and finally covering a smaller model that can run locally on a laptop. But first let’s start with some context before we get to Nanbeige 4.1 3B.

Qwen models have always been very popular models. I often tell the story that when I was an advisor during the NeurIPS LLM efficiency challenge a few years back, most of the winning solutions were based on a Qwen model.

​Now, Qwen3 is likely among the most widely used open-weight model suite since they cover such a wide range of sizes and use cases (from 0.6B to 235B)

Especially the smaller models (80B and less, like Qwen3-Next, covered previously) are great for local use on consumer hardware.

Figure 27: Relative adoption popularity of open-weight models. Note that this shows the number of models on the Hugging Face model hub that are finetuned using one of those models as a base model. (This is not the number of people who use the models on their computer locally, which would be a number impossible to know.) Source: Atom Project.​

Why I am mentioning all this is that Nanbeige 4.1 3B seems to target the “small” LLM on-device use case that Qwen3 is so popular for. According to the Nanbeige 4.1 3B benchmarks, their model is way ahead of Qwen3 (perhaps no surprise, given that Qwen3 is almost a year old).

Figure 28: Nanbeige 4.1 3B benchmark comparison with Qwen3 (Source: Nanbeige 4.1 3B model hub page).

Architecture-wise, Nanbeige 4.1 3B is similar to Qwen3 4B, which is, in turn, very similar to Llama 3.2 3B. I am showing Nanbeige 4.1 3B next to Llama 3.2 3B below because it is the most similar in size.

Figure 29: Nanbeige 4.1 3B next to Llama 3.2 3B.

Nanbeige 4.1 3B uses the same architectural components as Llama 3.2 3B, with some minor scaling differences (slightly smaller embedding dimensions and larger intermediate projections, and so on). The one difference not shown in the figure above is that Nanbeige does not tie the input embedding weights to the output layer weights, whereas Llama 3.2 3B does. (In my experience, weight tying is a nice way to reduce the total number of parameters, but it almost always results in worse training performance as evidenced by higher training and validation losses.)

​As mentioned before, this article focuses primarily on the architecture comparisons. And in this case, most of the performance gains (compared to the Nanbeige 4 3B predecessor) come from additional post-training with supervised fine-tuning and reinforcement learning, but interested readers can find more information in the detailed technical report.

8. Qwen3.5 and the Continuation of Hybrid Attention

While the previous section briefly covered Qwen3 as the most open-weight model family, it is getting a bit long in the tooth as its release is almost a year ago (if we don’t count the Qwen3-Next variants geared towards efficiency). However, the Qwen team just released a new Qwen3.5 model variant on February 15.

Qwen3.5 397B-A17B, a Mixture-of-Experts (MoE) with 397B parameters (17B active per token), is a step up from the largest Qwen3 model, which is 235B parameters in size. (There is also the 1 trillion-parameter Qwen3-Max model, but it was never released as an open-weight model.)

The obligatory benchmark overview shows that Qwen3.5 exceeds the previous Qwen3-Max model across the board, with a much stronger focus on agentic terminal coding applications (the main theme this year). Qwen3.5 appears to be roughly on par with GLM-5 and MiniMax M2.5 in terms of pure agentic coding performance (e.g., SWE-Bench Verified).​

Figure 30: Qwen3.5 benchmark overview from the official model hub page.

Since the Qwen team likes to release a separate coding model (e.g., see Qwen3-Coder-Next, which we discussed previously), this makes me curious to see how a potential Qwen3.5-Coder will perform.

Architecture-wise, Qwen3.5 adopts the hybrid attention model (featuring Gated DeltaNet) that Qwen3-Next and Qwen3-Coder-Next (section 4) used. This is interesting because Qwen3-Next models were initially an alternative to the full-attention Qwen3 models, but this suggests that the Qwen team has now adopted the hybrid attention mechanism into its main line of models.

Figure 31: Comparison between Qwen3.5 and the Qwen3(-Coder)-Next architectures.​

Besides scaling up the model size, as shown in the figure above, Qwen3.5 now also includes multimodal support (previously, it was only available in separate Qwen3-VL models).

Anyways, Qwen3.5 is a nice refresh of the Qwen series, and I hope that we will see smaller Qwen3.5 variants in the future, too!

Edit: Just as I finalized this article, the Qwen team launched said smaller model variants:

9. Ant Group’s Ling 2.5 1T with Lightning Attention

Ling 2.5 (and the reasoning variant Ring 2.5) are 1-trillion-parameter LLMs with a hybrid attention architecture in a similar spirit to Qwen3.5 and Qwen3-Next.

However, instead of Gated DeltaNet, they use a slightly simpler recurrent linear attention variant called Lightning Attention. In addition, Ling 2.5 adopts the Multi-Head Latent Attention (MLA) mechanism from DeepSeek.

Figure 32: Ling 2.5 compared to Qwen3.5; both architectures are linear attention hybrids.

Ling 2.5 is not the strongest model in terms of absolute benchmark performance, but its selling point is very good efficiency in long contexts (due to the hybrid attention). Unfortunately, there are no direct comparisons to Qwen3.5, but compared to Kimi K2 (1T parameters; the same size as Ling 2.5), Ling 2.5 achieves a 3.5x higher throughput at a sequence length of 32k tokens.

Figure 33: Relative throughput of Ling 2.5 compared to Kimi K2 (same 1 trillion parameter size); note that the throughput is normalized so that Kimi K2 is shown at 1x (Kimi’s throughput is not linear even though it appears linear in this plot). Source: Ling 2.5 model hub page.

10. Tiny Aya: A 3.35B Model with Strong Multilingual Support

Released on February 17, Tiny Aya is a new, “small” LLM by Cohere that is said to be the “most capable multilingual open-weight model” at the 3B parameter size class. (Tiny Aya outperforms Qwen3-4B, Gemma 3 4B, and Ministral 3 3B according to the announcement post).

This is a great model to run and experiment with locally. The only caveat is that while it’s an open-weight model, its licensing terms are relatively restricted and only allow non-commercial use.

That aside, Aya is a 3.35B parameter model that comes in several flavors that are useful for

personal and (non-commercial) research use:

More specifically, below is a list of languages the models are optimized for.

Figure 34: Languages supported by the various Aya models.

Architecture-wise, Tiny Aya is a classic decoder-style transformer with a few noteworthy modifications (besides the obvious ones like SwiGLU and Grouped Query Attention), as illustrated in the figure below.

Figure 35: Tiny Aya (featuring a parallel transformer block) and Qwen3 4B side by side.

Overall, the most noteworthy highlight in this architecture is the parallel transformer blocks. Here, the parallel transformer block computes attention and an MLP from the same normalized input, then adds both to the residual in a single step. I assume this is to reduce serial dependencies inside a layer to improve computational throughput.

For those readers familiar with Cohere’s Command-A architecture, Tiny Aya seems to be a smaller version of it. Also, an interesting detail is that the Tiny Aya team dropped QK-Norm (an RMSNorm applied to keys and queries inside the attention mechanism); QK-Norm has become quite standard for improving training stability in terms of reducing loss spikes. According to a developer on the Cohere team, QK-Norm was dropped “since it can interact with long context performance.”

​As you may know, I occasionally code architectures from scratch. Since I found the parallel transformer block quite intriguing and the model runs fine on low-end hardware, I implemented it from scratch (for educational purposes), which you can find here on GitHub.

Conclusion

This article was quite the whirlwind tour covering the main open-weight LLM releases around February 2026. If there is a takeaway from this, it’s that there are various model architectures (all derived from the original GPT model) that work well. Modeling performance is likely not attributed to the architecture design itself but rather the dataset quality and training recipes (a good topic for a separate article).

That said, architectural design remains an essential part of building a successful LLM, and many developers seem to be steering towards adding more and more computational performance tweaks. For example, this includes adapting MLA (Kimi K2.5, GLM-5, Ling 2.5) and DeepSeek Sparse Attention (GLM-5) to continue the Gated DeltaNet (Qwen3.5) or similar forms of linear attention (Ling 2.5).

Figure 37: Attention types used by the various architectures mentioned in this article.

Also, more classic efficiency tweaks like grouped query attention and sliding window attention (Arcee Trinity, Step 3.5 Flash, Tiny Aya) remain popular. Among the new releases, only MiniMax M2.5 and Nanbeige 4.1 stayed very classic here, using only Grouped Query Attention without any other efficiency tweak.

DeepSeek V4

DeepSeek V4 is the model everyone is waiting for. Unfortunately, as of this writing, it hasn’t been released yet. However, I plan to add it to this article once it’s released, which is likely on or before the first week of March.

Another interesting model is Sarvam (30B & 100B) from India. The model was recently announced, but it hasn’t been released yet. Stay tuned for an update here as well.

Update 1: Sarvam 30B and 105B (Mar 6, 2026)

As promised, here is a short update on Sarvam.

While waiting for DeepSeek V4 we got two very strong open-weight LLMs from India.

There are two size flavors, Sarvam 30B and Sarvam 105B model (both reasoning models), which were released as open-weight models on March 6th alongside a fairly detailed announcement blog.

Interestingly, the smaller 30B model uses “classic” Grouped Query Attention (GQA), whereas the larger 105B variant switched to DeepSeek-style Multi-Head Latent Attention (MLA).

Figure 37: The Sarvam 30B and 105B architectures

As I wrote about in my analyses before, both are popular attention variants to reduce KV cache size (the longer the context, the more you save compared to regular attention).

Figure 38: Relative efficiencies of GQA and MLA compared to MHA.

MLA is more complicated to implement, but it can give you better modeling performance if we go by the ablation studies in the 2024 DeepSeek V2 paper (as far as I know, this is still the most recent apples-to-apples comparison).

Speaking of modeling performance, the 105B model is on par with LLMs of similar size: gpt-oss 120B and Qwen3-Next (80B). Sarvam is better on some tasks and worse on others, but roughly the same on average.

Figure 39: Annotated benchmark (105B model) from the Sarvam blog post, with the best model in each row highlighted.

It’s not the strongest coder in SWE-Bench Verified terms, but it is surprisingly good at agentic reasoning and task completion (Tau2). It’s even better than Deepseek R1 0528 (not shown in the figure above).

Considering the smaller Sarvam 30B, the perhaps most comparable model to the 30B model is Nemotron 3 Nano 30B, which is slightly ahead in coding per SWE-Bench Verified and agentic reasoning (Tau2) but slightly worse in some other aspects (Live Code Bench v6, BrowseComp).

Figure 39: Annotated benchmark (30B model) from the Sarvam blog post, with the best model in each row highlighted.

Unfortunately, Qwen3-30B-A3B is missing in the benchmarks above, which is, as far as I know, is the most popular model of that size class. Interestingly, though, the Sarvam team compared their 30B model to Qwen3-30B-A3B on a computational performance analysis, where they found that Sarvam gets 20-40% more tokens/sec throughput compared to Qwen3 due to code and kernel optimizations.

One thing that is not captured by the benchmarks above is Sarvam’s good performance on Indian languages. According to a judge model, the Sarvam team found that their model is preferred 90% of the time compared to others when it comes to Indian texts. (Since they built and trained the tokenizer from scratch as well, Sarvam also comes with a 4 times higher token efficiency on Indian languages.


This magazine is a personal passion project, and your support helps keep it alive.

If you’d like to support my work, please consider a subscription or purchasing a copy of my Build a Large Language Model (From Scratch) book or its follow-up, Build a Reasoning Model (From Scratch). (I’m confident you’ll get a lot out of these; they explain how LLMs work in depth you won’t find elsewhere.)

Thanks for reading, and for helping support independent research!

Build a Large Language Model (From Scratch)
Build a Large Language Model (From Scratch) is now available on Amazon. Build a Reasoning Model (From Scratch) is in Early Access at Manning.

If you read the book and have a few minutes to spare, I’d really appreciate a brief review. It helps us authors a lot!

Your support means a great deal! Thank you!

❌